Thursday 31 December 2020

Cute Merry Kissmas


Hi there

Today I'm sharing the last of my Christmas cards made in 2020, and this is the card I made for my other half.

This one was super quick to make and I used an image from another stamp set that was new to me this year, Christmas Plushies.


I stamped the bear with the mistletoe image and coloured it in with Copics, including the background, where I used a colourless blender to create the falling snow.  The sentiment was stamped below before die cutting with a pierced square die.  I then die cut some patterned paper using a slightly larger die from the same stacking set, adhered that piece flat before adhering the top piece on fun foam.  That was it, super simple.

Materials used:
  • Stamps: Clearly Besotted - Christmas Plushies, Kiss Me Quick
  • Ink: Memento - Tuxedo Black
  • Coloured with Copic Markers
  • Dies: MFT Die-namics - Pierced Square Stax
  • Patterned Paper: Lawn Fawn - Let's Bokeh in the Snow

Challenge entries:

Sweet Stampin' - Last Minute Christmas
AAA Cards - CAS Game #180 - Made in Minutes (Option: Christmas)
Use You Stuff - Challenge #412 - Winter/Snow/Christmas
NBUS - Challenge #21 - new stamp set 


As that's all my Christmas cards now shared and considering the date, I'd like to take this opportunity to wish you all a wonderful New Year celebration (however you are able to celebrate) and all the best for 2021.  To be honest, it can only get better can't it after the awful year we've all had?  I'll be at home with a few glasses of fizz and a takeaway (if we manage to get one as I imagine demand will be through the roof!), and no doubt asleep well before the clock strikes twelve!  

Thank you all for your amazing support during 2020 and for leaving such wonderful, encouraging comments, I appreciate them all so much.  Stay safe and sending crafty hugs to each and every one of you xx 


Wednesday 30 December 2020

Stencilled Snowflake

Hi guys

I'm almost there with sharing all my 2020 Christmas makes, just one more after this one.

I decided on another square card base for this one as I think it worked best with this large stencil and the symmetry if the design.


This is a lovely metal stencil from Sweet Poppy Stencils.  I inked through it with pastel shades of Distress Ink then trimmed the panel down and matted it onto no-shed silver glitter cardstock and then adhered flat to the card base.  I added glue dots to various parts of the design with a glue pen and added some fine glitter.  To finish I stamped and heat embossed the sentiment on vellum which I wrapped around a strip of more of the glitter cardstock and adhered this on 3D foam in the centre.


Materials used:
  • Stencil: Sweet Poppy - Mehndi Snowflake
  • Ink: Distress Ink: Spun Sugar, Shaded Lilac, Salty Ocean; VersaMark
  • Stamp: Clearly Besotted - Tiny Type
  • Embossing Powder: Brutus Monroe - Alabaster White
  • Accents: Sweet Poppy Superfine Satin Glitter - Crystalina Rainbow
  • Vellum and cardstock from stash

Challenge entries:

Allsorts Challenge - Week 603/4 - Sparkle & Shine
Use Your Stuff - Challenge #412 - Winter/Snow/Christmas
Uniko - Challenge #62 - 'Tis the Season (Option: Sparkle)
NBUS - Challenge #21 - First use of this stencil


Thanks so much for taking a look, back again soon :)


Tuesday 29 December 2020

Festive Foliage

Good evening

Back with another of this year's makes and this time it's one with a nice classic and traditional feel.

I'll get straight to it...


For a change I chose to make a square card here and cut a square panel which was slightly smaller than the base.  I masked off the sides of the panel and began by lightly blending a background with Iced Spruce Distress Ink.  I used a lighter hand towards the centre, the blend didn't have to be perfect as I was going to stencil over the top.  I added the foliage stencil over the top and blended with red, brown and two shades of green ink.  I then cut a wide strip of vellum and stamped and heat embossed a bold sentiment in gold before wrapping this around the panel and securing on the reverse.  To finish I matted the panel onto a larger red panel and then adhered flat to the card base.


Materials used:
  • Stencil: Tim Holtz - Festive
  • Ink: Distress Ink - Iced Spruce, Pine Needles, Candied Apple, Gathered Twigs; VersaMark
  • Stamps: Clearly Besotted - Merry Calligraphy
  • Embossing Powder: Wow! - Metallic Gold Rich
  • Vellum and cardstock from stash

Challenge entries:

Crafty Hazelnut's Christmas Challenge - Challenge #522 - Anything Goes
Dream Valley - Challenge #238 - Christmas
Just Add Ink - Challenge #536 - Inspiration Pic
STAMPlorations - December Stencil Challenge - Anything Goes
STAMPlorations - December Theme & Photo Prompt Challenge - I chose the photo


Still a couple more to share with you so I'll be back again soon.


Monday 28 December 2020

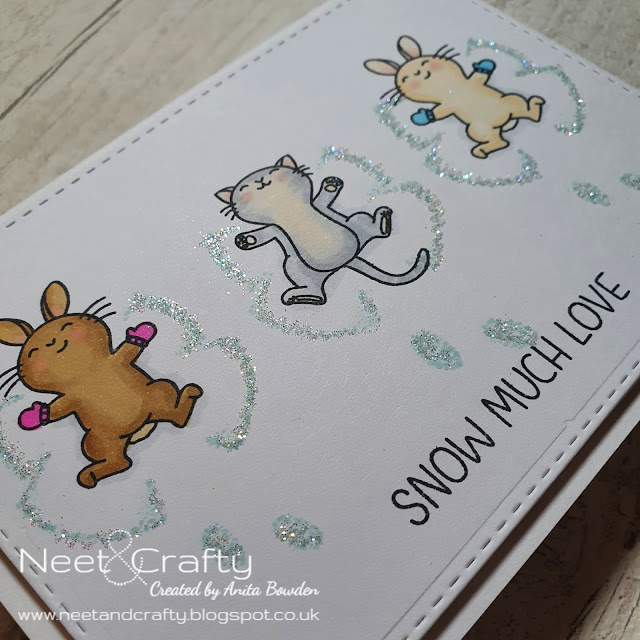
Snow Angels

Hi there

This evening I'm sharing a cute little Christmas card that I made for my neighbour.  I got my hands on this fab little set from a destash sale and I'm so glad I did.  My neighbour has a cat and two house rabbits so this was perfect!


I die cut a panel with a stitched rectangle die and then began by stamping the snow shapes and the footprints with pale blue ink.  Next I stamped the bunnies, the cat and the sentiment in black ink and coloured the image with Copics.  The panel was adhered to the card base on fun foam and then I finished by adding some glue to the snow shapes and footprints with a glue pen and sprinkled with super fine glitter.


Materials used:
  • Die: Create a Smile - Cool Cuts Double Stitched Rectangles
  • Stamps: Mama Elephant - Snow Angels
  • Ink: Altenew - Sea Glass; Memento - Tuxedo Black
  • Coloured with Copic markers
  • Accents: Sweet Poppy Superfine Satin Glitter - Crystalina Rainbow

Challenge entries:

Sweet Stampin' Challenge - Last Minute Christmas
NBUS - Challenge #21 - First use of new stamp set


Thanks for visiting today.  It's back to work for me tomorrow but I'll still be back to share more projects before the new year.


Sunday 27 December 2020

Elegant Tree with Micro Beads

Hi there

I've shared all my multiple makes with you so now I'll start sharing a few individual cards I made for certain people this year.  Today I'm sharing my first card using glass micro beads which I purchased from Sweet Poppy.  This was the Christmas card I made for my bestie this year.


I die cut the upper panel first using a stitched rectangle die, obviously you can't feed anything through a die-cutting machine after using this technique.  I then ink blended through the tree stencil with three shades of ink before then spreading translucent paste over the top.  You then need to work quickly to add the micro beads after removing the stencil before the paste starts to dry.  I used clear micro beads here over translucent paste so the colours then show through once dry.  Next I manipulated a clear sentiment stamp to follow the curve at the base of the tree and then stamped and heat embossed in silver.


Once completely dry, and allowing any warping to flatten out, I adhered the panel over some silver no-shed glitter cardstock and then adhered this flat to the card base.  I just love the effect of these beads and how it sparkles, it's so pretty!  


Materials used:
  • Stencil: Funky Fossil Designs - Elegant Tree
  • Ink: Altenew - Lagoon, Bamboo, Hydrangea; VersaMark
  • Embossing Paste: Sweet Poppy - Stencil Dimensions: Translucent
  • Stamp: Clearly Besotted - Cosy Christmas
  • Embossing Powder: Wow! - Metallic Silver
  • Accents: Sweet Poppy - Clear Glass Micro Beads

Challenge entries:

Crafty Hazelnut's Christmas Challenge - Challenge #522 - Anything Goes Christmas
Always Fun Challenges - Challenge #194 - Christmas
Allsorts Challenge - Week 603/4 - Sparkle and Shine
NBUS - Challenge #21 - first use of micro beads and this stencil
STAMPlorations - December Stencil Challenge - Anything Goes
Uniko - Challenge #62 - 'Tis the Season (option: Sparkle)


I still have a few more individual cards to share so will be back again very soon.


Saturday 26 December 2020

Christmas Card Multiples - Patterned Paper Apertures

Hi there

I hope you all managed to have a lovely Christmas Day yesterday.  This year is tough for sure so I hope you were able to make the best of whatever your situation.  It was just a quiet day for me yesterday, just at home with my other half.  Due to the limits on household mixing I was unable to see more of my family but hopefully we will be able to make up for it sometime soon.  Today is just a lazy day so I thought I'd lift my bum off the sofa and write this post :)


Between today and New Year I'll be sharing the remainder of the Christmas cards I made this year.  These were super quick ones, using some tri-fold card bases from my stash with already die cut square apertures in the front.

This first batch used some of the ivory card bases...


I began by stamping the sentiments on the central panels below the apertures, once folded these would be the fronts.  I then chose some glossy and glittered patterned paper from my stash and cut up sections which were adhered behind the apertures.  All that was left to do was glue the right hand panel of each of the tri-fold cards over the reverse of the aperture panels and that was it, super quick.


These card bases have a lovely linen texture so with the gloss and glitter of the patterned paper, I didn't think anything else was needed.  


Materials used:
  • Card bases from stash
  • Patterned Paper: Decotime - Christmas Patterns
  • Stamp: Clearly Besotted - Tiny Type
  • Ink: Versafine - Onyx Black

Challenge entries:

Always Fun Challenges - Challenge #194 - Christmas
Allsorts - Week 603/4 - Sparkle and Shine
AAA Cards - CAS Game #180 - Made in Minutes (Option: Christmas)


And for the next batch I used some white bases...


These were made in exactly the same way but instead of stamping the sentiments directly on the card bases, I stamped them onto the patterned papers and heat embossed the sentiments in gold.  


A bolder sentiment could have worked slightly better on this last card but in real life it is much easier to read than it appears here...


Materials used:
  • Card bases from stash
  • Patterned paper: Doodlebug - Santa Express
  • Stamps: Uniko - All Occasion Sentiments #4
  • Ink: VersaMark
  • Embossing Powder: Wow! - Metallic Gold Rich


Challenge entries


I'll be back with more very soon :)


Wednesday 23 December 2020

Christmas Card Multiples - Scenic Papers

Hi there

More of this year's Christmas cards and in this post I'm sharing some that I made using more patterned papers from my stash.  All of these were scenic papers which I've acquired free with publications over the last couple of years.  So glad I put them to use, my papers all too often get forgotten.

So I cut them down and added an accent here and there to make some slim cards.

Here are the first two...


I simply trimmed these down to leave a border at the top and bottom of the card bases, then cut some skinny strips of no-shred silver glitter card which were adhered in place to frame the top and bottom of the scenes.  Then to finish these I just stamped the sentiments in a co-ordinating shade.


Materials used:
  • Patterned papers and glitter cardstock from stash
  • Stamp: Altenew - Bells & Boughs (free with Simply Cards and Papercraft)
  • Ink: Versa Color - Mountain Lake; Versafine - Onyx Black


I made the following six cards from two sheets featuring three of the same design...


The panels were trimmed down and matted onto charcoal cardstock before adhering to the card bases.  I simply added to the scene by stamping the sleigh image and then made sentiment strips with white heat embossed sentiments.


Materials used:
  • Patterned paper and cardstock from stash
  • Stamps: Clearly Besotted - Sing It's Christmas; Card-io - Christmas Scenery 2
  • Ink: Altenew - Pure Graphite; VersaMark
  • Embossing Powder: Brutus Monroe - Alabaster White


And finally, I had this lovely winter design which I trimmed down the centre to make two tall, slim cards...


These were simply trimmed down, matted and layered onto red cardstock then the card bases.  Then the heat embossed sentiments were die cut with a stitched rectangle die and these were adhered flat to finish off the cards.


Materials used:
  • Patterned paper and cardstock from stash
  • Die: MFT Die-namics - Stitched Rectangle Stax
  • Stamp: Clearly Besotted - Mini Messages
  • Ink: VersaMark
  • Embossing Powder: Brutus Monroe - Alabaster White

These were super simple to create with only a little crafting involved but I love how they turned out.  I still have lots of papers so I'll certainly be revisiting them more often now.

I'll be back again soon with a few more projects.


Monday 21 December 2020

Christmas Card Multiples - Rooftop Reindeer

Hi guys

More Christmas makes, and this time four cuties from a set I bought recently from Clearly Besotted called Prancing Plushies.

I have some lovely sets that require colouring so I really must make an effort to start my cards earlier next year.  Although I love colouring and need lots of practice using my markers, I do find colouring very time-consuming so these weren't ideal for quick last minute makes.  This set also doesn't currently have matching dies so the fussy cutting also took some time.


I masked off rectangular sections on my card bases and blended with two shades of Distress inks and then added water droplets and blotted away the colour to create snow.  I then stamped all the images onto one sheet of cardstock before colouring and fussy cutting them all.  To make these mail friendly I used glue dots rather than 3D foam for less bulk.

And it's not until now looking at the photos that I've realised I never added the sentiments to the bottom!  I purposely masked the rectangles to leave a larger border at the bottom and then must have completely forgotten - doh!


Materials used:
  • Stamps: Clearly Besotted - Prancing Plushies
  • Ink: Memento - Tuxedo Black; Distress Ink - Dusty Concord, Faded Jeans
  • Coloured with ProMarkers and Copics


Still lots more to share with you, so I'll be back again very soon.


Sunday 20 December 2020

Christmas Card Multiples - Tone on Tone Poinsettias

Good evening

Do you remember the card I made for the last Less is More challenge, the one with the holly on the green blended background?  You can find it, here.  Well, I loved it so much I made another version with tone on tone poinsettias.

And of course I made more than one...


These were made in exactly the same way as before.  I blended the top corner of the coloured card base then stamped the images over the blended area.  I then stamped and heat embossed the sentiment in gold.  To finish, some tiny Nuvo drops were added to the flower centres.


Materials used:
  • Stamps: Clearly Besotted - Pretty Poinsettia, Sing It's Christmas
  • Ink: Distress Ink - Festive Berries; Altenew - Velvet
  • Embossing Powder: Wow! - Metallic Gold Rich
  • Accents: Nuvo Crystal Drops - Antique Rose
  • Coloured cardstock from stash

Challenge entries:

AAA Cards - CAS Game #18 - Made in Minutes (Option: Christmas)
Dream Valley - Challenge #238 - Christmas
My Time to Craft - Challenge #447 - Monochromatic Christmas
Sweet Stampin' Challenge - Last Minute Christmas


And going back to the green holly card, I loved it so much I made more of them!


Thanks for your visit and I always appreciate your lovely feedback.  I still have more to share so will be back soon to show you.


Related Posts Plugin for WordPress, Blogger...