Saturday 28 July 2018

Shifted Stencilling

Hi guys

I saw a new challenge over at Inkspirational this morning which is to make a card in ten minutes or less!  I find one of the quickest ways to make a card is to use stencilling.  This card took me 8 minutes 56 seconds!

I've been meaning to ink up this new stencil from Skull and Cross Buns for a few weeks so today it received its first inking.  You can check out the full range of their stencils, here.

This one creates such a fabulous background design and I chose to do shifted stencilling on this card, I love the shadow effect...


On a panel of kraft cardstock slightly smaller than the card base I first inked through the stencil with white pigment ink.  After cleaning the white ink off the stencil I then shifted it up and over slightly and blended with three colours of Distress Oxide ink.  I gave it a blast with my heat gun to dry the ink and added a little anti-static powder to the centre so I could stamp and heat emboss the sentiment in white.  I then popped the panel up on fun foam.  I love the way these Distress Oxides blend on kraft cardstock, they're still very new to me so I'm still experimenting :)

Materials used:

  • Kraft cardstock:  Neenah - Dessert Storm
  • Stencil: Skull and Cross Buns - Decreasing Circles Stencil
  • Ink: Hero Arts - Unicorn; Distress Oxide - Picked Raspberry, Wilted Violet, Mermaid Lagoon; VersaMark
  • Stamp: Skull and Cross Buns - Congrats Script Font
  • Embossing Powder: Altenew - Pure White


I'm also linking up at the following challenge:

Addicted to Stamps and More - Challenge #302 - Make Your Mark


Thanks so much for popping by. 

Saturday 21 July 2018

Less is More Challenge #376

Good morning!

Firstly, apologies that it's been two weeks since my last post, life's just been busy and I've not found much time to craft.  However, I did have a little free time last weekend and decided to give my blog a facelift.  I hope you like my new design, I'd love to know what you think.

So, let's get back to the main reason for this post, it's new challenge day at Less is More and I'm here to introduce the challenge for the fortnight ahead.

Woohoo, it's that genre that fills some of us with dread...yes, it's One Layer challenge time!  Here's what we want to see...


Continuing as our July sponsor is Seven Hills Crafts so please do play along for a chance to win our monthly prize.


I have just the one card for you this time.  I was looking for something stripey in my stash and came across a stencil I've had for a while but never used.  Stencils are a great choice for one layer cards.  So, as you do in the summer heat, I made a Christmas card, never too early is it! 

Here it is...


This was pretty simple to create.  I taped the stencil down to my card base, with the large bauble off the right edge and masked off the rest.  I then blended with Distress Oxide ink in Wilted Violet, and the hanger part with silver pigment ink.  With the stencil still in place I spritzed with some shimmer mist.  I then repeated the process with the smaller bauble, but this time blending with Distress Oxide ink in Mermaid Lagoon.  I then used a silver pigment ink pen to draw the string.  To finish I stamped the sentiment in black which I shaped to follow the curve of the bauble.

The shimmer mist can be seen better in the photo below...


Materials used:

  • Stencil: Imagination Crafts - Candy Stripe Medium
  • Ink: Distress Oxide - Wilted Violet, Mermaid Lagoon; Versa Color - Silver; Versafine - Onyx Black; Signo Uniball pen in Silver
  • Stamp: Paula Pascual - Christmas Messages
  • Accents: Cosmic Shimmer Mist - Pearl Mist

Challenge entries:

Addicted to Stamps and More - Challenge #301 - Anything Goes
CAS on Friday - Challenge #137 - Christmas in July
AAA Cards - CAS Game #119 - Christmas in July
Simon Says Stamp Monday Challenge - Add a Little Sparkle


Thanks so much for visiting.  There is a great mix of design ideas created by my teamies so please do pop over and take a look if you have time, and if you need inspiration.  Don't let the one layer theme scare you, why not have a go and link up :)

Saturday 7 July 2018

Destash Sale!


I've finally had a chance to sort through my stash and offer up some used, and some new, stamps that I want to pass to other crafty loving homes.

I hope to sort through some other items, including dies, in the near future and will write a post to let you know when they're added to the listing.  I'll also give you a heads up on Instagram and Facebook.

You can find my listing by following the 'Destash Sale' page tab above, and which you can also find by clicking here.

I hope you will find something you like...Happy Shopping!


Less is More Challenge #375

Hi guys

The last two weeks have absolutely flown by and we are back with another new challenge for you over at Less is More.  And following the usual challenge sequence means it's time for a Colour challenge this time, here are the details...


And as we are into a brand new month we have a new sponsor, it's the fabulous craft store, Seven Hills Crafts back with us for July.  So don't forget to play along in our challenges this month for a chance to win the monthly prize.

We also have a super talented Guest Designer joining us for this colour challenge, Lynne who was our monthly winner for May!  Please do pop over to her blog to say hi and see her wonderful creative work.


OK, I was a bit on the fence with this colour combo at first and wasn't really 'feeling it' but as it happens, I have four sample cards to share with you!  It obviously kick started my creative mojo after all!

Here's the first.  This is my favourite of the four and I was going to share this one over on the main LIM post but Izzy beat me to it with a very similar stencilled project, so I'll share it here as my first one...


A pretty simple make.  I inked through a stencil with two colours of Distress Ink, blending where they met.  I then die cut the 'hugs' from some black fine glitter cardstock and twice from orange cardstock and stacked them up.  You can just about make out the orange cardstock in the pic below, as well as the glitter card...


I finished by adding some black Nuvo drops scattered around the sentiment.  Before I added these I felt that something was missing but I think I preferred it without.  Oh well!

Materials used:
  • Stencil: Altenew - Leaf Burst
  • Ink: Distress Ink - Peeled Paint, Spiced Marmalade
  • Die: Lawn Fawn - Scripty Hugs
  • Accents: Nuvo - Crystal Drops Ebony Black

Challenge entries:

STAMPlorations - Summer CAS Card Challenge
Addicted to Stamps and More - Challenge #299 - CAS
Just Us Girls - Challenge #448 - Citrus


Next up is the card I shared over on the main LIM post...


This is just simply stamped and a few accents added.  The stems and flower heads were stamped in Altenew inks and the sentiment in black.  I then added a couple of score lines for some interest to this one layer card.  And to finish I added some white dot details with a white pigment pen.

Materials used:
  • Stamps: Clearly Besotted - Pretty Petals
  • Ink: Altenew - Olive, Orange Cream; Versafine - Onyx Black
  • Accents: Signo Uniball pen - white pigment; Score lines

Challenge entries:

Seize the Birthday - Anything Goes (no Topping option for this one)
STAMPlorations - Summer Theme & Sketch Challenge - Stamps and Anything Goes
Stamping Sensations - July Challenge - In My Garden
Alphabet Challenge - H for Happy Birthday


This one follows on from the last LIM challenge as I found this orange floral panel in my 'bits box'...


The main flower was stamped in Versamark ink and heat embossed with white embossing powder, then masked before stamping the remaining flowers and leaves and then heat embossing those also.  I added a little depth of colour to the centres with a FlexMarker.  This was then trimmed and mounted onto a green card base.  I die cut the sentiment strip from the same green cardstock and heat embossed the sentiment in white.  A few green glitter enamel dots were added to complete the card.

Materials used:
  • Coloured cardstock from stash
  • Stamps: Honey Doo Crafts - Flowers for Design; MFT - Adorable Elephants (sentiment)
  • Ink: Versamark
  • Embossing Powder: Altenew - Pure White
  • Die: Clearly Besotted - Stripped
  • Accents: FlexMarker; Enamel Dots from stash 


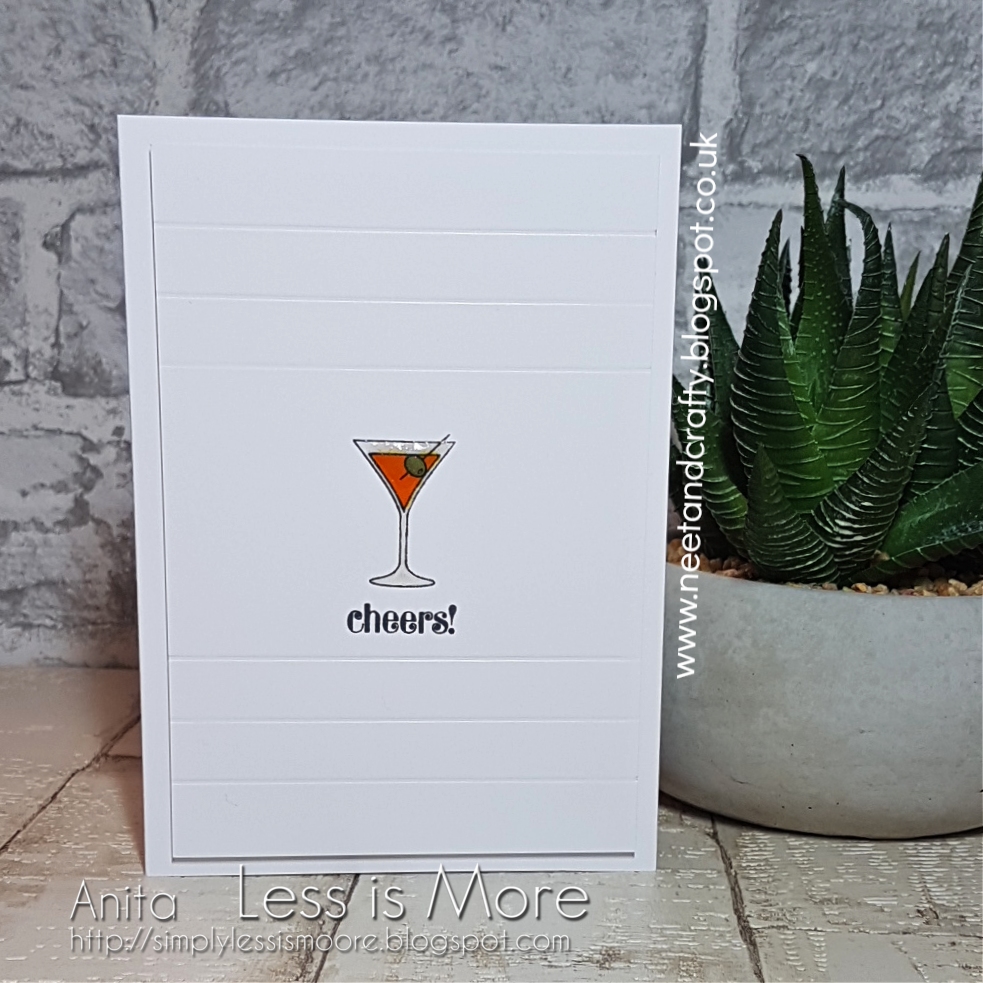
And I went super simple for my final card.  Although I love simple I don't love this card but thought I'd share it with you anyway...


I stamped the glass, olive and sentiment in black ink then coloured with Flexmarkers.  I made some horizonal score lines and popped the panel up on fun foam on the card base.  To finish I added a little Wink of Stella shimmer to the drink and covered with Glossy Accents.

Materials used:
  • Stamps: Clearly Besotted - Raise a Glass II
  • Ink: Memento - Tuxedo Black
  • Coloured with FlexMarkers
  • Accents: Wink of Stella - Clear; Glossy Accents; Score lines


That's all from me, please do pop over to the main Less is More blog, here, to follow the links to view my fellow teamies' makes.  Lots of different projects to inspire you for this colour combo.  I hope to see you in our gallery.  Happy Saturday, folks! :)

Tuesday 3 July 2018

Lightbox Wedding

Hi guys

A friend of mine had her gorgeous wedding on Saturday and today I'm sharing the card I made for her and her husband.

I wanted to use a new stamp set and co-ordinating embellishment from Skull and Cross Buns with which you can create one of the massive trends at the moment....a lightbox!  Check out the site, here, for this new stamp set, as well as some new embellishments and stencils :)

This one took a little forward planning as it was my first attempt at creating a light up card using Chibitronic LEDs and a pull-tab slide switch, I've only made them previously using the push battery method.  My first circuit started to be a little temperamental before I completed the card so I started again and had success the second time around!

Here's the completed card...


And here it is with the light activated...


I started by cutting an aperture where the lightbox would sit and marked on a piece of card behind (on which I would build my circuit) where I wanted the LED, battery and slide switch to be.  I then followed this tutorial, here, to create my circuit (my card is much less complicated than the one in the example!).  Apologies, I didn't take any photos of the inner panel.

I marked through the acrylic grid with pencil onto the back of some vellum to help with alignment and then stamped the letters and heart in black and heat embossed with clear powder.  I then erased the pencil lines and adhered the vellum behind the aperture.  I wanted to diffuse the light a little more so added another layer of vellum.  The light is very bright in these photos, you can in fact see the heart with the light activated.

The circuit panel was then adhered in position on the card base.  I didn't take into account that the copper tape could be seen through the vellum so I did some surgery with some scrap white card to cover that area and just made a hole for the LED to shine through.  I stamped the sentiment before adhering the top panel on 3D foam.  Next I adhered the acrylic lightbox grid over the aperture using Glossy Accents to ensure it adhered well.  I then stamped, coloured and die cut the floral image and popped this up on 3D foam.  I finished by adding some really pretty iridescent jewels.

I just hope the little circuit is still behaving itself now it's in the hands of the new Mr and Mrs! :)


Below is a very amateur video I took to show it in action...


Materials used:

  • Stamps: Skull and Cross Buns - Lightbox Love; Clearly Besotted - Fairytale Ending(flowers), Time to Celebrate (arrow on slider); Lawn Fawn - Happy Wedding
  • Ink: Versafine - Onyx Black; Memento - Tuxedo Black
  • Dies: Clearly Besotted - Fairytale Ending; Stripped (for the slider switch)
  • Embossing Powder: Wow! - Clear Gloss
  • Image coloured with ProMarkers
  • Tools: Chibitronics - White LED sticker (copper tape and battery)
  • Vellum from stash
  • Accents: Little Things from Lucy's Cards - Jewels (Clear iridescent mix)

Challenge entries:

Daring Cardmakers - Weddings and Anniversaries
Just Add Ink - Challenge #415 - Inspiration photo
Dream Valley - Challenge #182 - All Things Bright and Beautiful
AAA Cards - CAS Game #118 - Use a Frame


Thanks so much for visiting today.  Why not get yourself some Chibitronics LEDs and have a go yourself.  It's very satisfying when it works! :D

Monday 2 July 2018

Happy Little Stampers July 2018 CAS Challenge

Hi guys

It's new challenge time over at Happy Little Stampers and today is the turn of the July CAS challenge.  I'll get straight to it, here's what we want to see on your creations this month...


The winner for this challenge will receive a $20 coupon to spend at the shop! Check out all the details HERE.

IF YOU USE STAMPS BY HAPPY LITTLE STAMPERS AND YOU ARE THE RANDOM WINNER, YOUR PRIZE WILL BE DOUBLED!


For my DT card I've used a stamp set which is new to my stash together with sentiment stamps from the HLS Perfectly Succulent stamp set...


I actually made a one layer when I didn't have to! lol  I stamped the cute little ellie and coloured him with Polychromos coloured pencils.  I then stamped and cut out a mask before inking through the background stencil.  I simply finished by stamping the sentiments.

Materials used:
  • Stamps: MFT - Adorable Elephants; Happy Little Stampers - Perfectly Succulent
  • Ink: Versafine - Onyx Black; Distress Ink - Festive Berries, Worn Lipstick
  • Stencil: Bought from Stamposaurus but has no name
  • Coloured with Faber Castell Polychromos pencils

Challenge entries:
Allsorts - Challenge #474 - Baby Animals


All the HLS challenges run until the end of the month, so plenty of time to link up.  And don't forget to keep a look out for the other challenges starting over the course of the next few days :)

Muse Challenge #273 - Just Because

Hi guys

It's the first Monday of the month which means the designer spot over at Muse for this week is back with me :)

I've created a one layer card to hopefully inspire you this week, using a new to me stamp set from Uniko.  I only recently bought some Distress Oxide inks so getting to grips with those too, trying to find the best cardstock for blending.

Hopefully the soft colours, layout, silhouette, one layer, theme, etc. will give you an inspiration springboard to play along this week.


I started by masking the horizontal strip with post-it notes and then blended three colours of Distress Oxide ink.  I added some water splatters and blotted with a paper towel.  I then removed the masks and stamped the foliage silhouette and sentiment in black.  I'm still learning with Distress Oxides and didn't realise they weren't so good for overstamping so the black ink is a little paler within the blended strip but I quite like it for this design.  To finish I added some tiny trios of Nuvo drops in black.

Materials used:
  • Ink: Distress Oxide - Shaded Lilac, Salty Ocean, Cracked Pistachio; Versafine - Onyx Black
  • Stamps: Uniko - Just Because
  • Accents: Nuvo - Crystal Drops - Ebony Black

Challenge entries:

Just Us Girls - Challenge #447 - Anything Goes
Moving Along with the Times - Challenge #74 - June Blooms
Simon Says Stamp Wednesday Challenge - Anything Goes


Thanks so much for visiting today, I'll be back this evening with information about the new CAS challenge at Happy Little Stampers!

Related Posts Plugin for WordPress, Blogger...