Friday 27 March 2020

Magnolias for Mother's Day

Hi guys

Just popping by to share the card I made for my lovely mum for Mother's Day last weekend.


Some patterned paper was die cut at an angle and adhered to the card base.  I then stamped the layered magnolia flowers and leaves and cut them out with their co-ordinating dies and adhered in place.  The card was simply finished with a sentiment stamped in black.


Materials used:

  • Stamps: Clearly Besotted - Magnolia Moments (and co-ordinating dies), Love You Tons
  • Ink: Altenew - Frosty Pink, Coral Berry, Velvet, Frayed Leaf, Forest Glades; Versafine - Onyx Black
  • Die: MFT - Stitched Basic Edges
  • Avery Elle - The Sorbet Collection


Challenge entries:

Use Your Stuff - Challenge #394 - Spring
Stamping Sensations - March Challenge - Spring Florals
Penny Black and More - March Challenge - Spring Flowers


Thank you for taking the time to visit :)

Thursday 26 March 2020

More Honey Doo Makes

Good morning

I'm back today to share some more sample cards I've made for Honey Doo Crafts, ahead of their next shows on Create & Craft TV this Friday, 27 March 2020.

Amanda will be sharing her products and also doing demos in shows at 11.15am and 3.45pm.

All of my cards in this post were made using existing products, some of which will feature in the shows, and there will be a few new stamp sets on the shows too.  You can see previews of these over on the Honey Doo Facebook page, here.  Yesterday evening, Amanda held a Facebook Live giving you a preview of the stamps and samples.


First up I've used the Stars and Stripes set, Feathered Flourishes and Ribbons dies, and a sentiment from the Just in Case set...


I die cut a piece of kraft cardstock and then die cut some white cardstock with the Ribbons die and trimmed out just a section of it and adhered across the panel.  I then stamped and heat embossed the flowers in white pearl embossing powder and fussy cut them out.  I also die cut the flourish from some green vellum.  I curled the petals with a paint brush handle before adhering these with the flourish.  The sentiment was stamped in black and I added a pearl to the flower centre to finish before adhering the whole panel to the card base.


Materials used:
  • Stamps: Honey Doo Crafts - Stars & Stripes, Just in Case
  • Dies: Honey Doo Crafts - Ribbons, Feathered Flourish; Create a Smile - Cool Cuts Double Stitched Rectangles
  • Ink: VersaMark; Versafine - Onyx Black
  • Embossing Powder: Wow - White Pearl
  • Kraft Cardstock: Neenah Classic Crest - Dessert Storm
  • Vellum and pearl from stash


For this next card I've used Stars and Stripes again, Mesh stencil and sentiment from Just in Case...


On a piece of cardstock I blended through the Mesh stencil using a rainbow of Distress Inks, which I then die cut with a stitched border die and adhered down the edge of the card base.  I then stamped the flowers in black and heat embossed in clear.  These were popped up on glue dots and I finished with a stamped sentiment.


Materials used:
  • Stencil: Honey Doo Crafts - Mesh
  • Ink: Distress Ink - Squeezed Lemonade, Carved Pumpkin, Candied Apple, Picked Raspberry, Wilted Violet, Broken China, Lucky Glover; Versafine - Onyx Black
  • Stamps: Honey Doo Crafts - Stars and Stripes, Just in Case
  • Die: Poppy Stamps - Stitched Landscapes


This one uses the Stitch in Time set and a sentiment also from Just in Case...


I used my MISTI to stamp the repeated flower background with just the one flower stamp in the set, these were then coloured with teal toned ProMarkers, the darkest flower in the centre then fading out to paler flowers around the edge.  The panel was then adhered flat before adding a popped up embossed sentiment.

Materials used:
  • Stamps: Honey Doo Crafts - Stitch in Time, Just in Case
  • Ink: Memento - Tuxedo Black; VersaMark
  • Coloured with ProMarkers
  • Embossing Powder: Wow - Opaque Bright White


A very simple card next, using the Starry Eye and Just in Case stamp sets...


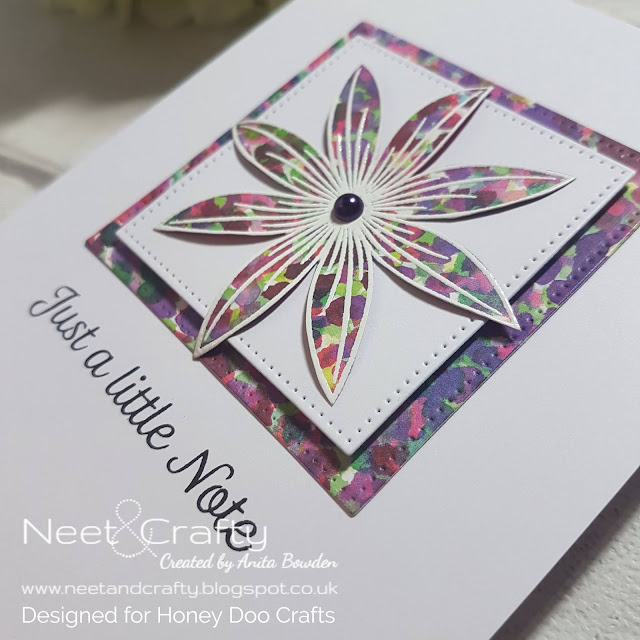
I die cut two pierced squares, one in white and one from patterned paper.  I then stamped the flower onto the same patterned paper and heat embossed in white.  I popped up the white square over the patterned one, and then fussy cut the flower.  The pieces were adhered to the card base, the sentiment stamped below and a purple pearl enamel dot added to the centre of the flower.


Materials used:
  • Stamps: Honey Doo Crafts - Starry Eye, Just in Case
  • Die: MFT - Pierced Square Stax
  • Ink: Versafine - Onyx Black; VersaMark
  • Embossing Powder: Wow - Opaque Bright White


Starry Eye was used again for this next one, along with the Tartan stencil and Cheers sentiment set...


Here, firstly I stamped the flowers and then masked them before creating the background with the Tartan stencil.  I coloured the flowers and die cut the panel.  To finish I stamped the sentiment onto a vellum strip, heat embossed in white and then wrapped this around the panel.  The panel was adhered on fun foam and some gems added to complete the card.


Materials used:
  • Stamps: Honey Doo Crafts - Starry Eye, Cheers
  • Stencil: Honey Doo Crafts - Tartan
  • Ink: Memento - Tuxedo Black; VersaMark; Distress Ink - Victoria Velvet, Tattered Rose
  • Coloured with ProMarkers
  • Die: Create a Smile - Cool Cuts Double Stitched Rectangles
  • Vellum and gems from stash


My final card uses the leaves from the Stitch in Time set and sentiment from Daffodils...


I wasn't sure about this card, and I'm still not, but I wanted to use just the leaves from the Stitch in Time set.  I added masking tape to the card base about half way down and blended upwards with a little green ink and then used blue ink to create the clouds using a stencil.  I then stamped the leaves multiple times in a row, masking a few, and then coloured with ProMarkers.  The sentiment was heat embossed in white onto a die cut sentiment strip.

Materials used:
  • Stamps: Honey Doo Crafts - Stitch in Time, Daffodils
  • Stencil: MFT - Cloud
  • Ink: Distress Ink - Mowed Lawn, Tumbled Glass; Memento - Tuxedo Black; VersaMark
  • Coloured with ProMarkers
  • Embossing Powder: Wow - Opaque Bright White
  • Die: Clearly Besotted - Stripped Die Collection


Thanks so much for visiting.  I hope, with so many people having to stay at home, you can tune in to the two shows of Friday and support Amanda.  At the moment Honey Doo and Create and Craft TV have measures in place for the show to still go ahead despite the COVID-19 issues.  

Take care of yourselves during this uncertain time, I'm sending lots of love to you all xx

(AD - some products kindly gifted for design team purposes)

Sunday 22 March 2020

Layered Butterfly on Petals

Hi guys

Another card for you today, this was the card I made for my lovely sister-in-law's birthday earlier this month.

You may recognise the basic design as it's very similar to a card I made back in January, here.


As before, I masked a section and then blended with light pink ink before then blending through the stencil with the darker shade.  I stamped the sentiment in black before then adding the two butterfly die cuts, just adhering in the centre, the lower layer being vellum.  Some clear gemstones were added to finish.  I love how this die cut mirrors the design of the stencilled flowers.  I didn't plan that, I only noticed after I'd taken the photo!


Materials used:

  • Stencil: Funky Fossil - Pretty Petals
  • Ink: Distress Ink - Spun Sugar, Seedless Preserves; Versafine - Onyx Black
  • Stamp: Marion Emberson - On Your Special Day
  • Dies: Clearly Besotted - Butterfly Duo Die Collection
  • Accent: Gemstones from stash

Challenge entries:

Addicted to Stamps and More - Challenge #381 - Anything Goes
Time Out - Challenge #157 - Birthday
AAA Birthday - Game #11 - Flowers
STAMPlorations - March Stencil Challenge - Anything Goes


Thanks so much for visiting, I hope you've had a good weekend, and managing to keep yourselves busy if you're self-isolating or social distancing.  A very worrying world to be in right now, stay safe everyone xx

Saturday 21 March 2020

Who's Turning 40

Hi guys

Back to share another make, this one being the card I made for a wonderful friend who turned 40 last month.

This was my first use of this stencil set by Birch Press, I love it!


I started with a die cut panel of white cardstock.  First I stamped all the images in black ink, and left the stamps in my MISTI ready for restamping later.  I stamped the WTF and the 40 onto post-it notes and cut these out to use as masks.  The stencilling was next, building up the layers one by one using Distress Oxide inks.  The masks were then removed and I restamped the images to sharpen up the black lines.  I mounted the panel onto a card base using fun foam then added some shimmer to the white sections using a sparkle pen.  I managed to pick up the sparkle in the next photo...


Materials used:

  • Stamps: CAS-ual Fridays - WTF 2
  • Stencils: Birch Press - Mandala Stencil Set
  • Ink: Versafine - Onyx Black; Distress Oxides - Spun Sugar, Picked Raspberry, Wilted Violet, Peacock Feathers
  • Die: Create a Smile - Cool Cuts Double Stitched Rectangles
  • Accents: Spectrum Noir Sparkle Pen - Clear

Challenge entries:

Addicted to Stamps and More - Challenge #381 - Anything Goes
STAMPlorations - March Stencil Challenge
Simon Says Stamp Monday Challenge - Stencil Fun


I appreciate your visit, thanks so much :)

A Pop of Pink and Polka Dots

Good morning

I'm going to be playing catch up this weekend and sharing some cards I've made over the last month or so but not yet found the time to share.

And although I'm still working, I think with the current crisis around the world, and the need for social distancing will mean that I'll be finding lots of time to craft in the evenings and weekends and share more makes with you.  I was also meant to be participating in my very first craft fair next month but of course it's been postponed for now, such a shame as I was getting really excited about it! :(

So this is a great opportunity for me to get more stock made for the fair ready for when it does finally take place, add more to my online shop and also do that job I've been putting off for ages....tidying my craft space!  Yikes!!!

Ok, back to it, and this is the birthday card I made for my bestie last month.  I love black and white cards with a pop of colour so that was my starting point for this one...


I began by die cutting a frame using two stitched rectangle dies, which I then backed with some black and white polka dot paper.  Next I die cut the flower twice, one from white cardstock and again from bright pink cardstock.  I adhered the white flower, minus the petals, tucking the stem into the frame, then inlaid the pink petals.  The frame was then popped up on the card base using foam and the sentiment stamped below.


Materials used:

  • Dies: Create a Smile - Cool Cuts Double Stitched Rectangles; Creative Expressions - Scribble Flowers
  • Patterned Paper: MFT - Dots & Stripes Neutrals
  • Stamps: Clearly Besotted - Beautiful Friend
  • Ink: Versafine - Onyx Black

Challenge entries:#

CAS on Friday - Challenge #176 - Birthday
Daring Cardmakers - Floral Focus
Addicted to Stamps and More - Challenge #381 - Anything Goes
Happy Little Stampers - March Anything Goes with Dies Challenge
Time Out - Challenge #157 - Birthday (optional twist: die cutting)
The Flower Challenge - Challenge #42 - Anything Goes
AAA Birthday - Game #11 - Flowers


Thanks so much for visiting, I'll be back with more very soon :)

Stay safe, everyone xx

Saturday 14 March 2020

Perfectly CAS - March 2020 Challenge

Hi guys

I'm here to introduce the March challenge at Perfectly CAS...


The rules are simple, we want to see you using die cuts while keeping your designs to just one third of the card or less.

I chose to use some die cuts to create the laser cut effect...


This took a little measuring and lining up but wasn't too difficult.  I began with two strips of white cardstock and stamped the sentiment along the edge of one of them.  I then die cut the Gardenia die twice, laid the strips down upside down and adhered the die cuts across the gap on the reverse, thereby creating one complete panel.  I laid the strips onto my glass mat and use those guidelines to keep it straight.  I then adhered a strip of patterned paper behind the die cuts and trimmed off any excess of the paper and die cuts.  The panel was then popped onto the card base using fun foam.

Materials used:
  • Die: Memory Box - Gardenia
  • Stamp: Clearly Besotted - A Little Sentimental
  • Patterned Paper: First Edition - Wildflowers

Challenge entries:

Happy Little Stampers - March Anything Goes with Dies Challenge
Time Out - Challenge #157 - Birthday


This challenge will run until a few days before the April challenge starts, so there is almost a month to play along.

Less is More Challenge #415

Good morning

Another Less is More challenge is just starting and this time we have a Colour challenge for you.  This is the colour combo we'd like you to use...


Our generous sponsor for March is Cas-ual Fridays Stamps.  Just play along in our March challenges for a chance to win our monthly prize.


We are also sadly saying goodbye to our teamie, Nonni, who is stepping down from the Design Team, this will be her last challenge with us.  Thanks for being a wonderful team member, Nonni, and I'm sure everyone will join me in thanking you for your fabulous CAS design inspiration.  Nonni will still be present in blogland and on Instagram so we will still get to see her fabulous creations.

Nonni's departure also means that we have a Design Team spot to fill!  Please do pop over to the main Less is More blog, here, for the details of how to apply.


Ok, back to the current challenge, here is my sample card using the above colour combo...


I began by stamping using the layered floral stamps, before masking the flower and stamping the foliage in grey.  I die cut the panel with a stitched rectangle die and stamped the sentiment in black.  Once the panel was popped up on fun foam I then adhered some scattered co-ordinating jewels.

Materials used:

  • Stamps: Altenew - Beautiful Day; Clearly Besotted - Pretty Petals
  • Ink: Altenew - Industrial Diamond, Silver Stone, Frosty Pink, Coral Berry, Velvet; Versafine - Onyx Black
  • Die: Create a Smile - Cool Cuts Double Stitched Rectangles
  • Accents: Little Things from Lucy's Cards - Jewels: Raspberry Mix

Challenge entries:

The Flower Challenge - Challenge #42 - Anything Goes
AAA Birthday - Game #11 - Flowers
STAMPlorations - March Theme & Photo Challenge - Stamps and Nature


Thanks so much for visiting.  The challenge will be open for a fortnight so plenty of time to play along.

Monday 2 March 2020

Happy Little Stampers March 2020 CAS Challenge

Good evening

The March CAS Challenge has just gone live over at Happy Little Stampers.  I think this one will create a wonderfully diverse gallery this month, here's the cue card...


There are so many great crafting techniques, I really didn't know which one to choose!  In the end I decided on the Ghosting Technique as it can create a totally different look when using stencils.

Here's my sample card...


On a piece of white cardstock I blended a background of three colours of Distress Ink.  To create the ghosting effect I placed my stencil over the top and then spritzed with water.  After removing the stencil I then blotted with kitchen paper which lifts and removes the colour.  Once dry I die cut the panel with a stitched circular die.  Next I stamped the sentiment onto a die cut strip before also cutting one edge with the same circle die.  The stitched edging was then lined up when adhering the strip to the inked circle.  To finish I created some score lines on my card base before popping the circle up on fun foam.


Materials used:
  • Ink: Distress Ink - Dusty Concord, Broken China, Evergreen Bough; Versafine - Onyx Black
  • Stencil: Funky Fossil - Round in Flowers
  • Dies: MFT Die-namics - Double Stitched Circle Stax; Stitched Sentiment Strips
  • Stamp: Altenew - Beautiful Lady

Challenge entries:

STAMPlorations - March Stencil Challenge - Anything Goes


Thanks so much for visiting.  This challenge, along with all the different Happy Little Stampers challenges (some of which are yet to commence), will run until the end of the month so there's plenty of time to play along.
Related Posts Plugin for WordPress, Blogger...