Saturday 21 November 2020

Less is More Challenge #433

Hi there

Today, I'm back to announce the new challenge at Less is More.  This will be the last challenge of the year in order to give the Design Team a little break throughout December.

And just to cheer you all up, we're finishing with a One Layer Challenge!  But I can assure you it's an easy one, here's the cue card...


And we also have a familiar face joining us for this one.  Our previous leader at Less is More, the lovely Chrissie, was our October challenge winner and is therefore joining us as our Guest Designer.  Please do pop over to take a look at her lovely CAS project and to say hi.  It's so great to have you back, Chrissie!


I have two one layer makes to share with you this time.  The first was a super quick make and I'm actually really loving this one...


I masked off the back of the green card base and then lightly blended some green ink from the upper corner, fading it out.  The holly (from an oldie but goodie stamp set, now retired) was then stamped in dark green ink and the sentiment in VersaMark.  I then heat embossed the sentiment in gold before finally adding some holly berries with Nuvo drops.


I'm still way behind on my Christmas makes this year, so as I love this design so much I think I may make more of these, and some variations of the same layout.  Although this was a one layer card, made from one piece of green card, to stretch my coloured cardstock I'll more than likely make panels to adhere to the fronts of more cost effective white card bases.

Materials used:
  • Stamps: Clearly Besotted - Christmas Poinsettia, Sing It's Christmas
  • Ink: Distress Ink - Pine Needles; Altenew - Evergreen; VersaMark
  • Embossing Powder: Wow! - Metallic Gold Rich
  • Accents: Nuvo Crystal Drops - Autumn Red
Challenge entries:

Time Out - Challenge #175 - Quick
We love Chocolate Baroque - November Challenge - Christmas


And while we're on the subject of holly, I wanted to share this picture with you.  I took it a couple of weeks ago when visiting a local Country Park.  I've never seen a holly bush with so many berries, it looks so festive!


Ok, would it even be approaching Christmas if I didn't make a winter scene card using my Card-io stamps?  Here's card number two...


I masked off a central rectangle on my card base and then chose a selection of images from the different scene-builder sets and roughly planned the layout.  Using some paper scraps cut with curves I gently blended the glow and evening sky, the snow banks and shadows where my images would be, and gave the edges a touch of ink to frame the scene.  Then it was just a case of stamping the images in black ink, the church and trees with a mask in place, and the foreground foliage in first and second generation stamping.  To finish, I adhered some fine glitter with a glue pen, which you can see more clearly below.


Materials used:
  • Stamps: Card-io - Festive Fun, Festive Scene, Greenery 1, Mini Tall Trees, Dear Deer, Branching Out
  • Ink: Versafine - Onyx Black; Versa Color - Marigold, Neptune
  • Accents: Cosmic Shimmer Diamond Frost - Frosty Dawn
  • Quickie Glue pen

Challenge entries:

Uniko - Challenge #62 - Tis the Season (option: Sparkle)


Thanks so much for taking a look today.  As usual, the challenge linky over at Less is More will remain open for two weeks.  Looking forward to seeing lots of one layer makes in the gallery in the run up to Christmas.


Saturday 7 November 2020

Case Me a Christmas Card with Michelle Lupton

Hi there

I'm so pleased once again to have been invited by the fabulous Michelle Lupton to join her annual Christmas card challenge.  This year there is a spin on her previous Challenge Me a Christmas Card series.....this time it being Case Me a Christmas Card. 


So this time we are both making a Christmas card inspired by any of our previous creations, not just Christmas designs.  And my goodness, what an amazing array of cards I had to choose from!

Here is my card, followed by Michelle's gorgeous design which inspired me...


I stamped the snowflake background with VersaMark ink and then heat embossed in white.  Then, using the wet on wet technique, I painted half of the panel using a selection of Zig markers in shades of blue mixed with water.  I trimmed the panel down and adhered to a card base, flipping Michelle's design with the colour at the top.  I then also used a two font, two colour sentiment strip and finished the design with some sequin accents.


Materials used:
  • Stamps: Wow! - Blizzard; Clearly Besotted - Brushed Sentiments
  • Ink: VersaMark; Versafine - Onyx Black; Versa Color - Turquoise
  • Embossing Powder: Wow! - Opaque Bright White
  • Coloured with Zig Clean Color Real Brush Markers
  • Accents: Little Things from Lucy's Cards - True Blue mix

And this is Michelle's beautiful make which you can view, here...


And you can follow this link, here, to see which of my cards Michelle has chosen to CASE...I'm intrigued to see it myself as I have no idea!

Thanks so much Michelle for inviting me to join you again this year, always such fun to play along.


Magnetic Bookmarks

Hi there

I'm popping by today to share something different I've been working on lately.

After receiving some great feedback about my traditional tag-style bookmarks and selling many of them in my Facebook shop, I put some feelers out among my book-loving friends about what kind of bookmarks they usually use.  As well as answers such as paper scraps and envelopes, I discovered that many use magnetic ones as well as the tag/strip style.  So behind the scenes I've been making a few different ones to add to my shop, just to see how well they are received.

Here is a quick look at them, although it's quite a photo heavy post!  They are fundamentally all made in the same way; a piece of sturdy cardstock scored and folded, with slim adhesive magnetic strips on the inside.  I've added different designs using techniques including stencilling, stamping, ink blending and colouring.


Dandelions and Stripes

This is a part white/part striped cardstock which I've scored part way through the striped section, the reverse side is entirely striped.  The dandelion images have then been stamped in co-ordinating shades.


Materials used:
  • Stamps: Clearly Besotted - Dandelion Dreams
  • Ink: Altenew - Silver Stone, Lavender Fields, Sunkissed, Dusk
  • Cardstock from stash


Pastel Unicorns

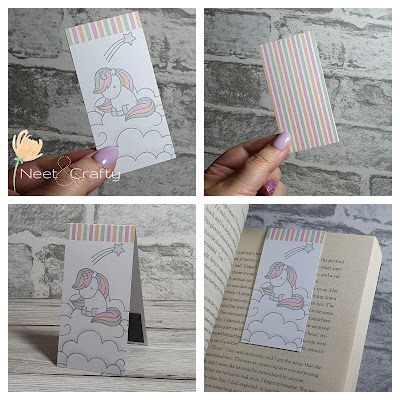
The next three designs are also made with similar cardstock but in more pastel shades, so the stripes cover the reverse side of the bookmark.  I've then stamped the images and coloured with ProMarkers.  I've added some sparkle to the star, unicorn horns and hooves with a shimmer pen.


Materials used:
  • Stamps: Clearly Besotted - Fairy Tale Unicorns, Call Cupid
  • Ink: Memento - London Fog
  • Coloured with ProMarkers
  • Accents: Spectrum Noir Sparkle Pen - Crystal Clear


Solitary Winter Tree

This next one uses white cardstock which I've masked, ink blended and stamped to create a winter landscape scene.  The reverse side is left plain white.


Materials used:
  • Stamp: Card-io - Winter Trees
  • Ink: Distress Ink - Tumbled Glass, Dusty Concord; Versafine - Onyx Black


Watercolour Scribble Flowers

For this one I randomly stamped the flowers on white cardstock and then watercoloured the entire pattern with Distress Inks mixed with water.  I created the pattern on a piece of A5 cardstock and cut the bookmark from the entire design so the pattern continues on the reverse side.


Materials used:
  • Stamps: Lil Inker Designs - Inky Flowers
  • Ink: Versafine - Onyx Black; Distress Ink - Salty Ocean, Spun Sugar, Picked Raspberry, Dusty Concord, Wilted Violet, Squeezed Lemonade


Daisies and Swirls

For this design I lightly ink blended some white cardstock with yellow ink before then ink blending through a floral stencil with a heavier layer of yellow, orange and green.  The pattern continues on the reverse side.


Materials used:
  • Stencil: Dutch Doobadoo - Flower Swirl
  • Ink: Distress Ink - Squeezed Lemonade, Carved Pumpkin, Bundled Sage


Art Nouveau Roses

This was created in the same way as the daisy bookmark, the background first ink blended with pale pink and then the stencilled pattern blended with pink and purple shades.  The pattern continues on the reverse.


Materials used:
  • Stencil: Tim Holtz - Mini Stencil Set 14
  • Ink: Distress Ink - Spun Sugar, Picked Raspberry, Wilted Violet


Snow on Snow

Here I began by ink blending the background with pale blue ink before randomly stencilling the snowflakes in blue and lilac.  I then ink blended through a snowfall stencil and heat embossed the snow to add some texture.  The pattern continues on the reverse.


Materials used:
  • Stencil: Crafters Companion Signature Collection - Snow is Falling; Clearly Besotted - Snowy Day
  • Ink: Distress Ink - Tumbled Glass, Salty Ocean, Shade Lilac; Hero Arts - Unicorn
  • Embossing Powder: Wow! - Opaque Bright White


Thanks so much for taking a look, I hope you like them :)

Less is More Challenge #432

Hi there

It's Colour challenge time over at Less is More and for the next fortnight we have two colour combos for you to choose from...


And as we've entered into a new month, we also have a new sponsor, the wonderfully generous


We also have one of our regular participants joining us as a Guest Designer for this challenge, our August winner, Kathy K!  I'm sure you're all familiar with Kathy's fantastic creations so why not pop over to her blog to say hi and take a look at her card for this colour challenge.


Ok, on to my samples, and I have one of each colour combo for you this time.  First up is the blue and silver...


I die cut a faux stitched rectangle from white cardstock and then also die cut a negative snowflake in the centre of the panel.  Before adhering to the card base on fun foam, I backed the negative snowflake with light blue glitter cardstock.  The central section becomes detached when die cut so I adhered this back in place and accented with a glittered enamel dot.  To finish I stamped and heat embossed the sentiment in silver on a die cut strip and adhered this at the base on a 3D foam strip.


Materials used:
  • Dies: Create a Smile - Cool Cuts Double Stitched Rectangles, Negative Snowflake; MFT Die-namics - Stitched Rectangle Stax
  • Stamp: Uniko - Snowflake Serenade
  • Ink: VersaMark
  • Embossing Powder: Wow! - Metallic Silver
  • Accent: Doodlebug Sprinkles - Silver


Next up is my red and gold card.  I'm really not sure about this one, I think the photography lets it down as the shiny gold really doesn't translate very well...


I began by using a window die as I figured it would look like a ribbon-trimmed present.  So I cut this from deep red and again from textured gold cardstock.  I adhered the red frame and then pieced in the gold sections.  I used the same red cardstock and die cut it using a bow die set and mounted it onto the present.  I then stamped and heat embossed the sentiment in gold onto a mini tag die cut and tucked this under the bow.  That was going to be my finished card but it just didn't look complete somehow.  So I grabbed a new stencil which I recently purchased which gives a torn edge effect and added some red ink to the top and base.  I'm still not sure about it, but thought I would share it with you all the same.


Materials used:
  • Dies: Clearly Besotted - Window Die, Tiny Tags; Frantic Stamper - Small Solid Bow
  • Stamp: Uniko - Rustic Wreath
  • Ink: VersaMark; Distress Ink - Festive Berries
  • Embossing Powder: Wow! - Metallic Gold Rich
  • Stencil: Clearly Besotted - Tear Away


Thanks so much for taking a look today.  Hopefully you can join in over the next two weeks.  If, like me, you still need to make your Christmas cards (other than these I've not started yet!) then these colour combos should help you as they are ideal for festive makes.  And there's lots of inspiration from my teamies over at the main blog too.


Friday 6 November 2020

Masculine Happy Birthday

Hi there

Today I'm sharing the birthday card I made for my boyfriend.  It was his birthday yesterday which was really bad timing as yesterday was the start of the second lockdown in England, this time for four weeks.  So, unfortunately, we weren't able to go out and celebrate anywhere or with anyone else.  Both of us have had lockdown birthdays this year so we'll be making up for it next year for sure (hopefully!!)

I wanted to make a masculine card, but wanted a change from the usual blues, browns or bold colours I usually reach for when making cards for guys.

My lovely crafty friend, Sarah from Sazzle Dazzle Crafts, kindly recently sent me some coloured cardstock samples for me to try and the grey that I used here for the background was one of those samples and I love it!


I began by covering the card base with the grey cardstock.  I then die cut the 'happy' from various shades of cardstock from my scraps folders: mint, dark slate blue, light blue and white.  I layered them up slightly offset, with the white at the back to create the most contrast with the grey.  Before adhering in position I die cut a balloon string from black glitter cardstock and then adhered the 'happy' over the top.  I die cut a heart balloon from polka dot paper and popped this up on 3D foam, then finished by stamping the remainder of the sentiment.


Materials used:
  • Dies: Wplus9 - Happy Trio, Whole Lotta Happy; MFT Die-namics - Blueprints 26
  • Stamp: Clearly Besotted - A Little Sentimental
  • Ink: Versafine - Onyx Black
  • Patterned paper: Doodlebug - Kraft in Color: Color


Thank you for visiting, I'll be back in the morning to share the new challenge over at Less is More.


Related Posts Plugin for WordPress, Blogger...