Wednesday 26 February 2014

Eyelet Accents

Hi there

Tonight I've made a card and managed to combine a few challenges.

The first challenge is at Less Is More and this week the recipe is to use any kind of metal on our creations.

There is another challenge this week at Daring Cardmakers and the theme there is 'Old but not Forgotten'.

When I first started cardmaking many years ago I used a lot of eyelets and brads but these have been abandoned for a year or so and certainly since I started blogging, so I thought I'd give my eyelets an airing.

Until now I've used them to accent corners or to thread ribbon through but I went in a different direction today and used them to accent my stamped image...


When looking through my stamps this one just jumped out at me as it had little rings which were perfect to accent with the eyelets.  I stamped the image on a white panel and randomly affixed the coloured eyelets.  I chose a bright pink card base but didn't want the pink to show through the holes in the eyelets so I adhered a scrap of black cardstock behind the eyelet section before attaching the panel to the cardbase with 3D foam strips.  And there you have it, so easy.

Materials used:
  • Stamps: Marion Emberson Designs - On your special day; Clearly Besotted Stamps - Many Messages
  • Ink: Versafine - Onyx Black
  • Eyelets and cardstock from stash

I would also like to enter this card into the following challenges:

Addicted to Stamps and More - Challenge #84 - Clean and Simple
Dynamic Duos - #91 - Triple Threat Week


I never thought I'd really like a card using eyelets and I'd pretty much left them hidden away in my craft cupboard, never to be used again!  I'd love it if you'd leave a comment to let me know what you think, and share if there's anything in your stash that you've abandoned.  You never know, use it in a different way and you just might surprise yourself! :)

Bye for now

Monday 24 February 2014

Just a Floral Note

Hi guys

Well, I've finally managed to create a card for the current Clearly Besotted Challenge right before the deadline.

Here's my card and the colour palette we were given as inspiration...


I had great fun using some of my new CBS dies on this one, and these stamps have all had their first outing too.  

Materials used:
  • Dies: Clearly Besotted Stamps - Scalloped Tag Die, Scalloped Edges Die Collection, Fancy Florals
  • Stamps: Clearly Besotted Stamps- Basic Stripes, Fancy Florals, Many Messages
  • Ink: Versa Color - Sky Blue, Olive, Burgundy, Sky Gray; Versafine - Onyx Black
  • Twine: Doodlebug - Brights Collection
  • Gems: Papermania - Glazed Gems (Iridescent)
  • Cardstock from stash

I'm also entering this card into the following challenges:

Crafty Creations - Challenge #257 - Keep It Simple
Retro Sketches - #103 - sketch


Before I disappear for the evening I'd like to say thank you for all your lovely comments about my Deer's Leap card, and I was chuffed to bits to get the news today that the awesome Ardyth at CASology has chosen my card for an Honorable Mention!  That's completely made my Monday :)

Thanks so much for visiting and I hope to see you again soon.


Friday 21 February 2014

Deer's Leap

Hi there

I have a very clean and simple card to share with you tonight.

I wanted to take part in the latest challenge at CASology where the code word this week is 'Jump'.  I had a rummage through my stash and couldn't really find anything suitable so I went on the hunt for a free digi and I found the following image at a great blog, Free Vintage Digital Stamps.


I printed the leaping deer onto white cardstock and die cut using a rectangular die.  I then dug out some red mirri card (shocker...this hasn't seen the light of day for ages, not even last Christmas!) and die cut using the same die.  I then layered them up, slightly offset, before adhering to a textured card base.  To finish I coloured a tiny clear gemstone with a red FlexMarker to create Rudolph's nose.  And that's it!  I decided not to add a sentiment as I don't think its needed here, the image speaks for itself.  I'm not usually one for making Christmas cards this early in the year but I wanted to create this one as I really love the image.

Materials used:

  • Digi: Free Vintage Digital Stamps - Leaping Deer Silhouette
  • Die: Spellbinders Nestabilities - Classic Rectangles
  • Gem and cardstock from stash
  • FlexMarker - Berry Red

I have also decided to enter this card into the following challenges:

Charisma Cardz - Challenge #4 - Inspired by a Move (Rudolph The Red-Nosed Reindeer - The Movie)
Addicted to Stamps and More - Challenge #83 - Holidays
Crafty Creations - Challenge #257 - Keep It Simple
Festive Friday - Challenge #25 - Photo inspiration


Thanks for stopping by.  That's all from me for today, I'm going to spend the rest of the evening in my comfies in front of the TV after a very hard week at work.  

See you soon


Thursday 20 February 2014

Masculine Best Wishes

Hi guys

Just popping by with a very quick post as its late and I should be in bed by now!

I always find cards for guys very difficult to make but I wanted to have a go as there are a couple of masculine challenges this week.  This is not a favourite card of mine by any means but a challenge is a challenge so I thought I would share.

Here's my attempt...


Materials used:
  • Stamps: Stampin' Up - Need for Speed; Kaisercraft - Bubble Wrap; Woodware - Salutations
  • Ink: Versa Color - Neptune and Khaki; Versafine - Onyx Black
  • Die: Spellbinders Nestabilities - Classic Ovals Large; Clearly Besotted Stamps - Tag Along
  • Twine and cardstock from stash

Challenge entries:
Less is More - Week 159 - Masculine
CAS on Sunday - Challenge #27 - Masculine
Sketch Saturday - Week #297


That's all folks, I'm off for a date with my duvet!


Sunday 16 February 2014

Just to Brighten Your Day

Hi there

So much for crafting in the daylight.  Once I'd completed my chores of cleaning the office at work and doing the weekly shop and then got home to do some more crafting, the light needed to be switched on again!  Oh well, the sunshine was lovely while it lasted.

I'm back with a very colourful card this evening, the sunshine must have put me in a very bright and cheerful mood :)


For this card I inked up two stamps I've never used before.  I started by stamping the flowers in VersaMark on a scrap of white cardstock and embossed with black embossing powder.  I then coloured them in with ProMarkers.  I used a circle die to cut them out.  I chose a textured card base to make the circle stand out more.  I placed the die cut roughly where I wanted it to go and then stamped the sentiment.  Next I adhered the die cut using 3D foam and at the very end I added some Glossy Accents to make the flowers bolder.  And there you have it.  Fairly quick apart from letting the Glossy Accents dry.

Materials used:

  • Stamps: Dawn Bibby Designs - Butterfly, Dragonfly; Visible Image - sentiment (unknown stamp name)
  • Ink: VersaMark; Versafine - Onyx Black
  • Embossing Powder: Stampin' Up - Black
  • Die: Xcut - Nested Circles
  • Coloured with Promarkers
  • Accents: Ranger- Glossy Accents

Challenge Entries:

CASology - Week 82 - Bold
Keep It Simple - #33 - Tropical
Daring Cardmakers - A Pop of Neon
Just Us Girls - Challenge #228 - Colour


As always, thanks so much for your visit to my little space in Blogland.  That's all for this weekend, hopefully I can find some time in the evenings this week to share a little more with you.

Bye for now

Sending Hugs

Hi guys

Finally, some decent daylight to craft by!!!  It's so nice to see blue skies this morning after what has been a very miserable 2014 so far down here in Devon.

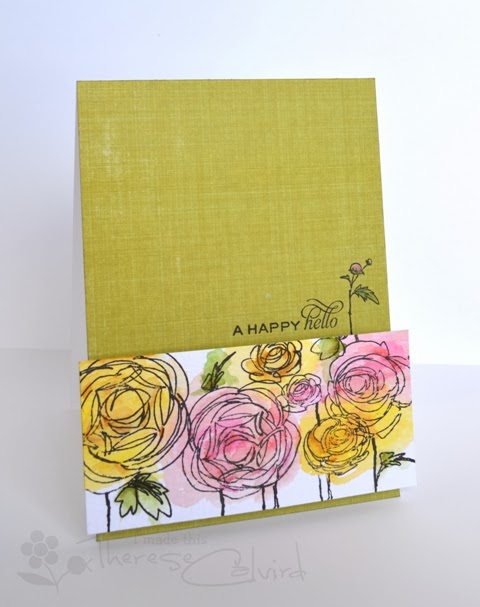
I've missed out on the last couple of challenges over at Muse so I wanted to give this one a go before the deadline tomorrow.  This week, Therese Calvird is our muse and this is my take on her card...


Although I used natural light for this photo, the colours are showing a little 'off' (really need a decent camera!).  The background paper is 'Certainly Celery' by Stampin' Up which is much more of a lime colour than it translates here.

I dug out one of the very first stamp sets I ever bought for this card, a little set of wooden flower stamps by Hero Arts.  I coloured the blooms with ProMarkers and FlexMarkers before die cutting with a square die.  I covered the base card with the Stampin' Up patterned paper, placed the flower panel where I wanted it so I could stamp the sentiment, then adhered the panel using 3D foam to add some dimension.

As you can see from Therese's card below, I took my inspiration from the colours and the floral panel, but decided to change it up a little using a square card and panel.


Materials used:

  • Patterned Paper: Stampin' Up Design Series Paper (retired) - Certainly Celery
  • Stamps: Hero Arts - Fashion Flowers; Clearly Besotted Stamps - Say It In Style
  • Ink: Memento - Tuxedo Black
  • Coloured with ProMarkers and FlexMarkers

I have also decided to link this card up to the following challenges:

Addicted to Stamps and More - Challenge #82 - Make Your Mark
Stampin' for the Weekend - Flower Power


Thanks for popping by today, see you soon :)


Saturday 15 February 2014

I'm Nuts About You

Hi there

As promised, I'm back to share another Valentine's Day card I made for an order.  This was for my Brother's girlfriend to give to him.

They both love spending time with and photographing anything nature related.  I was lucky enough to win a giveaway from Stephanie at Clearly Besotted a while ago so the 'Nuts for You' stamp set and matching dies I won were perfect for this card.

Here it is...


Yes, its those waterfall hearts again, I just love that paper!

I covered the card base with the paper before die cutting a circle and running it through my Big Shot using a woodgrain embossing folder.  I die cut the branch from some dark brown textured cardstock and wrapped some jute twine around it which was secured with the two stamped and die cut hearts.

Next came the difficult bit, colouring in the squirrel.  Who knew that grey squirrels were in fact not just grey?!  After that little challenge I die cut him out and placed him over the sentiment strip which was stamped with the co-ordinating sentiment and acorns.  And another 'Valentine' sentiment strip finished off the card.

I did struggle with this one a bit as, again, this was an A5 card, but I'm pleased with the end result :)

Materials used:
  • Digi paper: Pink Petticoat - Waterfall Hearts
  • Dies: Xcut - Nested Circles; MFT Die-namics - Fishtail Flag Stax; Clearly Besotted Stamps - Nuts for You, Paired Up and Mini Love Hearts
  • Stamps: Clearly Besotted Stamps - Nuts for You, Paired Up and Mini Love Hearts
  • Ink: Versafine - Onyx Black; Versa Color - Cardinal; Memento - London Fog
  • ProMarkers
  • Jute Twine

Challenge Entries:
2 Sisters Challenge - #173 - Embossing
Oh La La Creations - Challenge #149 - Use a Heart
Passion for ProMarkers - Week 234 - Have a Heart
Addicted to Stamps and More - Challenge #82 - Make Your Mark
Cute Card Thursday - Challenge 308 - Clever Cutting
Totally Papercrafts - Challenge #206 - Valentine/Love


Thanks so much for visiting.  I intend to be a better blogger from now on, and hope to post lots more and more importantly, comment on all your fab creations!

Have a lovely weekend whatever you're up to.


Love Ewe

Good morning lovelies

Apart from a couple of Valentine's Day cards which I'm going to share with you today I've had no time for crafting at all since last weekend.  I've been feeling absolutely shattered in the evenings as work is just constantly hectic at the moment.  I work for an insurance loss adjuster so you can imagine how busy we are at the moment with all this horrendous weather we've been having in the South West!

I did make some time to make this card for my chap...


My mojo went AWOL this week so it took a little time to figure out a layout for this one.  I wanted to make a larger card too, this is A5, but I do struggle to fill the larger sizes whilst keeping a clean and simple style.

I chose a digi image and digi paper from Pink Petticoat for this one.  I edged the card with the heart paper and a strip of dark grey cardstock I had in my stash.  I then adhered a white panel over the top, aligned to the left, wrapped with some organza ribbon.  I die cut the paper and the printed image using the same heart die and layered these together.  Next I grabbed a scrap of cardstock and coloured it with a red ProMarker before punching out the hearts with a tiny punch.  I then coated the three red hearts in Glossy Accents and left to dry before adding these as a finishing touch.


I made an insert for the card with a stamped sentiment and two little hearts in the corner.  I don't always add inserts to my cards but it does give them a more professional finish, especially to larger cards.

Materials used:

  • Digis: Pink Petticoat - Waterfall Hearts and Just For Ewe
  • Die: Xcut - Nested Hearts
  • Punch: Craft Creatives - Mini heart punch
  • ProMarker: Berry Red
  • Cardstock and ribbon from stash
  • Stamps: Clearly Besotted Stamps - Happy Days and Mini Love Hearts
  • Ink: Versafine - Onyx Black; Versa Color - Cardinal

Challenge Entries:
Oh La La Creations - Challenge #149 - Use a Heart
Creative Card Crew - #55 - KISS (Keep It Simple and Sweet)
Creative Inspirations - Challenge 252 - Love

Totally Papercrafts - Challenge #206 - Valentine/Love


I think men are difficult to buy for on Valentine's Day so I decided to put my baking skills into action and combined two of his favourite things - peanut butter and cake - and produced these Peanut Butter Brownies.  I also bought this cute little glass jar to put them in.  And by making these I knew I wouldn't be tempted to pinch one and ruin my diet as I don't like peanut butter so they're all for him :)  And I am informed that they are yummy!


I've added the link here if you want to give them a try :)


I'll be back shortly with another Valentine card I made for an order.

Hopefully this weather will calm down soon (surely it can't go on for much longer!!) so I won't feel so exhausted from work and can find more crafty time!

See you soon and stay safe


Sunday 9 February 2014

Thinking of You

Hi guys

Well, this morning we seem to have a gap in the stormy weather down here in Devon and at the moment the sun is shiny! A very welcome sight :)

Today, I've had a go at recreating a one-layer card very similar to a fab card made a while ago by Rebecca at Melly moo, you can see Rebecca's post here.  For my card I used chalks to create the shadow.  It doesn't jump off the page as well as Rebecca's card.  I really need to invest in some ink/sponging products!  That said, I do like it and I think the subtle feel is fitting for the sentiment.  See what you think...


I was lucky enough to get my order in for the Dandelion Dreams stamp set at Clearly Besotted before it sold out...and I adore it.  The note pad stamp was released a while ago but I only just purchased it with this month's order so wanted to give that a whirl too.

I started by stamping the 'decorative tape' and then masked this off before stamping the note pad.  Then, lots of post-it notes were used as masks to create an edge to the pad and a gap to chalk the shadow.  I then masked off the shadow before stamping the dandelions.

I'm fairly happy with the result but I don't think I managed to accomplish exactly what I set out to do.  Oh well, its all good practice!

Materials used:
  • Stamps: Kaisercraft - Decorative Tape Pieces; Clearly Besotted Stamps -Just A Note, Dandelion Dreams, Many Messages
  • Ink: Memento - London Fog; Versa Color - Seafoam and Petal Pink; Versafine - Onyx Black
  • Chalk: Craf-T Products - Decorating Chalks

Challenge Entries:
Less is More - Week 158 - One Layer Anything Goes
Addicted to Stamps and More - Challenge #81 - Anything Goes
Totally Gorjuss - Challenge 222 - Sentiment as Main Focus
Dynamic Duos - #89 Subtly Yours - Light Green and Soft Pink


Apart from the sentiment set, all of these stamp sets are new to my collection and I love them.  No doubt you'll be seeing a lot more of these in the future.  

There are a few chores I need to do today but you never know, I'll more than likely get distracted and have another card to share later ;)

See you soon


Thursday 6 February 2014

Rainbow Wishes

Hi guys

I'm back with a very quick card tonight.  Less is More is one of my favourite challenge blogs and I try to take part as often as I can, although I have missed a few lately.  They are currently celebrating their 3rd birthday and I wanted to link up before the deadline tomorrow.  And to celebrate they have a really great colour challenge this week which is...
RAINBOW

I also decided to combine this challenge with the One-Layer Simplicity Challenge where their theme this week is 'Can You Repeat That?', and they want us to use some kind of repetition on our cards.

So, here's what I came up with...


This didn't take very long at all.  I drew a pencil line across the card and marked a central point before stamping the candles.  I erased the pencil marks once the ink had dried.  I then stamped the sentiment with the purple candle nestling in the corner but the card looked a bit off balance so I added a row of stamped dots to bring everything together, I think it works!

Materials used:

  • Stamps: Penny Black - Salutations; Clearly Besotted Stamps - Say It In Style; Hot Off The Press - Stamped Stitches
  • Ink: Versa Color - Cardinal, Orange, Canary, Fresh Green, Cyan and Heliotrope; Versafine - Onyx Black

I want to say a really big thank you and welcome to my newest followers, I have just hit 50 (as well as more that follow on Bloglovin').  Thanks so much for your support and I hope you find some inspiration from my designs.

Right, I really must go to bed, an early night is long overdue!

Night all 


Wednesday 5 February 2014

Get Well Soon

Hi there

I'm here tonight with a quick post to share a card I made for an order for a friend.  Apologies for the bad photography, I had to take it in artificial light last night.  I also usually use PicMonkey to edit my photos but for some reason its misbehaving and refusing to save my adjustments so I've tried my best to make it look as it is in real life.  It would be great to hear what editing software you use.  Unfortunately, I can't afford to buy any photo editing software at the moment so any suggestions for free online editing will be gratefully received!


I used another of my recently purchased digi papers from Pink Petticoat, aren't these Waterfall Hearts just gorgeous.  A simple stamped panel and some twine finished off the card.

Materials used:

  • Patterned Paper: Pink Petticoat - Waterfall Hearts
  • Stamps: Uniko Studio - Flower Power #1 and #2; Clearly Besotted Stamps - For Everyone and Many Messages
  • Ink: Versa Color - Grape and Olive; Versafine - Onyx Black
  • Twine: Doodlebug - Brights selection

Challenge Entries:
Totally Papercrafts - Challenge 204 - Clean and Simple
Simply Create Too - Challenge #54 - For a Female
Oh La La Creations - Challenge #149 - Use a Heart
Creative Inspirations - Challenge 251 - Anything Goes
Addicted to Stamps and More - Challenge #81 - Anything Goes

Thanks for popping by to visit my little space in blogland.  I hope those of you in the UK are staying safe in this terrible weather.  The South West was hit really hard last night and there's more to come at the weekend.  Take care everyone.


Tuesday 4 February 2014

Fabulous Friend

Hi there

Just popping by tonight to share a card I made for my bestie's birthday, Happy Birthday H :) xxx

I tried a couple of techniques which are new to me and that I've never tried before and it took a few attempts to get this right, a few bits and bobs did end up in the bin! :D


The first technique was using an inlaid die which, on a single piece of card would be quite simple.  But I tried to be fancy so it took me a while to get this right!  The second technique is one I've seen a lot of recently in blogland, and that is the layering up of the same die cut image and adhering the layers together.  You can see this in the third pic where I've layered up the various purple and lilac die cuts.  I've used lots of Clearly Besotted products on this card and I adore that 'fabulous' font, isn't it, well...fabulous!

Materials used:

  • Cardstock: Papermania Premium Textured Cardstock; white cardstock from stash
  • Dies: Clearly Besotted Stamps - Leafy Accents and Happy Everything; Spellbinders Nestabilities - Classic Ovals Large; MFT Die-namics - Fishtail Flag Stax
  • Stamps: Clearly Besotted Stamps - A Little Sentimental and Say It In Style
  • Ink: Versafine - Onyx Black
  • Gems: Kanban - Pastel Bling

Challenge entries:
Dream Valley Challenges - Challenge 74 - No Designer Paper
Simply Create Too - Challenge #54 - For a Female
Cute Card Thursday - Challenge 306 - Something New (2 new techniques)


I hope you are all well and to those of you in the UK, stay safe in this dreadful weather, I think our South West is going to take a battering tonight :(

Take care


Sunday 2 February 2014

Inspired by.....#4

Hi guys

This card is another to add to my 'Inspired by...' series.

I thought this one would be easy but I've been faffing around for ages trying to put this one together!  I started with a square base card, then abandoned it.  Next I tried a portrait card, and yes, abandoned that too!  So I settled on this landscape version.  I'm not loving this card, really not sure why.  I like all the elements but not sure I like them together.  Anyhow, I thought I would share it with you and add it to my stash.


and here is where my inspiration came from...


My bed linen!


Materials used:
  • Stamps: Clearly Besotted Stamps - Flower Arrangement; Uniko Studio - Flower Power #2
  • Ink: Versa Color - Cement, Bamboo and Split Pea; Versafine - Onyx Black
  • Patterned Paper: Pink Petticoat - Hydrangeas
  • Cardstock: Papermania - Kraftstax; white card from stash
  • Embossing Folder: Stampin' Up - Vine Street

Challenge entries:
Totally Gorjuss - Challenge 221 - Sunny Colours
2 Sisters Challenge - Challenge #173 - Embossing
Crafty Catz - Challenge #216 - Anything Goes
The Card Concept - Challenge #2 - Use Texture (I've used the style 'clean and layered')


Thanks for visiting, hopefully I can add more to my 'Inspired by...' collection this year, my efforts last year certainly need to be improved upon!

Take care


Related Posts Plugin for WordPress, Blogger...