Showing posts with label The Greetery. Show all posts

Thursday, 16 October 2025

CASE Me a Christmas Card with Michelle Lupton

Hi there

My lovely crafty friend from across the pond, Michelle Lupton has invited me to join her once again in her CASE Me a Christmas Card Series.  I'm so happy to be part of Michelle's series again.


CASE can either stand for 'Copy and Share Everything' or 'Copy and Selectively Edit'.  This year, the series features ten creative hops in October - two on YouTube and eight on Instagram - where we’ll CASE cards from fellow crafters.


So, to join us, make your own unique Christmas card inspired by someone in the hop, upload it via Inlinkz on @michelle_lupton ’s blog (link in Michelle’s IG profile), and you could even snag a prize from one of our awesome sponsors. Just look at this line up...


Or leave a comment on the stops on the hop (either on IG or on YT)! It's all about sharing ideas, connecting with other cardmakers, and sparking your creativity for the holidays!

I was inspired by Beth Opel, here's her gorgeous card...


I was inspired by the monochrome design, the embossed background with the white accents and the bows.

And here is my festive take, using Beth's card as the inspiration...


Beth embossed her background using pink cardstock and used white ink to highlight the raised elements. I started with white cardstock and inked up the background part of this festive embossing folder with dark green ink, thereby leaving the raised parts white. I too added a white sentiment on a die cut coloured background, mine being on a tag which I ink blended to match the background. And I added a white die cut bow cut from white glitter cardstock.


Materials used:

  • Embossing folder: Spellbinders - 3D Pine Cones & Berries
  • Ink: Altenew - Evergreen; VersaMark
  • Embossing Powder: Brutus Monroe - Alabaster
  • Dies: The Greetery - Fit to be Tied; MFT Die-namics - Stitched Traditional Tag Stax
  • Stamp: Clearly Besotted - Eat Drink Be Merry


The full list of my fellow crafters on this particular Instagram hop is as follows:
@michelle_lupton
@pocono.pam
@little.finn.crafts
@tinstar05
@craftyneet - THIS IS ME
@bopels
@hannelie.bester
@joy_in_a_jar
@thealtcardmaker

Thank you so much for taking a look and thank you once again to Michelle for inviting me to take part.  
CASEing cards is a great way to craft if you need a creative nudge, just remember to give credit to the original designer.


Thursday, 30 December 2021

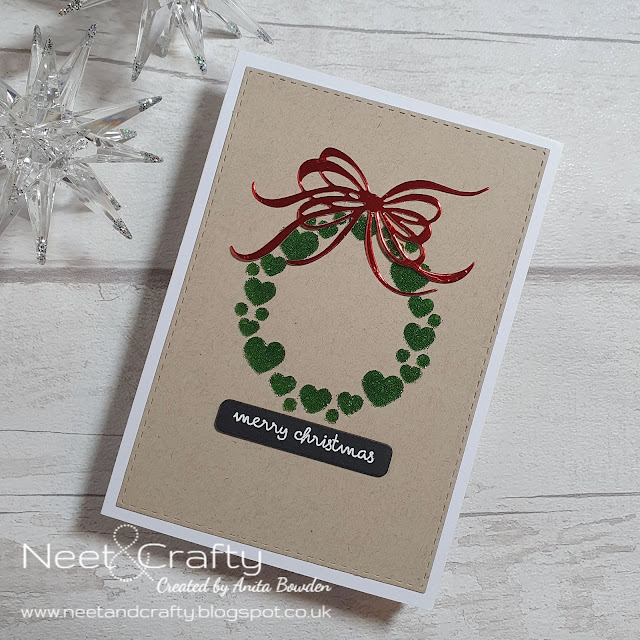
Micro Bead Wreath of Hearts

Good afternoon

I'm back this afternoon to share the last of my 2021 Christmas card makes.  Apologies that the selection was a little limited this year, that will teach me for leaving them even later than I usually do!

This will also be my last post of this year as I'm back to work tomorrow.  As you will have seen in my recent posts, I've also decided to step down from all the challenge blog Design Teams I've been part of for many years.  Hopefully this will give me the opportunity to put my spare time to better use and be able to craft more, without having the other commitments and deadlines that come with being on challenge blog Design Teams.  Hopefully it will be something I could reconsider in the future, it sure was fun.  I still remain a member of the Skull and Cross Buns Design Team and will introduce and showcase Emily's products when she needs me.

Ok, back to my final Christmas card, and this was the one I made for my other half...


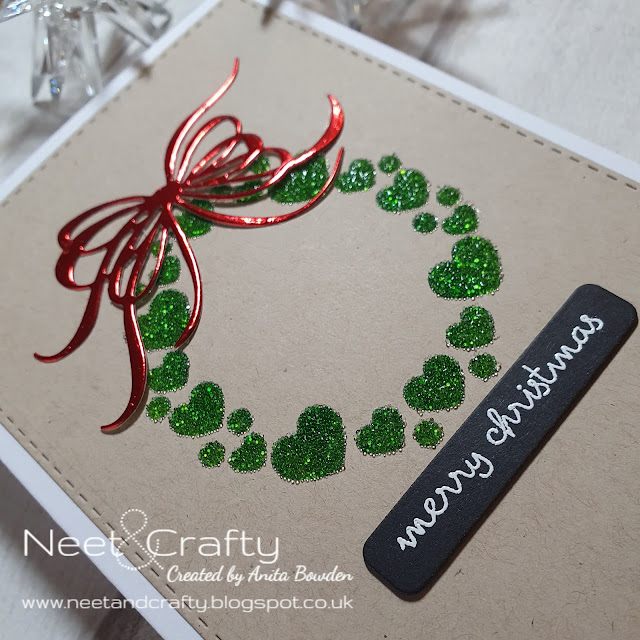
To make it a bit more masculine I began with a die cut panel of kraft cardstock.  I used the same technique as my previous trees card which used micro beads...I inked through the stencil with Distress Ink first and then cleaned the stencil before spreading translucent paste through it over the inked image and then sprinkling on the glass beads.  This was then left to dry completely before adhering the panel to a white card base.  And yes, it's the same sentiment again!  It was on my desk so it got used for pretty much every Christmas card this year!  I heat embossed it on a black die cut strip.  To finish, I die cut a bow from red glossy mirri cardstock and adhered this to the top of the wreath.


Materials used:
  • Dies: Create a Smile - Cool Cuts Double Stitched Rectangles; Altenew - Featured Sentiments Die Set; The Greetery - Fit to be Tied
  • Stencil: Clearly Besotted - Circle Around
  • Stamp: Clearly Besotted - Simple Script
  • Ink: Distress Ink - Rustic Wilderness, Pine Needles; VersaMark
  • Embossing Paste: Sweet Poppy - Stencil Dimensions:Translucent
  • Embossing Powder: Brutus Monroe - Alabaster White
  • Cardstock: Neenah - Desert Storm; red mirri card from stash
  • Accents: Sweet Poppy - Clear Glass Micro Beads

Challenge entries:

AAA Cards - Game #205 - Christmas
Happy Little Stampers - December Christmas Challenge - Anything Goes
Happy Little Stampers - December Stencil Challenge - Anything Goes
NBUS - Challenge #33 - The Greetery bow die and the wreath stencil are new to my stash
CHNC - Challenge #574 - Anything Goes Christmas
Uniko - Challenge #68 - Celebrate (Reds and Greens)
STAMPlorations - December Stencil Challenge - Anything Goes


I just love the online crafting community and want to say thank you all for your support and encouraging feedback throughout this year.  It's so great to know that I can provide lots of inspiration, and gain some back too!

So, all that's left to say is...

Winter Foliage Bundle

Hi guys

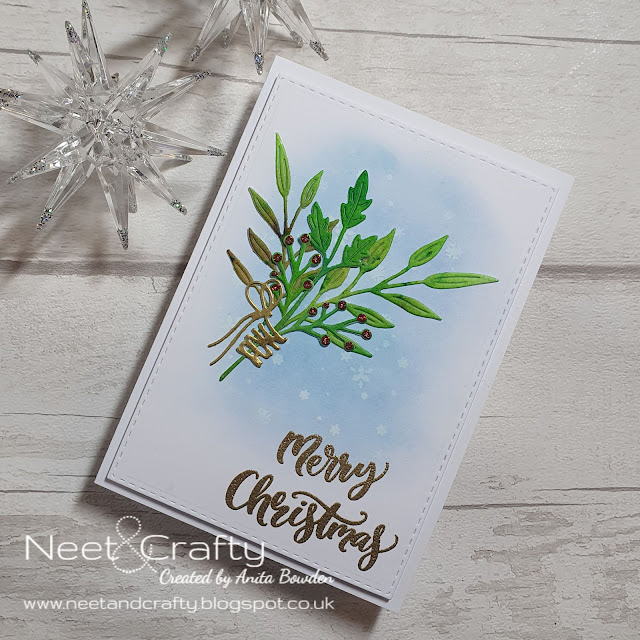
Today I'm sharing another card I made this Christmas, using some new goodies from The Greetery.  I can't take credit for this design as I saw a few examples from The Greetery where they used these products together and that's what encouraged me to buy them.

I'll get straight to the details...


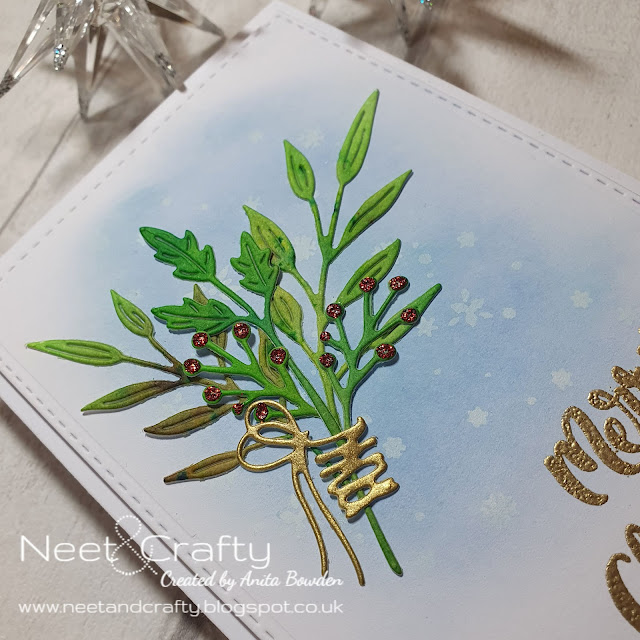
I began by die cutting a panel with a stitched rectangle die.  I lightly ink blended from the centre using Distress Oxide ink and then laid a snowflake stencil over the top and inked through with white pigment ink.  On some watercolour paper I sprinkled various shades of Brusho pigment powder and spritzed with water.  Once dry I die cut all the foliage.  I stamped the sentiment and heat embossed it in gold.  I layered up and adhered all the foliage before die cutting the string tie from gold cardstock and adhering this over the stems.  To finish I added some red Stickles for the berries.


Materials used:
  • Dies: The Greetery - Inside & Out Berry Branch, Fit to be Tied; Create a Smile - Cool Cuts Double Stitched Rectangles
  • Ink: Distress Oxide - Tumbled Glass; Hero Arts - Unicorn; VersaMark; Brusho - Leaf Green, Emerald Green, Dark Brown
  • Stencil: Memory Box - Tiny Snowflakes
  • Stamp: Clearly Besotted - O Christmas Tree 
  • Embossing Powder: Wow! - Metallic Gold Rich
  • Accents: Stickles - Ruby

Challenge entries:

AAA Cards - Game #205 - Christmas
Happy Little Stampers - December Christmas Challenge - Anything Goes
Happy Little Stampers - December Anything Goes with Dies Challenge
NBUS - Challenge #33 - The Greetery dies are new to my stash
CHNC - Challenge #574 - Anything Goes Christmas
STAMPlorations - December Theme and Photo Prompt Challenge (I used the photo prompt)
Uniko - Challenge #68 - Celebrate (Reds and Greens)


I'll be back with another later, thanks for visiting.


Wednesday, 29 December 2021

Christmas Card Multiples - Winter Foliage

Hi there

I'm back with the other Christmas card multiples I made this year.  I made two batches of two very similar designs, 16 cards in total, using the same stamp set and its companion dies, which I purchased very recently.  When I saw that The Greetery stamps were available in the UK from Seven Hills Crafts I just couldn't resist purchasing a few items!

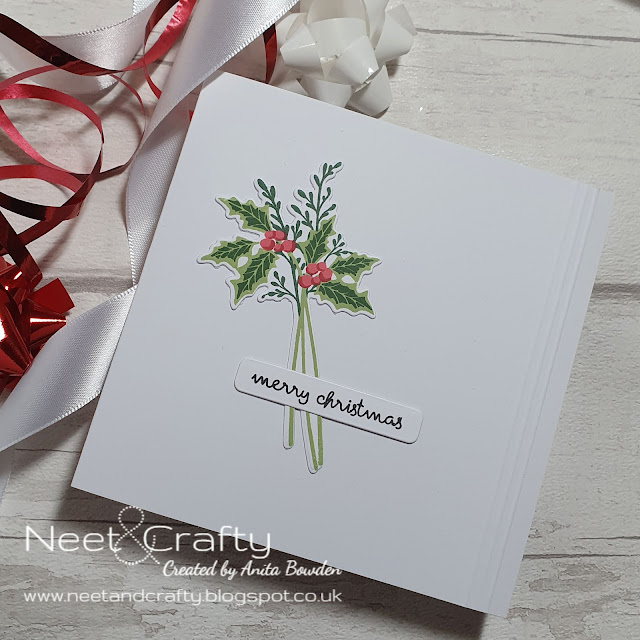
I love winter foliage and berries for Christmas cards so these are the sets I made...


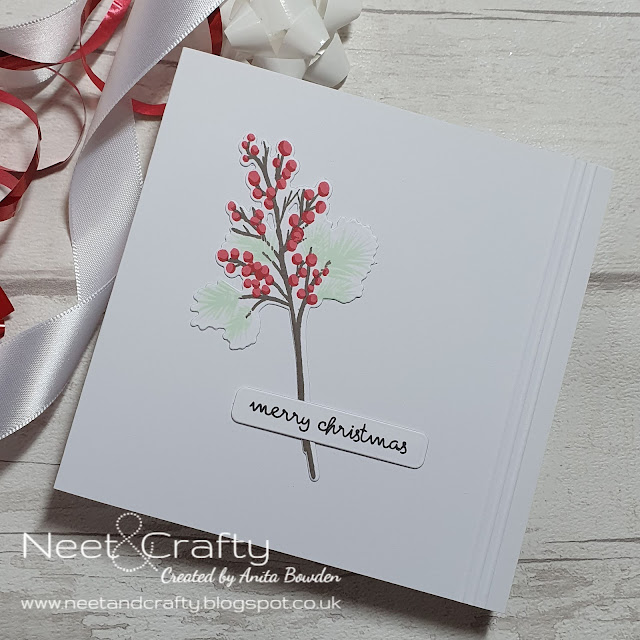
I stamped this design and the design in the second set (scroll down), using the layered stamping images from the set, on multiple pieces of white cardstock, which was made super easy using the MISTI as the images were in the correct place for the next piece.  Once stamped I then die cut the foliage clusters using the companion dies.  I then die cut the sentiment strips and stamped each one with the same sentiment.  Before adhering the die cuts I added three score lines to the edge of each card base.  The foliage die cuts were adhered flat and the sentiment strips I adhered on glue dots, so still slim enough to send easily through the mail.


This was the second design, using different stamps but the same layout...


Materials used:
  • Stamps: The Greetery - Budding Beauties Winter; Clearly Besotted - Simple Script
  • Dies: The Greetery - Budding Beauties Winter; Altenew - Featured Sentiments Die Set
  • Ink: Altenew - Forest Glades, Evergreen, Minty Mint, Lava Rock, Crimson, Velvet; Versafine Clair - Nocturne

Challenge entries:

AAA Cards - Game #205 - Christmas
Happy Little Stampers - December Christmas Challenge - Anything Goes
Happy Little Stampers - December Anything Goes with Dies Challenge
NBUS - Challenge #33 - The Greetery stamps and dies are new to my stash
Sweet Stampin' - Anything Christmas
CHNC - Challenge #574 - Anything Goes Christmas
STAMPlorations - December Theme and Photo Prompt Challenge (I used the photo prompt)
Uniko - Challenge #68 - Celebrate (Reds and Greens)


Thanks as always for visit, your support and feedback are so appreciated.  Just a few more to share so I'll be back soon.


Tuesday, 14 December 2021

Perfectly CAS December 2021 Challenge

Good evening

It's time for the December challenge over at Perfectly CAS.  

Sadly, this will be my last post as a member of the Perfectly CAS Design Team, I have made the difficult decision to step down.  I'm so sad to be leaving as I joined the PCAS family from the very beginning in September 2019, and I love that Kylie founded this challenge, aimed at keeping designs perfectly clean and simple.  As mentioned in my recent LIM and HLS posts, I need to take some time to just create without deadlines and DT commitments.  Thanks so much of course to my wonderful friend Kylie, for inviting me to join this fantastic team, and to my super talented teamies whose CAS creations are just amazing.  I still plan to post regularly so please do stick with me.

Ok, onto the last PCAS challenge of 2021...


I went with the sky option of the challenge cue card and, as I'm so far behind with my Christmas cards this year, I made one to fit this challenge...


I knew exactly which stamp I was going to use, and it was the landscape/sky image from this Card-io set, isn't it fabulous?! I just thought it was so unusual and such a lovely scene backdrop.  So, using my MISTI, I stamped it repeatedly using three shades of pigment ink, to create this gradient effect.  It took quite a few re-stamps and blotting ink off areas of the stamp but it's a great technique if you have a stamping platform.  Before stamping the stag I blended a little ink in the 'snow' where he would be standing, just to create some shadow.  The stag and sentiment were then stamped in black.

Materials used:
  • Stamps: Card-io - Magical Christmas; The Greetery - Budding Beauties Winter (sentiment)
  • Ink: Versa Color - Neptune, Heliotrope, Lilac; Versafine Clair - Nocturne

Challenge entries

CASology - Week 398 - Above
Sweet Stamping - Anything Christmas
We Love Stamping - December Challenge - Anything Stamped with CAS Option
NBUS - Challenge #33 - first use of the background and stag stamps
STAMPlorations - December Challenge - Anything CAS Goes
Dream Valley - Challenge #260 - Christmas


Thanks so much for all your visits and comments, they really are appreciated.  As always, this challenge link will remain open for almost a month, until a few days prior to the next challenge starting.


Saturday, 27 November 2021

Less is More Challenge #457 ... and some news

Good morning

It's Saturday and time for a new challenge over at Less is More.  The Design Team will be taking a short break throughout December so this will be the last challenge of 2021.

...and it is with a heavy heart that after six and a half years (how is it that long?!!!) I have decided to step down from this fabulous challenge Design Team.

After a few weeks as a Guest Designer, I joined the team in May 2015 (Challenge #225!), creating alongside the wonderful Chrissie, Sarah and Anne.  I had the pleasure of meeting these gorgeous ladies at a Craft Retreat a few years ago organised by our amazing Kylie, and later met the lovely Sharon, who has been running the challenge brilliantly in the most recent years.  They are all such great friends and will continue to be beyond Less is More.  And, of course, not forgetting my other LIM teamies past and present, I've learned so much from a fantastic bunch of CAS designers so I'm sending a huge thank you to all of you.

I won't be disappearing, I just feel like I need to have some time without the commitments and deadlines of a Design Team.  I would like to find more time to use my stash and just play!  


Ok, enough of the sadness, here's the info for the new challenge...


Image by monicore from Pixabay


Here's my card, I think you can see how I was inspired by the photo!


I began with a die cut panel of kraft cardstock.  I then grabbed some paper that has been in my stash for many many years, I think it was part of a bigger kit.  The red paper is shimmery and has a kind of jacquard pattern/print on it.  I used a stitched die to add the dash lines and then cut into a couple of strips.  I then used a bow die set and cut this from the same paper.  I die cut some pine needles from white glitter cardstock and a little tag from white card and stamped the sentiment.  It was then just a case of positioning and adhering.  I originally wasn't going to add the tag as the 'ribbon' already displays the sentiment but I think the tag finishes it off nicely.

You can see the design of the paper a lot clearer in this photo...


Materials used:
  • Dies: Create a Smile - Cool Cuts Double Stitched Rectangles; Paper Smooches - Dots and Dashes; Frantic Stamper - Small Solid Bow; Marianne Design Creatables - Petra's Larix Larch; MFT Die-namics - Blueprints 26 (tag)
  • Stamps: The Greetery - Budding Beauties Winter
  • Cardstock from stash

Thank you so much, LIMettes, for all your support and encouraging comments on my designs for Less is More.  Clean and simple is the style I love and I also love how this challenge has taken so many of you out of your comfort zones to try CAS designs.  

So this isn't goodbye, I'm sure I'll be a participant of LIM as I always have been since I began this blog xx


Related Posts Plugin for WordPress, Blogger...