Tuesday 30 June 2020

Skull and Cross Buns - July 2020 - Selection Two

Hi there

This morning I'm sharing a couple more samples using another of the new stencils from Skull and Cross Buns, ahead of their products being featured on Hochanda on the 9am show this Friday, 3 July 2020.

The new stencil in the spotlight here is called Rainbow Half...


I masked off the edges of the card base here before inking up each section of the stencil one by one in rainbow colours.  Lots of masking was required so that each part could be inked separately.  I then created a stitched frame using two rectangle dies and adhered two cloud border die cuts behind it at the top and base, and trimmed away the excess.  I stamped the word 'dream' from the Quirky Sentiments set and then adhered the frame to the card base, the rainbow showing through the aperture.

Materials used:
  • Stencil: Skull and Cross Buns - Rainbow Half
  • Ink: Distress Ink - Tumbled Glass, Shaded Lilac, Spun Sugar, Abandoned Coral, Dried Marigold, Squeezed Lemonade, Cracked Pistachio; Versafine - Onyx Black
  • Stamp: Skull and Cross Buns - Quirky Sentiments
  • Dies: Create a Smile - Double Stitched Rectangles; Lawn Fawn - Puffy Cloud Borders


This following idea suddenly sprung into my mind when holding the stencil at a different angle...


Straight away I saw that the WiFi logo could be created from the first few small sections of this stencil.  So not a greetings card, but something you could display in your home, either on a surface or in a frame to provide your guests with your Wifi ID and passcode.  So I inked through just the first three sections of the stencil blended two shades of Distress Oxide ink, and instead of adding the usual dot at the base, I stamped a heart from the Crafting is my Super Power set.  The 'you got this' sentiment is from Quirky Sentiments and the boxes at the bottom are from the Planner Banners set.  A die cut frame finished this project.

Materials used:
  • Stencil: Skull and Cross Buns - Rainbow Half
  • Stamps: Skull and Cross Buns - Quirky Sentiments, Crafting is my Super Power, Planner Banners
  • Ink: Distress Oxide - Cracked Pistachio, Peacock Feathers; Versafine - Onyx Black; Altenew - Lagoon
  • Dies: Create a Smile - Double Stitched Rectangles

Challenge entries:

Make My Monday - Challenge #125 - Use Stencils
STAMPlorations - June Stencil Challenge - Anything Goes


These are the new stencils being launched exclusively on Hochanda on Friday...


I'll be back with more to share tomorrow :)

(AD - some products kindly gifted for design team purposes)

Monday 29 June 2020

Skull and Cross Buns - July 2020 - Selection One

Hi guys

The fantastic Skull and Cross Buns are back with some new products which will be showcased on Hochanda on Friday 3 July 2020, at 9am (channel details can be found at the base of this post).

There are four new stencils being featured, as well as some existing popular items.

Over the next few days I'll be sharing some of my samples made using these products, ahead of the show on Friday morning.


First up is the new Twisted Ray stencil...


I've inked through this stencil twice, first with the lilac shade, then shifted it before blending the bolder blue and purple.  The dots were stamped using a stamp from the Planner Banners set, and the panel was then matted and adhered to the card base before adding one of the embellishments from the Tropical Party Embellish! Set 1.  


Materials used:
  • Stencil: Skull and Cross Buns - Twisted Ray
  • Stamp: Skull and Cross Buns - Planner Banners
  • Ink: Distress Oxide - Shaded Lilac, Blueprint Sketch, Wilted Violet; Altenew - Rubellite
  • Accents: Skull and Cross Buns - Tropical Party Embellish! Set 1


I've used the stencil again here, paired with the Crafting Is My Super Power stamp set...


I blended through the stencil with sunny shades of ink then, with the stencil still in place, I stamped through each section with the various images from the stamp set.  The inked sections either side needed to be masked as I worked my way around.  I stamped and heat embossed the sentiment in white on a vellum strip which I layered on a black strip.  A black enamel star was added in the centre to finish the card.

Materials used:
  • Stencil: Skull and Cross Buns - Twisted Ray
  • Stamps: Skull and Cross Buns - Crafting Is My Super Power
  • Ink: Distress Ink - Squeezed Lemonade, Carved Pumpkin, Abandoned Coral; Versafine - Onyx Black; VersaMark
  • Embossing Powder: Altenew - Pure White
  • Die: MFT Die-namics - Fishtail Flag Stax
  • Accent: Doodlebug - Graduation Assortment (star)

Challenge entries:

Make My Monday - Challenge #125 - Use Stencils
STAMPlorations - June 2020 Stencil Challenge - Anything Goes
Just Us Girls - Challenge #542 - Photo Inspiration


The four new stencils being featured on the show are shown below...


Thanks so much for stopping by, I'll be back tomorrow to share more samples using SACB products.

(AD - some products kindly gifted for design team purposes)

Saturday 20 June 2020

Less is More Challenge #422

Hi guys

A new challenge at Less is More is just beginning and for the next fortnight we have a Recipe challenge and we want to see...


Continuing as our generous sponsor we have Uniko who are offering the prize for one lucky winner


For my sample card I've used some stamps by our sponsor...


I began with a panel of white cardstock and masked off two random curves leaving a section free in the centre.  I then stamped the solid flowers in yellow, lilac and blue inks before overstamping them with their co-ordinating outline stamp, purposely offsetting the placement slightly to create a quirky design.  To define the edges of the masked area, once the ink was dry I lightly blended with green ink.  I die cut the panel with a stitched rectangle die then stamped the sentiment in black before mounting the panel on fun foam.

Materials used:
  • Stamps: Uniko - Flower Power #7, Happy Days
  • Ink: Altenew - Mango Smoothie, Lavender Fields, Caribbean Sky; Distress Ink - Cracked Pistachio; Versafine - Onyx Black; Memento - Tuxedo Black
  • Die: Create a Smile - Cool Cuts Double Stitched Rectangles


Challenge entries:

Alphabet Challenge - F is for Flora or Fauna
Addicted to Stamps and More - Challenge #394 - Clean and Simple


Thanks so much for looking, I appreciate every one of your visits.  And don't forget to check out the main Less is More challenge blog for more inspiration by my teamies too.  I hope you can play along.

Wednesday 17 June 2020

My Craft Space - June 2020 Update

Good morning

I'm just popping by this morning to let you know that I've updated my 'My Craft Space' page.

You can find the update by clicking, here, or on the tab above.

I originally shared my 'new' craft space three years ago and although my limited space doesn't allow much to change, I've added a few things and moved things around to work better for me.  I've also spent the last few weeks going through my whole stash and tidying it up.  I need to go through all my stamps and purge some but for the moment they are all in order where they should be.


Thanks for looking and have a great day, whatever you're doing.  I'm now off to work but remaining in the same chair at home!

Sunday 14 June 2020

Perfectly CAS - June 2020 Challenge

Hi there

It's time for the June challenge at Perfectly CAS, I'll get straight to it with the cue word for this month...


There are lots of directions you can go in for the word 'sparkle'.  I chose diamonds as my theme which led me to making an engagement card.  I also added some sparkly elements to my design...


Although a really simple card, this one did take a little time to ensure the placement was right.  The letters were die cut from rose gold low shed glitter cardstock and I began by drawing a pencil line towards the bottom of my card base before adding the letters.  I adhered the letters slightly above the guideline to allow room to erase it afterwards.  I adhered all the letters apart from the 'C', stamped and heat embossed the ring in silver, then adhered the 'C'.  To finish I coloured in the ring with a silver pen, coloured the diamond using a very pale blue/grey ProMarker and added some final bling with a sparkle pen.


Materials used:
  • Dies: Lil' Inker Designs - Mixed and Stitched Alphabet
  • Stamps: Lawn Fawn - Happy Wedding
  • Ink: VersaMark
  • Embossing Powder: Wow! - Metallic Silver
  • Accents: Signo Uniball pigment pen - Silver; ProMarker - Dove Grey; Spectrum Noir sparkle pen - Clear

Thanks so much for visiting.  If you pop over to the main challenge blog you will find lots of inspiration from my fellow teamies, and also there is a note from Kylie.  After this June challenge there will be a six month break.  Kylie runs many challenges as has been doing so for eight years so understandably, she is taking a well deserved break!  We will be back so please do keep a look out for more information at the end of the year.

Saturday 13 June 2020

My Swatch Folder

Hi there

Just a quick post about how I make and store swatches of products in my stash.

I use the method shared by Jennifer McGuire many years ago, you can find her video here.

Basically, this involves using individually stamped swatches which are then stored in coin pockets.  I purchased some coin pockets from Amazon, these are A4 ones which fit into any ring binder.

Jennifer has a download link for her templates but I struggled to get them to line up properly when printing, possibly due to the difference in size between US Letter size and UK A4 size.  So I set up my own template in MS Word, using a table with the right measurements then just removed the grid lines.  I just over-type this whenever I make new swatches.  Then it's just a case of printing and trimming.

I have a circular solid stamp set aside that I use for all my swatches.


And as you can see above, I also made swatches for my embossing powders.

I initially created this swatch folder a couple of years ago and have bought more inks since then so that's another task for me to do very soon.

I highly recommend creating one of these, it's a great way to see the true colours of what you have rather than relying on the ink pad packaging.  I originally had some swatches which were little punched cards kept on a metal ring but found that much more fiddly.  It's so much better to see the colours laid out and easier just to flip through the pages.

I hope this helps!

How I Store My Dies

Hi there

Since I've been on the subject of craft organisation and storage in my recent posts, I thought I'd just add a quick post about how I store my dies.

I love how some crafters use magnetic boards on their craft room walls to store their dies but I have a very compact craft space and it's also in the main hallway of my very small flat so I need to keep it looking tidy.  So my die storage is nothing fancy but it works for me.

I use two Papermania Stamp and Die Storage Folders which I purchase from The Range, here.


These are supplied with ten pockets, each with a magnetic sheet.  You can also buy the pockets separately should you need more.  

I take all of my dies out of their original packaging and place them in here, with a label detailing the brand and name.  My dies are not in any particular order at the moment, I just tend to use one folder for frames/outlines/background type dies, and the other for everything else, flowers/butterflies/alphabets, etc.


I used to keep these folders in a drawer but it wasn't the best use of space and when full they are quite heavy to keep lifting from a drawer, so they now live in the top section of my trolley, alongside my desk.

Any dies that co-ordinate with stamps I store with their companion stamp set in my main craft cupboard.

I appreciate your visit, thank you :)

Stencil Storage Update

Hi guys

A little update for you today about how I store my stencils.

I shared a detailed post in 2018 about my stencil storage which you can find, here.

To be honest, not much has changed.  My stash of stencils has grown considerably in the last two years so I have transferred them from a ring binder to a lever arch file.  Stencils are very inexpensive and there are so many great techniques you can do with them, so it's a great way to add to your stash if you're on a tight budget.

I use A4 photo sleeves with pockets which I purchase from Amazon.  The most common 6" x 6" stencils as well as the larger A5 stencils will fit into the photo sleeves with two pockets.  Since my last update I have also now purchased more photo sleeves which have four pockets which are ideal for the smaller ones and also for slim/tall stencils.

By placing some paper behind the stencils this also allows me to store them back to back.  I previously just used white copier paper but have recently bought some inexpensive coloured paper from eBay which makes the stencils a lot easier to see.  

The only other change is that I have typed up my labels.  I don't love my handwriting and typing these up didn't take long at all.  I just used MS Word and printed onto Avery L4732 label sheets.  There are 80 labels per sheet so, as you can imagine, I've had this pack of labels for years!  

And this is the cute file I keep them in.  I bought a few different folders from this range some years ago (Bramble Wood from WH Smith, a stationery/book store here in the UK) but I think they may now be discontinued.  But any ring binder or lever arch file will work fine for these pockets.


Thanks for visiting and I hope this will give you some ideas.  I thought this lockdown would mean lots of crafting for me but instead I've been sorting through everything, and I'm loving being this organised!

Friday 12 June 2020

Storing Those Scraps!


Hi there

I think anyone that is a crafter will agree that no matter how hard we try, we end up with countless off-cuts and scraps left from our projects.  

I am certainly guilty of nearly always reaching for a fresh piece of cardstock from my organised stash instead of using up the perfectly good smaller pieces, and the mountain of these leftovers was starting to grow.

So I gathered together the box and carrier bag that these were living in and spent a couple of hours sorting through them and organising them into some logical and easy to grab storage.

I had some A5 plastic zip wallets which I had picked up previously from a couple of stores as I thought they would prove to be useful at some point, and they were perfect for this.  Any off-cuts which were larger than A5 I placed back in my main cardstock storage.


I had four of these reinforced plastic zip wallets which I picked up some time ago at The Range (I can't see them on the website but they were in store in the office stationery section).

So I used these four wallets for: Blues, Greens, Purples/Lilacs and Reds/Pinks

And so that each can be identified easily from my cupboard I tied co-ordinating pieces of ribbon to the tabs already on these...


I also had some different plastic wallets, with plastic slide-type zips, which I had previously bought from WH Smith (a stationery/book store here in the UK).  These aren't as sturdy and probably not as hardwearing so I used these for the colours of which I have fewer scraps.

So in these I am storing: Yellow/Oranges, Metallic/Glitter, Black/Neutrals, Vellum/Acetate


These don't have ribbon tabs so I punched holes in the side and tied the identifying ribbons to those...


I had tonnes of white and cream cardstock scraps so these are now altogether in a larger A4 zip wallet...


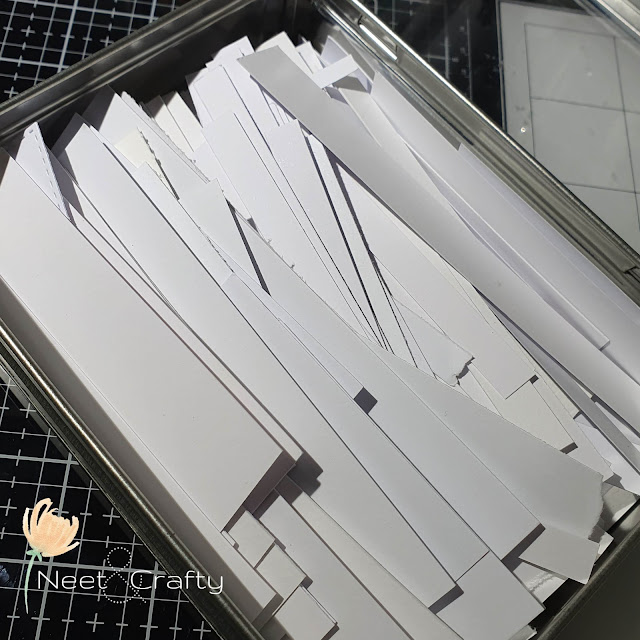
I also had countless strips of white trimmings so these now live in a spare tin so whenever I need a sentiment strip I don't need to even go to my white scraps wallet, I'll just use these....and it appears these could last a lifetime!


I feel so much better for sorting all these out, it's a job that needed doing for a couple of years, and I hope you find this useful.

Saturday 6 June 2020

Less is More Challenge #421

Good morning, everyone

It's Saturday morning so that means there's a fresh challenge just starting over at Less is More.  This time it's the turn of our Theme challenge and here is the cue card...


And we also have a generous sponsor back with us for the month of June, which is the fantastic Uniko so just by playing along in our challenges puts you in the running for our monthly prize.


I used products from Uniko on my sample card...


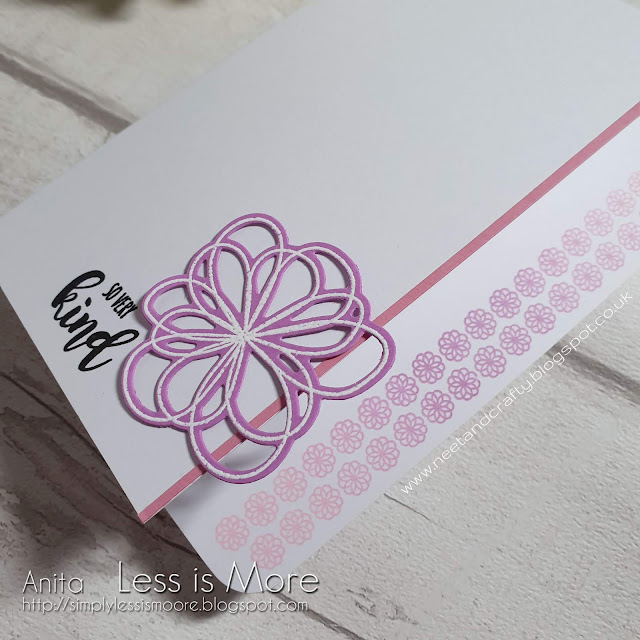
I did something I've not done for ages for this card, I trimmed away the front panel and used the outside edge of the inside to stamp my border.  I used my MISTI to stamp this multiple times with three shades of pink pigment ink to create an ombre effect.  Next I added a thin strip of pink cardstock to highlight the border of front panel.  I stamped, heat embossed in white and die cut the flower from co-ordinating cardstock and stamped the sentiment in black.  And to finish, I did something else I've not done for ages, I rounded the corners of the back panel for a little interest.


Materials used:

  • Stamps: Uniko - Background Builders: Flower Power, Kindness Blooms
  • Die: Uniko - Kindness Blooms
  • Ink: Versa Color - Petal Pink, Lilac, Amethyst; VersaMark; Versafine - Onyx Black
  • Embossing Powder: Altenew - Pure White
  • Corner Rounder Punch by Tonic
  • Cardstock from stash

Challenge entries:

Time Out - Challenge #163 - Proust Quote
Just Add Ink - Challenge #508 - Just add "F" (flowers)


As always, the challenge will run for two weeks, and if you need more inspiration please do pop over to the main challenge blog, where you can also follow the links to my teamies' personal blogs as they may be sharing more projects there too.

Thanks as always for visiting x

Tuesday 2 June 2020

Happy Little Stampers June 2020 CAS Challenge

Hi there

The CAS Challenge at Happy Little Stampers is just starting. 

I'll get straight to it with the cue card...


I chose a really simple one layer design for this one...


This was so easy to create.  I masked off around one of the balloon shapes in the stencil and repeatedly ink blended it, adding light and shade while trying to retain the transparency of real balloons.  Then just finished with a simple black sentiment.  Perfect for lots of occasions.

Materials used:

  • Stencil: MFT - Big Balloons
  • Ink: Distress Ink - Twisted Citron, Worn Lipstick, Wilted Violet, Salty Ocean; Versafine - Onyx Black
  • Sentiment: Lili of the Valley - It's Time to Party

Challenge entries:

STAMPlorations - June Stencil Challenge - Anything Goes
My Time To Craft - Challenge #433 - Use a Stencil
Time Out - Challenge #162 - Free


If you pop over to the main challenge blog you'll see a note from Kylie, our 'boss' at Happy Little Stampers.  She works so hard behind the scenes running lots of different challenge blogs and has decided to take a well-earned break for six months.  So the break will start after the June challenges finish, at the end of the month.
Related Posts Plugin for WordPress, Blogger...