Showing posts with label Versa Color. Show all posts

Sunday, 18 February 2024

Uniko 12th Birthday New Release, Brand Ambassador Blog Hop and Giveaway

Good morning!

It's release day over at Uniko and I'm here to reveal the whole release and share another card.

Here's the final card I made and I decided to use the new Background Blocks MOD Builder and sentiments from the new Mid Century Modern Everyday Sentiments set...


I began by stamping the MOD builder off the edge of the card in a pale ink and coloured it it with a Copic marker.  I kept my stamp in my MISTI so I could re-stamp in the teal colour afterwards, as the ink I used isn't Copic friendly.  Next I stamped a flower using elements from the Mid Century Modern Florals set in co-ordinating colours.  I stamped two of the greetings from the Mid Century Modern Everyday Sentiments set in bold black and then finished the card by adding some dot sprinkles to the corner image and the flower.


Materials used:
  • Stamps: Uniko - Background Blocks MOD Builder, Mid Century Modern Everyday Sentiments, Mid Century Modern Florals
  • Ink: Copic Marker - BG23; Versa Color - Lagoon Blue; Altenew - Volcano Lake; Versafine Clair - Nocturne
  • Accents: Little Things from Lucy's Cards - Sprinkles: Little Dots


So, now to reveal the new products in full.

An addition to the Ink & Flip stencil series...Ink & Flip Geometric Heart Layering set...


a new addition to the Mid Century Modern series...Mid Century Modern Birthday...


and more sentiments to co-ordinate...Mid Century Modern Everyday Sentiments...


and finally...Background Blocks MOD Builder


I think this is a great little release from Bev to celebrate Uniko's 12th Birthday!  Be sure to leave some comment love either on the Brand Ambassador blogs or social media.  You can find all the links over at the Uniko blog, here.  There are a few giveaways this month and you can find out all the information over at the main Uniko blog.  The Giveaways are open until the end of February and the new products, above, are available to purchase now.

Thanks for visiting today.


Friday, 8 December 2023

Uniko December 2023 Reveal, Release, Brand Ambassador Blog Hop and Giveaway!

Good morning!

It's release day over at Uniko and I'm here to reveal the whole release and share another card.

Here's the final card I made and I decided to use the new Background Blocks Perspective stamp to make a festive design...


I stamped the image, first in a pale blue ink on blue cardstock.  I then coloured with Copics before restamping in VersaMark and heat embossing in white.  I then stamped and heat embossed two of the small snowflakes from the Snowflake Serenade stamp set into some of the squares.  The panel was then die cut with a stitched rectangle die.  I adhered the panel to a card base and then carried on filling in the remaining squares with some snowflake, star and dot embellishments, and I added some details with a white gel pen.  I stamped the sentiment, from the Pattern Building Christmas Tree set, in blue ink, trimmed it down and adhered it to the centre on 3D foam.


Materials used:
  • Stamps: Uniko - Background Blocks Perspective, Snowflake Serenade, Pattern Building Christmas Tree
  • Ink: VersaMark; Versa Color - Sky Blue; coloured with Copics
  • Embossing Powder: Brutus Monroe - Alabaster
  • Die: Create a Smile - Cool Cuts Double Stitched Rectangles
  • Accents: various from stash


So, now to reveal the new products in full.

Two new Background Blocks stamps, first up is Background Blocks Layered Stripes...


and Background Blocks Perspective...


and last but not least, Bev's super creative Ink & Flip Snowflake stencil...


So, just a mini release but I'm sure you'll agree these are great little additions to the Uniko library.

Be sure to leave some comment love either on the Brand Ambassador blogs or social media.  You can find all the links over at the Uniko blog, here.  

You have until midnight Friday 15 December 2023 to comment for a chance to win a £20 eGift Certificate.  Good luck!

Thanks for visiting today.


Tuesday, 5 December 2023

Uniko December 2023 Release - Introducing...Background Blocks Layered Stripes

Good morning

I'm here today to introduce the first product from the latest release coming up from Uniko.

It's a new addition to the Background Blocks series and a lovely bold and versatile design, Background Blocks Layered Stripes.

Here's my first card...


On a panel of white cardstock I stamped and heat embossed the stripes in clear.  I then used the emboss resist technique to ink blend the background before trimming down the panel.  I chose to pair this with a flower created using elements from the Mid Century Modern Florals set stamped in just black and grey to contrast with the background.  I fussy cut the flower and adhered on 3D foam.  I then used a sentiment from the Simply Said Blocks set, which I stamped on a scrap of cardstock that was trimmed from the background piece.

Materials used:

  • Stamps: Uniko - Background Blocks Layered Stripes, Mid Century Modern Florals, Simply Said Blocks
  • Ink: VersaMark; Distress Oxide - Picked Raspberry, Blueprint Sketch, Squeezed Lemonade; Versafine Clair - Nocturne, Morning Mist
  • Embossing Powder: Wow! - Clear Gloss


And for my second card I combined the background stamp with elements from the Mid Century Modern Baubles set...


I used a circle die to cut a mask and put this in position before stamping the layered stripes background in red.  I stamped and heat embossed the sentiment from Mid Century Modern Baubles, as well as the bow which was stamped separately and fussy cut.  I used an embossing pen to create the string and also heat embossed this in gold.  The bow was popped up on 3D foam and I finished the card by adding some dotted shading to the bauble using a gold gel pen. 


Materials used:
  • Stamps: Uniko - Background Blocks Layered Stripes, Mid Century Modern Baubles
  • Ink: Versa Color - Cardinal; VersaMark
  • Embossing Powder: Wow! - Metallic Gold Rich
  • Accents: Uniball - Signo gold pen


For more projects by the talented Bev and my fellow Brand Ambassadors, please do pop over to the main Uniko blog, here, to see this new stamp in action.

The new products will be available to purchase from the Uniko website from Friday 8 December.

I'll be back with more inspiration using another of the new products tomorrow.


Wednesday, 29 November 2023

Uniko Brand Ambassador Inspiration - Rustic Christmas

Good morning!

I'm sharing two cards over at the Uniko blog today, here, and I decided to dig out an "oldie but goodie" stamp set for these, Rustic Christmas.  I just love the perfect little tree in this set so have kept these cards clean and simple so it takes centre stage.

You can find all the information regarding the steps taken to make these cards over on my Uniko post.

First up, I've tried to create a northern lights sky as my backdrop...


Materials used:
  • Stamps: Uniko - Rustic Christmas
  • Ink: Distress Ink - Twisted Citron, Mowed Lawn, Picked Raspberry, Black Soot, Chipped Sapphire; Versafine Clair - Nocturne; VersaMark
  • Embossing Powder: Brutus Monroe - Alabaster
  • Accents: Sakura - White Gelly Roll 10


My second project is another one layer card, again, super simple...


Materials used:

  • Stamps: Uniko - Rustic Christmas
  • Ink: Versa Color - Magenta, Violet, Turquoise, Evergreen; Versafine Clair - Nocturne
  • Embossing Powder: Wow! - Clear Gloss
  • Accent: Doodlebug - Sprinkles: Graduation Assortment


I hope this gives you some inspiration and encourages you to have a rummage through your stash to see what older stamp sets you have that could be inked up.  Thanks for taking the time to visit and I wish you a lovely Wednesday.


Tuesday, 1 August 2023

Uniko July/August 2023 Release - Introducing...Mid Century Modern Wreath Builder

Good morning

I'm here today to introduce the first product from the latest release coming up from Uniko.

It's a new addition to the Mid Century Modern series and a great Christmas builder set...Mid Century Modern Wreath Builder.

Here's my first card...


I began with the elements that I wanted to appear in the foreground, the bow and holly, and I stamped these in pigment ink and heat embossed with clear embossing powder.  These would then resist anything else stamped over the top.  This saved having to stamp and fussy cut them.  So I stamped the two parts of the bow in red and pink, and then the holly.  Once embossed I then stamped the two background parts of the main wreath.  I then stamped the sentiment, also from this set, in black ink before die cutting the panel and mounting onto a green card base.


Materials used:
  • Stamps: Uniko - Mid Century Modern Wreath Builder
  • Ink: Versa Color - Cardinal, Petal Pink, Evergreen, Green Tea; Altenew - Evergreen; Versafine Clair - Nocturne
  • Embossing Powder: Wow! - Clear Gloss
  • Die: Create a Smile - Cool Cuts Double Stitched Rectangles


And for my second card I used the holly elements from the set to create a background...


I tried to keep the colours of the design in a classic Mid Century Modern colour palette, hence why the berries are orange not red.  I'm not sure if that translated but I kinda like it :D  The busy background isn't my style at all but I love it and it was worth the effort making it all fit!  The sentiments are also from this set.

Materials used:
  • Stamps: Uniko: Mid Century Modern Wreath Builder
  • Ink: Altenew - Moss, Olive, Autumn Blaze, Firebrick, Lagoon, Desert Night
  • Die: Create a Smile - Cool Cuts Double Stitched Rectangles


And my final card using this set is a super simple one...


Just straightforward stamping on this one.  All one layer and then to finish I used my score board to create double score lines around the edge, avoiding the stamped images.

Materials used:
  • Stamps: Uniko - Mid Century Modern Wreath Builder
  • Ink: Altenew - Aqualicious, Orange Cream, Autumn Blaze, Lagoon, Desert Night; Versafine Clair - Nocturne


For more projects by the talented Bev and my fellow Brand Ambassadors, please do pop over to the main Uniko blog, here, to see this new stamp set in action.

The new products will be available to purchase from the Uniko website from 6 August at 9.00am BST.

I'll be back with more inspiration using another of the new products tomorrow.


Tuesday, 14 December 2021

Perfectly CAS December 2021 Challenge

Good evening

It's time for the December challenge over at Perfectly CAS.  

Sadly, this will be my last post as a member of the Perfectly CAS Design Team, I have made the difficult decision to step down.  I'm so sad to be leaving as I joined the PCAS family from the very beginning in September 2019, and I love that Kylie founded this challenge, aimed at keeping designs perfectly clean and simple.  As mentioned in my recent LIM and HLS posts, I need to take some time to just create without deadlines and DT commitments.  Thanks so much of course to my wonderful friend Kylie, for inviting me to join this fantastic team, and to my super talented teamies whose CAS creations are just amazing.  I still plan to post regularly so please do stick with me.

Ok, onto the last PCAS challenge of 2021...


I went with the sky option of the challenge cue card and, as I'm so far behind with my Christmas cards this year, I made one to fit this challenge...


I knew exactly which stamp I was going to use, and it was the landscape/sky image from this Card-io set, isn't it fabulous?! I just thought it was so unusual and such a lovely scene backdrop.  So, using my MISTI, I stamped it repeatedly using three shades of pigment ink, to create this gradient effect.  It took quite a few re-stamps and blotting ink off areas of the stamp but it's a great technique if you have a stamping platform.  Before stamping the stag I blended a little ink in the 'snow' where he would be standing, just to create some shadow.  The stag and sentiment were then stamped in black.

Materials used:
  • Stamps: Card-io - Magical Christmas; The Greetery - Budding Beauties Winter (sentiment)
  • Ink: Versa Color - Neptune, Heliotrope, Lilac; Versafine Clair - Nocturne

Challenge entries

CASology - Week 398 - Above
Sweet Stamping - Anything Christmas
We Love Stamping - December Challenge - Anything Stamped with CAS Option
NBUS - Challenge #33 - first use of the background and stag stamps
STAMPlorations - December Challenge - Anything CAS Goes
Dream Valley - Challenge #260 - Christmas


Thanks so much for all your visits and comments, they really are appreciated.  As always, this challenge link will remain open for almost a month, until a few days prior to the next challenge starting.


Saturday, 13 November 2021

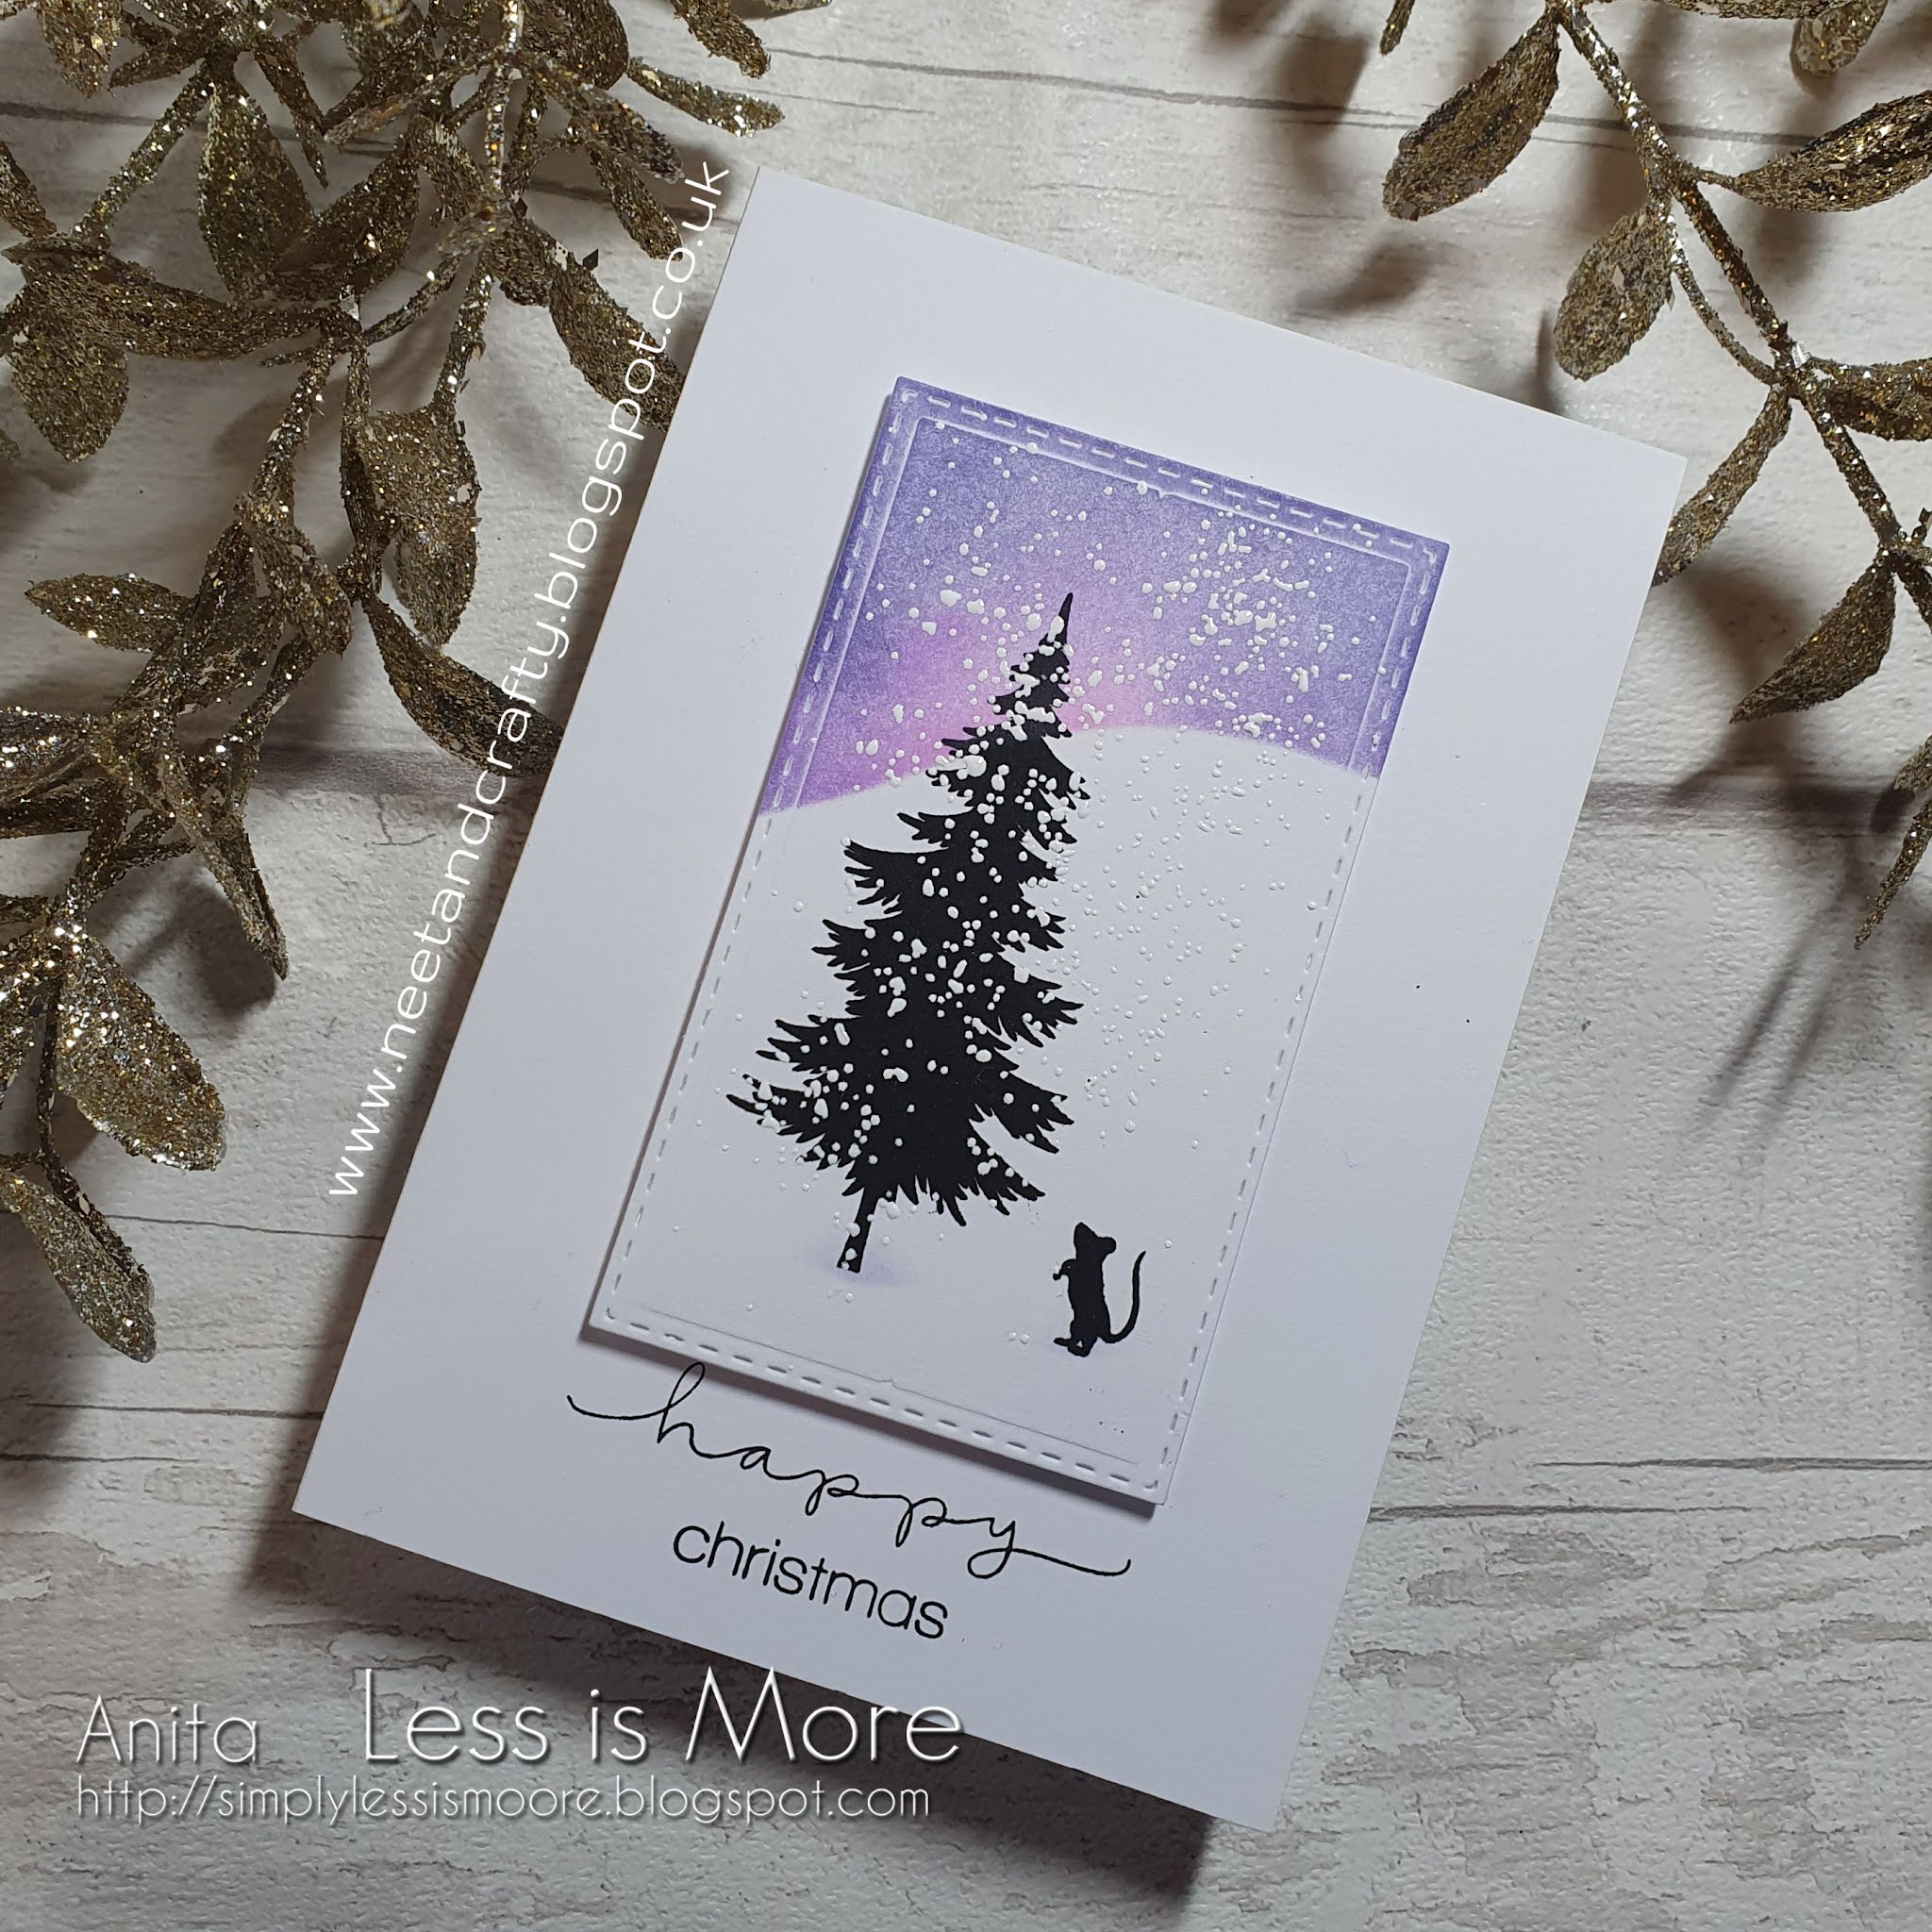
Less is More Challenge #456

Good morning

Welcome to Saturday and a new challenge over at Less is More.  Today it's a Theme challenge, here's the cue card...


We have our September winner joining us as a Guest Designer today, the super talented and wonderful CAS card creater, Asa.  Please do pop over to her blog to take a look at her card and to say hi.


As always at this time of year I'm behind with making my Christmas cards so if the theme fits, that's what I'm making! :)


I began with a die cut stitched rectangle and then ink blended the skyline.  I figured out where the tree and mouse would be stamped and added a little ink blending to ground them.  These were then both stamped in black.  Next I sprinkled over some embossing enamel to create some snow, heating from the underside so the heat gun didn't blow it out of position.  I then adhered the panel onto the card base using fun foam before stamping the sentiment below.


Materials used:
  • Die: Create a Smile - Cool Cuts Double Stitched Rectangles
  • Ink: Versa Color - Neptune, Heliotrope, Lilac; Versafine Clair - Nocturne
  • Stamps: Card-io - Magical Christmas (mouse); Woodware - Three Trees; Simon Says Stamp - Happy
  • Accents: Stampendous Deep Impression Embossing Enamel - Chunky White

Challenge entries:

Stamping Sensations - November Challenge - Christmas
We Love Stamping - November Challenge - Christmas
Happy Little Stampers - November Christmas Challenge - Anything Goes: Make a Scene


There's lots of inspiration from my teamies over at the Less is More challenge blog, and as always the challenge link is open for two weeks.  Hope to see your cards in the gallery.


Sunday, 14 February 2021

Perfectly CAS February 2021 Challenge

Hi there

I'm here tonight to announce the February challenge at Perfectly CAS, the challenge where the aim is to keep your design to one third or less of your project space.  Here is your cue card for this challenge...


There are lots of different ways to interpret the word splash but I went down the traditional route and chose water...


I was originally going to use a stamp set with dolphins with this splash stencil but the proportions were all wrong, the dolphin was far too small for a splash this size!  So I chose a mermaid tail instead. This wasn't the easiest to create as both are stencils.  On a die cut panel I began by stencilling the mermaid tail, which is part of a stencil of a whole mermaid, in two shades of Distress Ink.  To stencil the splash I then had to make a mask of the masked tail before inking up the splash so it would appear behind the tail.  Once inked up the tail looked a bit lost so I replaced the stencil and inked over the coloured ink blending with a light layer of silver pigment ink which lifted it a little more.  I stamped the sentiment and popped the panel up on fun foam but it still needed something else, so I used a white pigment ink pen to add some detailing to the water.  I attempted to add some detail to the tail with a silver pen but the silver ink meant it had nothing to grip to, so I only managed to add a few details, as you can see below.  Not the finish I had hoped for but it does add a little something more.


Materials used:
  • Stencils: Funky Fossil - Mermaids; Clearly Besotted - Splash It
  • Stamp: Clearly Besotted - Make a Splash
  • Ink: Distress Ink - Peacock Feathers, Dusty Concord, Salty Ocean, Chipped Sapphire; Versa Color - Silver; Versafine- Onyx Black
  • Die: Create a Smile - Cool Cuts Double Stitched Rectangles
  • Accents: Signo Uniball pen - white, silver

Challenge entries:

Happy Little Stampers - February Stencil Challenge - Anything Goes
NBUS - Challenge #23 - First time using the splash stencil
Uniko - Challenge #63 - Anything Goes - Option: use a stencil(s)


This challenge will end a few days before the March challenge starts so there's almost a month to take part, so what are you waiting for?


Wednesday, 23 December 2020

Christmas Card Multiples - Scenic Papers

Hi there

More of this year's Christmas cards and in this post I'm sharing some that I made using more patterned papers from my stash.  All of these were scenic papers which I've acquired free with publications over the last couple of years.  So glad I put them to use, my papers all too often get forgotten.

So I cut them down and added an accent here and there to make some slim cards.

Here are the first two...


I simply trimmed these down to leave a border at the top and bottom of the card bases, then cut some skinny strips of no-shred silver glitter card which were adhered in place to frame the top and bottom of the scenes.  Then to finish these I just stamped the sentiments in a co-ordinating shade.


Materials used:
  • Patterned papers and glitter cardstock from stash
  • Stamp: Altenew - Bells & Boughs (free with Simply Cards and Papercraft)
  • Ink: Versa Color - Mountain Lake; Versafine - Onyx Black


I made the following six cards from two sheets featuring three of the same design...


The panels were trimmed down and matted onto charcoal cardstock before adhering to the card bases.  I simply added to the scene by stamping the sleigh image and then made sentiment strips with white heat embossed sentiments.


Materials used:
  • Patterned paper and cardstock from stash
  • Stamps: Clearly Besotted - Sing It's Christmas; Card-io - Christmas Scenery 2
  • Ink: Altenew - Pure Graphite; VersaMark
  • Embossing Powder: Brutus Monroe - Alabaster White


And finally, I had this lovely winter design which I trimmed down the centre to make two tall, slim cards...


These were simply trimmed down, matted and layered onto red cardstock then the card bases.  Then the heat embossed sentiments were die cut with a stitched rectangle die and these were adhered flat to finish off the cards.


Materials used:
  • Patterned paper and cardstock from stash
  • Die: MFT Die-namics - Stitched Rectangle Stax
  • Stamp: Clearly Besotted - Mini Messages
  • Ink: VersaMark
  • Embossing Powder: Brutus Monroe - Alabaster White

These were super simple to create with only a little crafting involved but I love how they turned out.  I still have lots of papers so I'll certainly be revisiting them more often now.

I'll be back again soon with a few more projects.


Related Posts Plugin for WordPress, Blogger...