Showing posts with label Zig Clean Color Real Brush Markers. Show all posts

Saturday, 7 October 2023

Uniko October New Release, Brand Ambassador Blog Hop and Giveaway

Good morning!

It's new release day over at Uniko and if you follow the Uniko blog you'll have seen the introductions from Bev throughout this week.

The release will be available to purchase from the Uniko website from this evening at 9pm BST.

There are some great new stamps in this release.  First up is the latest addition to the Framed series: Framed - Snowflakes
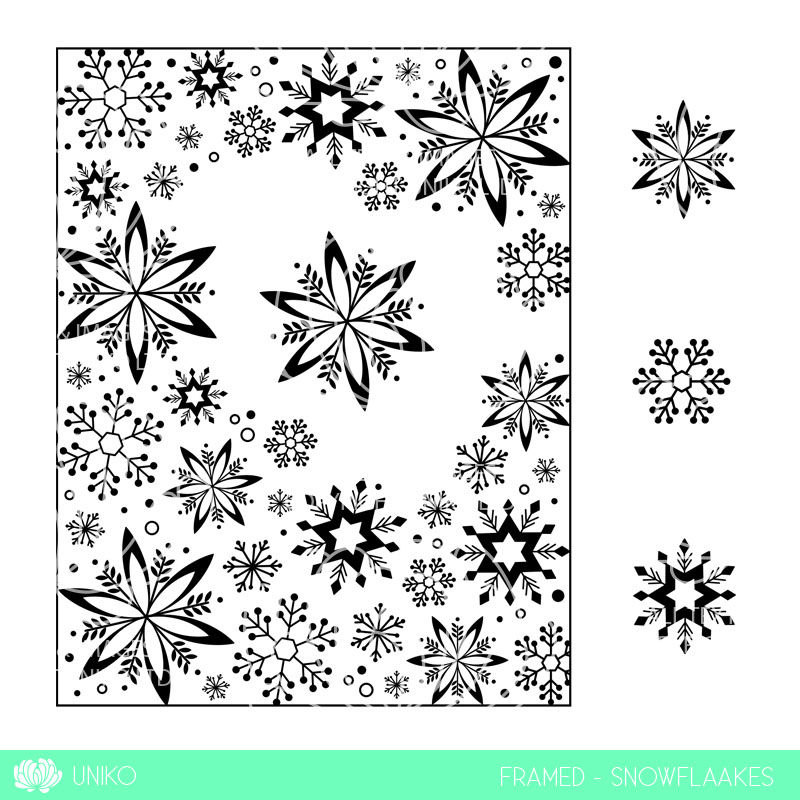

Here's the card I made using this set...


Here I used a panel of watercolour paper and heat embossed in white the main frame and a couple of the separate snowflakes.  I used the wet on wet technique, adding water within the confines of the frame and then adding colour from a variety of pink, blue and purple Zig markers.  Once dry I trimmed the panel down and adhered it to a card base.  The sentiment, from the oldie but goodie Stunning Snowflakes set was heat embossed on vellum and wrapped around a strip of pink cardstock.


Materials used:
  • Stamps: Uniko - Framed Snowflakes, Stunning Snowflakes
  • Ink: VersaMark; Zig Clean Color Real Brush Markers
  • Embossing Powder: Wow! - Opaque Bright White


Next up is a beautiful new stamp set called Autumn Serenade, a new addition to the "Serenade" series...


Here's my make using this one...


I began by stamping the main swirl image and heat embossing in gold.  I then masked off a vertical section and ink blended with four shades of Distress Oxide.  The stamped sentiment finished this one.

I just love the shine of the gold with the chalky finish of the oxides. Just remember to give the embossed parts a quick buff with a soft cloth to bring the shine back after inking.


Materials used:
  • Stamps: Uniko - Autumn Serenade
  • Ink: VersaMark; Distress Oxide - Lumberjack Plaid, Vintage Photo, Carved Pumpkin, Pine Needles; Versafine Clair - Fallen Leaves
  • Embossing Powder: Wow! - Metallic Gold Rich


Bev has now added poppies to her floral collection.  Introducing, Remembrance...

And here's my card...


I stamped the image on some watercolour paper and then, after not using them for ages, decided to add colour with my Brushos.  I carefully sprinkled a teeny amount of the red and spritzed with a water mister.  I then did the same with two shades of green.  Once the panel was completely dry I die cut with a scalloped rectangle and stamped the sentiment before adhering to a card base.


Materials used:
  • Stamps: Uniko - Remembrance
  • Ink: Versafine - Onyx Black; Brushos - Brilliant Red, Emerald Green, Leaf Green
  • Die: Create a Smile - Cool Cuts Scalloped Rectangles

There is also a new addition to the BIG & BOLD series, with BIG & BOLD Thank/s/ful.  Such a useful set and this can also be paired with BIG & BOLD You.

The set also features a two step leaf in both solid and outline form along with a variety of accent sentiments.  The leaf design also co-ordinates with those in the Autumn Serenade set.


Unfortunately, I don't have a sample card to share for this set yet.


Bev will be selecting one lucky winner to win the entire release.  All you need to do is leave some comments over at the main Uniko blog post, here, as well as comments on the Brand Ambassadors' blog posts (linked within that post) and/or social media.  You have until midnight on Saturday 14th October 2023 BST, good luck!

I think you'll agree that Bev has smashed it once again with these new products.

Happy Saturday, I hope you enjoy taking a look at all the inspiration from the team.


Thursday, 2 December 2021

Happy Little Stampers December 2021 CAS Challenge

Hi guys

The December challenges at Happy Little Stampers are now rolling out and today it's the turn of the CAS challenge.

Before I get to the challenge details, I have some news.  Sadly, after almost six and a half years, I've made the difficult decision to step down from the Design Team.  Special thanks go to Kylie for being an absolute diamond, a wonderful friend and a brilliant boss lady.  I don't know how you've put up with me for so long!  I've had the pleasure of attending two of her amazing HLS Craft Retreats here in the UK and, if it wasn't for her, I wouldn't have had the opportunity of finally meeting some of my friends from the crafting community.  And of course, thank you to my fellow teamies from the HLS family and participants over the years, you've all been so amazing and supportive.  I've had a blast but I need to step away from Design Team commitments and deadlines for a while, to just give me some time to enjoy my hobby and use my stash without any restrictions.

Ok, let's see what the December challenge is asking for, here's the cue card...


While rummaging through my stash I found a stamp set from Clearly Besotted called Christmas Characters, perfect for this one...


I stamped the little elf in black ink and then coloured him using a blend of Zig markers and water.  I used Strathmore Bristol cardstock for this as it takes water really well.  I then die cut the image with a pierced square die, and another slightly larger cut from red cardstock.  These were layered up onto the card base and I finished with a sentiment, from another Clearly Besotted set.

Materials used:
  • Stamps: Clearly Besotted - Christmas Characters, Little Elves (sentiment)
  • Dies: MFT Die-namics - Pierced Square Stax
  • Ink: Versafine - Onyx Black; Versafine Clair - Nocturne
  • Coloured with Zig Clean Color Real Brush Markers
  • Cardstock: Strathmore Bristol Smooth (for image); other cardstock from stash

Thanks so much for looking, I'm grateful for every visitor.  All the Happy Little Stampers challenges (some still to start) will remain open for entries until the end of the month, so plenty of time to play along.


Saturday, 7 November 2020

Case Me a Christmas Card with Michelle Lupton

Hi there

I'm so pleased once again to have been invited by the fabulous Michelle Lupton to join her annual Christmas card challenge.  This year there is a spin on her previous Challenge Me a Christmas Card series.....this time it being Case Me a Christmas Card. 


So this time we are both making a Christmas card inspired by any of our previous creations, not just Christmas designs.  And my goodness, what an amazing array of cards I had to choose from!

Here is my card, followed by Michelle's gorgeous design which inspired me...


I stamped the snowflake background with VersaMark ink and then heat embossed in white.  Then, using the wet on wet technique, I painted half of the panel using a selection of Zig markers in shades of blue mixed with water.  I trimmed the panel down and adhered to a card base, flipping Michelle's design with the colour at the top.  I then also used a two font, two colour sentiment strip and finished the design with some sequin accents.


Materials used:
  • Stamps: Wow! - Blizzard; Clearly Besotted - Brushed Sentiments
  • Ink: VersaMark; Versafine - Onyx Black; Versa Color - Turquoise
  • Embossing Powder: Wow! - Opaque Bright White
  • Coloured with Zig Clean Color Real Brush Markers
  • Accents: Little Things from Lucy's Cards - True Blue mix

And this is Michelle's beautiful make which you can view, here...


And you can follow this link, here, to see which of my cards Michelle has chosen to CASE...I'm intrigued to see it myself as I have no idea!

Thanks so much Michelle for inviting me to join you again this year, always such fun to play along.


Thursday, 21 May 2020

Honey Doo Crafts - May 2020 Release - Floral Arch and Around the Table

Hi there

In this post I'm sharing my final two sample cards using the new stamps from Honey Doo Crafts.

All the new products will be launched on Create & Craft TV tomorrow, 22 May 2020, the shows being at 11.15am and 3.45pm.  And they are also already available to purchase over at the Honey Doo Crafts store, here.


First up is a card I've made using the new Floral Arch stamp set...


The Bride and Groom image I shared yesterday is designed to fit within this arch but I chose to use the arch on its own here.  I stamped the image onto some clear vellum and heat embossed it in white before fussy cutting it out.  I then coloured in the wooden arch and voile swag on the reverse using Zig markers.  For my beach scene die cut panel I firstly blended the sand, the sea, and then the clouds with Distress Inks, using a stencil for the clouds (even through I covered most of them up!).  I then added the additional details to create the sand - a metallic and a black/white embossing powder, which I sprinkled on and then heat from the underside so it didn't get blown away by the heat gun.  And for the breaking waves I used embossing enamel, again heat from the reserve side.  A closer view of the 'sand' can be seen in the next photo...


To finish, I stamped the sentiment from the same set, adhered the panel on fun foam, and then adhered the arch using clear glue dots.

Materials used:

  • Stamps: Honey Doo Crafts - Floral Arch
  • Die: Create a Smile - Cool Cuts Double Stitched Rectangles
  • Ink: VersaMark; Distress Ink - Tea Dye, Salty Ocean, Tumbed Glass
  • Stencil: MFT - Mini Cloud Edges
  • Embossing Powder: Wow! - Aztec Glintz, Salt & Pepper; Stampendous - Deep Impressions Embossing Enamel
  • Vellum from Stash
  • Coloured with Zig Clean Color Real Brush Markers


And my second card uses a new set called Around the Table...


I began with a gentle blend of Distress Inks on my card base and then stamped the table and chairs image and coloured with ProMarkers.  I created a frame using a stitched rectangular die and adhered this flat to the card.  I used the Honey Doo Palm Leaves die and trimmed a section out to lay over one corner.  I finished with an embossed sentiment from the same set and popped this up on 3D foam.

Materials used:

  • Stamps: Honey Doo Crafts - Around the Table
  • Ink: Distress Ink - Tumbled Glass, Pumice Stone; Memento - Tuxedo Black; VersaMark
  • Dies: Create a Smile - Cool Cuts Double Stitched Rectangles; Honey Doo Crafts - Palm Leaves
  • Embossing Powder: Altenew - Pure White
  • Coloured with ProMarkers


There is one extra new stamp set for which, unfortunately, I didn't find time to make a sample.  It's called Beach Hut and you can find it here.


Thanks so much for visiting and for taking a look at my sample cards.  I'll be back again on Saturday morning to introduce the next challenge over at Less is More.

(AD - some products kindly gifted for design team purposes)

Wednesday, 16 October 2019

Honey Doo Crafts - October 2019 Release - Selection One

Hi guys

I've been busy behind the scenes recently making sample cards for the latest release at Honey Doo Crafts.  I'll be sharing lots of samples over the next week, ahead of their next showcase shows on Hochanda TV next Thursday, 24 October 2019.

The new release includes more fabulous florals that Honey Doo Crafts do so well, some autumnal themes, Christmas sets, sentiments and also some great new stencils.


Ok, first up is a card I made using new sets, Stars and Stripes and Pumpkin Corner...


I loved the design of the flowers in the Stars and Stripes set the minute I saw it and because the flower has only four petals I knew it would work well for a repeated background.  With a bit of measuring and a ruler and a pencil I set down some guidelines and then repeatedly stamped the same flower.  Once the stamping was complete I erased the pencil lines and coloured the images with ProMarkers.  To finish, I simply heat embossed the sentiment from the Pumpkin Corner set in white on a strip of vellum, wrapped this around the panel and adhered the panel to the card base.


Materials used:

  • Stamps: Honey Doo Crafts - Stars and Stripes, Pumpkin Corner
  • Ink: Memento - Tuxedo Black; VersaMark
  • Embossing Powder: Wow! - Opaque Bright White
  • Coloured with ProMarkers
  • Vellum from stash

Challenge entries:

Always Fun Challenges - Challenge #132 - Monochrome
Sweet Stampin' - Autumn Colours/Harvest


For my next card I've used the Stars and Stripes flowers again but to create a completely different look, and the sentiment from the Retirement set...


I stamped and heat embossed the different sized flowers from the Stars and Stripes set onto vellum, coloured them on the reverse using Zig markers and then fussy cut them out.  On the card base I masked two edges and ink blended with some green ink just to ground the design.  I then layered up the flowers, arranged and adhered them to the base and popped in behind a few die cuts from the previously released Feathered Flourishes die set, also cut from vellum.  To complete the card, I used a fancy rectangular die cut, inked up the edges to match the ink blending on the base and stamped the sentiment from the Retirement set.  This was then popped up on 3D foam.


Materials used:

  • Stamps: Honey Doo Crafts - Stars and Stripes, Retirement
  • Ink: Distress Oxide - Cracked Pistachio; VersaMark; Versafine - Onyx Black
  • Embossing Powder: Wow! - Opaque Bright White
  • Coloured with Zig Clean Color Real Brush Markers
  • Vellum from stash
  • Dies: Honey Doo Crafts - Feathered Flourishes; Spellbinders Nestabilities - Reverse Wonky Rectangles


Next up I used just the leaves from the Stars and Stripes set together with the Autumn Changes sentiment...


On a strip of vellum I stamped and heat embossed the leaves from the Stars and Stripes set in white.  I die cut a panel using a stitched rectangle die, masked a vertical section slightly wider than the vellum strip and ink blended this in autumnal colours before wrapping the vellum around and securing on the reverse.  I then stamped the sentiment called Autumn Changes using my MISTI, repeatedly stamping in varying colours of pigment ink to co-ordinate with the inked section.  The panel was then popped up on fun foam.

Materials used:

  • Stamps: Honey Doo Crafts - Stars and Stripes, Autumn Changes
  • Ink: VersaMark; Distress Ink - Spiced Marmalade, Peeled Paint, Frayed Burlap; Versa Color - Bamboo, Umber, Topaz
  • Embossing Powder: Wow! - Opaque Bright White
  • Die: Create a Smile - Cool Cuts Double Stitched Rectangles
  • Vellum from stash

Challenge entry:

Stamping Sensations - October Challenge - Trees/Leaves/Autumn


Next up is another autumnal themed card using new Autumn Colours and Pumpkin Corner...


I stamped the main image from Autumn Colours onto a white die cut cardstock panel and again on a scrap of cardstock, this one then heat embossed in copper.  I ink blended over the embossed image with Distress Inks before die cutting with a circle die.  The circle was then lined up over the main image and popped up on 3D foam.  The panel was matted onto a brown piece of cardstock and onto the base, and the card was finished with a heat embossed sentiment from the Pumpkin Corner set, and again die cut with a circle die.

Materials used:
  • Stamps: Honey Doo Crafts - Autumn Colours and Pumpkin Corner
  • Ink: Versa Color - Bark; VersaMark; Distress Ink - Peeled Paint, Carved Pumpkin, Frayed Burlap
  • Embossing Powder: Wow! - Metallic Copper
  • Dies: Create a Smile - Cool Cuts Double Stitched Rectangles; Hero Arts - Infinity Circle Dies


My final card for this first post used the new Palm Leaves stencil and the Autumn Changes sentiment...


I used the ghosting technique for my background here.  I die cut a cardstock panel then ink blended with Distress Inks before laying the Palm Leaves stencil over the top, spritzing with water and then blotting away the colour.  This panel was popped up on fun foam then the Autumn Changes sentiment was stamped and heat embossed in gold on some brown cardstock die cut with a fishtail die.

Materials used:
  • Stamp: Honey Doo Crafts - Autumn Changes
  • Stencil: Honey Doo Crafts - Palm Leaves
  • Ink: Distress Ink - Fired Brick, Brushed Corduroy, Forest Moss, Crushed Olive; VersaMark
  • Embossing Powder: Wow! - Metallic Gold Rich
  • Dies: Create a Smile - Cool Cuts Double Stitched Rectangles; MFT Die-namics - Fishtail Flag Stax


I hope you're loving these new products.  There's lots more that I'll be sharing over the next few days, I went a bit crazy and made lots of samples this time!

The shows will air on Hochanda TV here in the UK on Thursday 24 October 2019 at 12pm and 4pm. (Sky 673 / Freeview 85)


Thanks so much for stopping by.


(AD - some products kindly gifted for design team purposes)

Sunday, 7 July 2019

Designing for Honey Doo Crafts - Introducing Big Bold Blooms and Chrysanthemum


Hi there

I'm thrilled to be designing again for Honey Doo Crafts.

Amanda will be showcasing many of the brand's existing products on Hochanda this coming Friday, 12 July 2019 (Sky 673 / Freeview 85) at 10am and 3pm. 

As well as lots of the fabulous existing stamps and dies, Amanda will also be introducing two new large stamp sets: Big Bold Blooms and Chrysanthemum.  If you can't wait until Friday, these can be purchased direct from Honey Doo Crafts right now.

Here are my sample cards using these two new sets.  First up is Big Bold Blooms...


I began by stamping the three different sized flower images onto some clear vellum and heat embossed in white.  I then coloured these on the reverse using Zig markers, blending with a darker shade towards the centre to create some depth, and fussy cut them out.  The leaves were stamped and heat embossed in white onto some pale green vellum, and also fussy cut...


I stamped the sentiment on a white cardstock panel and ran this through my Big Shot with a wave effect embossing folder before adhering to the card base on fun foam.  I used the handle of a paint brush to curl the petals of the flowers before gluing the layers together.  Then finished by adhering to the panel and slotting in the leaves using glue dots.


Materials used:

  • Stamps: Honey Doo Crafts - Big Bold Blooms, Birthday Sentiments
  • Ink: VersaMark; Versafine - Onyx Black; Zig Clean Color Real Brush Markers
  • Embossing Powder: Altenew - Pure White
  • Embossing Folder: We R Memory Keepers - Next Level: Wave
  • Vellum from stash

Challenge entries:

Penny Black and More - July Challenge - Summer Colours
Stamping Sensations - July Challenge - Earth Laughs in Flowers
Creative Moments - Challenge #172 - Anything Goes
Time Out - Challenge #139 - Inspired by Words
STAMPlorations - Summer Theme and Sketch Challenge - Stamps and Anything Goes


Next up is another card using Big Bold Blooms...


I began by diagonally masking a section of the card base.  I then stamped the leaves in grey ink, masked these and then ink blended out from the masked edge with Distress Ink.  I then roughly coloured the leaves with ProMarkers.  Next I stamped the three flowers and coloured these with ProMarkers before fussy cutting, adding some shimmer and layering up.  The card was completed by adding the sentiment stamped in blue.


Materials used:

  • Stamps: Honey Doo Crafts - Big Bold Blooms, Happy Times
  • Ink: Memento - London Fog; Distress Ink - Dried Marigold; Versa Color - Neptune
  • Coloured with ProMarkers
  • Accent: Spectrum Noir Sparkle Pen - Clear


And now my sample card using the stunning new Chrysanthemum set...


On a white cardstock panel I stamped the largest of the flowers and then masked it before stamping the two smaller blooms.  All three flowers were then coloured with ProMarkers.  I then cut away part of the panel on the right hand side and fussy cut around the petals.  The panel was then adhered on 3D foam onto the card base over a strip of black textured cardstock.  I added a heat embossed sentiment on a black strip and finished by adding some dotted details to the flower centres with a white pen.

Materials used:

  • Stamps: Honey Doo Crafts - Chrysanthemum, Just in Case
  • Ink: Memento - Tuxedo Black; VersaMark
  • Embossing Powder: Wow! - Opaque Bright White
  • Accents: Signo Uniball Pen - White

Challenge entries:

Inkspirational - Challenge #190 - 3 or 5 of something


If you can't wait until Friday to see the two new sets, you can find them by clicking the logo below...


Thanks so much for stopping by.  I'll be sharing more samples over the next few days using existing stamp sets from Honey Doo ahead of the Hochanda shows on Friday.  I would love for you to pop back and take a look.


Enjoy your Sunday :)

Tuesday, 2 April 2019

Guest Designer for Honey Doo Crafts - Selection Three

Hi guys

Tonight I'm sharing the last few of my makes for my Guest Designer spot with Honey Doo Crafts. 

The new sets will be showcased on TV shopping channel, Hochanda tomorrow, 3 April 2019 at 12pm and 4pm BST so please do tune in if you can (Sky 673 / Freeview 85).


So, my cards today have used three more of the new sets I've yet to share.

First up is a shaker card I made using a lovely set called Peony Crest...


To begin I blended a little pale pink ink on the card base and stamped the sentiment.  I then created the offset oval shaker window using a oval stitched die, backed with acetate, and edged the panel with a stitched rectangle die.  The panel was popped up on 3D foam strips, trapping the confetti shaker bits inside.  I then stamped, coloured and fussy cut the main peony crest image and adhered to the panel.


Materials used:

  • Stamps: Honey Doo Crafts - Peony Crest
  • Ink: Distress Ink - Spun Sugar; Memento - Tuxedo Black
  • Dies: Create a Smile - Cool Cuts Double Stitched Rectangles; Lil Inkers - Stitched Ovals
  • Coloured with ProMarkers
  • Shaker Contents: Nuvo Pure Sheen Confetti - Diamond Harlequin; Little Things from Lucy's Cards - Itty Bitty Stars (Neon Bright)


For this next card I used the small images from a new set called Garden Peony to create a background pattern...


I stamped and coloured the panel the same size as the card base.  I then used a border die to cut away an inner section (I can use the cut away part on another card).  The remaining two parts of the panel were popped up on fun foam and the sentiment stamped between, directly onto the card base.  Simples!

Materials used:

  • Stamps: Honey Doo Crafts - Garden Peony, Peony Crest (sentiment)
  • Ink: Memento - Tuxedo Black
  • Coloured with ProMarkers
  • Die: Avery Elle - Dotted Border Dies


And a nice sunny card to complete my selection, using a set called Hello Sunshine...


I masked the card base and blended ink through a sun ray stencil for the central background.  I then created a frame using two rectangle dies and stamped the sentiment along the top before popping up on foam strips.  I then stamped the sunflowers onto watercolour paper and watercoloured with my Zig markers.  The image was then fussy cut out, adhered over the base, using foam pads to pop up the parts within the frame, and then the edges were trimmed to align with the card base.

Materials used:

  • Stamps: Honey Doo Crafts - Hello Sunshine
  • Ink: Distress Ink - Squeezed Lemonade, Spiced Marmalade; Versafine - Onyx Black; Zig Clean Color Real Brush Markers
  • Stencil: MFT - Sun Ray
  • Dies: Create a Smile - Cool Cuts Double Stitched Rectangles

Challenge entry:

Allsorts - Challenge #513 - Use Yellow


Thanks so much for all your lovely visits and comments, I appreciate each and every one of you.  And I hope you love these new stamps and enjoy the show tomorrow if you are able to watch it, unfortunately I'll be at work during both shows so I'll be catching up afterwards.

Sunday, 17 February 2019

Adorable Elephant Valentine

Hi guys

Today I'm sharing a Valentine's Day card I was commissioned to make.

Super cute and simple...


I stamped the elephant and balloon and then watercoloured using my Zig markers.  This was originally stamped on my card base but I made an accidental splodge on the edge of it so cut it down with a stitched rectangle die.  The sentiment was computer generated as these are the exact words that were wanted, and I die cut this down with a smaller die from the same set.

About a year ago I picked up some cardstock which is embossed with vertical lines, so I used this for the card base and absolutely love it.  I can't believe I've not used it until now!  It's fairly smooth on the reverse side but I still added a paper insert inside the card for a better finish.


Materials used:

  • Stamps: MFT - Adorable Elephants
  • Ink: Versafine - Onyx Black; Zig Clean Color Real Brush Markers
  • Dies: Create a Smile - Cool Cuts Double Stitched Rectangles
  • Embossed cardstock from stash (unknown brand)

Challenge entries:

Just Add Ink - Challenge #444 - Colour Challenge (my red zig marker faded to pink when adding water, plus grey)
Crafty Cardmakers - Challenge #227 - Love, Love, Love
Always Fun Challenges - Challenge #97 - Love/Valentines
STAMPlorations - February Theme and Sketch Challenge - Stamps and Hearts
Creative with Stamps - Challenge #35 - Love


Thanks for stopping by, I hope you've had a lovely weekend.
Related Posts Plugin for WordPress, Blogger...