Showing posts with label Doodlebug. Show all posts

Friday, 8 August 2025

Uniko August 2025 Release - Introducing...Background Blocks Swiss Dots

Good morning

More from Uniko this morning and it's the introduction of a stamp which I think will be super useful in any crafter's stash - Background Blocks Swiss Dots.

I have two cards for you today, one using the stamp as a background and another using it as the main focal point.

Here's the first and I've used it with the floral image from Pure Florals Cosmos and a greeting from Organic Blooms...


I began by stamping the Cosmos on a white cardstock panel and colouring with Copics.  I then masked the image before stamping the background dots in a gradient of three shades of aqua/teal.  I then stamped the greeting in black ink before matting and layering onto some co-ordinating lilac cardstock, flat to the card base.

Materials used:

  • Stamps: Uniko - Background Blocks Swiss Dots, Pure Florals Cosmos, Organic Blooms
  • Ink: Memento - Tuxedo Black; Altenew - Dew Drops, Aqualicious, Teal Cave; Versafine Clair - Nocturne
  • Coloured with Copics
  • Cardstock from stash


For my second card I made the dots the focus and added a sentiment from the Simply Said Blocks II set...


On a die cut panel I started by stamping and heat embossing the dots in white.  I then masked around the rectangle and ink blended with three shades of Distress Oxides, the dots resisting the ink.  I then wiped over the design with a soft cloth to remove any excess ink on the dots.  The panel was adhered flat to the card base and I then stamped and cut out the sentiment and finished with some co-ordinating enamel dots.

Materials used:
  • Stamps: Uniko - Background Blocks Swiss Dots; Simply Said Blocks II
  • Ink: VersaMark; Distress Oxide - Kitsch Flamingo, Tumbled Glass, Cracked Pistachio; Versafine Clair - Nocturne
  • Embossing Powder: Brutus Monroe - Alabaster
  • Die: Create a Smile - Cool Cuts Double Stitched Rectangles
  • Accents: Doodlebug Sprinkles - Limeade, Blue Jean and Bubblegum Assortments


To see more projects using this versatile stamp, pop on over to the Uniko blog, here.  I'll be back tomorrow to introduce the final two products included in this release.

All the new products will be available from this coming Sunday, 10 August 2025 at 9am BST.

I hope you're enjoying these showcases and would love you to pop back tomorrow.


Sunday, 29 June 2025

Uniko Flippin' Fabulous Ink & Flip Masculine Inspiration Brand Ambassador Blog Hop & Giveaway

Hi there

Yes, I'm still here!  So sorry for the silence, it's been a busy couple of months so I've not managed to find time for any crafting but I'm back today to join in the finale of the masculine themed month with Uniko.

Today the team are showcasing the Ink & Flip stencils and giving them a masculine touch.

And, by visiting each of the Brand Ambassadors along the hop, starting at the Uniko blog, here, as well as commenting on our socials, you're in with a chance of winning an Ink & Flip stencil of your choice.  

I have two stencilled cards to share today, one using an Ink & Flip stencil and another using another stencil from Uniko.


Ok, here's my first where I've chosen the Ink & Flip Christmas Star as it offers a fantastic central focal point for any card...


I inked up both sides of the stencil, first in Pumpkin Pie ink and then with Dusk ink, which created the star and a darker green shade where the the colours overlap.  Next I stamped the sentiment from the Mid Century Modern Birthday stamp set in a darker blue, and then finished with the Background Blocks Linear image stamped in each corner in black.

Materials used:
  • Stencil: Uniko - Ink & Flip Christmas Star
  • Stamps: Uniko - Mid Century Modern Birthday; Background Blocks Linear
  • Ink: Altenew - Pumpkin Pie, Dusk, Desert Night; Versafine Clair - Nocturne


And for my second masculine make I've used the Mid Century Modern Circles & Stars stencil...


This love using the shifted stencil technique with this stencil, it creates the illusion of so much dimension on a flat panel.  So I began with a dark orange panel of cardstock and inked through the stencil in a dark blue ink.  I then shifted the stencil slightly downwards and to the right and then inked through again with a white pigment ink.  This created the lighter blue and makes the original inking look like shadows.  I die cut the panel and adhered it flat to my card base then found an unused die cut circle in my stash so stamped the sentiment from the Mid Century Modern Everyday Sentiments set in black. The card was finished with some co-ordinating enamel dots.

Materials used:
  • Stencil - Uniko - Mid Century Modern Circles & Stars
  • Stamps: Uniko - Mid Century Modern Everyday Sentiments
  • Ink: Altenew - Dusk; Hero Arts - Unicorn; Versafine Clair - Nocturne
  • Die: Create a Smile - Cool Cuts Double Stitched Rectangles; circle from stash
  • Accents: Doodlebug Sprinkles - Tangerine and Blue Jeans Assortments


Thanks for visiting today and good luck if you comment along the hop.  

I appreciate you looking and plan to be back again very soon :)


Wednesday, 23 April 2025

Uniko April 2025 Release - Introducing...Stencil Layering Flower Fusion

Hi there

It's the second day of the new product introductions from Uniko.

Today, the team are showcasing a new set of layering stencils...Layering Flower Fusion.

I love this set.  You can use all the separate stencils to build a background pattern or just select parts of it to create unique designs.

Here's my first card using the set and for this one I used all four stencils, and a sentiment from the new Butterfly Serenade set that was introduced yesterday...


This was super simple to create, I just used each of the stencils in turn to create the background design.  And I kept it a one layer card by stamping the sentiment in black over the background at the end.

Last year I treated myself to the Color Cubes by Sarah Renae Clark and this was the first time I put them to use to determine my colour palette.  I've have used them a few more times for cards I made for this release and will be sharing them in my upcoming posts.


Materials used:
  • Stencils: Uniko - Layering Flower Fusion
  • Stamp: Uniko - Butterfly Serenade
  • Ink: Altenew - Evergreen, Warm Sunshine, Polar Bear, Misty Morning; Memento - Cottage Ivy; Versafine Clair - Nocturne
  • Accents: Doodlebug Sprinkles - Bumble Bee Assortment


And for my second card I selected various images from the stencils to create a CAS design, using a sentiment from Simply Said Blocks...


I inked three of the flowers in two shades of Distress Oxide and then just one of the leaf sprigs, also with two shades of ink.  I also added the flower centres using the tiny dots in the stencil.  I die cut a stitched panel and stamped a sentiment against the edge, before adhering the panel flat to my card base.

Materials used:
  • Stencils: Uniko - Layering Flower Fusion
  • Stamp: Uniko - Simply Said Blocks
  • Ink: Distress Oxide - Festive Berries, Saltwater Taffy, Dried Marigold, Peacock Feathers, Salvaged Patina; Versafine Clair - Nocturne
  • Die: Create a Smile - Cool Cuts Double Stitched Rectangles


My fellow Brand Ambassadors have made some beautiful cards using this set, you can see more at the Uniko blog, here.  I'll have more to share tomorrow so please do pop back if you are able.

All the new products will be available from next Sunday 27 April 2025.


Sunday, 5 January 2025

Uniko January 2025 Reveal, Release, Brand Ambassador Blog Hop & Giveaway

Good morning!

It's release day over at Uniko and I'm here to reveal the whole release and share another card.

Here's the final card I made...


I grabbed the new Mid Century Modern Circles & Stars stencil and inked it up using the shifted stencil technique.  So, on any cardstock other than white (I chose a neutral beige), ink up in a colour first, here I used Distress Oxide Dried Marigold.  Then once dry, shift the stencil slightly, and ink through it with white pigment ink.  I shifted it slightly downward and to the right.  I love the dimensional effect you get with this technique, some colours work better than others.  I die cut the panel and adhered it flat to the card base.  I then stamped a sentiment from the new Flower Power #11 on a die cut strip and popped it up on 3D foam.  A few orange enamel dots and the card was finished.


Materials used:
  • Stamps: Uniko - Flower Power #11
  • Stencils: Uniko - Mid Century Modern Circles and Stars
  • Ink: Distress Oxide: Dried Marigold; Hero Arts - Unicorn; Versafine Clair - Nocturne
  • Dies: Create a Smile - Cool Cuts Double Stitched Rectangles
  • Accents: Doodlebug Sprinkles
  • Cardstock from stash


So, now to reveal the new and reintroduced products in full.

Reintroducing... Background Builders: Flower Power

Now the new stamp sets....Sparkle Sentiments...


And the new addition to the Flower Power series...Flower Power #11

and Simply Said Blocks Occasions...

Two new Ink & Flip stencil sets...Ink & Flip Layering Geometric Gem...

and Ink & Flip Layering Flower...


a new layering stencil set...Layering Picked Posies...


and finally, another stencil to join the Mid Century Modern collection...Mid Century Modern Circles & Stars...


No doubt there is something amongst the above that grabs your creative attention.  Be sure to leave some comments on the Brand Ambassador blogs or social media.  You can find all the links over at the Uniko bloghere.  By leaving comments along the way you will be in with a chance of winning some goodies.  All the details are on the Uniko blog post.

The products are available from the Uniko store now, here

Thanks for visiting today and for your lovely comments here and on my socials this week :)

Wednesday, 29 November 2023

Uniko Brand Ambassador Inspiration - Rustic Christmas

Good morning!

I'm sharing two cards over at the Uniko blog today, here, and I decided to dig out an "oldie but goodie" stamp set for these, Rustic Christmas.  I just love the perfect little tree in this set so have kept these cards clean and simple so it takes centre stage.

You can find all the information regarding the steps taken to make these cards over on my Uniko post.

First up, I've tried to create a northern lights sky as my backdrop...


Materials used:
  • Stamps: Uniko - Rustic Christmas
  • Ink: Distress Ink - Twisted Citron, Mowed Lawn, Picked Raspberry, Black Soot, Chipped Sapphire; Versafine Clair - Nocturne; VersaMark
  • Embossing Powder: Brutus Monroe - Alabaster
  • Accents: Sakura - White Gelly Roll 10


My second project is another one layer card, again, super simple...


Materials used:

  • Stamps: Uniko - Rustic Christmas
  • Ink: Versa Color - Magenta, Violet, Turquoise, Evergreen; Versafine Clair - Nocturne
  • Embossing Powder: Wow! - Clear Gloss
  • Accent: Doodlebug - Sprinkles: Graduation Assortment


I hope this gives you some inspiration and encourages you to have a rummage through your stash to see what older stamp sets you have that could be inked up.  Thanks for taking the time to visit and I wish you a lovely Wednesday.


Wednesday, 11 January 2023

Uniko January 2023 Mini Release - Introducing...Mid Century Modern Frames

Hi there

It's Day 2 of the introductions from the upcoming mini release from Uniko.

Today it's all about Mid Century Modern Frames, another great set that Bev has designed to extend the Mid Century Modern collection.  A great mix of retro images and sentiments are included in this set.

Here's my first card, and here I've paired this set with the Background Blocks Mid Century Modern Linear stamp that was introduced by the team yesterday...


For some reason I chose to use some white hammered cardstock for this card, just fancied a change!  And although this looks super simple, it did take quite a few steps to create.  I began by stamping the frame image in a pale ink and then coloured in the pink and aqua sections with Copics.  I left my stamp in my MISTI so I could then re-stamp over the image in exactly the same position so I could then heat emboss in white.  It's so much easier this way than trying to colour with markers once the image has been embossed.  I then cut a mask for the entire frame and stamped the linear image in aqua ink so it appeared to be behind the frame.  


I heat embossed the sentiment, also from the set, in white and finished the card by adding some hot pink enamel dots.

Materials used:
  • Stamps: Uniko - Mid Century Modern Frames, Background Blocks Mid Century Modern Linear
  • Ink: VersaMark; Altenew - Volcano Lake
  • Embossing Powder: Brutus Monroe - Alabaster White
  • Coloured with Copics
  • Accents: Doodlebug - Sprinkles: Bubblegum Assortment


And more masking was involved for my second card too, and I used the new set combined with the Mid Century Modern Shapes stencil...


Here I stamped the frame first, coloured with Copics and then created a mask.  I then ink blended through a couple of the shapes from the Mid Century Modern Shapes stencil.  I removed the mask and then stamped and heat embossed the sentiment in white and stamped the star burst.  The panel was die cut with a stitched rectangle die and I chose a card base in a co-ordinating shade.

Materials used:
  • Stamps: Uniko - Mid Century Modern Frames
  • Stencil: Uniko - Mid Century Modern Shapes
  • Ink: Memento - Tuxedo Black; Altenew - Autumn Blaze, Honey Drizzle; Versafine Clair - Nocturne; VersaMark
  • Coloured with Copics
  • Embossing Powder: Brutus Monroe - Alabaster White
  • Die: Create a Smile - Cool Cuts Double Stitched Rectangles
  • Coloured cardstock from stash


Over on the main Uniko blog, here, Bev and my fellow Brand Ambassadors are showcasing this set today, so be sure to go check it out.

The new products will be available to purchase from the Uniko website from 13 January at 10am GMT.

I'll be back with more inspiration tomorrow, using two more new projects.


Sunday, 31 January 2021

Uniko - Super Sunday Guest Designer Spot


Good morning, everyone

Today I'm super excited as I'm being featured in Uniko's Super Sunday Guest Designer Spot.  I was so honoured when I received the invitation from the lovely Bev and I've had great fun creating with lots of my Uniko stamps.


This post is a bit photo heavy as I got a bit carried away and created quite a few cards, once I started I couldn't stop!  I've centred all these cards around Uniko's current themes of love, kindness and friendship, I hope you like them.


Card #1

For this first sweet card I combined stamps from Uniko's Background Builders Classics and Simply Said sets...


I die cut a heart window first in my upper panel and then marked the area on the card base that would show through the aperture, masked it off then stamped the various border designs in varying shades of pink.  The sentiment was heat embossed in white to show through the raised panel.

Materials used:
  • Stamps: Uniko - Background Builders Classics, Simply Said
  • Dies: Xcut - Heart Nesting Dies; Create a Smile - Cool Cuts Double Stitched Rectangles
  • Ink: Altenew - Frosty Pink, Coral Berry, Ruby Red, Grapevine; VersaMark
  • Embossing Powder: Brutus Monroe - Alabaster White


Cards #2 and #3

For these two love themed cards I used the Scattered Polka Hearts background stamp and sentiments from the You Are…Sentiments Outlined set...


For this first one I heat embossed the background hearts in white and used emboss resist to blend over the top with Distress Oxides in a diagonal gradient.  I then used a vellum wrap with the sentiment heat embossed in white.


Materials used:
  • Stamps: Uniko - Scattered Polka Hearts, You Are...Sentiments Outlined
  • Ink: Distress Oxide - Spun Sugar, Picked Raspberry, Festive Berries; VersaMark
  • Die: Create a Smile - Cool Cuts Double Stitched Rectangles
  • Embossing Powder: Brutus Monroe - Alabaster White
  • Vellum from stash

And an alternative using the same stamp sets...


This one is a similar design but in reverse.  I used my MISTI to stamp the polka hearts multiple times, creating a gradient of pale to deep pink.  Here I heat embossed the sentiment on a die cut heart from black cardstock and popped it up on 3D foam.


Materials used:
  • Stamps: Uniko - Scattered Polka Hearts, You Are...Sentiments Outlined
  • Dies: Create a Smile - Cool Cuts Double Stitched Rectangles; Xcut - Heart Nesting Dies
  • Ink: Altenew - Frosty Pink, Coral Berry, Ruby Red; VersaMark
  • Embossing Powder: Brutus Monroe - Alabaster White


Card #4

My next make used the gorgeous Bee Happy stamp set...


I adhered some honeycomb/hexagon patterned paper to the lower half of my card base and then die cut an angled stitched edge from my upper panel.  This was then stamped in black, grey and honey shades using various stamps all from the same set, with a little Copic colouring on the bee.

Materials used:
  • Stamps: Uniko - Bee Happy
  • Ink: Altenew - Sunkissed; Hero Arts - Soft Granite; Memento - Tuxedo Black
  • Die: MFT Die-namics - Stitched Basic Edges
  • Patterned Paper - Doodlebug - Kraft in Color (kraft)


Card #5

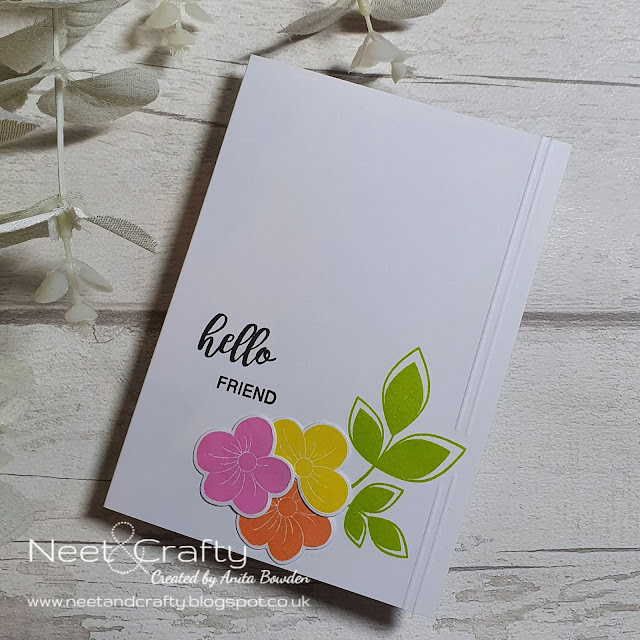
This selection of Uniko creations wouldn’t be complete without using one of the Flower Power sets, and here I’ve combined blooms from Flower Power #2 with leaves from Natures Treasures II and the sentiment from Hello Lovely...


I used really bright summer colours here, started with the leaves and then stamped and die cut the flowers, using their co-ordinating dies, before adhering them in a cluster on glue dots.  The stamped sentiment and some vertical score lines finished off this one layer card.

Materials used:
  • Stamps: Uniko - Flower Power #2 (and companion dies), Natures Treasures II, Hello Lovely
  • Ink: Altenew - Pinkalicious, Orange Cream, Maple Yellow, Parrot; Versafine - Onyx Black


Card #6

I chose stamps from Just Because, Beautiful and Hello Lovely for this friend card...


On a pale green panel I stamped the same image in different orientations both in green and also heat embossed in white.  The sentiment was heat embossed on a green strip and a further smaller strip adhered on 3D foam.


Materials used:
  • Stamps: Uniko - Just Because, Beautiful, Hello Lovely
  • Die: Create a Smile - Cool Cuts Double Stitched Rectangles
  • Ink: Altenew - Frayed Leaf; VersaMark
  • Embossing Powder: Brutus Monroe - Alabaster White


Card #7

It wasn’t until I was making these that I realised how much the flower stem from the You Are, Yes You set resembled the flower in my blog logo!  I combined it here with the Background Builders Pinstripe II stamp and the sentiment from Originally Organic Additions.  I also thought I'd work with my blog colours too...


I stamped the flower in a pale ink before colouring with Copics and then masking it to stamp the pinstripes.  With the stem stamp still in my MISTI, I then restamped it over the original image before heat embossing in white. 


Materials used:
  • Stamps: Uniko - You Are Yes You, Background Blocks Pinstripe II, Originally Organic Additions
  • Die: Create a Smile - Cool Cuts Double Stitched Rectangles
  • Ink: Memento - London Fog; Altenew - Mountain Mist; VersaMark; Versafine - Onyx Black
  • Embossing Powder: Brutus Monroe - Alabaster White
  • Coloured with Copic markers


I'm linking up with the following challenges:

Card #1
NBUS - Challenge #22 - both stamp sets are new to my stash for this GD spot


Card #2
Alphabet Challenge - V is for Vellum

Card #7
Just Us Girls - Challenge #569 - Masking
Fusion - Flowers (using the inspiration photo)


Thanks so much for taking a look at my cards today and I hope they have given you some crafty inspiration.

And many thanks to Bev for thinking of me and for providing this Guest Designer spot.  I thoroughly enjoyed making all of these.


Saturday, 26 December 2020

Christmas Card Multiples - Patterned Paper Apertures

Hi there

I hope you all managed to have a lovely Christmas Day yesterday.  This year is tough for sure so I hope you were able to make the best of whatever your situation.  It was just a quiet day for me yesterday, just at home with my other half.  Due to the limits on household mixing I was unable to see more of my family but hopefully we will be able to make up for it sometime soon.  Today is just a lazy day so I thought I'd lift my bum off the sofa and write this post :)


Between today and New Year I'll be sharing the remainder of the Christmas cards I made this year.  These were super quick ones, using some tri-fold card bases from my stash with already die cut square apertures in the front.

This first batch used some of the ivory card bases...


I began by stamping the sentiments on the central panels below the apertures, once folded these would be the fronts.  I then chose some glossy and glittered patterned paper from my stash and cut up sections which were adhered behind the apertures.  All that was left to do was glue the right hand panel of each of the tri-fold cards over the reverse of the aperture panels and that was it, super quick.


These card bases have a lovely linen texture so with the gloss and glitter of the patterned paper, I didn't think anything else was needed.  


Materials used:
  • Card bases from stash
  • Patterned Paper: Decotime - Christmas Patterns
  • Stamp: Clearly Besotted - Tiny Type
  • Ink: Versafine - Onyx Black

Challenge entries:

Always Fun Challenges - Challenge #194 - Christmas
Allsorts - Week 603/4 - Sparkle and Shine
AAA Cards - CAS Game #180 - Made in Minutes (Option: Christmas)


And for the next batch I used some white bases...


These were made in exactly the same way but instead of stamping the sentiments directly on the card bases, I stamped them onto the patterned papers and heat embossed the sentiments in gold.  


A bolder sentiment could have worked slightly better on this last card but in real life it is much easier to read than it appears here...


Materials used:
  • Card bases from stash
  • Patterned paper: Doodlebug - Santa Express
  • Stamps: Uniko - All Occasion Sentiments #4
  • Ink: VersaMark
  • Embossing Powder: Wow! - Metallic Gold Rich


Challenge entries


I'll be back with more very soon :)


Related Posts Plugin for WordPress, Blogger...