Thursday, 14 February 2019

Guest Designer for Honey Doo Crafts - Selection Three

Hi there

I'm back this morning to share my final batch of samples as Guest Designer using the latest product release from Honey Doo Crafts, ahead of their shows on Hochanda later today (scroll to the end for the show times and channels).

Amanda designs such beautiful floral stamps, so grab a brew and scroll down to see what I did with them.

For my first two cards I've used the new Spring Time Blooms set, in very different ways.  Here's the first...


I began by stamping lots of the leaves and one of the flowers on vellum and heat embossing in white, then I die cut with the co-ordinating dies.  Before adhering into a wreath shape I lightly drew a circle with pencil on the card base and blended ink through the Mesh stencil.  I erased the pencil line then adhered the leaves with glue dots, overlapping each one.  I then stamped a further flower on white cardstock, blended with Distress Oxide inks and adhered the vellum flower on top to soften the colour.  The layered flower was then also adhered using glue dots.  I stamped a sentiment within the centre of the wreath and added some Nuvo drops to finish.


Materials used:

  • Stamps: Honey Doo Crafts - Spring Time Blooms (and co-ordinating dies), Hopeful and Happy Quotes
  • Stencil: Honey Doo Crafts - Mesh
  • Ink: VersaMark; Distress Oxide - Abandoned Coral, Squeezed Lemonade; Versafine - Onyx Black
  • Embossing Powder: Altenew - Pure White
  • Vellum from stash
  • Accents: Nuvo Jewel Drops - Rosewater

Challenge entries:

Happy Little Stampers - February Anything Goes with Dies Challenge
The Flower Challenge - Challenge #29 - Use Your Latest Stamps or Dies


I can't take credit for the design of this next card as I was inspired by a card I saw on Instagram, by Kards By Kristen, who in turn was inspired by a card she'd seen over on the Altenew page.  I loved the tone on tone grey with the metallic embossing so made this next, more CAS version, using the Spring Time Blooms stamps for a completely different look...


I stamped the flowers and leaves, masking in places, using VersaMark on a mid grey cardstock and then heat embossed in silver.  I then added detailing just to the flowers with some grey ProMarkers.  I trimmed the panel down and adhered it to a black card base.  To finish I stamped the sentiment, also heat embossed in silver and die cut it using a stitched rectangle.  This was then matted onto a panel of black and popped up on 3D foam.


Materials used:
  • Stamps: Honey Doo Crafts - Spring Time Blooms, Happy Times
  • Ink: VersaMark
  • Embossing Powder: Wow! - Metallic Silver
  • Coloured with ProMarkers
  • Die: MFT Die-namics - Wonky Stitched Rectangles


For the next two cards I used the new Butterflies and Flowers Large Corner stamp and co-ordinating die, this is such an elegant design...


Have you ever had an idea in your head and then once you get going you wish you'd never started?!  Well, that happened here but I'm glad I persevered.  I wanted to do some inset stamping, within the negative space of the die cut, but I greatly mis-judged all the itty bitty in-betweeny bits there were with this die! Yikes!!!

I started with a single white cardstock panel the same size as the card base.  I die cut the design and then laid the panel over the card base.  Using my MISTI (hallelujah for that gadget!) I lined up the stamp in the aperture and then inked it up and stamped the image directly onto the card base.  I then coloured the petals with some co-ordinating coloured pencils.

Then came the fiddly bit...to replace all the negative die cut bits!  The plan was to pop the panel up on 3D foam but this just wasn't possible with so many inset parts.  So, I stamped the sentiment on the panel then adhered it flat to the base.  I then temporarily replaced the positive part of the die cut, glued all the tiddlers in between and then removed the positive part.  It's not as dramatic as I envisioned but it worked...phew!


To finish, I added some smooth silver gemstones to the flower centres.

Materials used:
  • Stamps: Butterflies and Flowers Large Corner (and co-ordinating die); Just in Case
  • Ink: Altenew - Lagoon, Emerald
  • Coloured with Faber Castell Polychromos
  • Smooth gemstones from stash


I once again used the Butterflies and Flowers Large Corner stamp and die here, but the positive die cut this time...


I stamped the image in VersaMark and heat embossed using a pearl powder, why do I do this knowing full well it will be a nightmare to photograph?!  I die cut it with the co-ordinating die and then added some watercolour to the petals using my Zig markers.  On the card base I masked off the bottom and the left borders and faded out some ink blending with Distress Inks.  The sentiment was stamped in grey before popping the die cut up on 3D foam squares.  Below is a much better image, capturing the pearly embossing...


Materials used:
  • Stamps: Honey Doo Crafts - Butterfly and Flowers Large Corner (and co-ordinating die), Hopeful and Happy Quotes
  • Ink: VersaMark; Distress Ink - Picked Raspberry, Spun Sugar; Versa Color - Sky Gray; Zig Clean Colour Real Brush Markers
  • Embossing Powder: Wow! - White Pearl


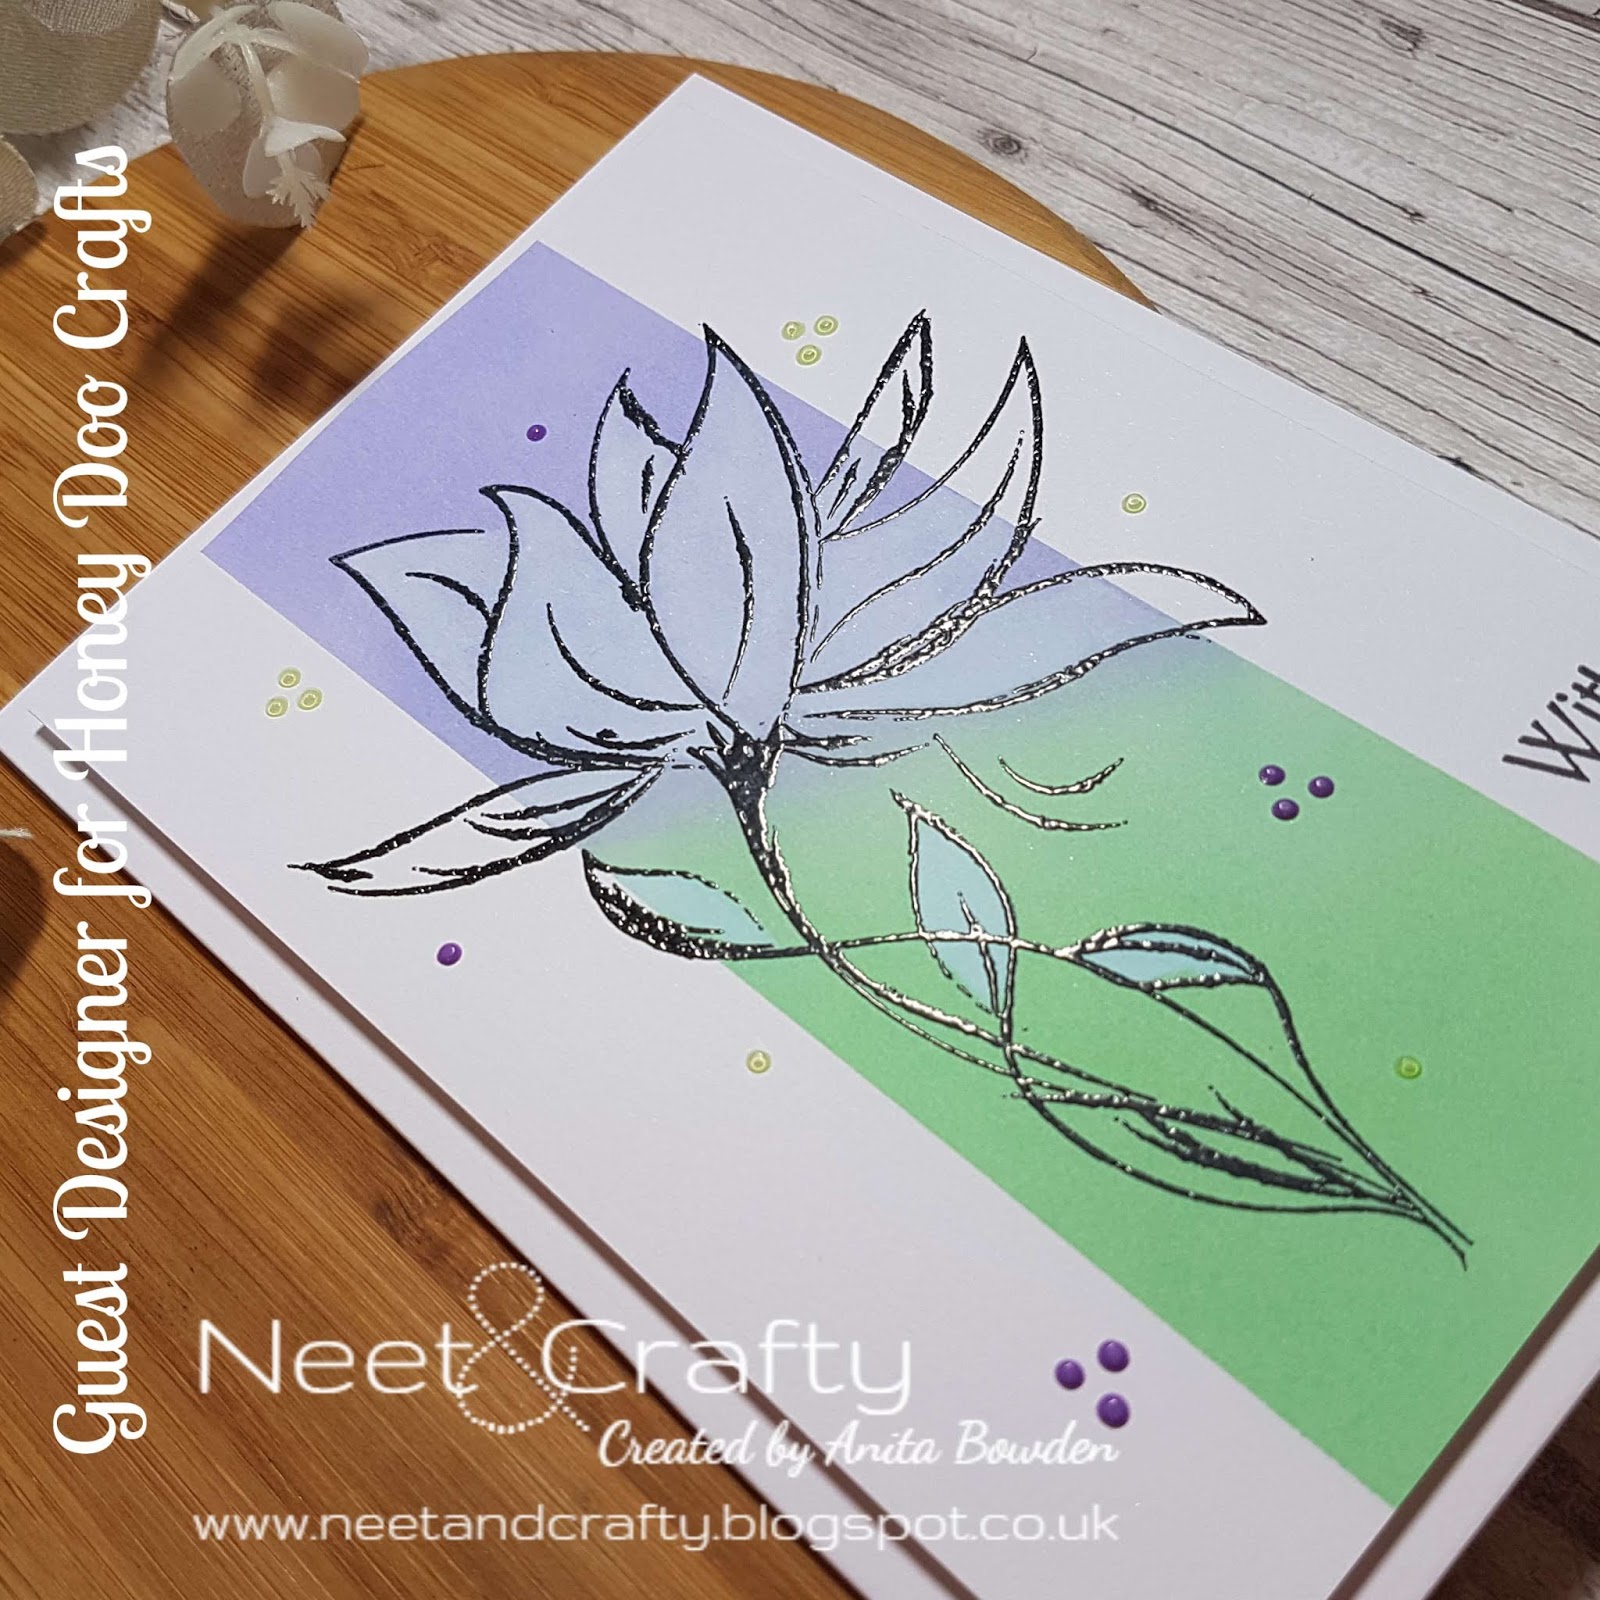
And finally, this last card uses another great floral set called Buds and Blooms...


On a panel of purple cardstock I spread some embossing paste through the Mesh stencil and left this to dry.  On some white cardstock I stamped the flowers and leaves and heat embossed in white.  I then used emboss resist to colour them by blending with Distress Oxide inks.  These were then fussy cut out.  The purple panel was adhered flat and the images were arranged and adhered using glue dots.  I finished by stamping the sentiment onto a die cut flag and tucked this behind the flowers.


Materials used:
  • Stamps: Honey Doo Crafts - Buds and Blooms, Just in Case
  • Stencil: Honey Doo Crafts - Mesh
  • Embossing Paste: Dreamweaver
  • Embossing Powder: Altenew - Pure White
  • Ink: VersaMark; Distress Oxide - Peacock Feathers, Shaded Lilac, Wilted Violet
  • Die: MFT Die-namics - Fishtail Flag Stax


Don't forget, Honey Doo Crafts will be live on Hochanda today (Freeview 85 / Sky 673) at 12pm and 4pm, so tune in if you can to see these great new products in more detail.


Thanks so much for visiting, I hope you've enjoyed my samples.  And I want to send a massive thank you to Amanda and the Honey Doo team for asking me to join them again as Guest Designer :)

Wednesday, 13 February 2019

Guest Designer for Honey Doo Crafts - Selection Two

Good morning

As I mentioned in my post yesterday, I'm excited to be joining Honey Doo Crafts for the second time as a Guest Designer, showcasing their fabulous new stamps and dies for the upcoming shows on Hochanda.

Today I'm sharing more of my samples, using some of the new products.


First up is a die set called Feathered Flourishes.  I'm really pleased with how this first card turned out.  I chose to use a faux laser cut technique I first saw in a Jennifer McGuire video a few years ago, and have used a couple of times...


I began by masking my card base and creating an ink blended and water splattered background using Distress Oxide Inks.  Next I die cut a frame using some stitched rectangle dies.  To create the faux laser cut effect all you need to do is adhere various die cuts and adhere them to the edge of your aperture or frame and trim off the excess.  This is a fairly easy technique, the only fiddly part is ensuring you add enough 3D foam pieces to the reverse of your die cuts so that they have enough support and don't sag when added to your card front.  The photo below shows this more clearly.


I finished by stamping a small sentiment panel and backing this with a vellum panel, which was then also popped up on 3D foam to support it.

Materials used:

  • Dies: Honey Doo Crafts - Feathered Flourishes; Create a Smile - Double Stitched Rectangles
  • Ink: Distress Oxide - Wilted Violet, Mermaid Lagoon; Versafine - Onyx Black
  • Stamp: Honey Doo Crafts - Just in Case
  • Vellum from stash

Challenge entry:

Happy Little Stampers - February Anything Goes with Dies Challenge


Next up I've used the Feathered Flourishes dies once again, with the new Daisy stamp set...


I started by creating the daisies.  I stamped them in VersaMark on pale yellow vellum and heat embossed in white.  These were then fussy cut and the petals curled slightly using the rod of a paint brush.  I then die cut some of the flourishes from green textured cardstock.  On a panel of white cardstock I added some graduated score lines for some background interest and then arranged and adhered the flourishes and daisies, adding some enamel dots for the flower centres.


To finish I stamped the sentiment between two score lines and the popped the panel onto the card base using fun foam.

Materials used:

  • Stamps: Honey Doo Crafts - Daisy, Just in Case
  • Dies: Honey Doo Crafts - Feathered Flourishes
  • Ink: VersaMark; Versafine - Onyx Black
  • Embossing Powder: Altenew - Pure White
  • Vellum from stash
  • Accents: Doodlebug Sprinkles - Bumblebee Assortment

Challenge entry:

The Flower Challenge - Challenge #29 - Use Your Latest Stamps or Dies


Next up I've used the Daisy set again, but this time just the leaves...


I die cut a stitched panel and then, using my MISTI for alignment, stamped a row of the same leaves in rainbow order.  I simply stamped the sentiment above in black and adhered the panel to the card base on fun foam.  To finish, I added some co-ordinating enamel dots.

Materials used:
  • Stamps: Honey Doo Crafts - Daisy, Cheers
  • Ink: Versafine - Onyx Black; Versa Color - Canary, Fresh Green, Cyan, Violet, Magenta
  • Die: Create a Smile - Double Stitched Rectangles
  • Accents: Doodlebug Sprinkles


The next stamp set is called Budding Flourishes and I kept this one really simple...


After die cutting the rectangular panel I then used a piece of cardstock die cut with an oval die as a template to blend the sunset background.  I shifted the oval down very slightly, only 1-2mm, to ensure the stamped image met the edge of the oval mask, this was simply stamped in black ink, as was the sentiment alongside.  The panel was then popped up for dimension.

Materials used:

  • Stamps: Honey Doo Crafts - Budding Flourishes, Hopeful & Happy Quotes
  • Dies: Create a Smile - Double Stitched Rectangle; Lil Inker Designs - Stitched Ovals (used to create mask)
  • Ink: Distress Oxide - Squeezed Lemonade, Spiced Marmalade, Abandoned Coral; Versafine - Onyx Black


And finally, this card uses the gorgeous new Floral Sketch stamp and the watercolour lifting technique...


I stamped the image in black pigment ink and heat embossed it using clear embossing powder.  I then masked the two sides of the panel vertically and blended Distress Inks down the centre.  I then 'painted' the image with water, section by section, waited a few seconds and blotted away the colour with a paper towel.  So the sections within the image appear lighter than the background.  I stamped the sentiment at the bottom right before adhering the panel on fun foam.


I then added some Nuvo drops in co-ordinating shades around the design, although with hindsight I think I preferred it without the drops.

Materials used:
  • Stamps: Honey Doo Crafts - Floral Sketch, Just in Case
  • Ink: Versafine - Onyx Black; Distress Oxide - Shaded Lilac, Cracked Pistachio
  • Embossing Powder: Wow! - Clear Gloss
  • Accents: Nuvo Drops


Don't forget to tune in to Hochanda tomorrow if you can (Freeview 85 / Sky 673) at 12pm and 4pm to see these great new products in more detail.


Thanks so much for popping by.  I'll be back tomorrow with my final batch of samples ahead of Thursday's shows.

Tuesday, 12 February 2019

Guest Designer for Honey Doo Crafts - Selection One

Hi there

I'm absolutely thrilled to have been asked to Guest Design for Honey Doo Crafts once again.

The lovely Amanda Fletcher from Honey Doo will be sharing some fabulous new products, along with some demonstrations, over on the craft shopping channel, Hochanda (Freeview 85 / Sky 673) this coming Thursday, 14 February 2019, at 12pm and 4pm.

Part of the reason I've been a bit quiet on my blog lately is because I've been beavering away behind the scenes playing with these wonderful stamp sets and creating samples for the show.

So, over the next few posts I'll be sharing my cards using these gorgeous new products.


First up, and as the show is going to be on Valentine's Day, I thought I'd share this stunning stamp called Single Rose.

I love these highly detailed floral images that Amanda designs and I love to leave them just black and white, mask them and add detail to the background, which is what I've done for these first two samples...


I stamped the rose stem in black directly onto my card base and stamped a second time on a few post-it notes to create some masks.  Yes, it did take some time to cut out the masks but it's so worth it.  I die cut a heart from some spare cardstock and used the negative space as a mask to blend the heart background with Distress Inks. 


I removed all the masks, stamped a simple sentiment in red ink and added some Raindrops to finish.

Materials used:

  • Stamps: Honey Doo Crafts - Single Rose, Just in Case
  • Die (for masking): MFT Die-namics - Stitched Heart Stax
  • Ink: Memento - Tuxedo Black; Distress Ink - Candied Apple, Aged Mahogany; Altenew - Velvet
  • Accents: Little Things from Lucy's Cards - Raindrops

Challenge entries:

Crafty Cardmakers - Challenge #227 - Love, Love, Love
Use Your Stuff - Challenge #347 - Hearts/Pink Red
Always Fun - Challenge #97 - Love/Valentines
AAA Cards - CAS Game #133 - One Layer (Love)


I followed a similar technique on this one, but here I used a stencil to create the backdrop...


The rose was stamped on a panel of white cardstock and masked off with cut out post-it notes.  I then laid the stencil over the image and blended through two Distress Oxide inks.  The panel was then popped up on fun foam and a sentiment strip added, with the sentiment heat embossed in white.

Materials used:

  • Stamps: Honey Doo Crafts - Single Rose, Just in Case
  • Stencil: Honey Doo Crafts - Mesh
  • Ink: Versafine - Onyx Black; Distress Oxide - Mermaid Lagoon, Twisted Citron; VersaMark
  • Embossing Powder: Wow! - Opaque Bright White

Challenge entry:

The Flower Challenge - Challenge #29 - Use Your Latest Stamps or Dies


Next up, as Spring flowers are certainly starting to make an appearance here in the UK, is the new Daffodils stamp set..


I stamped the daffodils image and watercoloured with Zig markers.  It's difficult to see in this photograph but I blended the background using a cloud stencil, this is a lot clearer in real life.  I stamped the sentiment from the same set.  I added some striped patterned paper to the card base before popping the panel up on fun foam in the centre.

Materials used:

  • Stamps: Honey Doo Crafts - Daffodils
  • Ink: Versafine - Onyx Black; Distress Ink - Tumbled Glass; Zig Clean Color Real Brush Markers
  • Stencil: MFT - Cloud
  • Patterned Paper: Lawn Fawn - Let's Polka Mon Amie


Next up is Entangled Flourish and for this one I used the spotlighting technique with a raised die cut...


I started with a die cut panel and stamped this gorgeous image in black, and that's how it remained.  On another panel I stamped the same image and then die cut a central section of it with an oval die.  This was then watercoloured using Zig markers.  The main panel was adhered on fun foam to the card base, and the coloured oval was then carefully adhered on top of this, being sure to line everything up with the image underneath to create a seamless design.  You can see the dimension from the angled photograph below...


To finish I heat embossed the sentiment in white and popped the black strip up on a 3D foam strip.

Materials used:

  • Stamps: Honey Doo Crafts - Entangled Flourish, Just in Case
  • Ink: Versafine - Onyx Black; VersaMark; Zig Clean Color Real Brush Markers
  • Dies: Create a Smile - Double Stitched Rectangles; Lil Inker Designs - Stitched Ovals
  • Embossing Powder: Wow! - Opaque Bright White

Challenge entry:

Happy Little Stampers - February Anything Goes with Dies Challenge
STAMPlorations - February CAS Challenge - Anything CAS Goes


Last up for this selection is the Carnations stamp set and co-ordinating dies, this one has been available for a while but is also being featured on the show.  This is a bit different for me but I wanted to use these stamps in one of the ways Amanda intended when designing it, using embossed vellum layers...


I chose some yellow vellum I've had in my stash for years, but on reflection I think it was a little too thick for this technique but hopefully you'll see the effects that can be achieved.  I stamped numerous layers of the carnations on the vellum in VersaMark ink and heat embossed in a co-ordinating shade of embossing powder.  I was hoping to achieve the two-tone frilly effect of real life carnations.  These were then die cut with the co-ordinating dies.  Each layer was then manipulated by folding the petals and then glued one at a time to create the cluster.  I stamped the carnation stem on the card base and layered up some patterned paper, with an oval cut away, and topped with an oval stitched frame.  The flower head was then adhered with some strong glue dots and the sentiment stamped at the base.

The following angled photograph shows the dimension in more detail...


Materials used:
  • Stamps: Honey Doo Crafts - Carnations, Daffodils (sentiment)
  • Dies: Honey Doo Crafts - Carnations Outlines Dies; Lil Inker Designs - Stitched Ovals
  • Ink: VersaMark; Versafine - Onyx Black; Altenew - Evergreen
  • Embossing Powder: Wow! - Aztec Glintz
  • Patterned Paper: Lawn Fawn - Let's Polka
  • Vellum from stash


Thanks so much for visiting.  I'll be back tomorrow with some more of my sample cards made using these lovely sets by Honey Doo Crafts, ahead of the shows on Thursday.


Saturday, 2 February 2019

Happy Little Stampers February 2019 CAS Challenge

Good evening

The February CAS challenge over at Happy Little Stampers is just starting so I'll get straight to it and share this month's cue card...


This challenge, along with the rest of the HLS challenges (most to start over the next few days) will run until the end of the month so there's plenty of time to play along.

I kept my card super simple, using just an inlaid die cut and a stamped sentiment...


I began by die cutting the stitched rectangular panel.  I die cut the flower from the panel, and again from textured green and coral cardstock.  I secured an adhesive panel to the reverse and inlaid the coloured die cuts into the negative space.  I stamped the sentiment in black before adhering the panel to the base on fun foam.

Materials used:
  • Dies: Create a Smile - Cool Cuts Double Stitched Rectangles; Creative Expressions - Scribble Flowers
  • Stamp: Mama Elephant - Ella & Friends
  • Ink: Versafine - Onyx Black

Thanks so much for visiting :)

Less is More Challenge #388 and 8th Birthday!

Hi guys

This month over at Less is More we're celebrating as it's our 8th Birthday!


And to start off our birthday month we have a Colour challenge for you...


Returning for this challenge is one of our regular sponsors, Uniko, so please do play along for a chance to be showCASed or be a prize winner. 


We have some wonderful Guesties joining us too so please do pop over to the main Less is More post to find out who they are! :)


Onto my Design Team card, where I've used stamps by our sponsor...


This was so simple to make, just a panel of white card stock, purely stamped in navy, yellow and black, then popped up onto the card base using fun foam.

Materials used:
  • Stamps: Uniko - Background Builders: Vines, All Occasion Sentiments #6
  • Ink: Altenew - Desert Night, Warm Sunshine; Versafine - Onyx Black


Thanks so much for visiting, and as always, the challenge will run for the next fortnight so there's plenty of time to link up.
Related Posts Plugin for WordPress, Blogger...