Showing posts with label Hot Off The Press. Show all posts

Tuesday, 19 May 2020

Honey Doo Crafts - May 2020 Release - Cherry on Top

Hi guys

I'm back tonight to share a couple more sample makes using another of the new stamp sets from Honey Doo Crafts.

And if you missed Amanda's Facebook live earlier this evening where she was sharing all the new products and samples, you can watch it back over on their Facebook page, here.


Ok, these are my cards using the new Cherry On Top stamp set...


I began by stamping both the image and sentiment in VersaMark ink on kraft cardstock but only heat embossed the sentiment at this stage.  VersaMark ink leaves a tone on tone watermark of the image.   Next I coloured in the cupcake by painting with a mix of Honey Doo mica powders and water.  These create a lovely shimmery effect.  Once dry I then re-stamped the cupcake in VersaMark (by leaving the stamp in my MISTI I was able to stamp in the exact same spot) and then heat embossed in white.  The panel was then popped up on 3D foam.


Materials used:

  • Stamps: Honey Doo Crafts - Cherry on Top
  • Ink: VersaMark
  • Embossing Powder: Altenew - Pure White
  • Mica Powders: Honey Doo Crafts - Berry Red, White Opal, Purple Topaz, Green Emerald
  • Cardstock: Neenah - Desert Storm


For this next card I used the Cherry on Top stamp again, and some other existing Honey Doo products...


The cupcake was stamped in black and coloured with ProMarkers, I then fussy cut this out.  I used some stitched dies to create a frame and also used the Honey Doo Encircle die and laid a section behind the frame and adhered them all together.  I then added some patterned paper to the card base and popped the frame up on 3D foam.  The cake was then adhered over the top and a stamped sentiment strip added to finish, this sentiment being from the Honey Doo Just in Case stamp set.

Materials used:

  • Stamps: Honey Doo Crafts - Cherry on Top, Just in Case
  • Dies: Honey Doo Crafts - Encircle; Clearly Besotted - Frame It; MFT Die-namics - Stitched Sentiment Strips
  • Ink: Memento - Tuxedo Black
  • Coloured with ProMarkers
  • Patterned Paper: Hot Off The Press - Floral Cardmakers Ultimate Pack (years old!)


Thanks so much for visiting, I'll have more samples for you tomorrow.


(AD - some products kindly gifted for design team purposes)

Sunday, 19 February 2017

Home Sweet Home

Goo evening

Just thought I'd pop in quickly and share the most recent card I made.  This one was for my Brother and Sister-in-Law who moved into their first purchased property this weekend.

They love nature, particularly birds so I chose to stamp with a little birdhouse...


I blended up from the corner of a white cardstock panel with three shades of Distress Ink before splattering with water and blotting away some of the colour.  The birdhouse and sentiment were simply stamped in black before popping the panel up on 3D foam.

Materials used:

  • Stamps: Hot Off The Press - Sweet Tweets (free with a publication); Woodware - Home Sweet Home
  • Ink: Versafine - Onyx Black; Distress Ink - Wilted Violet, Picked Raspberry, Spiced Marmalade

Challenge entries:

Allsorts - Challenge #403 - Anything Goes
Addicted to Stamps and More - Challenge #229 - Clean and Simple


Thanks so much for stopping by.  I hope you've had a wonderful weekend.


Saturday, 22 October 2016

Less is More Week #299

Hi there

It's Recipe challenge time at Less is More for the next week and we have a fun one for you....and a choice.  So why not enter more than once?!  We would like to see you using...


Vellum or Acetate


I've made one of each for you so let's get to it...


This card uses some vellum I've had for absolutely ages!  It comes from a book of tone on tone vellum that was part of a larger set of books of papers I bought from QVC, in the days when I bought all my craft kits from there.  The vellum is clear and it has a slightly pearlescent design printed onto it...that wasn't my handy work folks!

So I started by cutting an angled piece of vellum and then masked off the lower part of my card base that would be showing below it. I then sponge blended some distress ink fading down from the top of my card base underneath where the vellum would be overlaid.  I stamped the sentiment in a co-ordinating ink onto the base and then adhered the vellum on the reverse where it folded over the top. A few sequins were added to finish.

Materials used:

  • Ink: Distress Ink - Cracked Pistachio, Altenew - Mountain Mist
  • Stamp: Clearly Besotted - Just Fabulous
  • Vellum: Hot Off The Press - Tone on Tone 
  • Sequins: Little Things from Lucy's Cards - Icicle Sequin Mix


Challenge entries:

Addicted to Stamps and More - Challenge #216 - Anything Goes
STAMPlorations - October Challenge - Theme / Sketch - Stamps and Sponging


And for my card using acetate I created a very CAS shaker...


I started by die cutting the flower from a panel of white cardstock.  I adhered some acetate behind the opening and then inlaid another die cut from the same die, this time from pearlescent cardstock.  I stamped the 'hi' sentiment in black and then added lots of 3D foam to the reverse of my panel, particularly around the flower head as this part was to be the shaker element.  I marked in pencil on the card base roughly where the flower head would be and then sprinkled on some sequins and beads before adhering the panel over the top.

Materials used:

  • Die: Creative Expressions - Scribble Flower
  • Stamp: Paper Smooches - Bold Buzzwords (a pre-loved set recently purchased from the lovely Michelle Short - Thanks Michelle!)
  • Ink: Versafine - Onyx Black
  • Sequins: Little Things from Lucy's Cards - True Blue Shaker Selection
  • Pearlescent cardstock from stash


Challenge entry:

The Flower Challenge - Challenge #1 - Anything Goes

We would love you to display our banner !


Thanks so much for visiting today.  If you have the time please do pop over to my fellow LIM teamies, they have some great inspiration for you.  I'm really looking forward to seeing your CAS ideas for vellum and acetate this week.


Saturday, 16 July 2016

Less is More Week 285

Hi there

Apologies for the lack of blog posts, it's been a whole week since my last one.  I just seem to be busy all the time (but not doing anything particularly exciting!) at the moment.  I promise to try harder in future ;)

But I'm here today to share the next new challenge over at Less is More where we are back with a Theme challenge and this week it's...


Repetition
Feel free to interpret this however you like.


My first is a new baby card...


Pretty simple really, just repeated stamping of the elephants and ric-rac.  I added the sentiment in black as a contrast to the pink and grey and then added some clear gemstones for the elephants' eyes.  The panel was then popped up on 3D foam.

Materials used:

  • Stamps: Jane's Doodles - Jungle Baby; Hot Off The Press - Stamped Stitches; Clearly Besotted - Little Onesie
  • Ink: Versa Color - Petal Pink, Sky Gray; Versafine - Onyx Black
  • Accents: Clear gemstones from stash

Challenge entries:

Crafty Cardmakers - Challenge #168 - Bling it up
Crafty Catz - Challenge #333 - Add Bling
The Crafter's Cafe - Challenge #153 - CAS
Brown Sugar - Challenge #207 - Baby/Baby Shower
Crafty Creations - Challenge #319 - Clean & Simple


And for my second card I used geometric die cuts in a repetitive pattern for a masculine birthday card...


I die cut the curved off squares from three colours of cardstock and adhered them in a repetitive pattern on the diagonal onto a panel of white cardstock.  To ensure the first row was straight I temporarily adhered a scrap of cardstock to the panel and butted the die cuts up to it.  I then just followed the pattern for each row, shifting them along each time.  I stamped the Happy Birthday in black and trimmed off the die cuts that were overlapping the edges.  I finished by adhering the panel to some black cardstock and then flat to the card base.

Materials used:

  • Die and Stamp: Clearly Besotted - Geometric Style
  • Ink: Versafine - Onyx Black
  • Coloured Cardstock: Papermania Solid Cardstock

Challenge entry:

Moving Along with the Times - Challenge #24 - No Designer Papers


I think this could be a really interesting challenge this week, so I'm looking forward to seeing your entries in the gallery.

Thanks so much for visiting as always.


Saturday, 19 December 2015

Less is More - Two-Weeker!

Good morning crafters

There is a new challenge just starting over at Less is More.  This challenge will run for two weeks to cover the Christmas/New Year break.  We've worked our way around our usual sequence and we're back with a Theme challenge which is....


Homespun


Not an easy challenge for me but I've got two sample cards for you today showing how I interpreted the theme.  Here they are...


I stamped four different stitch designs on a white cardstock panel and topped with a faux stitched heart, stamped and die cut from some patterned paper.  I tied some twine in a bow to the back of a button, adhered this with a glue dot and stamped the sentiment to co-ordinate with the button.

Materials used:

  • Stamps: Hot Off The Press - Stamped Stitches; Clearly Besotted - Love Hearts (and co-ordinating die)
  • Ink: Versafine - Onyx Black; Versa Color - Celadon
  • Patterned paper from stash
  • Accents: Twine - Hemptique - Ruby Collection; Button - Stampin' Up - Subtles


And my second card...


I embossed a white cardstock panel with a patchwork quilt design.  I then stamped the sentiment onto a strip of white cardstock and the image onto some gingham patterned paper.  I swirled some jute twine and anchored it in place when adhering the image on 3D foam.

Materials used:

  • Embossing folder: DoCrafts - Boofle
  • Stamps: Woodware - Home Sweet Home
  • Ink: Versafine - Onyx Black
  • Patterned Paper: DoCrafts - Boofle
  • Accents: Jute twine from stash


We'd love to see how you interpret this theme.  And don't forget, this challenge will run for a fortnight, with the next challenge starting on Saturday 2 January 2016.

Thanks so much for stopping by.


Saturday, 17 October 2015

It's All About the Boys

Good Morning!

It's time for yet another new challenge at Less is More, where on earth are these weeks going?  We're back with a Theme challenge for you this week and it's certainly one that I always struggle with, we want your creations to be.....


Masculine
Please remember to keep your creations clean and simple


So, without further ado, here are some examples for you...


A while ago I received a lovely gesture from the very sweet Barb Ghig of Barb's Studio Creations. She had seen a comment I had made about not being able to get hold of Papertrey Ink products in the UK without paying really high shipping costs so she very sweetly sent me lots, and I mean lots (!!!), of die cut images, all by Papertrey Ink.  Thanks once again, Barb, you are so so kind!  My stash has been all over the place for a while but I finally used one of them on this card.

I stamped various sunburst images to create the background directly on my card base.  I then used the 'happy' die cut word and coloured it with a black ProMarker and adhered it to the card base.  I stamped the sentiment offset below in black, and a few tiny black gemstones were scattered around before smothering the 'happy' with Glossy Accents.

Materials used:

  • Stamps: Clearly Besotted - Sunburst, Sentimental Type
  • Die: Papertrey Ink - Wet Paint
  • Ink: Versa Color - Topaz, Khaki, Atlantic, Bamboo; Versafine - Onyx Black
  • Accents: Glossy Accents; Black gemstones from stash


Challenge entries:

Creative Inspirations - Challenge #331 - Clean and Simple
Crafty Catz - Challenge #297 - Anything Goes


Card two...


I adhered a piece of striped patterned paper to the bottom section of the card.  I then cut a thin strip of blue cardstock and adhered this along the top of the paper to give it a clean edge, and doodled a faux stitched line using a black fineliner pen.  The celebrate flag is from a free set I recently received from Clearly Besotted and this was stamped at the top in black ink and a few co-ordinating Doodlebug Sprinkles were added to finish.

Materials used:

  • Patterned Paper: Hot Off The Press - Cardmakers Ultimate Pack (years old!)
  • Stamp: Clearly Besotted - Flag Sentiments
  • Ink: Versafine - Onyx Black
  • Accents: Derwent Graphik Line Maker pen; Doodlebug Sprinkles - Blue Jean, Limeade and Bon Bon


Challenge entry:

A Gem of a Challenge - Challenge #155 - Spots and/or Stripes


And finally, one for the younger male...


I'm always lacking in my stock of these cards so thought this was a good opportunity to make one!  I used a rectangle die to cut out a piece of polka dot patterned paper and adhered this flat to my card base.  I stamped the train, die cut with its co-ordinating die, and then coloured it in with ProMarkers.  The train was then popped up on 3D foam and the sentiment from the same set stamped below.

Materials used:
  • Die: Spellbinders Nestabilities - Classic Rectangles; Clearly Besotted - Going Places
  • Patterned Paper: Doodlebug - Kraft in Color paper pad
  • Stamps: Clearly Besotted - Going Places
  • Ink: Memento - Tuxedo Black
  • Coloured with ProMarkers


If you have the time, please pop by my teamies' personal blogs where they will be sharing more inspiration with you.  I'm looking forward to seeing your creations in the gallery this week to give ME some inspiration for masculine cards!

Bye for now


Wednesday, 27 May 2015

Addicted to Stamps and More #146

Hi there

There's a new weekly challenge just starting over at Addicted to Stamps and More.  The sequence has whizzed around to our regular theme which is...


Anything Goes
Just let your creativity flow and you can enter any card/project you like.
So the only restriction is our usual rule of a maximum of 10 challenge links.


Our wonderful sponsor this week is STAMPlorations and they are offering a $10 gift certificate to our lucky winner.


Here is my DT card for you...


This was quite a simple make.  I used a two-step stamp here.  I used mini Distress Ink pads to ink up the purple and green and then spritzed with a mist of water before stamping onto my card panel.  I then inked up the second stamp with black Distress Ink and stamped over the top.  These were very difficult to line up as they are rubber cling stamps as opposed to clear.  My black stamping was slightly misaligned but for this type of sketchy stamp and the water spritzing technique I don't think it matters too much.  I added a simple sentiment and matted my white panel onto black cardstock before adhering flat to my card base.

Materials used:
  • Stamps: Rubbernecker - Lilies with Color; Hot Off The Press - unknown set name (sentiment)
  • Ink: Distress Inks - Seedless Preserves, Mowed Lawn and Black Soot; Versafine - Onyx Black
  • Cardstock: Anna Marie Designs (white); Papermania (black)

Challenge entries:

Dream Valley - Challenge #107 - Anything Goes
A Gem of a Challenge - Challenge #145 - Flowers
613 Avenue Create - Challenge #125 - Anything Goes
Inkspirational - Challenge #83 - Purple
Seize the Birthday - Anything Goes
Simply Create Too - Challenge #86 - Keep it Simple


There is a wonderful selection of projects by the ATSM Design Team this week so why not pop over there to get some inspiration and leave some love.

That's all for now, have a wonderful day.


Sunday, 6 July 2014

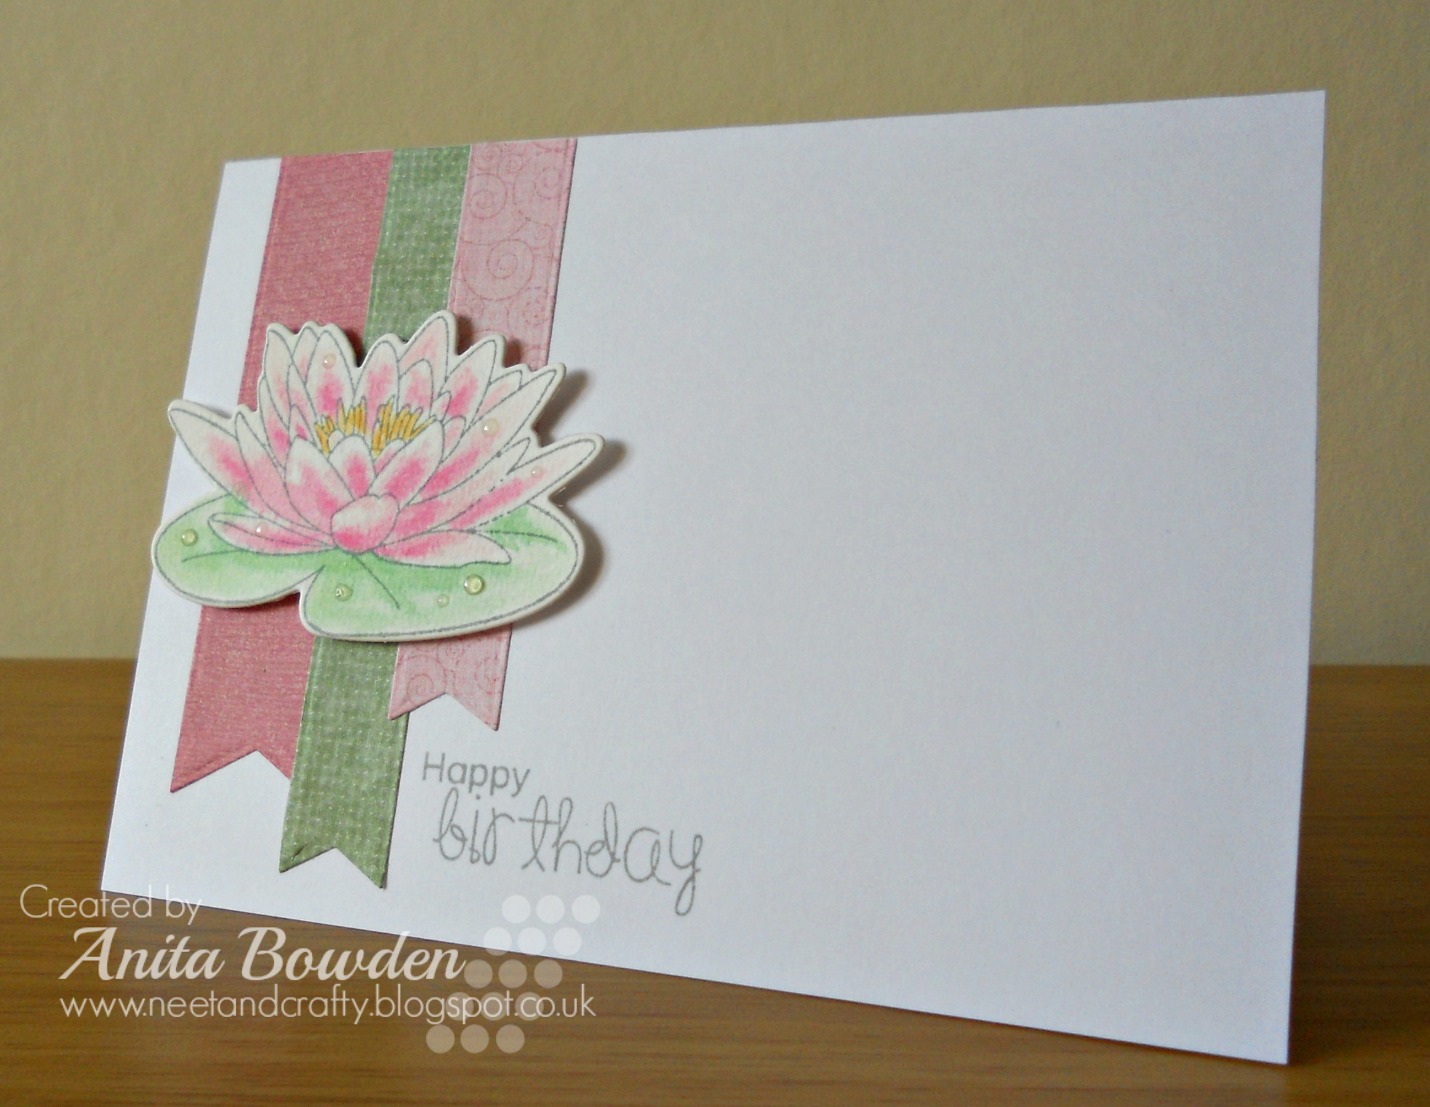
Watercoloured Waterlily

Hi there

Today I'm sharing a card I've just made, initially for the CASology challenge but I've also found a few more challenges to combine which are listed below.

The challenge this week at CASology has the cue word 'Float'.  Here I've used a waterlily stamp from a Clearly Besotted set I've had for some time, but I'd not yet inked up this particular stamp.


I used the waterlily die to cut out some watercolour paper.  I then stamped the co-ordinating waterlily in grey ink as I thought black may be too harsh for a watercolour image.  In hindsight I think I should have used something even paler.  I then squished my green, pink and yellow inks onto an acrylic block and coloured in the image using a waterbrush.  I used some fishtail flag dies to cut out three pieces of patterned paper and layered these up before adhering the waterlily on top using 3D foam.  I stamped the sentiment in the same grey ink and finished off with a few 'water droplets' of glossy accents.

Materials used:

  • Stamps: Clearly Besotted Stamps - With Love and Pretty Petals
  • Dies: Clearly Besotted - With Love; MFT Die-namics - Fishtail Flag Stax
  • Ink: Memento - London Grey, Angel Pink, Rose Bud, Cantaloupe and Cottage Ivy
  • Patterned Paper: Hot Off The Press - Cardmaker's Ultimate Pack, Floral
  • Glossy Accents

I'd also like to enter this card into the following challenges:

Love to Create - Challenge #122 - 3 or more Design Papers
The Friday Mashup! - Challenge 167 - Watercolour Wash / CAS
AAA Cards - Game #10 - Play with Watercolour Techniques
Brown Sugar - Challenge #101 - Anything Goes


I hope to be back again soon with more to share.  I've had a hectic weekend so this is all I can share at the moment.  

Hope to see you soon :)


Thursday, 6 February 2014

Rainbow Wishes

Hi guys

I'm back with a very quick card tonight.  Less is More is one of my favourite challenge blogs and I try to take part as often as I can, although I have missed a few lately.  They are currently celebrating their 3rd birthday and I wanted to link up before the deadline tomorrow.  And to celebrate they have a really great colour challenge this week which is...
RAINBOW

I also decided to combine this challenge with the One-Layer Simplicity Challenge where their theme this week is 'Can You Repeat That?', and they want us to use some kind of repetition on our cards.

So, here's what I came up with...


This didn't take very long at all.  I drew a pencil line across the card and marked a central point before stamping the candles.  I erased the pencil marks once the ink had dried.  I then stamped the sentiment with the purple candle nestling in the corner but the card looked a bit off balance so I added a row of stamped dots to bring everything together, I think it works!

Materials used:

  • Stamps: Penny Black - Salutations; Clearly Besotted Stamps - Say It In Style; Hot Off The Press - Stamped Stitches
  • Ink: Versa Color - Cardinal, Orange, Canary, Fresh Green, Cyan and Heliotrope; Versafine - Onyx Black

I want to say a really big thank you and welcome to my newest followers, I have just hit 50 (as well as more that follow on Bloglovin').  Thanks so much for your support and I hope you find some inspiration from my designs.

Right, I really must go to bed, an early night is long overdue!

Night all 


Tuesday, 19 November 2013

Patterned Paper Bloom

Hi there

Today I'm here to share my card for the current challenge at Less is More where the theme is to 'Use Designer Paper in a CAS Way'.

I don't have a massive collection of patterned paper but what I do have I don't use nearly as much as I could.  So, here is my first proper attempt at stamping on patterned paper.


I used the gerbera stamp and first stamped the bottom half in green onto some green patterned paper, then stamped the top half in burgundy onto some pink patterned paper.  The stamp does have a co-ordinating die but I decided to fussy cut the images as I didn't want any white edging.  I coloured the centre of the bloom with a ProMarker.  I used a border die to give some interest to the base of the card and used the same die to cut some matching patterned paper which I used to ground the image.  The stamped images were then adhered directly to the card base and a sentiment was stamped alongside it.

Materials used:
  • Stamps: Clearly Besotted Stamps - With Love
  • Ink: Versa Color - Burgundy and Green Tea; Versafine - Onyx Black
  • Patterned Paper: Hot Off The Press - Cardmaker's Ultimate Pack (Floral)
  • ProMarker: Antique Pink
  • Die: Stampin' Up Edgelits - Adorning Accents

I wasn't sure I liked this card as it was evolving but I'm really pleased with the finished result.  It made a nice change to try something new :)

That's all for now, I'll shortly be off to grab some ZZZs

Night all

Sunday, 10 November 2013

One Layer Thank You

Hi guys

After a lazy morning followed by cooking the Sunday roast I decided to spend some time crafting this afternoon.

There are three current challenges I've spotted today, all requesting One Layer Cards:

Less is More - One Layer Card: Thank you
CAS on Sunday - One Layer Wonder
My Time to Craft - One Layer or Less

*Update - thanks to Nancy I'm also entering this card into the technique challenge at Just Us Girls which is to create a background of words :)

I decided to have a go at creating a word background.  Only yesterday I watched a video tutorial by the awesome Jennifer McGuire and had this technique in mind when I created my card.  Jennifer is a-ma-zing, its well worth a visit to her blog if you haven't yet discovered her talents.


I raided my clear stamp stash and grabbed any 'thank you' stamps I could find and then used a square die as my guide and organised the stamps upside down within the square.  This is a lot more difficult than it looks!  Once sorted I transferred them onto my stamp press to keep the stamps in position.

I then used my square die with my embossing mat to create an embossed square on my card base, without cutting through.  I then stamped the various thank you images in four different ink colours.

I'm not entirely happy with the layout but not bad for a first attempt!  With so many different fonts, some having scroll details, it was quite a task to find a layout that worked so what looks like a simple card actually took a while to create.

Materials used:
  • Stamps: Clearly Besotted Stamps - Butterfly Wishes, Butterfly Wishes Additions, Honecomb; Woodware - Salutations; BoBunny - Sentiments Stamp; Marion Emberson Designs - It's all in the Words; Penny Black - Salutations; Wild Rose Studio - Everyday Greetings; Hot Off The Press (name of set unknown)
  • Ink: Versa Color - Magenta, Turquoise, Violet and Split Pea
  • Die: Xcut - Nested Squares

I think I need a few more attempts at this technique but I'm really happy with the embossed square frame, great for adding interest to one layer cards.

Thanks for popping by and I hope to see you again very soon.


Saturday, 9 November 2013

Stitched Let It Snow

Hi there

I'm here this morning to share a card I've made for the latest challenge at Muse, and this week we are basing our creations on a lovely card made by the super talented Laurie Willison.

When I saw Laurie's card, the '&' reminded me of a snowman wearing a scarf so that's the direction I headed in.  I kept the layout and colour scheme almost the same.


I wanted to use one of my new stamp sets from this month's release at Clearly Besotted Stamps called 'In Stitches: Christmas'.  The cute snowman and sentiment are both from this set.  I masked off the bottom of the card and used a stripes stamp to create the diagonal base.  I then stamped a row of stitches which I have in another set of stamps, to continue the theme.

Materials used:
  • Stamps: Clearly Besotted Stamps - In Stitches: Christmas and Basic Stripes; Hot Off The Press - Stamped Stitches
  • Ink: Versa Color - Green Tea, Charcoal, Sky Gray and Scarlet

Here is Laurie's beautiful card...


That's all from me at the mo, I'm off now to do some very neglected and overdue housework!  Thanks for popping by and have a happy Saturday.


Tuesday, 5 November 2013

Masculine Stitches & Hexagons

Good morning crafters

I'm not usually here in the morning on a weekday but it's my boyfriend's birthday today so we've taken the day off.  I woke up early and as he's still in the land of nod I thought I'd share the card I made for him.

I really struggle with masculine cards and don't having much in my stash in the way of stamps so I decided to just use masculine colours and some die cuts.  I wasn't happy with this at all until I finally stuck everything in position and now I actually really like it.


I cut out the heart and hexagons from some coloured cardstock, not really knowing what to do with them at this stage.  I used a stitched line stamp to frame the white cardstock, which was then adhered to some charcoal grey cardstock.  It was then just a case of arranging everything until I found a layout I liked.  I stamped the sentiment and added some dew drops to finish.

Materials used:
  • Coloured Cardstock: Papermania Premium Textured Cardstock
  • Dies: Clearly Besotted Stamps - Love Hearts and Honeycomb
  • Stamps: Clearly Besotted Stamps - Love Hearts; Hot Off The Press - Stamped Stitches; Personal Impressions - To My...(Sue Dix)
  • Ink: Versa Color - Charcoal and Pinecone

I'm entering this card into the following challenges:

Daring Cardmakers - November Colour Combination


Moving Along With The Times - No (Design or Digital) Papers


That's all from me today, I've no idea what we're up to today but a good start would be to go and wake him up! :)

Take care and have a happy Tuesday.


Wednesday, 21 August 2013

Embossed Circles

Hi guys

Firstly, I'd like to give a warm welcome to two new followers, Hazel and Sarah.  Thank you so much for joining me and I hope I'll keep you interested and maybe give you some inspiration :)

I'm here this evening to share the following card...


Materials used:
  • Cardstock: Dovecraft - 12 x 12 Icicle
  • Embossing Folder: Couture Creations - Peacock Pleasure
  • Stamps: Inkadinkado - Circle and Dots; Hot Off The Press - unknown set (sentiment)
  • Ink: Versafine - Onyx Black; Brilliance - Graphite Black
  • Die: Xcut - Nested Circles
  • Ribbon and gems from stash
 
I'm entering this into a couple of challenges this week, the first being Dynamic Duos, to use Light Aqua and Black with the option of Embossing...
 

I've not entered this challenge before but I'm starting to enjoy colour challenges a bit more now.  I've not used SU products but hopefully I've come close enough with these shades :)


The second challenge is at Less is More although I'm not sure I've successfully complied with the brief this week.  The theme is 'Round and Round' so I immediately thought of this embossing folder featuring circles within circles.  However, after reading it properly (that'll teach me!!) Chrissie and Jen wanted us to use any image which implies this movement...ie things with wheels or which move in this manner etc or in fact cards with some moving parts.  Circles go round and round, right?!  Oh well, I enjoyed making it so may as well enter it :D

That's all for now folks but I hope to be back soon with more to share.

Take care


Related Posts Plugin for WordPress, Blogger...