Showing posts with label Brads. Show all posts

Saturday, 23 May 2015

Exciting News!

Good morning crafters

Today I'm thrilled to be sharing some exciting news with you!

After spending a few weeks guest designing with the lovely ladies at Less is More I have been asked to become a permanent member of their Design Team...woohooo!!!

When Chrissie asked me I didn't hesitate to say yes.  Less is More is one of my favourite challenge blogs and one that I've tried to enter most weeks since I discovered the world of craft blogs and challenges so I'm absolutely delighted to be joining their little team.  I only hope I can match their standard each week and provide you with some inspiration.  Thanks so much Chrissie, Sarah and Anne for having me! xx

So, on to this week's challenge.  We are back with a Recipe challenge and we would like you to

Use some metal


Here are my DT cards to hopefully inspire you...


I stamped the tree from Clearly Besotted's Joy to the World set in Neptune Versa Color ink and heat embossed with some embossing powder by All Night Media called Crystal Sparkle.  The blue frame is actually white cardstock, inked around the edges and heat embossed the same way to match.  I added a silver star brad to the top of the tree and the sentiment is a metal bar embellishment which has an eyelet fastener on the back.  These metal embellies have been in my stash for years.


The dotted glitter cardstock is called Sherbert Pips by Kanban and is die cut using a pierced square by MFT Die-namics, as is the small white square.  Then, using some textured paper I layered it up to create a baby's nappy, using a circular die to cut the leg holes and folded the layers around and secured them at the back.  A small safety pin finished it off.  I then stamped the simple sentiment from Clearly Besotted's Little Onesie set.


I really struggle with masculine cards so I'm really pleased with this one.  On a strip of dark grey cardstock I used translucent embossing paste through a metal effect stencil by Dutch Doobadoo.  Once dry I added a hammer charm/brad (from my stash) to some co-ordinating grosgrain ribbon and wrapped this around, securing on the back.  This was then mounted on a strip of lighter grey cardstock and a simple sentiment was stamped to finish, this from Sentiment Sampler by Paper Smooches.

I'd like to link this last card at the following challenges:

Seize the Birthday - Anything Goes
Creative Card Crew - Challenge #87 - Embossing
Simply Create Too - Challenge #86 - Keep It Simple


Thanks so much for visiting today, I do hope you'll have a go at our challenge to use some metal, this certainly challenged me to dig deep into my stash and use some embellishments I always forget about.

I hope to see you soon.


Sunday, 20 April 2014

A Little Note

Hi guys

I'm back to share a card I've made to combine a few different challenges.


I started by stamping the notepad image.  I stamped this off onto some scrap paper first as I wanted it to be faint.  I then cut this out using a rectangular die.  The stamp does include impressions for the holes but on this occasion I chose to punch these out.  I then chose some patterned paper and cut this out using the same rectangular die.  Next I stamped the flower and sentiment image before colouring in with ProMarkers, choosing colours to co-ordinate with the paper.  I then added a metal button brad through the top hole before laying up and adhering the rectangles.

Materials used:
  • Stamps: Clearly Besotted - Just a Note; Pink Petticoat - free stamps with a publication
  • Ink: Versa Color - Sky Gray; Memento - Tuxedo Black
  • Patterned Paper: Pebbles - Sunny Side
  • Die: Spellbinders Nestabilities - Classic Rectangles Large
  • Coloured with ProMarkers
  • Brad from stash
  • Single hole puncher

Challenge entries:

CASology - Week 91 - Note
Addicted to Stamps and More - Challenge #91 - Anything Goes
Keep It Simple - Challenge #38 - Bright Sparks
Crafty Catz - Challenge #227 - B is for... (in this case B is for brights, button and brad)
Retro Sketches - Sketch #111


Thanks for popping by, folks.  I hope you are all having a lovely Easter Sunday whatever you're up to.

Hope to see you again soon.


Wednesday, 23 January 2013

Best Friend Hugs

Since starting my blog I think this has to be my favourite card so far, I'm really pleased with the result.

I am entering this card into the following two challenges:

 
Clean & Simple Sketch


Week 103 Theme - Friends
 
 
So here it is
 
 
 a closer view...


When I saw that the latest Less is More theme was 'Friends' I knew exactly which stamp I wanted to use, its called 'Best Friends' by Wild Rose Studio.  Its such a fun and girlie stamp, I love it!  I stamped the image and coloured with ProMarkers and although still a novice I really enjoyed colouring this one.  I chose the patterned paper I wanted to use before I started colouring the image.  I still only have a few ProMarkers in my collection but managed to match it up ok.  The design paper I used is from a paper pad by First Edition Paper and has glossy, glittered accents.  I took the following photo using the flash to try to pick up on the glitter.


I die cut the image and popped it up on 3D foam and then finished off the card with some peach grosgrain ribbon, an extra large brad with a rub-on sentiment and an adhesive pearl.
 
Woohoo, actually really chuffed :)
 
Materials used:
  • Design Paper: First Edition Paper - Spring Feast Paper Pad
  • Cardstock: Kanban 300gsm Brilliant White Cardstock
  • Stamp: Wild Rose Studio - Best Friends
  • Ink: Impress - Jet Black
  • Coloured with ProMarkers
  • Die: Spellbinders Nestabilities - Reverse Wonky Rectangles
  • Brad and Rub-On: Hot Off The Press - Words, Hearts & Flowers
  • Ribbon and pearl from stash
 
Thanks so much for visiting, I really appreciate your interest.
 
Neet x


Saturday, 19 January 2013

Oldies...When Peel-Offs Ruled!

Hi guys

Today I thought I would share with you some of my cards from back in the day, when I first started creating.  I used to work in a large office and colleagues would buy cards from me so I always kept a stock of cards with me.  I now wish I'd taken photos of them all because I can now only share the ones that nobody wanted! :)

I was a bit scared of stamping back then so used to use many peel-offs.  I still have hundreds which have now been pretty much abandoned since I've discovered how beautiful cards can be when using stamps.  That said, these cards are quite handy to look back on as I really like some of the layouts.

So here we go:
No. 1
I actually love this little card.


I used a slim pearlescent card base and glittered transparent peel-offs which I adhered to clear vellum and coloured from behind and matted on mirri card
 
 
No. 2
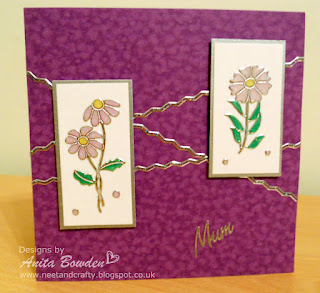
Same peel-offs as No. 1 matted onto a mottled base card, with yes you've guessed it, more peel-offs behind the mats to add interest.  I secretly quite like this one too!


No. 3
A bit of ripping and tearing, metallic peel-offs coloured with permanent pens and a few quilled toppers
 
 
No. 4
I trimmed the edge of this card and overlapped the topper over the outside edge.  The image is a glossy embossed rub-on
 
 
No. 5
This is a textured silver card base with a debossed panel.  I added a topper, gem, bow and of course a peel-off!
 
 
No. 6
Simple slim card with die cut shapes and peel-offs
 
 
No. 7
A peel-off matted and layered over mulberry paper
 
 
No. 8
Another glossy embossed rub-on as in No. 4, layered over adhesive ribbons
 
 
No. 9
 Embossing using brass stencils over a light box then basic matting and layering, and vellum secured with brads 
 
 
No. 10
This is a tiny little notecard and on this occasion not a peel-off in sight!  I stamped with black ink and embossed with clear embossing powder before colouring with glaze pens
 
 
No. 11
Coloured metallic peel-off and again, the edge of the card was trimmed to show the back inside edge
 
 
No. 12
An attempt at creating a masculine card.  The ribbon on the tag was tied through an eyelet
 
 
No. 13
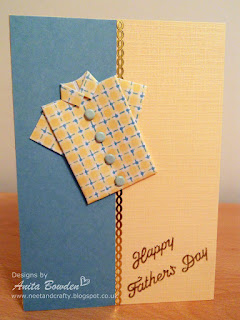
I was shown how to fold this little shirt by a demonstrator at a local craft exhibition.  I have my 'master' copy in a safe place so I can always refer back to it.  I used brads to create the shirt buttons.  And yes, more peel-offs!


Well there you have it, I hope you didn't find these too cringeworthy! 
 
I still can't part with my many peel-off sheets, perhaps they'll make another appearance on my blog, watch this space!
 
Thanks as always for visiting.
 
Neet x 
Related Posts Plugin for WordPress, Blogger...