Showing posts with label Masculine. Show all posts

Sunday, 29 June 2025

Uniko Flippin' Fabulous Ink & Flip Masculine Inspiration Brand Ambassador Blog Hop & Giveaway

Hi there

Yes, I'm still here!  So sorry for the silence, it's been a busy couple of months so I've not managed to find time for any crafting but I'm back today to join in the finale of the masculine themed month with Uniko.

Today the team are showcasing the Ink & Flip stencils and giving them a masculine touch.

And, by visiting each of the Brand Ambassadors along the hop, starting at the Uniko blog, here, as well as commenting on our socials, you're in with a chance of winning an Ink & Flip stencil of your choice.  

I have two stencilled cards to share today, one using an Ink & Flip stencil and another using another stencil from Uniko.


Ok, here's my first where I've chosen the Ink & Flip Christmas Star as it offers a fantastic central focal point for any card...


I inked up both sides of the stencil, first in Pumpkin Pie ink and then with Dusk ink, which created the star and a darker green shade where the the colours overlap.  Next I stamped the sentiment from the Mid Century Modern Birthday stamp set in a darker blue, and then finished with the Background Blocks Linear image stamped in each corner in black.

Materials used:
  • Stencil: Uniko - Ink & Flip Christmas Star
  • Stamps: Uniko - Mid Century Modern Birthday; Background Blocks Linear
  • Ink: Altenew - Pumpkin Pie, Dusk, Desert Night; Versafine Clair - Nocturne


And for my second masculine make I've used the Mid Century Modern Circles & Stars stencil...


This love using the shifted stencil technique with this stencil, it creates the illusion of so much dimension on a flat panel.  So I began with a dark orange panel of cardstock and inked through the stencil in a dark blue ink.  I then shifted the stencil slightly downwards and to the right and then inked through again with a white pigment ink.  This created the lighter blue and makes the original inking look like shadows.  I die cut the panel and adhered it flat to my card base then found an unused die cut circle in my stash so stamped the sentiment from the Mid Century Modern Everyday Sentiments set in black. The card was finished with some co-ordinating enamel dots.

Materials used:
  • Stencil - Uniko - Mid Century Modern Circles & Stars
  • Stamps: Uniko - Mid Century Modern Everyday Sentiments
  • Ink: Altenew - Dusk; Hero Arts - Unicorn; Versafine Clair - Nocturne
  • Die: Create a Smile - Cool Cuts Double Stitched Rectangles; circle from stash
  • Accents: Doodlebug Sprinkles - Tangerine and Blue Jeans Assortments


Thanks for visiting today and good luck if you comment along the hop.  

I appreciate you looking and plan to be back again very soon :)



Sunday, 23 February 2025

Uniko Celebrating 13 Years - Introducing...Stencil Geometric Happy Birthday

Hi there

It's day one of the introductions from the latest Uniko release.  Bev has some great new additions coming up.

We're kicking off with a new stencil.  This one is initially being offered as a freebie with any orders over £15, prior to it being a new addition to the product catalogue.

This stencil is great for masculine makes and when I first saw this it was giving me camouflage vibes. 

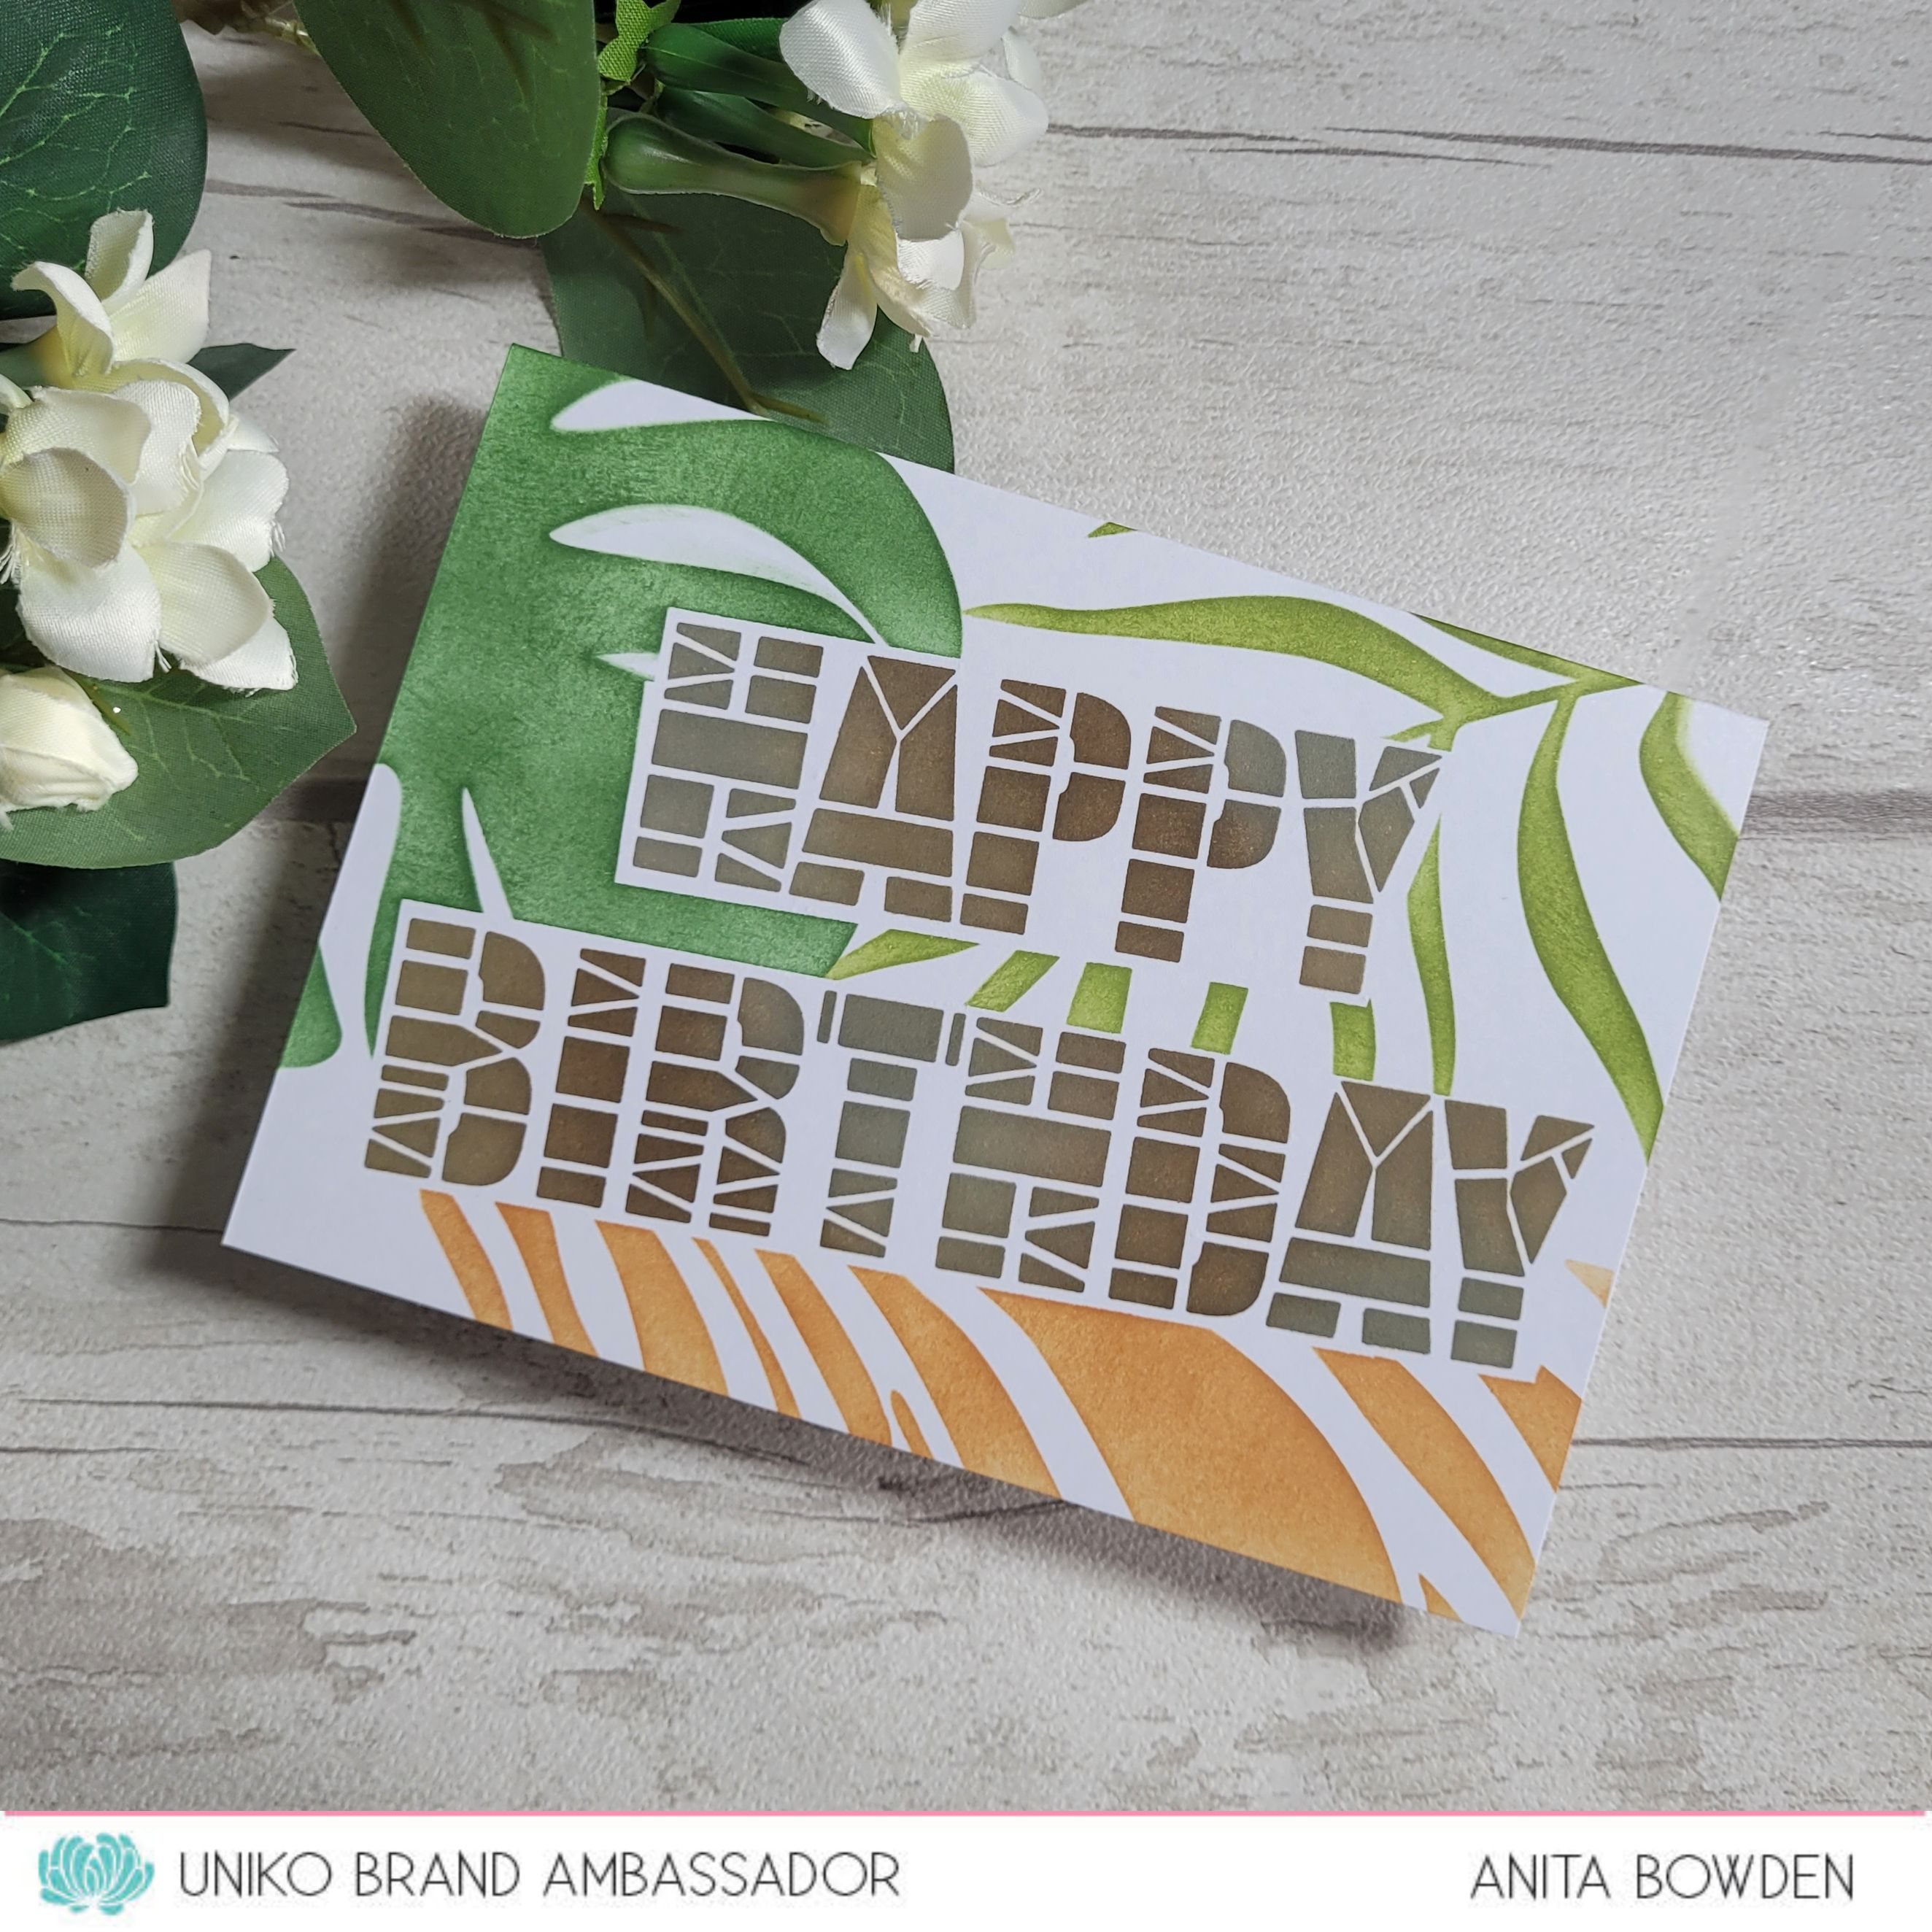
So that's the route I took for my first card, a jungle theme.  Here I used it with three other Uniko stencils...Tropical Leaf #1, Tropical Leaf #2 and Tiger Print (no longer available)...


I began by stencilling the Happy Birthday in three shades of brown/grey ink.  I then masked the words and inked up the other stencils surrounding it.  

Materials used:
  • Stencils: Uniko - Geometric Happy Birthday, Tropical Leaf 1, Tropical Leaf #2, Tiger Print
  • Ink: Distress Ink - Pumice Stone, Frayed Burlap, Ground Espresso, Peeled Paint, Rustic Wilderness, Rusty Hinge


And now my second card and this one shows that it's not just for masculine cards.  Here I framed the greeting with stamps from the Background Builders Squared and Background Builders Triangulate...


I simple inked through the Happy Birthday with pink and blue ink, creating the lilac where the inks blended.  Then simply stamped two borders above and below in black.

Materials used:
  • Stencil: Uniko - Geometric Happy Birthday
  • Stamps: Uniko - Background Builders Squared, Background Builders Triangulate
  • Ink: Distress Ink - Kitsch Flamingo, Salty Ocean; Versafine Clair - Nocturne


For lots more inspiration from the rest of the team using this stencil set, take a look at the Uniko blog, here.  I'll be back tomorrow to introduce two more products from this new release.

All the new products will be available from Friday 28 February 2025.


Wednesday, 27 March 2024

Uniko Brand Ambassador Inspiration - 3 Stamp Sets 1, One-Layer Card

Good morning

I'm back with some Uniko Brand Ambassador Inspiration today.

I was recently tasked with making an 18th birthday card for my godson and masculine cards are the kind I find the most difficult, so to make one for an older teenager was even more daunting!  I had a rummage through my Uniko stash and decided to combine three stamp sets: Big & Bold HappyBackground Blocks Halftone and Explosion!

And other than the number dies I adhered, this is a completely flat, one layer card with all the elements stamped directly on the card base.  For full details of how this was made, take a look at my post over on the Uniko blog, here.


Materials used:
  • Stamps: Uniko - Big & Bold Happy, Background Blocks Halftone, Explosion!
  • Ink: Altenew - Autumn Blaze, Nimbus, Olive, Vineyard Berry; Versafine Clair - Nocturne
  • Dies: Spellbinders - Be Bold Lowercase Alphabet and Numbers

I was really pleased with how this one turned out and I hope this gives you some inspiration for those trickier masculine designs.

Enjoy the rest of your week, and with the Easter weekend approaching we are already past the halfway point of the working week.  Mustn't grumble, eh!  I hope you have some lovely plans for the long weekend.
 

Wednesday, 23 February 2022

Uniko February 2022 Release - Introducing...Background Blocks Cogs, Background Blocks Splatters and Everyday Sentiments

Hi there

Welcome to the first of the introductions for Uniko's 10th Birthday Release. 

I'll get straight to it, I'm sure you'd rather see the products in action than have me waffling on!  And don't forget to pop on over to the Uniko blog where you will find more inspiration from the rest of the team too.

First up is the new Background Blocks Cogs stamp and I've used a sentiment from the new Everyday Sentiments set...


Masculine cards are the kind I find most difficult so I had to have a think and plan this one out.  I decided on layered emboss resist.  I've only used this technique a handful of times but the effects are great.  I masked off a central rectangle and then blended with a few earthy tones of Distress Ink.  After making sure the ink was completely dry and adding some anti-static powder, I stamped the cogs image with VersaMark ink,removed the masks and heat embossed in clear.  I replaced the masks and then blended over the entire background with a darker shade, which then reveals the previous ink colours trapped underneath the embossing.  The sentiment was stamped in a brown shade below.


Materials used:
  • Stamps: Uniko - Background Blocks Cogs, Everyday Sentiments
  • Ink: Distress Ink - Pumice Stone, Rusty Hinge, Brushed Corduroy, Frayed Burlap; VersaMark; Altenew - Moon Rock
  • Embossing Powder: Wow! - Clear Gloss
  • Die: Create a Smile - Cool Cuts Double Stitched Rectangles


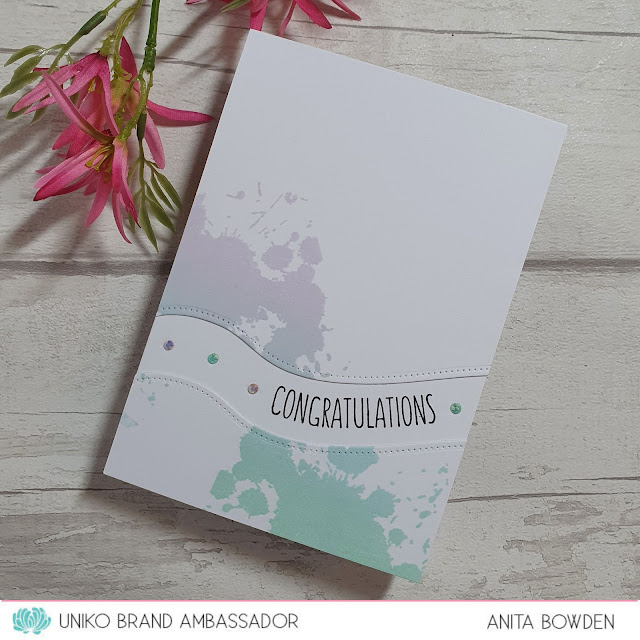
And for my second make I used the new Background Blocks Splatters stamp and another from Everyday Sentiments...


I began with a panel the same size as my card base and stamped the image twice, once with lilac fading into blue ink, and again with blue fading into green ink, to create a continuous flow of colour.  I then used a border die to cut a section away.  The two panels were then adhered to the card base and the sentiment stamped between, curved slightly to follow the shape of the die cuts.


Materials used:
  • Stamps: Uniko - Background Blocks Splatters, Everyday Sentiments
  • Ink: Altenew - Soft Lilac, Sea Glass, Mountain Mist; Versafine Clair - Nocturne
  • Die: Avery Elle - Dotted Border Dies
  • Accents: Little Things from Lucy's Cards - Jewels: Shimmering Pool Mix and Grape Mix


Thanks so much for stopping by today.  I'll be back tomorrow morning to share more makes using more products from this new release.

(AD - some products kindly gifted for Design Team purposes)


Thursday, 17 June 2021

Ombre Birthday Balloons

Hi there

Another recent make from me today and this time it's a birthday card I made for a male colleague.

When I first started selecting the patterned papers for this I thought the colours would be a little too feminine but combined with the dark grey I think it makes it very gender neutral.


I began by die cutting the grey panel with a stitched rectangle die.  I adhered the panel to the card base, making sure there was plenty of adhesive within the negative space of the letters.  I then die cut the sentiment again from some ombre patterned paper and paper pieced the letters back in, including the grey centres.  To finish I die cut two balloons from some polka dot ombre papers, layered and adhered these off the edge of the card and trimmed away the edges.

Materials used:
  • Dies: MFT Die-namics - Happy Birthday To You, Blueprints 26; Create a Smile - Cool Cuts Stitched Rectangles
  • Patterned Papers: Craft Sensations - Ombre Designs

Challenge entries:

Happy Little Stampers - June Anything Goes with Dies Challenge
Uniko - Challenge #65 - Anything Goes (Optional twist: use die cuts)


It's not often I make a card which involves no stamping whatsoever, and it's a simple design I could replicate using more of my patterned papers which I don't reach for nearly enough.

Thanks for taking the time to visit.


Sunday, 2 May 2021

Happy Little Stampers May 2021 CAS Challenge

Good evening

Tonight I'm here to announce the new CAS challenge for May over at Happy Little Stampers.  Here's the theme we want to see on your clean and simple cards this month...


I'll admit, I had very little in my stash that I could use for this challenge....note to self, stop buying floral stamp sets!  Anyhow, this cute little bears stamp was one I purchased some time ago, when Lili of the Valley were selling off all their rubber stamps.  I believe they only sell digi images now.


This was pretty easy to create.  I stamped the image and then coloured it with Copics.  I'm still learning with my markers but getting there slowly and I'm quite pleased with how this one turned out.  I added a strip of patterned paper to the bottom of my card base then trimmed the image panel down and adhered it flat.  Then to finish I stamped the sentiment, this one from a very old Clearly Besotted set.

Materials used:
  • Stamps: Lili of the Valley - Football Bears; Clearly Besotted - Going Places
  • Ink: Memento - Tuxedo Black; Versafine - Onyx Black
  • Coloured with Copics
  • Patterned paper from stash

Challenge entries:

Seize the Birthday - Challenge #213 - Furry Friends
Addicted to Stamps and More - Challenge #404 - Any Occasion
STAMPlorations - May CAS Challenge
NBUS - Challenge #26 - first inking of these bears


Thanks for taking a look.  As with all the HLS challenges, the links will remain open until the end of the month so there's plenty of time to join us.


Tuesday, 30 March 2021

60th Balloons and Stars


Hi there

Tonight I'm sharing a card I made for a work colleague's 60th birthday.  

I always struggle with masculine designs but I'm liking the grey/blue/silver combo here.  And I've had some pearlescent sheets of ready cut mini envelopes in my stash for YEARS so used one of them here.  

Apologies for the lighting in these photos, I couldn't free up my usual spot on my table before this one had to go in the mail so I had to wing it at my craft desk and hope for the best!


I began by die cutting a rectangle from grey cardstock and two squares, one from white cardstock and another from polka dot paper.  I layered these up and stamped the sentiment.  I folded up the mini envelope and adhered it in place, then adhered a selection of die cut mini stars and two balloons stamped with the numbers and heat embossed in white.


Materials used:
  • Dies: Create a Smile - Cool Cuts Double Stitched Rectangles; MFT Die-namics - Pierced Square Stax, Stitched Strip (mini stars); Clearly Besotted - Got Your Number (balloons)
  • Patterned Paper: MFT - Summertime Polka Dots
  • Stamps: Clearly Besotted - Message Me, Got Your Number
  • Ink: Versafine - Onyx Black; VersaMark
  • Embossing Powder: Brutus Monroe - Alabaster White
  • Cardstock and mini envelope from stash

Challenge entries:

Happy Little Stampers - March Anything Goes with Dies Challenge
STAMPlorations - March Theme and Photo Prompt Challenge (playing with stamps/numbers option)


Thanks for visiting today, I've got a few more projects to share over the next few days so please do pop back and take a look if you can.


Friday, 6 November 2020

Masculine Happy Birthday

Hi there

Today I'm sharing the birthday card I made for my boyfriend.  It was his birthday yesterday which was really bad timing as yesterday was the start of the second lockdown in England, this time for four weeks.  So, unfortunately, we weren't able to go out and celebrate anywhere or with anyone else.  Both of us have had lockdown birthdays this year so we'll be making up for it next year for sure (hopefully!!)

I wanted to make a masculine card, but wanted a change from the usual blues, browns or bold colours I usually reach for when making cards for guys.

My lovely crafty friend, Sarah from Sazzle Dazzle Crafts, kindly recently sent me some coloured cardstock samples for me to try and the grey that I used here for the background was one of those samples and I love it!


I began by covering the card base with the grey cardstock.  I then die cut the 'happy' from various shades of cardstock from my scraps folders: mint, dark slate blue, light blue and white.  I layered them up slightly offset, with the white at the back to create the most contrast with the grey.  Before adhering in position I die cut a balloon string from black glitter cardstock and then adhered the 'happy' over the top.  I die cut a heart balloon from polka dot paper and popped this up on 3D foam, then finished by stamping the remainder of the sentiment.


Materials used:
  • Dies: Wplus9 - Happy Trio, Whole Lotta Happy; MFT Die-namics - Blueprints 26
  • Stamp: Clearly Besotted - A Little Sentimental
  • Ink: Versafine - Onyx Black
  • Patterned paper: Doodlebug - Kraft in Color: Color


Thank you for visiting, I'll be back in the morning to share the new challenge over at Less is More.


Wednesday, 1 July 2020

Skull and Cross Buns - July 2020 - Selection Three

Good morning

A couple more makes today using Skull and Cross Buns products.  Don't forget, their products will be showcased on Hochanda on the 9am show this coming Friday, 3 July 2020.


Ok, the new stencil I've used today is called Elongated Triangles...


For this first card I used low tack masking tape to create a border on my card base as well as some random strips in different directions.  I then laid the stencil over each exposed area and blended through in bold ink colours, with each section having the stencil pattern in a different direction.  I then removed the tape and stamped the various sentiments from the Quirky Sentiments set and the star from the Planner Banners set was stamped in silver.  A simple but striking one layer design.

Materials used:
  • Stencil: Skull and Cross Buns - Elongated Triangles
  • Ink: Distress Ink - Twisted Citron, Wilted Violet, Blueprint Sketch, Peacock Feathers; Versafine - Onyx Black; Versa Color - Silver
  • Stamps: Skull and Cross Buns - Quirky Sentiments, Planner Banners


I used the same Elongated Triangles stencil here, but with a masculine theme...


For the top panel I ink blended the background with three shades of Distress Ink then used the ghosting technique, which involves laying the stencil over the panel, spritzing with water and then blotting away the colour from the exposed areas.  Once dry I die cut the panel with a stitched rectangle die and stamped the sentiment from the Quirky Sentiments set.  I adhered the panel, offset over a black panel onto the card base before finishing off with some stamped elements from the Planner Banners set.

Materials used:
  • Stencil: Skull and Cross Buns - Elongated Triangles
  • Ink: Distress Ink - Black Soot, Hickory Smoke, Ground Espresso; Versafine - Onyx Black; Versa Color - Pinecone, Charcoal
  • Die: Create a Smile - Cool Cuts Double Stitched Rectangles


Thanks as always for taking a look.  I'll be back with my final samples tomorrow morning, ahead of the show on Friday.
(AD - some products kindly gifted for design team purposes)

Friday, 14 February 2020

Perfectly CAS - February 2020 Challenge

Good evening

The February challenge over at Perfectly CAS is just launching and here's this month's cue card...


For some reason I chose to make a one layer card (I don't know why either!) and I opted to use a stencil featuring a triangular design for my sample card this time, one that is fairly new to my stash and not yet used.


I masked off a section and just ink blended through part of it.  I used three shades of Distress Ink and faded these out to follow the decreasing triangles.  I then stamped the sentiment and added the dots either side using just part of a stamp.  I thought I'd broken the rules here but after measuring the width of the stencilled area, it's exactly one third of the card width!  And I allowed a little leeway for my sentiment :D 

Materials used:
  • Stencil: Clearly Besotted - Triangle Fade
  • Ink: Distress Ink - Blueprint Sketch, Peacock Feathers, Twisted Citron; Versafine - Onyx Black
  • Stamps: Altenew - Beautiful Lady; Skull and Cross Buns - Planner Banner

Challenge entries:

Seize the Birthday - Challenge #183 - Anything Goes / White Space
Addicted to CAS - Challenge #177 - Ombre


There's lots of scope with this challenge so why not join us, just remember to keep your designs to roughly one third of your card base. 

Wednesday, 12 June 2019

Beer Cheers

Hi guys

It's been a while since I shared anything so I'm popping by tonight to share a card I made for my boss for his birthday.

I find masculine cards especially difficult but I'm pleased with how this one turned out.


I began by embossing a panel of white cardstock using a streamers and confetti embossing folder.  Next I stamped the beer glasses from a set which was free with a magazine, and also had co-ordinating dies.  I coloured the image with ProMarkers.  I die cut the 'cheers' from some gold glitter cardstock and once again from some fun foam, and stacked the two together for some dimension.  The panel was adhered to the base on fun foam, the glasses on 3D foam pads and the cheers adhered below.


Materials used:

  • Embossing Folder: Hobbycraft - Streamers
  • Stamp: Bubbles & Fizz - Free with Papercraft Essentials magazine (and co-ordinating die)
  • Ink: Memento - Tuxedo Black
  • Coloured with ProMarkers
  • Die: Paper Smooches - Birthday Words

Challenge entries:

STAMPlorations - June Challenge - Stamps and Birthdays
STAMPlorations - June CAS Card Challege - Anything CAS Goes
Seize the Birthday - Challenge #167 - Anything Goes
Uniko - Challenge #53 - Anything Goes + Optional Twist Masculine


Thanks so much for visiting, I hope to share more very soon.

Thursday, 28 March 2019

Hidden Sentiment Splats

Hi guys

Apologies for the silence here for almost two weeks.  I've been creating lots behind the scenes but haven't been able to share those yet, but they'll be up on here very soon.

On top of that I was unwell for a while, after finally fighting off my cold I then had chronic sinusitis so for about ten days I felt like I'd been kicked in the face.  But it's finally subsided and I'm feeling much better now.  I kind of lost almost the whole of March!

So, until I can share my DT makes, in the meantime I thought I'd pop in to share a card I made last week for my godson's 13th birthday, it only seems like a couple of years since I was at his Christening and now he's a teenager!  Where does the time go?

I really struggle with masculine cards and even more so when they are for teenagers, so I went with bright colours and splats!  Who knows why?! :D


On a panel of white cardstock the same size as the card base I blended ink through a splats stencil with Distress Inks.  I then die cut the happy birthday from the panel, being sure to save all the little in-betweeny bits.  I then die cut it twice more from some black cardstock.  I added adhesive all over the card base and adhered the panel.  I then adhered one of the black die cuts into the negative space, filling in the spaces with the bits saved from the first cut.  The second black die cut and the original layer were then stacked and adhered on top.  You can see the dimension in the next photo...


To finish I die cut two balloons from black cardstock, and also stamped and die cut the numbers.  These were adhered together and affixed to the card, and I hand drew the balloon strings.

Materials used:

  • Stencil: Imagination Crafts - Splats
  • Ink: Distress Ink - Blueprint Sketch, Twisted Citron, Peacock Feathers; Versafine - Onyx Black
  • Dies: Paper Smooches - Happy Birthday Words; Clearly Besotted - Got Your Number
  • Stamps: Clearly Besotted - Got Your Number

Thanks so much for stopping by, I'll try not to leave it so long next time!

Related Posts Plugin for WordPress, Blogger...