Showing posts with label Craft Concepts. Show all posts

Saturday, 25 May 2019

Less is More Challenge #396

Good morning, crafters!

New challenge day is upon us once again over at Less is More, and today we're back with a Recipe challenge.  Here's the cue card with details of what we want to see you creating and sharing with us...


We're specifying less than one third to be true to our challenge guidelines and our love of unpatterned/untextured white space.


Continuing as our sponsor for this month is the fabulous and generous CAS-ual Fridays Stamps


and don't forget, as well as our monthly prize, they are also offering the discount code below


So, without further ado, I'll move on to my sample cards.  And it appears my mojo has returned, I have four cards for you!!!

Here's the first, and my favourite of this batch of makes...


I began with the dragonfly die cut, cut from white cardstock.  I squidged my VersaMark pad over it, held it with tweezers and poured two different embossing powders over it.  I heated it to melt the powders then repeated the process twice more to create the glossy effect.  On the card base I blended through a leaf stencil with Distress Ink and stamped the sentiment in metallic pigment ink.  To finish I adhered the body of the dragonfly only, and manipulated the wings upwards for some dimension.


Materials used:

  • Die: Clearly Besotted - Dragonfly Die Collection
  • Embossing Powder: Wow! - Peppermint Tea, Metallic Copper
  • Stencil: Funky Fossil - Forest Foliage
  • Stamp: Clearly Besotted - Make a Wish
  • Ink: VersaMark; Distress Ink - Lucky Clover; Versa Color - Bronze

Challenge entries:

AAA Cards - CAS Game #140 - Up to One Third (not twisting this time)


Onto my second card, and some simple stamping and heat embossing...


I chose a teal card base and panel for this one.  Before stamping the images with VersaMark I treated the surface with an anti-static powder tool to avoid the embossing powder clinging to unstamped areas of the panel.  I used parts of the same floral image at the top and base of my panel, and heat embossed these along with the sentiment in white embossing powder.  Once cooled I used a soft cloth to ensure no anti-static powder remained on the panel.  It was then adhered using fun foam.


Materials used:

  • Cardstock from stash
  • Stamps: Honey Doo Crafts - Roses and Lilies; MFT - Grand Peaceful Wildflowers (sentiment)
  • Ink: VersaMark
  • Embossing Powder: Wow! - Opaque Bright White

Challenge entries:

Moving Along with the Times - Challenge #98 - Monochrome Colour


I'm not loving this next one but thought I'd share it anyway..


I used a floral corner embossing folder on a white cardstock panel here and stamped the sentiment in pigment ink.  I adhered the panel flat to the card base then added some Nuvo drops to the centre of the flowers.  My drops weren't behaving and weren't coming out evenly so the look isn't really what I was going for but it's still quite a cute card.  I thought the embossing alone wasn't enough but perhaps it needed embellishing in a different way.  I might revisit this one :)

Materials used:

  • Embossing Folder: Craft Concepts - Florette
  • Stamp: Wplus9 - Strictly Sentiments
  • Ink: Versa Color - Lagoon Blue
  • Accents: Nuvo Crystal Drops - Carnation Pink

Challenge entries:

Alphabet Challenge - E is for Embossing Folder


For my final card I embossed a panel using a die set...


I used a set of dies, a tulip square and pierced frame, to emboss a panel using an embossing mat in my Big Shot.  I trimmed around the edge of the frame then die cut a slightly larger pierced square from purple mirri card.  I adhered the mirri square flat to the base then popped up the tulip square on 3D foam strips.  I used a bold sentiment below the focal point to finish the card.


Materials used:

  • Dies: Creative Expressions - Tulip Flower Square; MFT Die-namics - Pierced Square Stax
  • White and mirri card from stash
  • Stamp: Clearly Besotted - Brushed Greetings II
  • Ink: Versafine - Onyx Black

Challenge entries:

Allsorts Challenge - Week 520/1 - Happy Birthday 
The Flower Challenge - Challenge #32 - Embossing


There are so many ways to add embossed details to your cards.  If you need some inspiration please do visit the main Less is More challenge blog, here, to see what my teamies have been creating.  I'm looking forward to seeing your creations in our gallery, and don't forget, the linky is open for a fortnight so plenty of time to play along.

Saturday, 19 October 2013

Sketch Saturday #281 - Guest Designer!

Hi guys

It's Saturday morning so that means it's time for a fresh sketch at Sketch Saturday

I'm loving my October Guest Designer role and really enjoyed making my card based on this week's great new sketch.

Before I share my card with you I just wanted to remind you that there is still plenty of time to link up at the Sketch Saturday blog for a chance to win their Thank You Candy.  To celebrate their 2000 followers milestone they are offering loads of fab prizes and all you have to do is become a follower, add your details to the Linky and spread the word.  The deadline is 31 October.

So back to this week's sketch...


And here's my card...


I'm disappointed with the colour of these photographs.  Whenever I take photos of purple tones they always seem to come out very blue.
 
I recently purchased a Stampin' Up stamp set from eBay and tried the 2-step stamping technique for the first time and gave my Stamp-a-ma-jig its first outing.  I stamped the first image by colouring onto the stamp with some markers in lilac and green.  I then used my Stamp-a-ma-jig to line up the second stamp which I coloured with a darker purple marker.  This was then die cut with a circle die. 
 
I layered up the base card with two shades of purple/lilac cardstock and then cut the green cardstock to size before running it through my Big Shot in an embossing folder.  I stamped the sentiment and popped up the circular image on 3D foam for some dimension.
 
Materials used:
  • Stamps: Stampin' Up - Simply Soft (Hostess set); BoBunny - Sentiments Stamp
  • Ink: Whispers Strokes; Versa Color - Imperial Blue
  • Die: Xcut - Nested Circles
  • Embossing Folder: Craft Concepts - Cherry Blossoms
  • Cardstock: Bazzill Basics Premium Cardstock; Stampin' Up - Lucky Limeade and Wisteria Wonder
 
So, why not join in the challenge this week, I'd love to see what creations you come up with.
 
Sorry for being a bit quiet on the blog this week, I've had a busy week with no time for crafting but I've got the weekend to myself at home so hopefully I'll have more cards to share shortly.
 
See you soon


Sunday, 29 September 2013

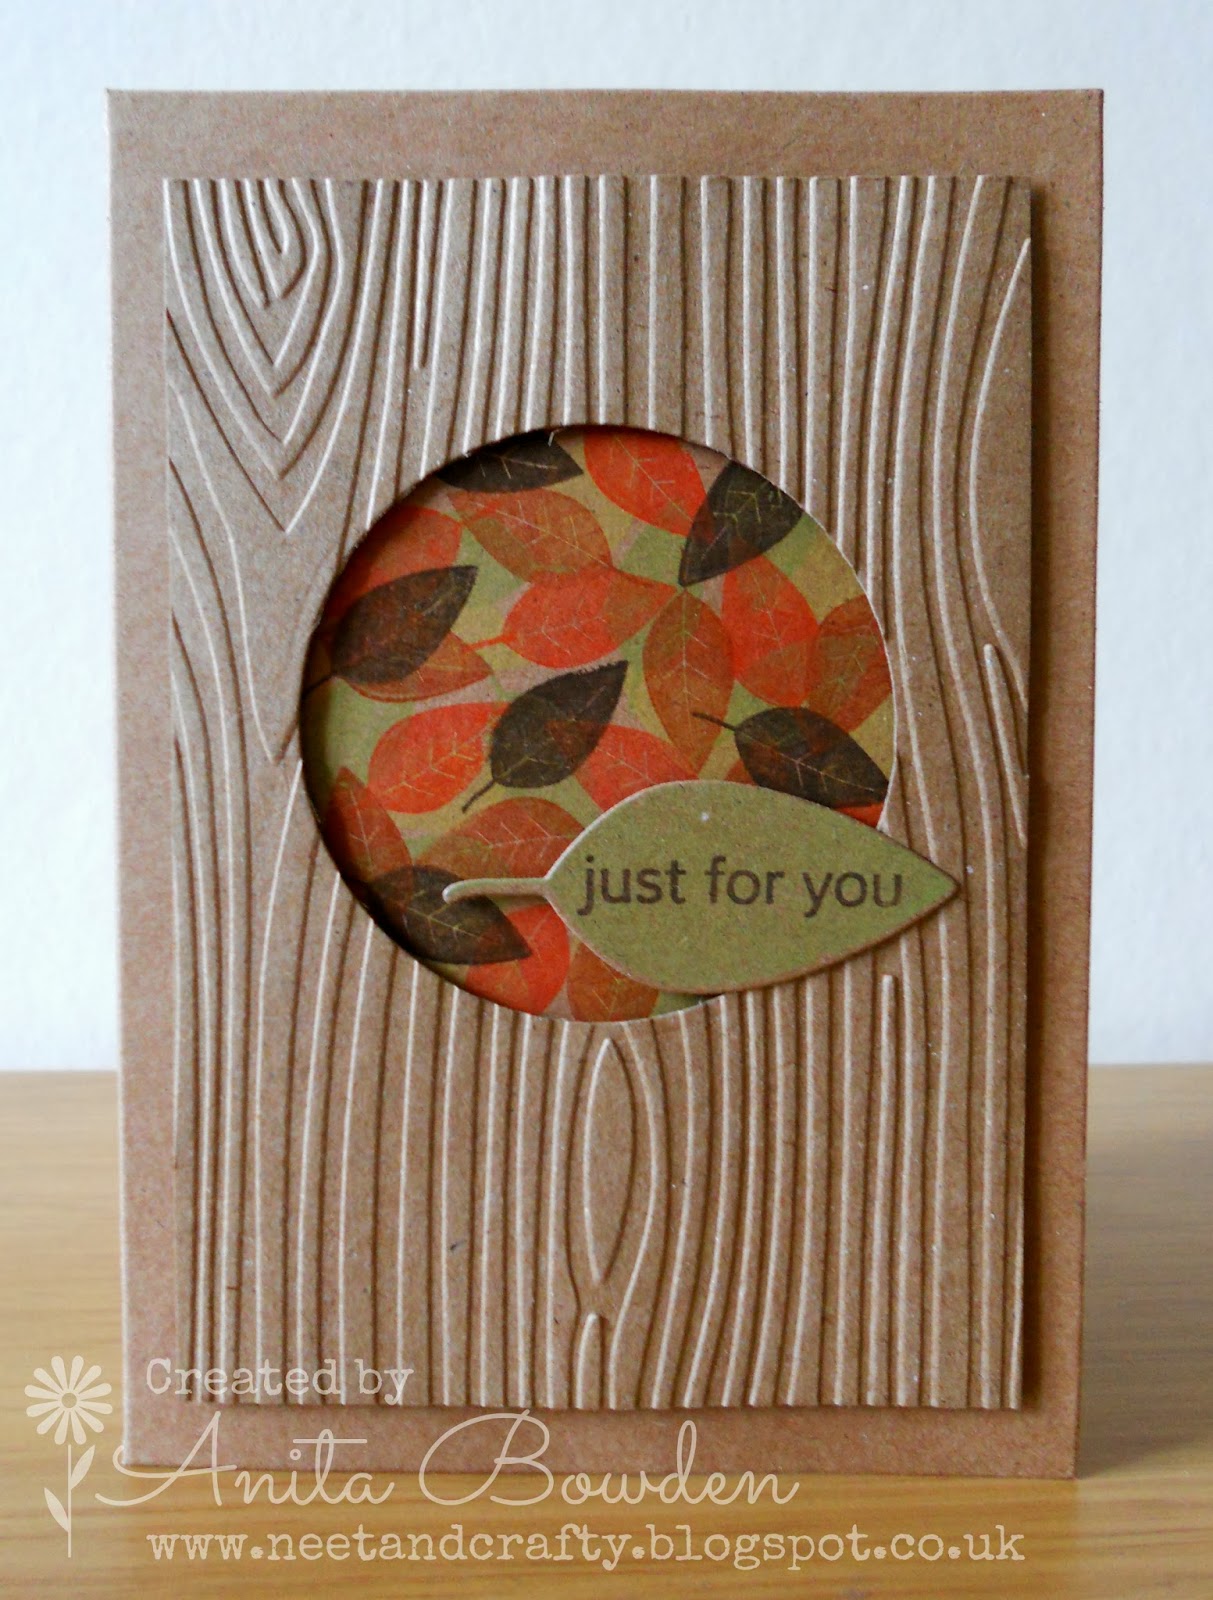
Autumnal Just For You

Hi there

I've had a hectic week but have managed to find a little time today to create this next card.


This was fairly simple to create.  I started by die cutting a circle from the top layer of kraft cardstock.  I then ran this panel through my Big Shot using a woodgrain embossing folder.  I stamped the leaves directly onto the base card covering the area that would appear through the aperture then mounted the upper layer on 3D foam.  I stamped the sentiment on a larger, matching die cut leaf and also popped this up on 3D foam. 
 
Materials used:
  • Stamps: Clearly Besotted Stamps - Autumn Flowers and A Little Sentimental
  • Ink: Versa Color - Khaki, Bamboo, Paprika, Bark and Pine Cone
  • Dies: Xcut - Nested Circles; Clearly Besotted Stamps - Autumn Flowers
  • Embossing Folder: Craft Concepts - Woodgrain
  • Cardstock: Papermania - Kraft
 
I'm entering this card into the following challenges:
 
Less is More - Sketch #10
 
 
Addicted to CAS - # 23 Autumn/Fall
Pile It On - #39 Leaves
2 Sisters Challenge - # 163 Anything Goes


Thanks so much for visiting, I'll be back with another card shortly :)


Thursday, 5 September 2013

Clearly Besotted Stamps - September Release Teaser Time - Day 5

Hi there


Today is the final teaser day for the September release of Clearly Besotted Stamps' new stamps and dies collections.  Don't forget to pop over to Stephanie's blog today, owner of Clearly Besotted Stamps, as she will be revealing the whole release in its full fantastic glory.  The eight new stamp sets and seven new die collections will be available to purchase from the online store from midnight tonight.

Today I am once again showcasing the 'Autumn Flowers' stamps and co-ordinating dies collection, I love it so much I made two more cards :)


I love this pine needle stamp, the detail is fantastic and it stamps beautifully.  I created the background frame by stamping and embossing white on white.  I must have taken about 20 photos to try to capture the effect but hopefully it comes across in the pics.  I then used the same stamp to create the main focal image before cutting and layering on a square frame of dark brown to echo the dark brown die cut pine cones.  A small die cut oval for the sentiment and some grosgrain ribbon completed the card.
 
Materials used:
  • Stamps and Dies: Clearly Besotted Stamps - Autumn Flowers; Spellbinders Nestabilities - Classic Ovals Large
  • Ink: VersaMark; Versa Color - Evergreen and Pine Cone
  • Embossing Powder: Stampin' Up - White
  • Cardstock and ribbon from stash


For this second card I used a snippet of dark brown cardstock and embossed using a woodgrain embossing folder.  I then created a stamped background panel which is popped up on 3D foam.  I stamped the sentiment and framed in a simple oval die cut, then finished off with a die cut oak leaf and acorns.   I love the stamped leaf images and how the effect that they are starting to break down looks so realistic.
 
Materials used:
  • Stamps and Dies: Clearly Besotted Stamps - Autumn Flowers; Spellbinders Nestabilities - Classic Ovals Large
  • Ink: Versa Color - Khaki, Bamboo, Paprika, Pine Cone and Bark
  • Embossing Folder: Craft Concepts - Woodgrain

Thanks so much for visiting today and I hope you've enjoyed my teaser cards.  And judging by Steph's previous releases there will be a high demand for these products so get yourself over to the online store from midnight tonight.  Happy shopping! :)

Take care


Sunday, 3 February 2013

Kraft & Kreme - Happy 2nd Birthday Less is More

Hi guys

I've not had much chance for crafting this week but I'm back and I'd like to start by wishing Less Is More a very happy 2nd birthday.  I only discovered the challenge blog about a month ago when I started my blog and so far I'm loving it and getting loads of inspiration from all the different entries for each challenge.

So this week's challenge at Less is More is a colour challenge and we are only allowed to use
Kraft & Kreme
on our creations.
 
 
Here is my card...
 
 
and a closer view...


I did find this challenge a struggle at first due to my lack of stock but I love the finished result.
 
I started by using a kraft card base.  I then found some pearlescent cream card in my stash and I love the effect of embossing on pearlescent card so I ran this through my Big Shot using an embossing folder.  Before adhering to the base I rounded one corner of the embossed card with some decorative scissors.  Next I used an oval die to cut out more kraft card.  I then discovered that stamping the sentiment with VersaMark on kraft doesn't show up too well!  So I die cut another oval and the only ink I had which would be suitable for this design was white, which I then heat embossed with clear embossing powder to make it more subtle.  I affixed this oval to the base and finished by die cutting two small butterflies and popping these up on 3D foam.  I was going to carry on and use some pearls to decorate the butterflies but decided that of course, Less is More, and due to the embossed background the card didn't need any more.  Very proud of myself for holding back! :)
 
Materials used:
  • Card: Papermania - Recycled Kraft Card Blanks; Pearlescent cream card from stash
  • Embossing Folder: Craft Concepts - Florette
  • Stamp: Woodware - Salutations stamp set
  • Ink: Versacolor - White
  • Embossing Powder: Rubber Stampede - Clear
  • Dies: Spellbinders - Nestabilities Classic Ovals Large; Clearly Besotted - Butterfly Wishes
  • Decorative Scissors: Fiskars - Corner Edgers 'Rounder'
 
I don't think this will be the last time I use this colour combo, sometimes colour just isn't required.
 
Thanks for visiting, I really appreciate you stopping by.
 
 
Neet x


Related Posts Plugin for WordPress, Blogger...