Showing posts with label Glossy Accents. Show all posts

Thursday, 3 October 2024

Uniko - Let's Have Some FLIPPIN' Seasonal Fun - Introducing...Ink & Flip Layering Cobweb

Good morning, folks

Today it's the first of two introductions from Uniko.

Bev has done it again and come up with two new Ink & Flip layering stencil designs.  The second you'll have to wait until tomorrow to see but today we are introducing the new Ink & Flip Layering Cobweb stencil set.

I have two cards for you and on this first one I've used both of the stencils together with stamps from the Mid Century Modern Purrfect Day and Alphabet Outlined sets...


Although this is a one layer card it took quite some time to create.  I began by stamping just the eyes from the MCM Purrfect Day set and the letters from the Alphabet Outlined set in Copic friendly ink, coloured them in then stamped and cut masks for all the elements.  I then inked up the first flip stencil which creates the outer area surrounding the cobweb in a purple and blue/grey ink.  With the masks still in place I then inked through the central cobweb stencil in two shades of grey.  Once the masks were removed I added some Glossy Accents to the eyes.


Materials used:
  • Stencil: Uniko - Ink & Flip Layering Cobweb
  • Stamps: Uniko - Mid Century Modern Purrfect Day, Alphabet Outlined
  • Ink: Altenew - Nimbus, Ultraviolet, Limestone, Industrial Diamond; Memento - Tuxedo Black
  • Coloured with Copics
  • Accents: Glossy Accents


And for my second card I used just the central cobweb stencil, along with stamps from the Alphabet Outlined set...


Here I inked through both sides of the stencil in the same shade of Distress Oxide on dark grey cardstock.  I then stamped and embossed the spider in black ink and clear embossing powder.  I finished the design by stamping the letters and heat embossing in white.

Materials used:
  • Stencil: Uniko - Ink & Flip Layering Cobweb
  • Stamps: Uniko - Alphabet Outlined; Clearly Besotted - In Print
  • Ink: Distress Oxide - Lost Shadow; VersaMark; Versafine Clair - Nocturne
  • Embossing Powder: Wow! - Clear Gloss, Opaque Bright White


To see more projects and this stencil set in action my fellow Brand Ambassadors are sharing more makes over at the main Uniko blog, here.

This stencil set will be available to purchase on Saturday, 5 October 2024. 

I'll be back tomorrow to introduce the other new Ink & Flip set so please do pop back to take a look.


Sunday, 11 February 2024

Uniko 12th Birthday Card Linky Party & Brand Ambassador Blog Hop

Hi there

It's a special day for Uniko today as it's 12 years since Bev launched the company.  Well done, Bev, that's a fantastic achievement, long may it continue!


So as part of the Birthday Celebrations today we have a fun party everyone can join in on, Uniko 12th Birthday Card Linky Party & Brand Ambassador Blog Hop.  You can find the main blog post, here.

Now for the card I created for this blog hop...I used 4 different Uniko stamp sets to make this one!


I began by creating the 3-tier cake by masking off the sides of my card and using stamps from the Background Builders Classics stamp set.  I then stamped the confetti above the cake using an image from the Big & Bold Happy stamp set and heat embossed this in gold.  The bunting was created using a stamp from the Background Builders Triangulate stamp set which I curved slightly.  The sentiment is from the Birthday Sentiments stamp set.  To finish I added some shine to the chocolate on the cake using Glossy Accents.


Materials used:
  • Stamps: Uniko - Background Builders Classics, Big & Bold Happy, Background Builders Triangulate, Birthday Sentiments
  • Ink: Altenew - Buttercream, Dark Chocolate, Frosty Pink, Sea Glass, Minty Mint; Versafine Clair - Nocturne; VersaMark
  • Embossing Powder: Wow! - Metallic Gold Rich

There is plenty of time to join us by making and linking up.  The deadline for submission is midnight (GMT) on Thursday 29 February 2024.  And the lucky winner will receive a £25 eGift Certificate.

All the rules for the Linky Party are detailed over at Uniko.

So, check out the main post, here, where you will find all the projects of the Brand Ambassadors and where to start the blog hop and link up.

Thanks for taking a look and enjoy the rest of your weekend.


Sunday, 6 February 2022

Skull and Cross Buns - Valentine's New for 2022

Hi there

I finally have some cards to share with you, my first of 2022!  Better late than never, eh!

I've been having a play with some of the New for 2022 Valentine's stamps from Skull and Cross Buns Rubber Stamps, combined with some existing SACB products and some other crafty bits from my stash.

Ok, for this first card I combined a few of the heart stamps...


On some white cardstock I stamped the Solid Heart, the Mini Hearts Outline (from a previous release) and the Happy Valentine's Day Heart Shape in a repetitive pattern in various shades of pink.  One of the solid hearts I stamped in a lighter shade then over-stamped with the sentiment stamp, which fits exactly over the top.  I then die cut using a stitched heart before adding some tiny smooth silver gems.  For some interest, before adhering the heart on foam to my card base, I scored five vertical lines directly onto the card base front.


Materials used:
  • Stamps: Skull and Cross Buns - Solid Heart, Mini Hearts Set (outline), Happy Valentine's Day Heart Shape
  • Ink: Altenew - Pinkalicious, Pink Diamond, Rose Quartz
  • Die: MFT Die-namics - Stitched Heart Stax
  • Gems from stash


Next up, the first of the fun new Valentine's Gonks...


On a die cut rectangle I stamped the Heart Boy Gonk in Copic friendly red ink and then added a little detailing with my Copic markers, just a little grey shading and gave him a pink nose.  I stamped a mask, covered him up and then stencilled over the background using the Brush Heart Pattern Stencil (discontinued) fading the hearts out towards the bottom.  I then used VersaMark ink to stamp the new You're The Best! sentiment and heat embossed it in silver.  After adhering the panel I added some Glossy Accents to the central heart.


Materials used:
  • Stamps: Skull and Cross Buns - Heart Boy Gonk; You're The Best
  • Stencil: Skull and Cross Buns - Brush Heart Pattern (discontinued)
  • Ink: Memento - Lady Bug; Distress Oxide - Worn Lipstick; VersaMark
  • Die: Create a Smile - Double Stitched Rectangles
  • Embossing Powder: Wow! - Metallic Silver
  • Accents: Glossy Accents, Copic markers


And the cute second Valentine's Gonk...


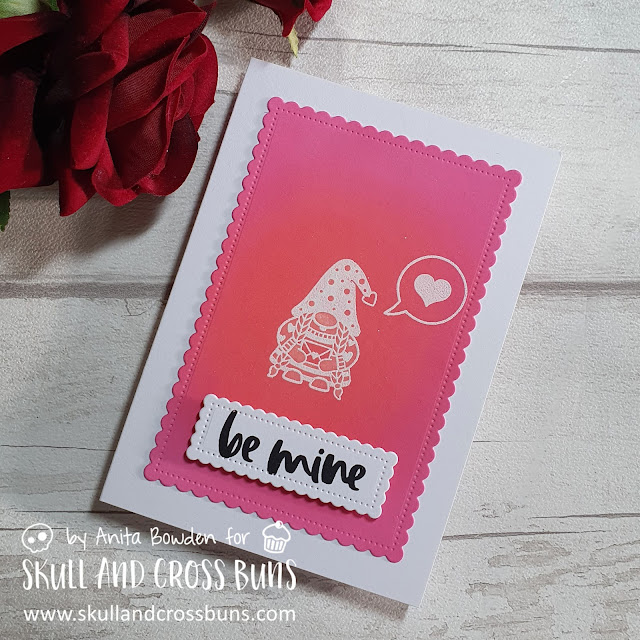
I stamped the new Envelope Girl Gonk and the new Love Heart Speech Bubble with VersaMark ink and heat embossed in white.  I then used the emboss resist technique and blended the whole background with red and pink Distress Oxide ink then buffed up the images to bring the white back.  I die cut this out using a scalloped rectangle die and adhered flat to the card base.  I die cut a smaller scalloped rectangle and stamped the sentiment from the existing Brush Hearts clear stamp set (reduced to clearance price) in black ink.  To finish, I 'painted' sections of the image using water, and blotted away the colour, leaving the envelope within the image a little more prominent.


Materials used:
  • Stamps: Skull and Cross Buns - Envelope Girl Gonk, Love Heart Speech Bubble, Brush Hearts clear set
  • Ink: VersaMark; Distress Oxide - Abandoned Coral, Picked Raspberries; Versafine Clair - Nocturne
  • Dies: Create a Smile - Scalloped Rectangles
  • Embossing Powder: Brutus Monroe - Alabaster White


And a few more of the new stamps for my final card...


A very simple stamped card here using the new for 2022 Heart Present, Solid Heart and Circle Heart stamps, together with the outline heart from the existing Mini Hearts set and a sentiment from the Contemporary Sentiments clear stamps set (reduced to clearance price), stamped in shades of blue and green.  To finish, I added some tiny hearts confetti.


Materials used:
  • Stamps: Skull and Cross Buns - Heart Present, Solid Heart, Circle Heart, Mini Hearts set (outline), Contemporary Sentiments clear set
  • Ink: Altenew - Desert Night, Volcanic Lake, Ocean Waves, Mountain Mist, Sea Glass; Versafine Clair - Nocturne
  • Accents: Little Things from Lucy's Cards - Sprinkles: Sky Blue Hearts


Challenge entries:

Card 1
Addicted to CAS - Challenge #213 - Hearts

Card 2
We Love Stamping - February Challenge - Anything Stamped with Option: Stencilling
NBUS - Challenge #35 - both new stamps

Card 4
Just Add Ink - Challenge #589 - Just Add Minimalist


Thanks for visiting today.  Please do take a look over at Skull and Cross Buns where you will find the new designs for 2022, as well as a great selection of rubber stamps, some of which can be personalised.  Also, all the clear stamp sets, stencils and embellishments are at greatly reduced prices, don't miss out!


(AD - some products kindly gifted for Design Team purposes)

Tuesday, 2 November 2021

Happy Little Stampers November 2021 CAS Challenge

Hi there

The November challenges at Happy Little Stampers are launching this week and today is the turn of the monthly CAS challenge.  Here's the cue card...


I just had to use this fabulous stamp set from Katzelkraft...


I chose this kitty and coloured him in the colours of my dear Elmo who I lost a few years ago.  He was so naughty but also very cute (didn't he know it!) and got away with absolutely everything, just by giving me 'the look'!

On a die cut panel I stamped the kitty and coloured him with Copics.  The thought bubble is a stencil which I gently inked through with Distress Ink and the sentiment is from another set which I stamped in black.  To finish, I added some gloss to his eyes.

Materials used:
  • Stamps: Katzelkraft - Les Chats Russes; Gerda Steiner - Moody Unicorns (sentiment)
  • Stencil: Clearly Besotted - Comic Cuts
  • Die: Create a Smile - Cool Cuts Double Stitched Rectangles
  • Ink: Memento - Tuxedo Black; Versafine Clair - Nocturne; Distress Ink - Hickory Smoke
  • Coloured with Copics
  • Accents: Glossy Accents

Challenge entries:

STAMPlorations - November CAS Challenge - Anything Goes with option of Neutrals Only


And just so you can see what I mean, here's the little man himself.  


Thanks so much for popping by.  As always, the HLS challenge links will remain open until the end of the month.


Tuesday, 14 September 2021

Perfectly CAS September 2021 Challenge

Good evening!

The September Challenge over at Perfectly CAS is now live.  Here's the cue card showing this month's theme...


So, quite a lot of options for this one as geometrics are very popular in the crafting world.  My sample card for this one is almost one layer, it just has the addition of a die cut sentiment...


I masked off a stencil, just leaving a few of the geometric circles and then ink blended through using three shades of Distress Oxides.  I die cut the 'happy' from black cardstock, adhered in place and then stamped 'birthday' above.  To finish, I added some Glossy Accents to the die cut for some dimension and shine.


Materials used:
  • Stencil: Funky Fossil - Fractional
  • Ink: Distress Oxide - Salty Ocean, Salvaged Patina, Cracked Pistachio; Versafine - Onyx Black
  • Die: Create a Smile - Cool Cuts Happy 
  • Stamp: Clearly Besotted - Modern Calligraphy Additions
  • Accents: Glossy Accents

Challenge entries:

Happy Little Stampers - September Stencil Challenge - Anything Goes
NBUS - Challenge #30 - First use of stencil, die and stamp!


Thanks for taking a look.  My teamies and I would love to see you in the gallery and, as always, the challenge link will remain open for the next four weeks :)


Saturday, 26 September 2020

Book Worm Bookmark

Hi there

You may be glad to know (!!) this is the last of my recent bookmark makes, but I had such fun making them I think some more may be created very soon! 

This little guy has been in my stamp stash for years and I've only ever used the set once before so I think he deserved an inking!  And for this one I used the tall tag die with the fishtail which came in the duo set with the other die I've been using.


I began by stamping and colouring the book on a die cut panel of white cardstock.  This was then masked and I ink blended the background in a neutral shade and then blended through a woodgrain stencil with a shade of brown.  I then stamped, coloured and die cut the book worm and adhered him onto the book.  I stamped the sentiment and then die cut a second panel from green polka dot paper and adhered this on the reverse for a cleaner finish.  I then added some gloss to his glasses.


I finished by adding some brown grosgrain ribbon through the slot and tied this with some co-ordinating green twine.  Here is the reverse view...


Materials used:
  • Stamps: Clearly Besotted - Bookworm and Bookworm Additions
  • Stencil: Funky Fossil - Woodgrain Background
  • Ink: Distress Ink - Antique Linen, Rusty Hinge; Memento - Tuxedo Black; Versafine - Onyx Black
  • Dies: MFT Die-namics - Tall Tag Duo; Clearly Besotted - Bookworm
  • Coloured with Copics
  • Accents: Glossy Accents; Ribbon - American Crafts; Twine - Hemptique


That's all from me today.  Phew!  That was a lot of posts today, thanks so much if you're still with me!

Butterflies and Flowers Bookmark


Good evening

Something that gets neglected in my craft stash is patterned papers, I just don't seem to use them very often on cards.  And after using some of them as co-ordinating back panels of some bookmarks, I thought they would be perfect used as a decorative rather than stamped or stencilled surface of a bookmark.

So that's what I did for this one...


Using a tall tag die I die cut two different designs from a glittered and glossy floral paper pad and adhered these back to back.  I then die cut two butterflies from white glitter cardstock.  The largest was adhered over a solid die cut from deep pink cardstock which I then infilled with Glossy Accents.  Once dry I adhered this to the top of the panel.  So that it didn't look untidy on the reverse I die cut another solid butterfly, from the same cardstock used for the front and adhered this on the back, mirroring the other butterfly.  The smaller butterfly was adhered over another solid die cut using the same paper used on the reverse and this was adhered over some die cut co-ordinating leaves.


This is the view from the reverse side...


Materials used:
  • Dies: MFT Die-namics - Tall Tag Duo; Clearly Besotted - Butterfly Duo Die Collection; Creative Expressions - Olive Branch
  • Patterned Paper: DecoTime (purchased from The Range)
  • Accents: Glossy Accents


I love how this turned out and I have so many lovely papers so I have a feeling a lot more of these will be made!


Cute Character Bookmarks


Hi there

I'm stopping by this afternoon to share something new I've been working on behind the scenes...Bookmarks!

I wanted to offer something different in my online shop, as well as cards, while still working with my stash of cardstock, stamps, stencils, etc.  Papercraft is what I love doing, so I thought this was a good direction to go in.

I've been making a few different styles/themes and in this first post I'm sharing a little batch featuring some cute characters.


Of all the designs I created, these were the most time-consuming as they all involved stamping, masking, ink blending, colouring and gloss accents.

They were all made in exactly the same way.  I began by stamping the four characters, which were then masked before stamping the books they are sitting on.  The books were also then masked before each background was ink blended with three shades of Distress Ink.  I removed the masked and coloured the images with Copic markers.  I then die cut each panel with a faux stitched tall tag die, as well as die cutting four different co-ordinating patterned papers which I then adhered back to back to create a cleaner finish.  I then held my breath while stamping the quotes on each one (didn't want to mess this bit up after so much work!)  Each bookmark was then finished with some grosgrain ribbon and tied with twine, and I added some gloss to the glasses and eyes.

Here's a closer view of each one, and the supplies I used for each...
Materials used:
  • Stamps: Clearly Besotted - Wise Owl, That's Genius
  • Distress Ink: Squeezed Lemonade, Dried Marigold, Abandoned Coral; Memento - Tuxedo Black; Versafine - Onyx Black
  • Die: MFT Die-namics - Tall Tag Duo
  • Coloured with Copics
  • Patterned Paper: Doodlebug - Kraft in Color: Color
  • Accents: Ribbon - American Crafts; Twine - Hemptique; Glossy Accents

Materials used:
  • Stamps: Clearly Besotted - Wise Owl, That's Genius
  • Distress Ink: Worn Lipstick, Shaded Lilac, Salty Ocean; Memento - Tuxedo Black; Versafine - Onyx Black
  • Die: MFT Die-namics - Tall Tag Duo
  • Coloured with Copics
  • Patterned Paper: Doodlebug - Kraft in Color: Color
  • Accents: Ribbon - American Crafts; Twine - Hemptique; Glossy Accents
Materials used:
  • Stamps: Clearly Besotted - Wise Owl, That's Genius
  • Distress Ink: Twisted Citron, Salty Ocean, Blueprint Sketch; Memento - Tuxedo Black; Versafine - Onyx Black
  • Die: MFT Die-namics - Tall Tag Duo
  • Coloured with Copics
  • Patterned Paper: Doodlebug - Kraft in Color: Color
  • Accents: Ribbon - American Crafts; Twine - Hemptique; Glossy Accents
Materials used:
  • Stamps: Clearly Besotted - Wise Owl
  • Distress Ink: Antique Linen, Peeled Paint, Frayed Burlap; Memento - Tuxedo Black; Versafine - Onyx Black
  • Die: MFT Die-namics - Tall Tag Duo
  • Coloured with Copics
  • Patterned Paper: Doodlebug - Kraft in Color: Color
  • Accents: Ribbon - American Crafts; Twine - Hemptique; Glossy Accents


I'm linking these up at Darnell's NBUS Challenge #18 as this tall tag die is a newbie and I'm loving using it! 


I'll be sharing all of my bookmarks today, in different posts by theme.  I hope you like them.


Saturday, 18 July 2020

Less is More Challenge #424

Good morning and happy Saturday

Less is More has a new challenge beginning today and it's the turn of their One Layer challenge.  Lots of options for this one and time to get ahead as the challenge is all about...


Continuing as our generous sponsor for July is

and remember, just by playing along will put you in the running for our monthly prize.


A little ink blending and stamping for my sample card this time...


I began by die cutting a circle from a post-it note to use as a mask to create a moon.  I then ink blended with Distress Inks to create a wintery dusk sky.  I removed the mask and then stamped the branch and bauble in black to create silhouettes.  The string was hand drawn with a fibre tip pen.  I finished by stamping the sentiment in a co-ordinating shade and added some Glossy Accents to the bauble for some shine.  Apart from the drying time of the gloss, this was a pretty quick card to make.


Materials used:
  • Die: Hero Arts - Infinity Circle Dies (for the mask)
  • Ink: Distress Ink - Tumbled Glass, Shaded Lilac, Spun Sugar; Versafine - Onyx Black; Versa Color - Heliotrope
  • Stamps: Fancy Foliage (free with Creative Stamping magazine); Card-io Majestix - Zendangles; Clearly Besotted - Sing It's Christmas
  • Accents: Fibre tip pen, Glossy Accents
Challenge entries:

AAA Cards - CAS Game #169 - Made in Minutes (Christmas in July)
Time Out - Challenge #166 - Peaceful


Thank you as always for taking a look.  Don't forget, you can find lots more inspiration over on the main challenge blog where my teamies are sharing some great makes.  

Related Posts Plugin for WordPress, Blogger...