Showing posts with label Sympathy Cards. Show all posts

Saturday, 22 April 2023

Uniko Designer Dies Natures Treasures II Release Day, Blog Hop & Giveaway!

Good morning

It's Release Day at Uniko so the new Natures Treasures II Designer Dies are now available to purchase from the shop, here.  You can see the full product image at the end of my post, below.

The team have more projects for you today which you can find over on the Uniko blog post, and by following the links of each of the Brand Ambassadors you may find some extra inspiration too.  And if you comment over on each of our blogs you'll be in with a chance of winning a gift certificate.  All the details are over on the main blog post.


So, two more for you, here they are...


This leaf is my favourite from the set so I had to use it again on this card, and I stuck with the ombre theme too.  On a scrap of cardstock I ink blended with Distress Oxides, fading it out, the die cut the leaf from it.  I stamped the Background Blocks Halftone image on the card base as I figured the fading out dots was a great match for the ombre leaf, which I adhered over it.  And I finished with a sentiment from the Simply Said Blocks II stamp set.

Materials used:
  • Stamp: Uniko - Simply Said Blocks II, Background Blocks Halftone
  • Dies: Uniko - Natures Treasures II
  • Ink: Distress Oxide - Abandoned Coral, Saltwater Taffy; Versafine Clair - Nocturne


And for my final card I combined the die set with the co-ordinating stamp set, Natures Treasures II...


I die cut the leaves from some green cardstock and then stamped with the co-ordinating image in VersaMark and heat embossed in cooper.  I die cut a white cardstock panel and heat embossed the sentiment from the Simply Said clear stamp set, before then adhering the leaves and trimming off the edges.


Materials used:
  • Stamps: Uniko - Natures Treasures II, Simply Said
  • Dies: Uniko - Natures Treasures II; Create a Smile - Double Stitched Rectangles
  • Ink: VersaMark
  • Embossing Powder: Wow! - Metallic Copper


So there you have it, a great die set, and even better if you have the co-ordinating stamp set too!  Don't forget to comment on each of the Brand Ambassadors' blogs for a chance to win the gift certificate.  You can visit them all directly from the Uniko blog, here

Happy Saturday, I hope you all have a lovely weekend.


Monday, 26 September 2022

Uniko Brand Ambassador Inspiration - Three Ways with Pure Florals: Lily


Good morning

I'm over on the Uniko blog today with some floral inspiration for your Monday morning.

You can find all the information on how I made these cards over on the blog post, here.


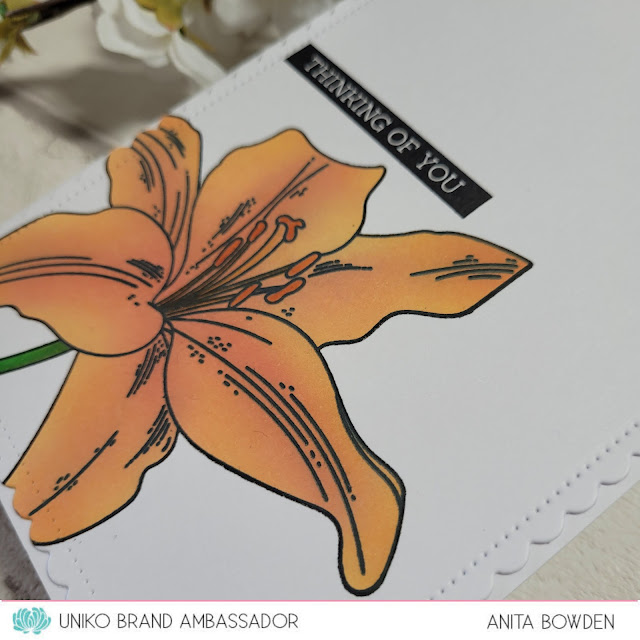
First up, I left the image uncoloured and added colour and interest around it...


Materials used:


For the second card I used the negative mask which was left over from the same masking sheet...


Materials used:
  • Stamps: Uniko - Pure Florals Lily, Simply Said Blocks II
  • Ink: Memento - Tuxedo Black; Versafine Clair - Nocturne; Distress Oxide - Dried Marigold, Spiced Marmalade, Abandoned Coral
  • Some colouring using Copic markers
  • Die: Create a Smile - Cool Cuts Scalloped Rectangles
  • Other: Inkadinkado - Stamping Mask Paper


Finally, a little spotlight colouring...


Materials used:
  • Stamps: Uniko - Pure Florals Lily, Simply Said Blocks II
  • Ink: Memento - Tuxedo Black; Versafine Clair - Nocturne
  • Coloured with Copic markers
  • Dies: Create a Smile - Cool Cuts Double Stitched Rectangles


Thanks so much for visiting today, have a wonderful week.

Thursday, 14 October 2021

Perfectly CAS October 2021 Challenge

Good evening

We're well into October now so it's time for a new challenge over at Perfectly CAS.  This challenge is all about keeping your cards truly clean and simple and limiting your design to one third or less of the overall surface.  Here's this month's cue card...


I decided to step away from flowers for this one and used a feather from a set that's been around for a long time but one that I haven't yet inked up...


It's been a while since I used the emboss resist technique and that's pretty much all that is involved here.  I used some anti-static powder before stamping the feather and sentiment in VersaMark and then heat embossed them in white.  I then used some large post-it notes to mask off the top and side of the card and ink blended, first in Salvaged Patina, fading it out just far enough to cover the sentiment, and then I added some Peacock Feathers to darken up the top corner.  

Despite using anti-static powder to avoid stray bits of embossing powder, a few stray bits did blow off the feather when using my heat gun.  It's advisable to use your heat gun on the underside when doing emboss resist to avoid this...shame I didn't remember that on this occasion!  No worries though, I'm still happy with it.


Materials used:
  • Stamps: Clearly Besotted - Tickle My Fancy; Altenew - Wildflower Garden (sentiment)
  • Ink: VersaMark; Distress Oxide - Salvaged Patina, Peacock Feathers
  • Embossing Powder: Wow! - Opaque Bright White

Challenge entries:

NBUS - Challenge #31 - First use of the feather stamp set
STAMPlorations - October CAS Challenge - Anything Goes (Optional: Ombre)


Thanks for taking a look.  Sympathy cards are never easy to make when needed, so why not use this challenge as a chance to make one to keep on hand.


Thursday, 26 March 2020

More Honey Doo Makes

Good morning

I'm back today to share some more sample cards I've made for Honey Doo Crafts, ahead of their next shows on Create & Craft TV this Friday, 27 March 2020.

Amanda will be sharing her products and also doing demos in shows at 11.15am and 3.45pm.

All of my cards in this post were made using existing products, some of which will feature in the shows, and there will be a few new stamp sets on the shows too.  You can see previews of these over on the Honey Doo Facebook page, here.  Yesterday evening, Amanda held a Facebook Live giving you a preview of the stamps and samples.


First up I've used the Stars and Stripes set, Feathered Flourishes and Ribbons dies, and a sentiment from the Just in Case set...


I die cut a piece of kraft cardstock and then die cut some white cardstock with the Ribbons die and trimmed out just a section of it and adhered across the panel.  I then stamped and heat embossed the flowers in white pearl embossing powder and fussy cut them out.  I also die cut the flourish from some green vellum.  I curled the petals with a paint brush handle before adhering these with the flourish.  The sentiment was stamped in black and I added a pearl to the flower centre to finish before adhering the whole panel to the card base.


Materials used:
  • Stamps: Honey Doo Crafts - Stars & Stripes, Just in Case
  • Dies: Honey Doo Crafts - Ribbons, Feathered Flourish; Create a Smile - Cool Cuts Double Stitched Rectangles
  • Ink: VersaMark; Versafine - Onyx Black
  • Embossing Powder: Wow - White Pearl
  • Kraft Cardstock: Neenah Classic Crest - Dessert Storm
  • Vellum and pearl from stash


For this next card I've used Stars and Stripes again, Mesh stencil and sentiment from Just in Case...


On a piece of cardstock I blended through the Mesh stencil using a rainbow of Distress Inks, which I then die cut with a stitched border die and adhered down the edge of the card base.  I then stamped the flowers in black and heat embossed in clear.  These were popped up on glue dots and I finished with a stamped sentiment.


Materials used:
  • Stencil: Honey Doo Crafts - Mesh
  • Ink: Distress Ink - Squeezed Lemonade, Carved Pumpkin, Candied Apple, Picked Raspberry, Wilted Violet, Broken China, Lucky Glover; Versafine - Onyx Black
  • Stamps: Honey Doo Crafts - Stars and Stripes, Just in Case
  • Die: Poppy Stamps - Stitched Landscapes


This one uses the Stitch in Time set and a sentiment also from Just in Case...


I used my MISTI to stamp the repeated flower background with just the one flower stamp in the set, these were then coloured with teal toned ProMarkers, the darkest flower in the centre then fading out to paler flowers around the edge.  The panel was then adhered flat before adding a popped up embossed sentiment.

Materials used:
  • Stamps: Honey Doo Crafts - Stitch in Time, Just in Case
  • Ink: Memento - Tuxedo Black; VersaMark
  • Coloured with ProMarkers
  • Embossing Powder: Wow - Opaque Bright White


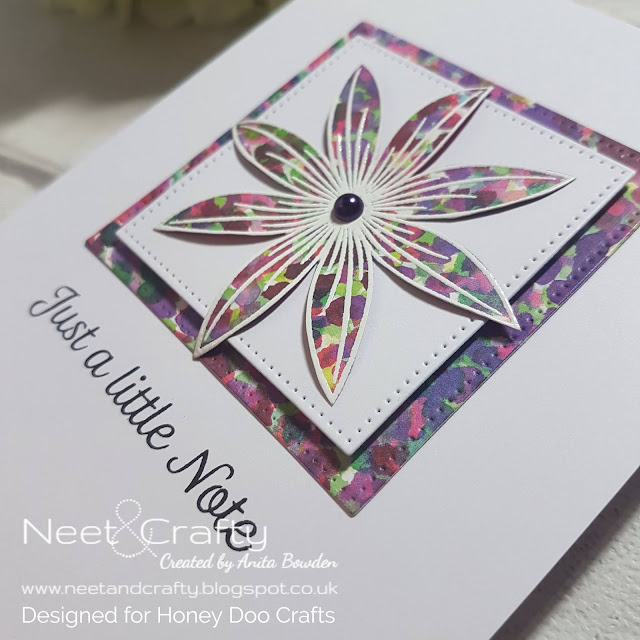
A very simple card next, using the Starry Eye and Just in Case stamp sets...


I die cut two pierced squares, one in white and one from patterned paper.  I then stamped the flower onto the same patterned paper and heat embossed in white.  I popped up the white square over the patterned one, and then fussy cut the flower.  The pieces were adhered to the card base, the sentiment stamped below and a purple pearl enamel dot added to the centre of the flower.


Materials used:
  • Stamps: Honey Doo Crafts - Starry Eye, Just in Case
  • Die: MFT - Pierced Square Stax
  • Ink: Versafine - Onyx Black; VersaMark
  • Embossing Powder: Wow - Opaque Bright White


Starry Eye was used again for this next one, along with the Tartan stencil and Cheers sentiment set...


Here, firstly I stamped the flowers and then masked them before creating the background with the Tartan stencil.  I coloured the flowers and die cut the panel.  To finish I stamped the sentiment onto a vellum strip, heat embossed in white and then wrapped this around the panel.  The panel was adhered on fun foam and some gems added to complete the card.


Materials used:
  • Stamps: Honey Doo Crafts - Starry Eye, Cheers
  • Stencil: Honey Doo Crafts - Tartan
  • Ink: Memento - Tuxedo Black; VersaMark; Distress Ink - Victoria Velvet, Tattered Rose
  • Coloured with ProMarkers
  • Die: Create a Smile - Cool Cuts Double Stitched Rectangles
  • Vellum and gems from stash


My final card uses the leaves from the Stitch in Time set and sentiment from Daffodils...


I wasn't sure about this card, and I'm still not, but I wanted to use just the leaves from the Stitch in Time set.  I added masking tape to the card base about half way down and blended upwards with a little green ink and then used blue ink to create the clouds using a stencil.  I then stamped the leaves multiple times in a row, masking a few, and then coloured with ProMarkers.  The sentiment was heat embossed in white onto a die cut sentiment strip.

Materials used:
  • Stamps: Honey Doo Crafts - Stitch in Time, Daffodils
  • Stencil: MFT - Cloud
  • Ink: Distress Ink - Mowed Lawn, Tumbled Glass; Memento - Tuxedo Black; VersaMark
  • Coloured with ProMarkers
  • Embossing Powder: Wow - Opaque Bright White
  • Die: Clearly Besotted - Stripped Die Collection


Thanks so much for visiting.  I hope, with so many people having to stay at home, you can tune in to the two shows of Friday and support Amanda.  At the moment Honey Doo and Create and Craft TV have measures in place for the show to still go ahead despite the COVID-19 issues.  

Take care of yourselves during this uncertain time, I'm sending lots of love to you all xx

(AD - some products kindly gifted for design team purposes)

Saturday, 17 August 2019

Less is More Challenge #402

Good morning!

Yet another fortnight has passed since the last Less is More challenge, so we're back with a brand new one today, and it's One Layer time! 

Although some crafters find one layer cards a bit tricky, the criteria this time should make this one a little simpler.  This time we want to see..


And throughout August our generous sponsor is Funky Fossil Designs, and the super talented Sarah Gray, is joining us once again as a guest designer.  And by simply playing along you'll be in with a chance of being our monthly winner!


I've used Funky Fossil stencils on all of my sample cards for this challenge.

For my first card I stepped out of my comfort zone of using a white card base, and chose the complete opposite...


Some of Sarah's stencils in the Funky Fossil store are supplied with both the negative aperture and the positive image.  Here I used the positive of the owl stencil and used some low tack tape to hold it in place on my card base.  I wasn't sure how well the ink blending would work as I used white pigment ink, as opposed to normally using Distress or dye inks.  I just needed to blast the surface with my heat gun afterwards to ensure the ink was dry.  I then used a circle die to create an aperture in some scrap cardstock, and with the owl still in place I blended the moon through the mask using silver pigment ink. 


I didn't want to risk warping my base by heat embossing the sentiment so I stamped the image with white pigment ink multiple times using my MISTI to ensure exact placement. 

Materials used:

  • Stencil: Funky Fossil - Owl in Flight
  • Ink: Hero Arts - Unicorn; Versa Color - Silver
  • Die: Hero Arts - Circle Infinity Dies
  • Stamp: MFT - Grand Peaceful Wildflowers

Challenge entries:

Addicted to Stamps and More - Challenge #354 - CAS
STAMPlorations - Summer CAS Card Challenge - Anything CAS Goes


For my second card I revisited one of my favourite layouts for one layer cards and used the ghosting technique...


With the card base laid flat I added some masking tape down the spine and across the top third of the card.  I then ink blended with green shades of Distress Ink.  The leaf stencil was then laid across the surface before spritzing with water and blotting away the colour.  To finish, the masks were removed and the sentiment was stamped in black across the centre.

Materials used:

  • Stencil: Funky Fossil - Forest Foliage
  • Ink: Distress Ink - Pine Needles, Crushed Olive, Peeled Paint, Forest Moss; Versafine - Onyx Black
  • Stamp: Clearly Besotted - Beautiful Friend

Challenge entries:

The Male Room - Challenge #117 - 6th Birthday
STAMPlorations - Summer Theme & Sketch Challenge - Stamps and Anything Goes


Finally, a card which was really quick and simple to make...


For this one, rather than inking through the stencil, I roughly inked a section of the stencil directly from pink and blue ink pads.  I then spritzed lightly with water and transferred the design to my card base.  I blasted with my heat gun to ensure it was dry, then overstamped the sentiment in black.

Materials used:

  • Stencil: Funky Fossil - Geometric Star
  • Ink: Distress Oxide - Salty Ocean, Picked Raspberry; Versafine - Onyx Black
  • Stamp: Clearly Besotted - Brushed Greetings II

Challenge entries:

AAA Cards - CAS Game #146 - Made in Minutes


Please do pop over to the main Less is More challenge blog, here, for lots more inspiration from my teamies.  Just remember to keep your creations clean and simple, including the white space we love, and keeping to the LIM one layer rules.  I hope to see you in the gallery :)

Saturday, 25 May 2019

Less is More Challenge #396

Good morning, crafters!

New challenge day is upon us once again over at Less is More, and today we're back with a Recipe challenge.  Here's the cue card with details of what we want to see you creating and sharing with us...


We're specifying less than one third to be true to our challenge guidelines and our love of unpatterned/untextured white space.


Continuing as our sponsor for this month is the fabulous and generous CAS-ual Fridays Stamps


and don't forget, as well as our monthly prize, they are also offering the discount code below


So, without further ado, I'll move on to my sample cards.  And it appears my mojo has returned, I have four cards for you!!!

Here's the first, and my favourite of this batch of makes...


I began with the dragonfly die cut, cut from white cardstock.  I squidged my VersaMark pad over it, held it with tweezers and poured two different embossing powders over it.  I heated it to melt the powders then repeated the process twice more to create the glossy effect.  On the card base I blended through a leaf stencil with Distress Ink and stamped the sentiment in metallic pigment ink.  To finish I adhered the body of the dragonfly only, and manipulated the wings upwards for some dimension.


Materials used:

  • Die: Clearly Besotted - Dragonfly Die Collection
  • Embossing Powder: Wow! - Peppermint Tea, Metallic Copper
  • Stencil: Funky Fossil - Forest Foliage
  • Stamp: Clearly Besotted - Make a Wish
  • Ink: VersaMark; Distress Ink - Lucky Clover; Versa Color - Bronze

Challenge entries:

AAA Cards - CAS Game #140 - Up to One Third (not twisting this time)


Onto my second card, and some simple stamping and heat embossing...


I chose a teal card base and panel for this one.  Before stamping the images with VersaMark I treated the surface with an anti-static powder tool to avoid the embossing powder clinging to unstamped areas of the panel.  I used parts of the same floral image at the top and base of my panel, and heat embossed these along with the sentiment in white embossing powder.  Once cooled I used a soft cloth to ensure no anti-static powder remained on the panel.  It was then adhered using fun foam.


Materials used:

  • Cardstock from stash
  • Stamps: Honey Doo Crafts - Roses and Lilies; MFT - Grand Peaceful Wildflowers (sentiment)
  • Ink: VersaMark
  • Embossing Powder: Wow! - Opaque Bright White

Challenge entries:

Moving Along with the Times - Challenge #98 - Monochrome Colour


I'm not loving this next one but thought I'd share it anyway..


I used a floral corner embossing folder on a white cardstock panel here and stamped the sentiment in pigment ink.  I adhered the panel flat to the card base then added some Nuvo drops to the centre of the flowers.  My drops weren't behaving and weren't coming out evenly so the look isn't really what I was going for but it's still quite a cute card.  I thought the embossing alone wasn't enough but perhaps it needed embellishing in a different way.  I might revisit this one :)

Materials used:

  • Embossing Folder: Craft Concepts - Florette
  • Stamp: Wplus9 - Strictly Sentiments
  • Ink: Versa Color - Lagoon Blue
  • Accents: Nuvo Crystal Drops - Carnation Pink

Challenge entries:

Alphabet Challenge - E is for Embossing Folder


For my final card I embossed a panel using a die set...


I used a set of dies, a tulip square and pierced frame, to emboss a panel using an embossing mat in my Big Shot.  I trimmed around the edge of the frame then die cut a slightly larger pierced square from purple mirri card.  I adhered the mirri square flat to the base then popped up the tulip square on 3D foam strips.  I used a bold sentiment below the focal point to finish the card.


Materials used:

  • Dies: Creative Expressions - Tulip Flower Square; MFT Die-namics - Pierced Square Stax
  • White and mirri card from stash
  • Stamp: Clearly Besotted - Brushed Greetings II
  • Ink: Versafine - Onyx Black

Challenge entries:

Allsorts Challenge - Week 520/1 - Happy Birthday 
The Flower Challenge - Challenge #32 - Embossing


There are so many ways to add embossed details to your cards.  If you need some inspiration please do visit the main Less is More challenge blog, here, to see what my teamies have been creating.  I'm looking forward to seeing your creations in our gallery, and don't forget, the linky is open for a fortnight so plenty of time to play along.

Related Posts Plugin for WordPress, Blogger...