Showing posts with label Shaker Cards. Show all posts

Wednesday, 26 October 2022

Uniko Brand Ambassador Inspiration - Clean and Simple with Metallic Accents

Good morning

I'm over on the Uniko blog today with some CAS cards incorporating some metallic elements and for both cards I've focused on Uniko dies.  

All the information about how these were made can be found over on the Uniko post, here.

 
First up is a clean and simple shaker card...


Materials used:
  • Dies: Uniko - Designer Dies Passiflora Collection; Create a Smile - Cool Cuts Double Stitched Rectangles
  • Stamp: Uniko - Birthday Wishes
  • Ink: VersaMark; Distress Oxide - Rustic Wilderness, Dried Marigold, Abandoned Coral
  • Embossing Powder: Wow! - Metallic Gold Rich
  • Accents: Little Things from Lucy's Cards - shaker mixes

For my second card I used created an aperture to add some gold accents...


Materials used:
  • Stamps: Uniko - Flower Power #1
  • Dies: Uniko - Designer Dies Flower Power #1-#6 Collection; Create a Smile - Cool Cuts Scalloped Rectangles
  • Ink: Versfine Clair - Nocturne; VersaMark
  • Embossing Powder: Wow! - Metallic Copper
  • Accents: Gold cardstock and black gemstone from stash


I really wanted to go back to a true clean and simple style with these and I hope you've got some inspiration from them.  Now I need to shift my focus from autumn to Christmas as time isn't slowing down and I've not even started...yikes!

Enjoy the rest of your week and sending crafty hugs,


Saturday, 26 February 2022

Uniko February 2022 Release - Introducing...Framed Balloons

Good morning

It's Day 4 of the introductions for the Uniko 10th Birthday release and the set being showcased today is another addition to the Framed series...Framed Balloons.  

Please do take a look over at the Uniko blog to also see how my fellow Brand Ambassadors have used this new set, so much creativity!

This one has such a great party feel so I created a shaker card to add more bling...


I stamped the main image and fussy cut the centre to create an aperture for my shaker window.  I first chose the sprinkles I was going to use before I coloured the balloons so I could co-ordinate the colour palette.  I die cut the panel and then used some white cardstock with silver flecks as my shaker backing to trap the confetti inside.  After adhering the panel to my card base I stamped the sentiments from the same set and heat embossed them in white on black sentiment strips.


Materials used:
  • Stamps: Uniko - Framed Balloons
  • Ink: Memento - Tuxedo Black; VersaMark
  • Coloured with Copics
  • Embossing Powder: Brutus Monroe - Alabaster
  • Dies: Create a Smile - Cool Cuts Double Stitched Rectangles; Altenew - Featured Sentiment Dies
  • Accents: Little Things from Lucy's Cards - Sprinkles: Hollow Stars and Rainbow Hearts

I hope you've enjoyed these teaser projects.  The full release will be revealed tomorrow so I hope to see you then.


(AD - some products kindly gifted for Design Team purposes)

Saturday, 4 September 2021

Less is More Challenge #451

Hi guys

At Less is More this morning there is a Theme challenge just starting.  Here's the cue card for this fortnight's challenge...


A pretty simple theme, just add some sparkle to your clean and simple designs.


And joining us as a wonderful Guestie for this challenge is the super talented Viv of Daizy-Mae Designs.  Viv is a loyal participant at Less is More and I'm sure many of you are familiar with her beautiful work.  Please do pop over to take a look at her project and to say hello.


I've not even begun my Christmas cards for this year so thought it was good time to get at least one made!  Here's my DT card and I decided to make a shaker...


I started with a die cut rectangular panel and then die cut using the snowglobe to form an aperture.  A then cut a second snowglobe from white glitter cardstock and set this aside.  Next I stamped the sentiment in dark green ink.  I adhered some acetate behind the window and covered the rear of the panel with 3D foam.  Next I die cut some trees from green cardstock and added some 'snow' using a white pen.  I adhered these to the card base, positioned so they would show through the aperture.  I then piled some glitter jewels over the trees and spread it out slightly before then adhering the panel over the top, trapping the shaker filling inside.  To finish, I adhered the white glitter snowglobe die cut over the acetate to frame the scene.


Materials used:
  • Dies: Create a Smile - Cool Cuts Double Stitched Rectangles; Clearly Besotted - Snowglobe Die; Craft Emotions - Pine Trees
  • Stamp: Clearly Besotted - Mini Messages
  • Ink: Altenew - Evergreen
  • Accents: Cosmic Shimmer - Glitter Jewels: Iced Crystals; Signo Uniball pen - white
  • Cardstocks and acetate from stash


For more inspiration, take a look at the main Less is More challenge post, where my teamies are sharing lots of different ways to use sparkle and, surprisingly, only one of my teamies has also made a Christmas card!  Sparkle isn't just for Christmas, eh!


Sunday, 21 February 2021

Heart of Hearts

Hi there

I shared a shaker card with you yesterday and thought I'd come back to share another one today.

This card I made for some very special friends who have recently got engaged.


I made a shaker window using a heart die which was cut from a small die cut square.  I filled the shaker with tiny heart confetti and trapped the sprinkles inside by backing with some silver glitter cardstock before mounting the panel onto a slightly larger die cut square.  The card base and uppermost square are linen cardstock but I used smooth white cardstock for the middle square.  I adhered the shaker sandwich flat to the card base and stamped the sentiment below.


Materials used:
  • Dies: MFT Die-namics - Pierced Square Stax, Stitched Heart Stax
  • Stamp: Altenew - Leaf Canopy 
  • Ink: Versafine - Onyx Black
  • Cardstock from stash
  • Accents: Little Things from Lucy's Cards - Sprinkles: Rainbow Hearts

Challenge entries:

AAA Cards - CAS Game #184 - Sketch
Addicted to Stamps and More - Challenge #399 - Any Occasion
Addicted to CAS - Challenge #191 - Hearts
Happy Little Stampers - February Anything Goes with Dies Challenge
Time Out - Challenge #181 - Photo Inspiration
Simply Create Too - Challenge #167 - Use Hearts


I hope you've all had a lovely weekend, thanks so much for popping by.


Saturday, 20 February 2021

Cocktail Shaker

Hi there

I don't usually write blog posts on a Saturday night but, quite frankly, what else is there to do?!  This pandemic has changed our lives so much hasn't it?  I might open a bottle of wine shortly (actually, there's no 'might' about it) but I'm certainly not going anywhere, just for a change!

Anyway, I thought I'd share a card I made earlier this month for a friend's birthday, so here it is, a fun little shaker card...


In my die cut upper panel I die cut an aperture with a cocktail glass die.  I then stamped the sentiment.  Sentiments are usually the last thing I add but once the foam is added on the reverse of a shaker panel it's more difficult to stamp cleanly.  The die has an inner section too so I cut it again from some silver glitter cardstock.  I then adhered this glitter die cut on the uppermost side, over the acetate.  I made the shaker window in the usual way: acetate, double sided foam barrier surround, filled with fun confetti and then sealed on the reverse before adhering to the card base.


Materials used:
  • Dies: Create a Smile - Cool Cuts Double Stitched Rectangles; Xcut - Cocktail Glass
  • Stamp: Clearly Besotted - Floral Spray
  • Ink: Versafine - Onyx Black
  • Glitter cardstock from stash
  • Accents: Little Things from Lucy's Cards - Sprinkles: Let's Polka


Thanks so much for visiting, I'll be back very soon with more to share.  Enjoy the rest of your weekend and stay safe.


Thursday, 2 July 2020

Skull and Cross Buns - July 2020 - Selection Four

Hi there

I'm back this morning with my final few sample cards using products by Skull and Cross Buns.

The new stencils, as well as some of their existing best sellers will be showcased on Hochanda at 9am tomorrow, Friday 3 July 2020.  And don't forget, if you're unable to catch the show live, you can watch it later on catch up via the Hochanda website.


Ok, first up I've used the already available Crafting Is My Super Power set...


I cut a rainbow of different coloured cardstock strips, some smooth and some textured, and adhered them to a paper background.  I then stamped lots of the images from the set in Versamark and heat embossed in white.  Next I used a mix of dark grey ink and water and used this to add some splatters to my card base for a little background interest.  I matted the panel onto some black cardstock and adhered it diagonally to my card base and trimmed away the excess.  The card was finished with a stamped sentiment, also from the same set.


Materials used:
  • Stamps: Skull and Cross Buns - Crafting Is My Super Power
  • Ink: VersaMark; Versafine - Onyx Black; Distress Ink - Hickory Smoke
  • Embossing Powder: Altenew - Pure White


Next up is the new Rainbow Pattern stencil...


I ink blended some cardstock with Distress Inks then, with the stencil, used the ghosting technique to spritz with water and blot away some of the ink.  Once dry I die cut the panel, stamped the sentiment from the Quirky Sentiments set and die cut three cloud apertures to make shaker windows.  3D foam was added to the back of the panel and then sequins trapped inside.


Materials used:
  • Stencil: Skull and Cross Buns - Rainbow Pattern
  • Ink: Distress Ink - Broken China, Shaded Lilac, Spun Sugar; Versafine - Onyx Black
  • Stamp: Skull and Cross Buns - Quirky Sentiments
  • Dies: Create a Smile - Cool Cuts Double Stitched Rectangles; Clearly Besotted - Cloudy Days
  • Accents: Little Things From Lucy's Cards - Fairy Lights Shaker Mix


I've used the stencil again here, combined with the already available I Believe in Unicorns set...


For this card I attempted the stencil faux monoprint technique.  I tried with both Distress Inks and Distress Oxides and neither worked as well as I'd hoped, Jennifer McGuire makes it look so easy!  I inked up my background then stamped and heat embossed the images from the set in clear embossing powder.  The next step is to spritz liberally with water, and sandwich the stencil between the wet inked piece and a clean piece of cardstock before running through your die cutting machine.  As well as some of the ink transferring to the clean piece, the stencil also then leaves an impression.  The ink didn't transfer well with either attempt so I think I'll try again with different cardstock next time.  Once dry I die cut the panel and matted it onto some purple cardstock before adhering to the card base popped up on fun foam.  I then stamped a sentiment strip using the same stamp set.


Materials used:
  • Stencil: Skull and Cross Buns - Rainbow Pattern
  • Ink: Distress Oxide - Spun Sugar, Tumbled Glass, Cracked Pistachio; VersaMark; Versa Color - Lavender, Petal Pink
  • Stamps: Skull and Cross Buns - I Believe In Unicorns
  • Embossing Powder: Wow! - Clear Gloss
  • Die: Create a Smile - Cool Cuts Double Stitched Rectangles


Ok, below are the four new stencils which will be available, together with details of the show...


Thanks so much for visiting, I'll be back on Saturday morning with details of the next Less is More challenge.
(AD - some products kindly gifted for design team purposes)

Thursday, 5 September 2019

Skull and Cross Buns - Hochanda Showcase Selection 4

Good morning

Just a quick reminder that Skull and Cross Buns will be launching on Hochanda TV here in the UK this afternoon at 4pm (Sky 673 / Freeview 85).

I have a few more makes to share with you, using some of the products which you can see in more detail during the show.

Here's the first...


For this one I've used the ghosting technique with the Honeycomb Hexagon Large Stencil.  To create this effect I blended Distress Inks in two yellow shades from the corner and faded it out.  I placed the stencil over the top, spritzed with water, removed the stencil and then blotted away the colour with a paper towel.  After die cutting the panel with a stitched rectangle die I then stamped the bee and its trail from the Spring Motifs set and the hello from Quirky Sentiments.  I coloured the bee and added some shimmer to its wings before popping the panel up on fun foam.


Materials used:

  • Ink: Distress Ink - Wild Honey, Mustard Seed; Memento - Tuxedo Black
  • Stencil: Skull and Cross Buns - Honeycomb Hexagon Large Stencil
  • Die: Create a Smile - Double Stitched Rectangles
  • Stamps: Skull and Cross Buns - Spring Motifs, Quirky Sentiments
  • Accents: Coloured with ProMarker; Spectrum Noir Sparkle Pen - Clear


Next up I used the same Honeycomb Hexagon stencil but using a different technique...


This time I gently inked up the corner area of the stencil directly from the ink pads, spritzed with water and then laid the stencil over my panel.  Once dry I die cut the panel with a stitched rectangle die.  I used a honeycomb die to cut the opposite corner and inked up the card base behind.  I wanted to incorporate one of the acrylic elements from the range so I decided to turn this card into a shaker by die cutting an aperture from the top panel, aligning the 'life is sweet' embellishment from the Retro Sweets Embellish! set and adhering this to the card base, then creating the shaker, trapping some co-ordinating jewels in the shaker window.


Materials used:

  • Stencil: Skull and Cross Buns - Honeycomb Hexagon Large Stencil
  • Ink: Distress Ink - Wild Honey, Mustard Seed
  • Dies: Create a Smile - Double Stitched Rectangles; Tim Holtz - Mixed Media; Spellbinders - Classic Rectangles
  • Accents: Skull and Cross Buns - Retro Sweets Embellish! set; Little Things from Lucy's Cards - Jewels (Lemon mix and Cherry mix)

Challenge entry:

Always Fun - Challenge #126 - Shaker Cards


After a long day of crafting, the next card was the last one I made on that particular day.  I wasn't going to share it as it's a bit busy and quite frankly, I think I was losing my mind...it's a bit bonkers!  But it's quite fun so here it is... lol


What's the best thing to have at a tropical party?  Quite clearly, a flamingo with a pineapple on its head!  I don't know what I was thinking, this isn't my style at all, but I wanted to showcase the stamp set and the fun embellishments that co-ordinate with it.  The card base was stamped around the edge with leaves from the Tropical Party set and the flamingo scene stamped and coloured where the aperture would be.  I die cut the panel with the stitched window and stamped the sentiment in black.  Once adhered in position I then finished by adhering the acrylic elements from the Tropical Party Embellish! set.


Materials:

  • Stamps: Skull and Cross Buns - Tropical Party
  • Die: MFT Die-namics - Rectangle Peek-a-boo Window
  • Ink: Altenew - Pinkalicious, Moss, Parrot, Lagoon
  • Coloured with Faber Castell Polychromos pencils
  • Accents: Skull and Cross Buns - Tropical Party Embellish! set


Thanks so much for looking.  If you're unable to watch the show, don't forget, you can watch it on catch up over on the Hochanda website :)


(AD - some products kindly gifted for design team purposes)

Tuesday, 2 July 2019

Happy Little Stampers July 2019 CAS Challenge

Good evening, crafters

We're back with a new batch of challenges for July over at Happy Little Stampers and today it's all about the CAS challenge.  Here's what we want to see from you this month...


I've used just dies to create my DT card for you, and I've made a shaker card, a great way to fill a negative space..


I wanted to go super CAS for this one so to add a little 'something' I chose linen cardstock for my base and panel.  I cut the wine glass from the panel and adhered some acetate behind it.  I then went searching through my sprinkles and shaker fillings and found the perfect glass filler...bubbles!!!

As my panel is smaller than my base I wanted to be able to see where I was lining up the panel so instead of adding the sprinkles to the back of the acetate, before I started the shaker process I drew through the aperture with a pencil onto the base and then put the sprinkles on there before adhering the panel over the top, trapping the sprinkles inside.  To finish I die cut the 'cheers' once from white cardstock and a second time from white glitter cardstock and stacked them up before adhering to my card.


I love this card, I didn't even remember that I bought the bubbles and they were just perfect for this shaker, and lots of occasions I can use it for too.

Materials used:

  • Dies: Reverse Confetti - Clink Confetti Cuts
  • Little Things From Lucy's Cards - Sprinkles: Iridescent Bubbles
  • White glitter cardstock and linen cardstock from stash

Challenge entries:

Crafty Cardmakers - Challenge #237 - Dies or Punches
Moving Along with the Times - Challenge #100 - CAS


Thanks so much for popping by and don't forget that this challenge, as with all the monthly HLS challenges, will remain open to link up until the end of the month.  Happy CAS crafting!


Tuesday, 2 April 2019

Guest Designer for Honey Doo Crafts - Selection Three

Hi guys

Tonight I'm sharing the last few of my makes for my Guest Designer spot with Honey Doo Crafts

The new sets will be showcased on TV shopping channel, Hochanda tomorrow, 3 April 2019 at 12pm and 4pm BST so please do tune in if you can (Sky 673 / Freeview 85).


So, my cards today have used three more of the new sets I've yet to share.

First up is a shaker card I made using a lovely set called Peony Crest...


To begin I blended a little pale pink ink on the card base and stamped the sentiment.  I then created the offset oval shaker window using a oval stitched die, backed with acetate, and edged the panel with a stitched rectangle die.  The panel was popped up on 3D foam strips, trapping the confetti shaker bits inside.  I then stamped, coloured and fussy cut the main peony crest image and adhered to the panel.


Materials used:

  • Stamps: Honey Doo Crafts - Peony Crest
  • Ink: Distress Ink - Spun Sugar; Memento - Tuxedo Black
  • Dies: Create a Smile - Cool Cuts Double Stitched Rectangles; Lil Inkers - Stitched Ovals
  • Coloured with ProMarkers
  • Shaker Contents: Nuvo Pure Sheen Confetti - Diamond Harlequin; Little Things from Lucy's Cards - Itty Bitty Stars (Neon Bright)


For this next card I used the small images from a new set called Garden Peony to create a background pattern...


I stamped and coloured the panel the same size as the card base.  I then used a border die to cut away an inner section (I can use the cut away part on another card).  The remaining two parts of the panel were popped up on fun foam and the sentiment stamped between, directly onto the card base.  Simples!

Materials used:

  • Stamps: Honey Doo Crafts - Garden Peony, Peony Crest (sentiment)
  • Ink: Memento - Tuxedo Black
  • Coloured with ProMarkers
  • Die: Avery Elle - Dotted Border Dies


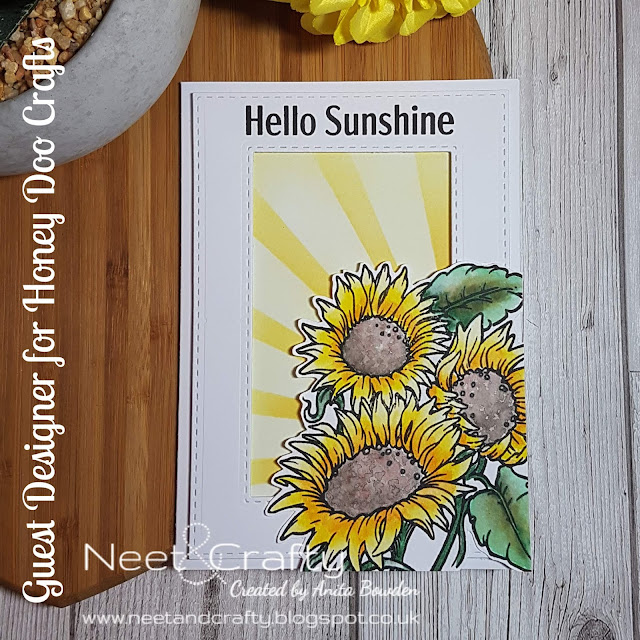
And a nice sunny card to complete my selection, using a set called Hello Sunshine...


I masked the card base and blended ink through a sun ray stencil for the central background.  I then created a frame using two rectangle dies and stamped the sentiment along the top before popping up on foam strips.  I then stamped the sunflowers onto watercolour paper and watercoloured with my Zig markers.  The image was then fussy cut out, adhered over the base, using foam pads to pop up the parts within the frame, and then the edges were trimmed to align with the card base.

Materials used:

  • Stamps: Honey Doo Crafts - Hello Sunshine
  • Ink: Distress Ink - Squeezed Lemonade, Spiced Marmalade; Versafine - Onyx Black; Zig Clean Color Real Brush Markers
  • Stencil: MFT - Sun Ray
  • Dies: Create a Smile - Cool Cuts Double Stitched Rectangles

Challenge entry:

Allsorts - Challenge #513 - Use Yellow


Thanks so much for all your lovely visits and comments, I appreciate each and every one of you.  And I hope you love these new stamps and enjoy the show tomorrow if you are able to watch it, unfortunately I'll be at work during both shows so I'll be catching up afterwards.

Tuesday, 2 October 2018

Happy Little Stampers October 2018 CAS Challenge

Hi there

As we're at the beginning of another month (!!!) it's new challenge time over at Happy Little Stampers, and the CAS challenge has just launched.  I'll get straight to the details...


The winner for this challenge will receive a $20 coupon to spend at the shop! Check out all the details HERE.

IF YOU USE STAMPS BY HAPPY LITTLE STAMPERS AND YOU ARE THE RANDOM WINNER, YOUR PRIZE WILL BE DOUBLED!


There are lots of different ways to use vellum and I chose to use it for a shaker card instead of using acetate, you get a lovely muted effect through the shaker window...


I started with a die cut panel and then die cut a circle aperture for my shaker window.  Before creating the shaker I stamped the sentiment on the panel in gold pigment ink.  On a piece of vellum I stamped the snowflake in VersaMark ink before heat embossing in silver.  I then adhered the vellum behind the aperture.  I attached foam tape all over the reverse of the panel, sprinkled a sequin mix onto the card base where the aperture would sit, and then adhered the panel, trapping the sequins inside.

I only realised when writing this post that the layout of this card is exactly the same as my HLS card last month, I clearly love this layout! 

Materials used:
  • Dies: Create a Smile - Cool Cuts Double Stitched Rectangles; Hero Arts - Circle Infinity dies
  • Stamps: Happy Little Stampers - Let It Snow
  • Ink: VersaMark; Versa Color - Gold
  • Vellum from stash
  • Accents: Little Things from Lucy's Cards - Eternity Ring shaker selection

Challenge entries

Crafty Hazelnut's Christmas Challenge - Challenge #405 - Anything Goes (something beginning with 'S')


Please do check out my teamies' creations over at the main HLS challenge post, here, for some great inspiration of different ways vellum can be used.

The links for all the HLS monthly challenges are open until the end of the month so plenty of time for you to play along :)
Related Posts Plugin for WordPress, Blogger...