Showing posts with label Just For You Cards. Show all posts

Saturday, 26 April 2025

Uniko April 2025 Release - Introducing...Stencil Layering Spring Blossom

Happy Friday!

It's the last of the introductions for the Uniko April 2025 release today and it's all about a new layering stencil set...Layering Spring Blossom.  This set has three stencils.

There are so many possibilities with this versatile stencil set...use the images individually or all together to create some really pretty backgrounds.

I got my Color Cubes out again for these and I love both these colour palettes.  I'll certainly be using these inspiration cards a lot more going forward, they really encourage you to combine colours you would never think to put together.  I've chosen colours as close to the suggestions as I can from what I have in my stash, I'd love to know what you think.

Here's my first card using the stencils and I've combined with a greeting from the Bauhaus Blocks stamp set...


I used all the stencils to build the background pattern and then cut down the panel with a stitched curved border die and trimmed it to fit my card base before adhering flat.  I then simply stamped the greeting in black along the curved edge and called it finished.  Lovely and clean and simple. 

And this was the Color Cube inspiration card I used...


Materials used:
  • Stencils: Uniko - Layering Spring Blossom
  • Stamp: Uniko - Bauhaus Blocks
  • Ink: Memento - Cottage Ivy, Tuxedo Black; Altenew - Ultraviolet, Rubellite, Burnt Red; Versafine Clair - Nocturne
  • Die: MFT Die-namics - Stitched Basic Edges


And a one layer, clean and simple card...


I began by masking off the edges of my card base.  I very lightly inked up my background, fading it out as I moved down to the base.  I then did the same with each element of the stencils, inking stronger at the top and fading the colours out at the centre.  I then finished with a greeting from the new Originally Organic Flower Garden stamp set, also new with this release.

And here is the colour palette I chose from my Color Cubes...


Materials used:
  • Stencil: Uniko - Layering Spring Blossom
  • Stamp: Uniko - Originally Organic Flower Garden
  • Ink: Altenew - Emerald, Volcano Lake, Deep Iris, Pumpkin Pie, Memento - Desert Sand


Ok, that's all the introductions done.  I hope you love all these new products that Bev has designed.  Lots more creative inspiration is waiting for you over at the Uniko blog, here.  My fellow Brand Ambassadors are sharing some beautiful projects.

Please do pop back tomorrow to see the full release reveal and to find out about the Uniko Giveaway.  All the new products will be available tomorrow, Sunday 27 April 2025 at 9am BST.

Wishing you a lovely weekend.



Friday, 28 February 2025

Uniko Celebrating 13 Years - New Release, Brand Ambassador Blog Hop and Giveaway!

Good morning!

It's release day over at Uniko and I'm here to reveal the whole release and share another card.

I just had to create another using the gorgeous Bright Butterflies Layering Stencils...


I inked up the butterfly using the stencils and then die cut around it with a circle die.  I adhered this on 3D foam to a slightly larger circle cut from blue cardstock and then adhered it flat to the card base.  I stamped the sentiment in blue ink to co-ordinate with the butterfly then added three smooth silver gems to finish.


Materials used:
  • Stencils: Uniko - Layering Bright Butterflies
  • Stamps: Uniko - Organic Blooms
  • Ink: Distress Ink - Tumbled Glass, Chipped Sapphire; Versafine Clair - Nocturne
  • Dies: Hero Arts - Nested Infinity Circles


So, now to reveal the new products in full

First up is the large stamp set...Alphabet Solid


The new Background Blocks stamp - Waves

Reintroducing Bright Butterflies...


Say hello to Layering Stencils Bright Butterflies...

and another set of layering stencils...Organic Blooms...


which looks like this when all used together...


The co-ordinating stamp set, Organic Blooms...

and a lovely floral addition...Spring Botanicals Primrose...

And finally, the new sentiment stencil...Geometric Happy Birthday...


What a great month it's been celebrating Uniko's 13th birthday.  Don't forget to leave some comments on the Brand Ambassador blogs or social media.  You can find all the links over at the Uniko bloghere.  By leaving comments along the way you will be in with a chance of winning an eGift Certificate.  All the details are on the Uniko blog post.

The products are available from the Uniko store now, here

Thanks for visiting today and for being so supportive over on my socials.  I hope you love the release...happy shopping!

Wednesday, 26 February 2025

Uniko Celebrating 13 Years - Introducing...Stencil Layering Organic Blooms and Organic Blooms Clear Stamps

Happy Wednesday

Welcome to day three of the Uniko new release introductions and today the team are introducing a new layering stencil set and co-ordinating stamp set.

You can use these independently and also together where you use the stencils to colour the stamped images.

For my first card I've used just the stencil set, together with a greeting from the stamp set...


I simply used the stencils to create the floral design directly on the card base.  I then used a curved die to cut the corner piece where I stamped the sentiment.  I added some co-ordinating sprinkles to finish the card.

Materials used:
  • Stencils: Uniko - Layering Organic Blooms
  • Stamps: Uniko - Organic Blooms
  • Ink: Altenew - Wisteria, Ultraviolet, Andromeda, Minty Mint, Sweet Leaf; Versafine Clair - Nocturne
  • Die: Avery Elle - Dotted Borders Die
  • Accents: Little Things from Lucy's Cards - Sprinkles: Wisteria


And now my second card where I used just the stamp set...


On a die cut panel I stamped the flowers and leaves, using some masking.  I then coloured the image with Copic markers.  I stamped the sentiment, also from the set, onto a vellum strip and heat embossed in white before adhering this from the edge of the panel.  The panel was then adhered flat to the card base.


Materials used:
  • Stamps: Uniko - Organic Blooms
  • Ink: Memento - Tuxedo Black; VersaMark
  • Coloured with Copics
  • Embossing Powder: Brutus Monroe - Alabaster
  • Die: Create a Smile - Cool Cuts Scalloped Rectangles

And I have one more where I've combined the stencil set with the stamp set...


I stamped a row of the flowers, masking so I could overlap them.  I then used the stencils to ink blend each flower, also using the masks where there were overlaps.  I kept this one really simple and just added a sentiment and nothing more.

Materials used:
  • Stamps: Uniko - Organic Blooms
  • Stencils: Uniko - Layering Organic Blooms
  • Ink: Memento - Tuxedo Black; Altenew - Rubellite, Pink Diamond, Maple Yellow, Citrus Burst; Versafine Clair - Nocturne


I hope you're enjoying all these introductions this week, I'll be back tomorrow with the final introduction before revealing the entire release on Friday, when the products will be available to purchase.

Thanks again for taking a look, I appreciate your visit.


Saturday, 24 July 2021

Less is More Challenge #448

Good morning

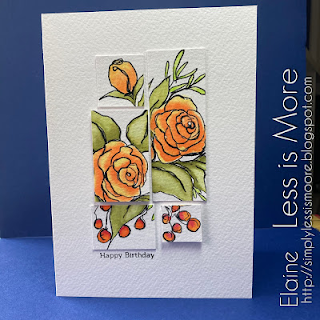
At Less is More we have something a little different for you for this next challenge.  Today is my fellow teamie, Elaine's, birthday and we thought it would be a fun idea for her to create a card for us all to CASe.


Here's her gorgeous creation, which includes lots of elements and techniques from which to draw your inspiration.
Happy Birthday, Elaine.  I hope you have a fabulous day! x


Ok, for my card I focused on a few elements:
  • Florals
  • Shades of orange
  • Tiled effect
  • Tiny sentiment


I knew I had a yet to be used stencil of blocks in a tiled layout so that was my starting point.  I laid this down on a panel of white cardstock at an angle and off the edge, no idea why, I was obviously feeling very jaunty angle-ish!  I lightly blended the palest of my inks to give the blocks some definition.  I then used a set of floral layering stencils, laid over the top, and inked through with two more shades of orange.  I always love the reveal when you remove stencils, I wasn't sure how this would look but I was pleasantly surprised.  I then trimmed the panel down, stamped the sentiment along the diagonal edge of the stencilling and adhered it to my card base on fun foam.  A really quick make!

Materials used:
  • Stencils: Clearly Besotted - Building Blocks; Altenew - Layered Dahlia
  • Ink: Distress Oxide - Dried Marigold, Spiced Marmalade, Abandoned Coral; Versafine - Onyx Black
  • Stamp: Altenew - Flower Vine

Challenge entries:

Addicted to Stamps and More - Challenge #410 - Die Cuts and/or Stencils
Happy Little Stampers - July Stencil Challenge - Anything Goes
NBUS - Challenge #28 - (first time using the Building Blocks stencil)


Thanks for taking a look.  For lots more inspiration for this challenge please do pop on over to the main Less is More challenge post where my teamies are sharing their projects inspired by Elaine's card, so many great makes.  


Saturday, 6 February 2021

Less is More - 10th Birthday Celebration! - Challenge #436


Good morning!

It's a celebration today as Less is More is celebrating a big birthday this month!


It was 10 years ago that Chrissie and Mandi created this fabulous challenge blog purely aimed at clean and simple designs, and how lucky are we because they are both joining us for this challenge to celebrate this milestone!  We still have so many participants every week and some have been with us from the very beginning, and I'm honoured to have been a part of the Design Team for almost 6 of those 10 years!  Wow, where does the time go?


Ok, for the first of this month's challenges we have a Colour challenge.  Here's the cue card...


Please do remember that this is a colour challenge, not a theme challenge.  Of course chocolate can be used as your theme, just keep the predominant colour(s) to chocolate shades.

And now for the best bit.....we have a fabulous array of wonderfully generous sponsors joining us for this birthday month, so check out all the details over at the main blog, here, to see what's up for grabs.  Just by playing along during February will mean you're in with a chance of winning a prize.


Ok, now for my card.  I'll admit, I was a bit stumped by this colour challenge, it's not a colour I reach for often and I have very little cardstock in shades of brown.  I almost went down the woodgrain route but instead I looked online for chocolate colour designs and I loved those that were combined with gold, so that was my starting point for this one.  So here you have milk and dark chocolate, with a little gold luxury!


I chose to use a chocolate coloured panel and then stamped the floral images which were from a stamp layering set, embossing the outline layers with gold and stamping the second layers with a darker shade of brown.  I also stamped the sentiment in the same shade of brown.  As I was going to add the panel to my card base I thought it needed a little something more, just a little.  So I used the same dark brown ink pad, direct to paper, and coloured a vertical strip along the edge of my card base.  I then trimmed a slim edge off my panel and adhered it to the card base, leaving the dark brown edge detail.

Materials used:
  • Stamps: Altenew - Golden Garden, Clearly Besotted - Floral Spray
  • Ink: VersaMark; Altenew - Espresso
  • Embossing Powder: Wow! - Metallic Gold Rich


If you're like me and are a little stumped by this colour theme then do check out the main challenge blog as my fellow teamies have some great projects they are sharing, you'll no doubt find some great inspiration over there.


Sunday, 13 May 2018

Spellbinders - Designer Series: Flower Garden

Hi guys

I was recently contacted by the fabulous Yana Smakula on behalf of Spellbinders asking if I would like to receive some Spellbinders goodies in the mail to play with.

Of course, I didn't hesitate in saying yes so today I'm sharing a couple of cards I've made using some dies from the Flower Garden collection.

First up is a card using the Spellbinders Flower Garden Floral Panel Card Etched Dies...


I'm loving the blush shade trend right now so chose that for this card.  I die cut the main blush panel using the gorgeous floral frame and outline dies.  The cardstock I chose was from a set of blush and grey shades so I chose one of the mid grey tones to cover my card base.  I wrapped some blush toned organza ribbon around the panel before adhering flat to the base then die cut the tag from the same die set from the same grey cardstock and heat embossed the sentiment in white (this particular embossing powder is a very creamy white so co-ordinates well with the blush tone).  The tag was then popped up on 3D foam.

Materials used:
  • Dies: Spellbinders - Designer Series Flower Garden: Floral Panel Card
  • Cardstock: Papermania - Midnight Blush
  • Stamp: Clearly Besotted - Scrumptious Script
  • Ink: VersaMark
  • Embossing Powder: Stampin' Up - White
  • Organza ribbon from stash

Challenge entries:

Happy Little Stampers - May Challenge - Anything Goes with Dies


Next up is a card using some dies from the same Flower Garden Series, this time the Corner Floral Etched Dies...


I began by adhering some patterned paper to my card base.  Next I took a panel of white cardstock and die cut the scalloped border using a Spellbinders Edgeabilities die that's been in my stash for years, the Classic Scallop.  I then chose to use the inlaid die technique and die cut the rose and leaves from the panel.  Using a separate piece of cardstock I blended with Distress Ink and then die cut these out and replaced the pieces into the main panel, using an adhesive sheet on the reverse.  All that was left to do was to stamp the sentiment and then adhere the panel onto the card base using 3D foam.

Materials used:
  • Dies: Spellbinders - Designer Series Flower Garden: Corner Floral, Edgeabilities: Classic Scallop
  • Patterned Paper: Dovecraft - Garden Party
  • Stamp: Clearly Besotted - Say It With Flowers
  • Ink: Versafine - Onyx Black; Distress Ink - Worn Lipstick, Peeled Paint

Challenge entries:

AAA Cards - CAS Game #115 - Inspired by Nature
Allsorts - Week 467 - In The Pink
Time Out - Challenge #109 - Inspired by Words


Thanks for visiting today and I hope you've had a lovely weekend.  It's back to work for me tomorrow after a lovely week off taking a few days out here and there, and for once the weather has been great for the most part.  Let's hope it stays that way as it was a long time coming!

Bye for now. 

Saturday, 14 April 2018

Less is More Challenge #369

Good morning, crafters

Back with a fresh new challenge over at Less is More and for this fortnight's challenge we have a really fun Theme for you.  Here's the cue...


...something that you've not used on your cards in ages / out of fashion or favour /
older stash items


We have two fabulous Guesties joining us this week, Cara and Sue, our previous January and February Winners.  Please do pop over to say hi and to see what they've been bringing back for this challenge.

Our sponsor for April is the wonderful Happy Little Stampers and I've been using HLS stamps on all of my cards for this challenge.  And don't forget that by playing along you also get a chance of becoming our monthly prize winner!
Picture


For my cards today I've chosen some old items from my stash which I've not used in a LONG time.

The first stash item I grabbed was my chalks, and I made two versions of the same design...


On a panel of white cardstock I stamped the dandelion image twice in VersaMark ink.  I then dabbed on some chalks using a cotton pad.  Once most of the design was covered in chalk I then blended the colour a little more to pick up the detail of the images.  As you're adding chalk to an ink that's still sticky it's best to dab first instead of swirling so as not to blur the stamped images.  I then used a co-ordinating green ink to stamp the sentiment.  The panel was then popped up on fun foam onto a pink card base.

Materials used:

  • Stamps: Happy Little Stampers - Dandelion Wishes
  • Ink: VersaMark; Versa Color - Bamboo
  • Chalks: Craf-T Products - Decorating Chalk
  • Coloured cardstock from stash

Challenge entries:

Addicted to Stamps and More - Challenge #287 - Make Your Mark (chalks)
Moving Along with the Times - Challenge #69 - Springtime


For my second version of this design I used the chalks on black cardstock...


The process here was the same but instead of using VersaMark I used a white pigment ink to which the chalk was then added.  The sentiment and stems here are in fact green but it doesn't show up too well in the pic.  The panel was then popped up on some black fun foam onto a green card base.  You do get more of a haze around the images on the black cardstock but I think that adds a nice softness to it.

Materials used:

  • Stamps: Happy Little Stampers - Dandelion Wishes
  • Ink: Hero Arts - Unicorn
  • Chalks: Craf-T Products - Decoration Chalk
  • Coloured cardstock from stash


And for my third card, and the one I shared over at the main LIM post, I had fun once again playing with shrink plastic!


I started by stamping the butterfly onto the rough side of some shrink plastic and then coloured it in with my coloured pencils.  You don't have to be too particular with the colouring detail as it will shrink to seven times smaller than it's original size.  I die cut the butterfly with its co-ordinating die and then used my heat gun to apply the heat required to shrink it.  It will curl while shrinking but it generally returns to a flat image, although my butterfly's antennas did get a little twisted in the process but I quite like how they look!  When still warm I just placed an acrylic block over it to ensure it was completely flat.  Here's a closer look...


On my card base I stamped the 'happy' using my MISTI with four different inks to create an ombre effect, stamped the rest of the sentiment in black and then adhered the butterfly using Glossy Accents to ensure it would adhere well.

Materials used:

  • Happy Little Stampers: Butterfly Birthday (and co-ordinating die), Mix Mash, Everyday Sentiments
  • Ink: Versafine - Onyx Black; Versa Color - Canary, Marigold, Orange, Camellia
  • Coloured with Faber Castell Polychromos
  • Shrink Plastic: Funstamps - Frosted

Challenge entries:

Seize the Birthday - Anything Goes: Vibrant Colours
STAMPlorations - April Challenge - Focus on the Sentiments
Creative with Stamps - Challenge #25 - CAS + Sentiment
Happy Little Stampers - Anything Goes with HLS Stamps


I had great fun returning to these old techniques and products.  My teamies are bringing back some great products and techniques on their projects over at the main challenge blog so please do drop by and visit them if you have time.

Can't wait to see what emerges from everyone's stash for this one!

Related Posts Plugin for WordPress, Blogger...