Saturday 28 November 2015

Less is More Week 252

Good morning crafters

We've whizzed around to another Saturday which signifies a new challenge over at Less is More.  This week it's the turn of our Recipe challenge and this week our recipe is...


Fruit
Please remember to keep your creations clean and simple


I must admit, this one did stump me as I knew I had very little fruit related stash but I managed to get my brain in gear and create two cards for you this week.


A fabulous digi by Pink Petticoat helped me with my first card...


I love the images from Pink Petticoat and sadly the online store is due to close in the near future.  Some wonderful digis are still available to purchase at the moment if you want to grab some bargains.  

I printed this digi, coloured it with my ProMarkers and then die cut with a fishtail flag die.  The musical notes were stamped onto the image panel.  I used two more of the fishtail flag dies to cut two pieces of co-ordinating patterned paper.  I adhered some kraft cardstock to my card base, layered the papers and finally popped the image panel up on 3D foam strips. 

Materials used:
  • Digi: Pink Petticoat - Partridge in a Pear Tree
  • Stamp: Clearly Besotted - Rockin' Robin
  • Coloured with ProMarkers
  • Dies: MFT Die-namics - Fishtail Flag Stax
  • Patterned Paper: MFT - Dots & Stripes Neutral; Doodlebug - Santa Express

Challenge entries:

Passion For ProMarkers - Challenge #324 - Christmas is Coming
A Gem of a Challenge - Challenge #158 - Inspired by a Christmas Song or Carol
CAS on Sunday - Challenge #72 - Christmas
Uniko - Challenge #27 - Christmas with optional twist of CAS
The Cutie Pie Challenge - Challenge #93 - Simply Cute and Christmassy
AAA Cards - Challenge #53 - Anything Goes


And for my second card, some fruity Christmas bling!


All the images on this card came from the same stamp set.  I stamped the glasses in silver, using my stamp-a-ma-jig to position them. I then used a stitched rectangle die to create the panel.  I stamped the strawberry, lime and holly and fussy cut these out before adhering in position.  I masked the central glass to stamp the straw.  I added some glue to the contents of each glass and added some fine glitter to add some festive sparkle.  This irridescent glitter is a lot more sparkly IRL!  For a tiny bit more bling I coloured a smooth clear gem with a red ProMarker and added this as the holly berry.

Materials used:
  • Stamps: Stampin' Up - Happy Hour
  • Die: MFT Die-namics - Stitched Rectangles
  • Ink: Versa Color and Versafine
  • Accents: Stampin' Glitter - Dazzling Diamonds; Gem from stash

Challenge entries:


The Crafter's Cafe - Challenge #137 - CAS with Food or Drink Theme
Addicted to CAS - Challenge #77 - Dimension


Thanks for popping by and I hope you can find some fruity inspiration and join us this week.

That's all from me for now, I'm off to have a long overdue hair cut and get some Christmas planning sorted.  I need to do a few bits each weekend otherwise it will be here and I won't have done anything!

Take care and bye for now


Tuesday 24 November 2015

Addicted to Stamps and More #172

Hi guys

Can you believe it's time for another new challenge over at Addicted to Stamps and More?!  Where do these weeks go?  Those of you that follow the challenge will know we follow a sequence of challenge themes and this week we're back with our regular theme...


Make Your Mark
You can find the challenge guidelines here.


Our Sponsor this week is the fabulous Stamporations and one lucky winner will receive a $10 gift certificate!


Here's my DT card...


Although I'm in desperate need of some Christmas cards right now I went ahead and made a girlie birthday card!  No idea why! lol

I stamped this lovely image from The Greening Farm and learned the hard way as, after completing my first coloured image I stamped the sentiment at the end and then dropped my stamp right over the image! Arrghhhh......so I had to start the whole thing again from scratch!

On a white cardstock panel I stamped the image and then stamped the sentiment alongside BEFORE I commenced my colouring!  I coloured the image with my ProMarkers and FlexMarkers, although I'm still struggling with my lack of blendable shades (note to self...stop buying stamps and get more markers!).  I covered the card base with some neutral polka dot paper and then adhered the panel in the bottom right corner.  

Materials used:
  • Stamps: The Greeting Farm - Rain Snow Shine; Clearly Besotted - It's Your Birthday
  • Ink: Impress - Jet Black; Versafine - Onyx Black
  • Coloured with ProMarkers and FlexMarkers
  • Patterned Paper: MFT - Dots & Stripes Neutral

Challenge entries:

613 Avenue Create - Challenge #151 - Anything Goes
Brown Sugar - Challenge #173 - Anything Goes
Without Words - November Challenge - Winter Birthday
AAA Cards - Game #53 - Anything Goes


There's a really diverse selection of creations by my teamies this week so, if you have time, I'm sure they would love for you to visit their personal blogs.

Why not Make Your Mark and play along with us this week.

Thanks for stopping by.


Saturday 21 November 2015

Less is More Week 251

Good morning

It's time for another new challenge at Less is More.  We are back with a theme challenge this week which is...


Numbers
Please remember to keep your creations clean and simple


So, I'll get straight to it with my samples...


I stamped five balloons in blue shades and die cut with their co-ordinating dies.  I then positioned them roughly where I wanted them and marked under each one with a pencil.  Further down the card I marked a central point then drew in the 'strings' with a fineliner pen.  The balloons where then adhered in place and the sentiment was stamped onto a panel, die cut using a stitched rectangle die.

Materials used:

  • Stamps: Clearly Besotted - Make a Wish; Paper Smooches - Birthday Sampler
  • Dies: Clearly Besotted - Make a Wish; MFT Die-namics - Stitched Rectangles
  • Ink: Versa Color - Cyan, Baby Blue, Royal Blue

Challenge entry:

Crafty Catz - Challenge #302 - Shades of Blue


And my second card...


I die cut a heart and embossed the sentiment and numbers with silver embossing powder.  I cut a smaller heart from a post-it note and placed this onto the white cardstock panel so I could blend out some distress inks, keeping the rough shape of the heart.  The embossed heart was then adhered onto the panel on 3D foam, as was the panel to the card base.

Materials used:
  • Die: X-Cut - Nested Hearts
  • Stamps: Uniko - Classic Numbers
  • Ink: VersaMark; Distress Ink - Spun Sugar, Shaded Lilac
  • Embossing Powder: Wow! - Metallic Silver

Challenge entry:

CAS-ual Fridays - Challenge #145 - Precious Metals


Thanks so much for popping by, myself and my teamies would love for you to join us this week and we can't wait to see you in the gallery.


Monday 16 November 2015

Muse #142 - Sending Aqua Love

Hi guys

There's a new challenge just starting over at Muse and I'm delighted to be your muse again for this week's challenge.

After making a few Christmas cards recently it was refreshing to make a non-festive card to hopefully inspire you.

Teals, turquoises and aquas are my absolutely favourite shades, especially when paired with white so that's where I started and here's the result...


I masked a horizontal section on a cardstock panel and stamped the leaves in aqua pigment ink.  I then heat embossed with clear embossing powder.  I added double score lines above and below the embossed section to add some definition before adhering the panel to the card base on 3D foam.  I die cut a stitched tag and stamped the sentiment, adhered to the panel and accented with a couple of turquoise die cut hearts.

Materials used:

  • Stamps: Uniko - Natures Treasures II; Clearly Besotted - Many Mini Messages
  • Ink: Versa Color - Seafoam; Versafine - Onyx Black
  • Embossing Powder: Rubber Stampede - Clear
  • Dies: MFT Die-namics - Stitched Traditional Tag Stax; Lawn Fawn - Hearts


Challenge entries:

Creative Inspirations - Challenge #335 - Anything Goes
CAS on Sunday - Challenge #71 - Tag It


I hope you will find some inspiration from my design and hope you'll join in the challenge this week.

Bye for now


Saturday 14 November 2015

It's Beginning to Look a Lot Like Christmas!

Hi guys

Welcome to my regular Saturday morning post to introduce the new challenge over at Less is More.  This week it's the turn of our One Layer Challenge.  And we would like you to make cards that depict...


Santa
Our guidelines can be found here.  Please remember to keep your creations clean and simple.


I have three cards to share with you this week, all very different.  I hope these will whet your appetite and inspire you to join us this week.

I was really pleased with the result on my first card, exactly how I had planned it (makes a change!)


This card took a bit of planning but was pretty simple to create.  I sketched a Santa hat onto a post-it note and cut it out from the inside to create a mask, firstly minus the white parts.  I used a grey card base as I wanted the white to eventually show up.  I blended red ink through the mask to add some light and shade.  I then cut two more masks for the fluffy white parts of the hat and swiped a VersaMark ink pad over the negative space onto my card base.  I then heat embossed these areas with white embossing powder.  I finished with a sentiment below in black.

Materials used:

  • Cardstock from stash
  • Ink: Distress Ink - Barn Door; VersaMark; Versafine - Onyx Black
  • Embossing Powder: Wow! - Opaque Bright White
  • Stamp: MFT - Christmas Cuteness


Challenge entries:

Creative Inspirations - Challenge #335 - Anything Goes
Crazy 4 Challenges - Challenge #310 - Christmas Theme


And my second...


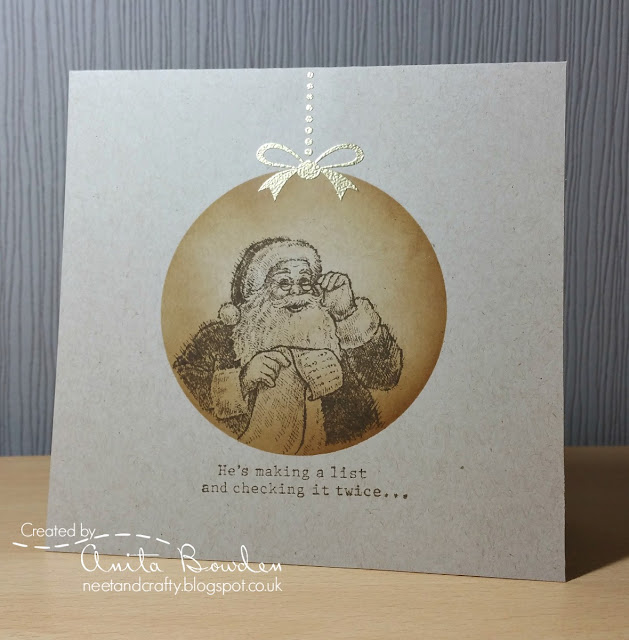
I think the Santa image I used here has a very vintage feel so I started with a kraft card base, masked a central circle and blended in some Distress Ink.  With the mask still in place I then stamped the Santa image, and the sentiment was stamped below in the same ink. It looked like something was missing so I decided to turn the sphere into a bauble and heat embossed the hanger and bow with gold embossing powder.

Materials used:

  • Cardstock: Neenah - Desert Storm
  • Die: MFT Die-namics - Double Stitched Circles
  • Ink: Distress Ink - Vintage Photo, Walnut Stain; VersaMark
  • Stamps: Stampin' Up - Santa's List; Clearly Besotted - Ornamental Style
  • Embossing Powder: Wow! - Metallic Gold Rich


Challenge entries:

The Crafter's Cafe - Challenge #136 - Inspired by a Song (Santa Claus is Coming to Town)
Brown Sugar Challenge - Challenge #172 - No Patterned Paper
CAS-ual Fridays - Challenge #145 - Precious Metals


I decided to create an iconic Christmas scene for my third card...


I masked the hill and the moon with post-it notes and blended the night sky with purple inks, and with the mask still in place I stamped the fence and trees.  I stamped the deer and added a little shading at his feet, then stamped the sleigh image and sentiment. As a finishing touch I applied some glue to the brow of the hill and sprinkled with some fine glitter.


Materials used:
  • Stamps: Card-io - Christmas Scenery 1, Christmas Scenery 2; Penny Black - Wonder Collection (sentiment)
  • Ink: Versa Color - Hyacinth, Heliotrope, Sky Gray; Versafine - Onyx Black
  • Accents: Stampin' Up Glitter - Dazzling Diamonds

Challenge entries:

Fantasy Stampers - Challenge #49 - Winter Wonderland
Cute Card Thursday - Challenge #399 - Birds/Animals
Penny Black and More - November Challenge - Anything Christmas
The Friday Mashup - Challenge #234 - Baby It's Cold Outside


One Layer Christmas Card Challenge - Challenge #21 - Anything Goes (twist of Reindeer)


My teamies have made some lovely creations this week so please pop over the the Less is More challenge blog and pay them a visit if you have the time.  One layer cards don't have to be difficult, I think they just take a little more planning beforehand.  We would love for you to join us this week, I'm sure you still have Christmas cards to add to your stash, I know I certainly do!

Thanks for visiting today, I hope to see you again soon.


Tuesday 10 November 2015

Addicted to Stamps and More #170

Hi guys

It's time for another new challenge over at Addicted to Stamps and More and with winter and Christmas fast approaching we have a very seasonal Photo Inspiration Challenge for you this week.  Here's the pic to inspire you...


Kylie's fabulous company, Happy Little Stampers will be sponsoring this week's challenge and one lucky winner will receive a $15 gift certificate.


Here's my DT card, I used the colours, the twigs and the red spheres as my inspiration...


On a white cardstock panel I stamped the twiggy branch in the top left hand corner.  I then stamped the tiny bauble in red and its super tiny topper in black and then used a black fine liner pen and a ruler to draw in the string and tie.  Next I hand cut some post-it notes and used these as masks to create the snow banks, gently blending the ink upwards from each mask.  I then used a similar scripty sentiment which I stamped in red, and stamped the single star in silver.  The panel was mounted on 3D foam and finally I added some Glossy Accents to the bauble.

Materials used:

  • Stamps: Inkylicious - Twiggy Branch; Card-io - Dotty Snowflakes; Clearly Besotted - Most Wonderful and Merry Little Christmas
  • Ink: Versa Color - Pinecone, Scarlet, Silver, Smoke Blue; Versafine - Onyx Black
  • Accents: Glossy Accents and Derwent Graphik Line Maker pen

Challenge entries:

Fantasy Stampers - Challenge #49 - Winter Wonderland
Crafty Catz - Challenge #300 - Winter
Crazy 4 Challenges - Challenge #310 - Christmas


Thanks so much for popping by, and if you can, please take a look at my teamies' creations this week and see how the photo inspired them too.  We would love for you to join in at ATSM this week. 


Saturday 7 November 2015

All Fired Up at Less is More

Hi guys

Today at Less is More we are starting another new challenge and we are back with our regular Colour challenge.  This week we would like you to use the colours of...


Fire
Please remember to keep your creations clean and simple


I have two sample cards for you this week, so let's get to it...


I squished a small amount of three Distress Inks onto my craft mat and spritzed with water.  I then smooshed the ink onto a cardstock panel bringing the colours up from the bottom corner.  Once dry I then repeated the process to intensify the colours.  I then spritzed some water into my hand and flicked small droplets over the inked area, left for a few moments and lifted the colour away with a paper towel.  I adhered the panel to my card base on 3D foam, added a vellum flourish die cut and adhered the black sentiment strip, where the sentiment was heat embossed in white.

Materials used:
  • Ink: Distress Inks - Barn Door, Spiced Marmalade, Mustard Seed; VersaMark
  • Die: MFT Die-namics - Leaf-Filled Flourish
  • Stamp: Clearly Besotted - Many Mini Messages
  • Embossing Powder: Wow! - Opaque Bright White


Challenge entries:

Crafty Cardmakers - Challenge #151 - Thank You
613 Avenue Create - Challenge #148 - Anything Goes
Simply Create Too - Challenge #98 - Give Thanks


And my second card...


I masked a square on a white cardstock panel with post-it notes and blended Distress Inks in three colours.  I then removed the masks and once dry, brushed over the square with my EK Success powder tool to remove any static.  The sunburst and sentiment were stamped in VersaMark and heat embossed with gold powder.  The panel was then popped up on 3D foam strips onto the card base.

Materials used:
  • Ink: Distress Ink - Barn Door, Spiced Marmalade, Mustard Seed; VersaMark
  • Stamps: Clearly Besotted - Sunburst
  • Embossing Powder: Wow! - Metallic Gold Rich

Challenge entry:

CAS-ual Fridays - Challenge #145 - Precious Metals


Thanks so much for visiting today and my teamies and I would love to see your creations in our gallery this week.

Have a lovely weekend.


Monday 2 November 2015

Happy Little Stampers November 2015 CAS Challenge

Hi there

Well, we're at the beginning of another month and that means it's new CAS Challenge time at Happy Little Stampers.  We have another great technique challenge for you, here it is...


This challenge is sponsored by


and one lucky winner will receive this fabulous stamp set!


For my DT card I decided to go super CAS and I love how it turned out...


I knew this challenge would be coming up so while I was at a craft show in the summer I treated myself to a little gilding flakes starter kit by Honey Doo Crafts.  It's got everything you need to get started.  There are lots of different shades of flakes but as I'd never used them before I just went with their one tone gold, Golden Sands.

I stamped the bauble and sentiment with the mixed media glue onto some deep red cardstock, followed the instructions that came with the kit and voila....here's a closer look.


I then simply die cut the image with a rectangle die and mounted this onto my card base with 3D foam.  I almost went for a black card base but I think the red and gold looks quite classy on the white.  What do you think?

Materials used:
  • Stamps: Marion Emberson Designs - Sparkling Christmas; Happy Little Stampers - Mixed Christmas Sentiments
  • Gilding Flakes: Honey Doo Crafts - Golden Sands (together with starter kit)
  • Die: Spellbinders Nestabilities - Classic Rectangles

I'm going to link this card up at the following challenges:

Merry Monday - Challenge #178 - Red and Gold
Crazy 4 Challenges - Challenge #310 - Christmas
Crafty Hazelnut's Christmas Challenge - Challenge #253 - It's Time to Sing (The First Noel)
Crafty Hazelnut's Christmas Challenge - Challenge Extra for November - Anything Goes


My teamies over at Happy Little Stampers have created some wonderful cards for this challenge, if you have the time please drop by and see what they've made, you won't be disappointed.  And we also have a Guest Designer joining us this month, the fabulous Karen Mead of Made by Meadie.  Please stop by her blog and show her some love, her card is amazing!

And you don't need to use gilding flakes for this challenge.  There are lots of ways to add gilding and there is some help for you over at the challenge blog, here, if you are unsure.  There is a definition and some tutorials for you.  I can't wait to see your creations this month.


Sunday 1 November 2015

Vintage Rose Save the Date Tags

Hi guys

I've got something a little different to share with you today.

I was recently asked by a friend to make some Save the Date cards for her wedding next year.  They had seen some online that they liked that were in the form of a luggage tag so they wanted to go with that design.  Based on the colour scheme she gave me I made some mock-ups with different fonts and images for them to choose from.

This was the final design...


I printed the wording onto some cream cardstock before die cutting with the stitched tag die.  The fonts I used were called EcuyerDAX, Elegant Typewriter and Typewriter Condensed.  I think these work really well with the rose design.  Then came the time consuming part.  When I showed them the vintage rose design I didn't imagine how much time these would take.  Of course, the roses and the leaves are separate stamps and it is also a three-step stamping set, so each tag has twelve separate stamped images on it! Unfortunately, my printer won't take very thick card so the card I used was fairly thin, so I die cut more tags and adhered them back to back (my poor Big Shot was very tired, as was my arm!).  This also covered up the rough side of the die cuts and gave a better finish.  I then punched the holes with a single hole punch and tied some jute twine to each one.

Materials used:

  • Stamps: Altenew - Vintage Roses
  • Ink: Versa Color - Vanilla, Sand Beige, Umber
  • Die: MFT Die-namics - Stitched Tags
  • 2-ply jute twine

I would like to link these up at the following challenges:

The Challenge - Challenge #48 - Weddings
Sweet Stampin' Challenge - Dies and/or Punches (used both here)
The Friday Mashup - Challenge #232 - Leaves
Crafty Catz - Challenge #299 - Let's Tag It


I'm now putting together some ideas for the wedding invitations using the same theme and will share these at a later date.  

Thanks so much for visiting today.  Have a great day whatever you're up to.


Related Posts Plugin for WordPress, Blogger...