Showing posts with label Pebbles. Show all posts

Saturday, 3 February 2018

Less is More is 7!

Good morning!

At Less is More this month we're celebrating...it's our 7th Birthday!  Over on the main challenge blog there's a bumper post telling you all about it, so for all the details please do pop over there.

In a nutshell, as it's our birthday month we are celebrating with two challenges, two sponsors, we have prizes and also have some familiar faces back with us to celebrate, as well as our sponsor Guest Designers so please do check it out and follow all the links to see more details of all their fabulous creations.

The first challenge for this month is a theme and here are the details...


Our sponsor for this first challenge of February is the awesome Uniko so don't forgot you have to play along for a chance to win the monthly prize.

Uniko


I did have a bit of a panic when I saw this challenge as I have almost nothing to fit this theme in my stash but I luckily found a free stamp set with a magazine only last week which was perfect for the challenge...and then also DID find a few bits within my stash that could work too.  And amazingly, I've made six cards for you, I just couldn't stop!


Card One


I die cut a circle off the edge of a white cardstock panel and then ink blended the card base in the area to show through the aperture.  I placed the panel over the base and stamped the musical image through the aperture onto the blended area.  The sentiment was then stamped onto the panel which was adhered flat.

Materials used:
  • Ink: Distress Ink - Candied Apple, Picked Raspberry, Wilted Violet; Versafine - Onyx Black
  • Die: Hero Arts - Infinity Circle Dies
  • Stamps: Sheena Douglass - The Music and Dance Collection (free with magazine)

Challenge entries:

Crafty Cardmakers - Challenge #204 - Get Inky/Messy


Card Two


This has got to be one of the quickest cards I've ever made!  I embossed the card base with a square die and then used another die from the same set to cut out the pierced square.  The sentiment and note were stamped and the small panel popped up on 3D foam.  The embossed card base can be seen more clearly below...


Materials used:
  • Die: MFT Die-namics - Pierced Square Stax
  • Stamps: Clearly Besotted - Scrumptious Sentiments; Sheena Douglass - The Music and Dance Collection (free with magazine)
  • Ink: Versafine - Onyx Black; Versa Color - Camelia

Challenge entries:

Freshly Make Sketches - Challenge #322


Card Three


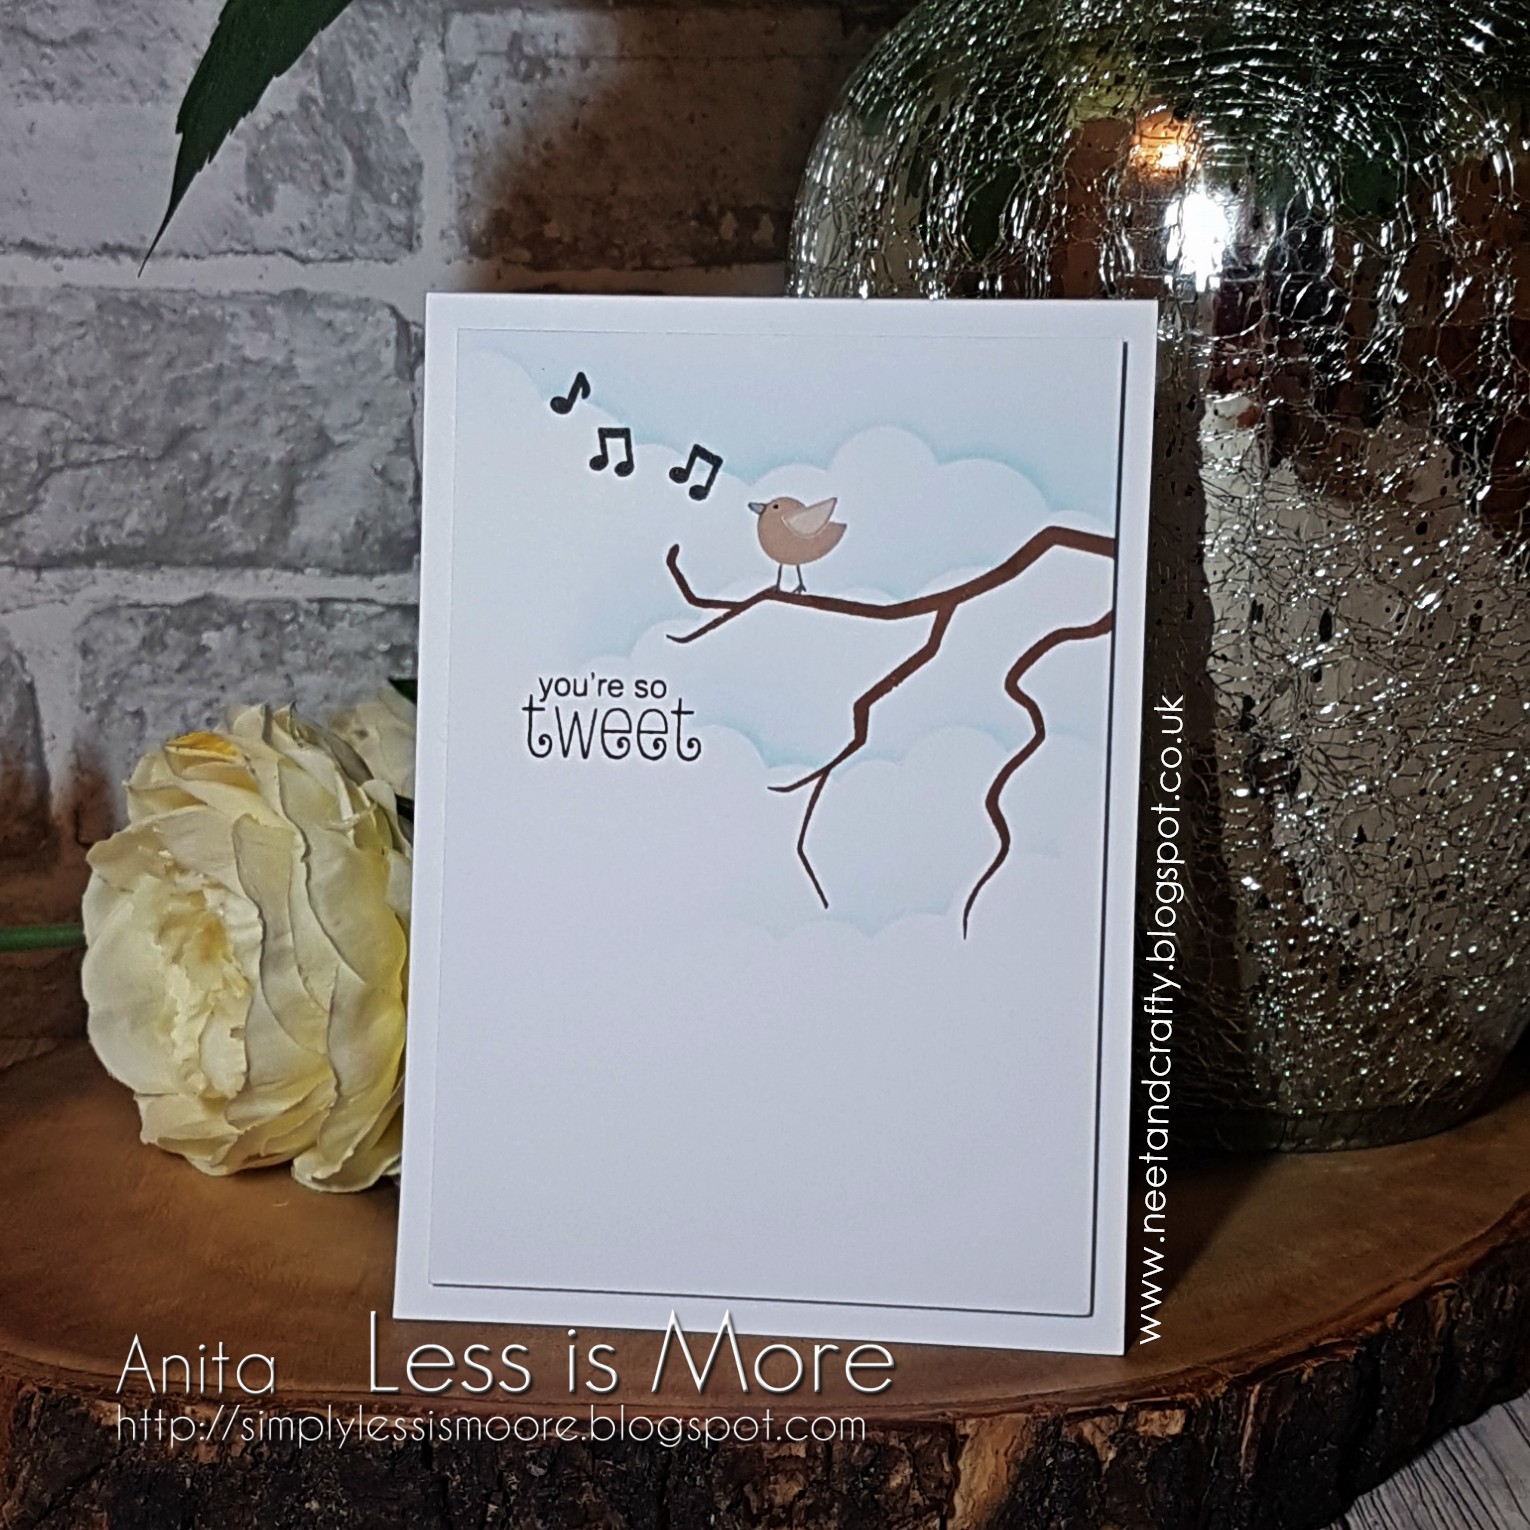
A panel of white cardtock was blended at the top with blue ink and a cloud stencil.  Then the branch, bird, music notes and sentiment were simply stamped to create the scene.  The panel was popped up on fun foam.

Materials used:
  • Stencil: MFT - Mini Cloud Edges
  • Ink: Distress Ink - Tumbled Glass; Altenew - Espresso, Sand Dunes, Rocky Shore, Industrial Diamond; Versafine - Onyx Black
  • Stamps: Clearly Besotted - So Tweet, Love Blossoms; Lawn Fawn - Happy Wedding (notes)

Challenge entries:

Simon Says Stamp Wednesday Challenge - Anything Goes


Card Four


This was super easy.  On a panel of white cardstock I masked a horizontal strip and blended the four colours of Distress Ink.  The images were simply stamped in black before mounting the panel on fun foam.

Materials used:
  • Ink: Distress Ink - Twisted Citron, Peacock Feathers, Blueprint Sketch, Wilted Violet; Versafine - Onyx Black
  • Stamps: Sheena Douglass - The Music and Dance Collection (free with magazine)

Challenge entries:

Addicted to Stamps and More - Challenge #277 - Make Your Mark (ink blending/sponging)


Card Five


I stamped the music score image onto a panel and then the sentiment above.  The holly was stamped in green pigment ink and I added some enamel dots for the berries.  The panel was foam mounted.  Yay, another Christmas 2018 card in the bag!

Materials used:
  • Stamps: Clearly Besotted - Background Builder; Christmas Sparkle (free with a magazine)
  • Ink: Versafine - Onyx Black; Versa Color - Evergreen
  • Accents: Doodlebug Sprinkles - Ladybug

Card Six


This is my least favourite of my six cards but I thought I'd share it with you anyway.  The music score, another stamp from the free set, was stamped on a panel of white cardstock which I then die cut with a landscape die.  I manipulated the sentiment to follow the curve before stamping it above.  I adhered some stripey paper to the card base and the panel flat over the top before colouring the flowers with Zig markers.

Materials used:
  • Stamps: Sheena Douglass - The Music and Dance Collection (free with magazine); SP & Co - Just a Note
  • Ink: Versafine - Onyx Black
  • Patterned Paper: Pebbles - Sunny Side
  • Coloured with Zig Clean Color Real Brush Markers


Thank you SO much if you made it to the end.  I hope you'll feel inspired to play along, and don't forget that our challenges now run for two weeks so there's more time for you to link up.

My teamies have some great projects being shared over at LIM and to see more, and from our guests, just follow each of their links.

Have a wonderful weekend.

Thursday, 13 April 2017

Seize the Birthday - Surprise Party Guest! (Week 4)

Good afternoon!

I'm happy to be back sharing a card for another week of my Surprise Party Guest role at Seize the Birthday.  I love the theme this week as it meant I had to use something I neglect to use far too often!


Every week at Seize the Birthday is Anything Goes as long as it's a birthday theme.


And some weeks there are also optional Toppings


And this week's Topping option is...

Two Patterned Papers


I had fun using two co-ordinating papers from the same paper pad here...


I adhered a strip of the floral paper directly to the card base.  I then adhered the polka dot paper over this which had been die cut with a stitched edge die.  This was then stamped with a bold happy birthday sentiment which was heat embossed in white.  I wasn't sure about the placement of the sentiment at first but I now quite like the quirky angles! :)

Materials used:

  • Patterned Paper: Pebbles - Sunny Side
  • Die: MFT Die-namics - Stitched Basic Edges
  • Stamps: Uniko - All Occasion Sentiments #2
  • Ink: VersaMark
  • Embossing Powder: Wow! - Opaque Bright White


I hope you get a chance to play along with this one, it's a great way to use some of those lovely papers that seem to get left in a cupboard or drawer and forgotten about!

Oh, and I hope you all have a fantastic Easter weekend.  This is a scheduled post so right now I'll be leaping out of the office looking forward to four days off work...bliss!


Saturday, 28 January 2017

Less is More Week #313

Good morning!

Wow, these weeks are just flying by, I can't believe we're back to another Saturday morning...they are always very welcome though!

So, as usual this marks the start of a new challenge over at Less is More and we're back with a Recipe challenge.  And this week, the ingredient we want to see is...


Balloons
(one or more)


And first things first, we have a Guest Designer joining us this week who was our December winner, and a fabulous artist I'm sure most of you are familiar with....the super talented Birgit!  She never fails to wow me with her creativity and her card this week is fabulous so, if you have time please do pop over and show your appreciation.


Right, onto my cards, and I have two for you this week, both of which have already been posted off for birthdays during this past week.

My first uses a stamp from a wonderful set by Katzelkraft which Santa very kindly brought to me.  I decided I needed some fun and quirky stamps in my stash and as a cat lover these were on my Christmas list.  The card was mailed off to a friend who is also a cat lover, and as she has four furbabies this had to be the theme for her card!


This week I wanted to make use of something I haven't used for ages.....patterned paper!  It was getting neglected in the bottom of my cupboard so I had a rummage and pulled out a colourful design to work with.  That was my starting point so, after stamping the cat in black I used some co-ordinating ink colours to stamp the balloons, and used a fine liner to draw the balloon string tying it to his tail.  The speech bubble was also stamped in black, and this is from a set I managed to buy from the lovely Michelle Short when she had a stash sale last year.  I then die cut the bottom of my white cardstock panel with a pierced border and adhered this over the patterned paper onto the card base.  I would have preferred to have the patterned paper section a little shallower but I had already die cut my panel so to preserve some white space I left the cat uncoloured.

Materials used:

  • Patterned Paper: Pebbles - Sunny Side
  • Stamps: Katzelkraft - Les Chats Russes; Clearly Besotted - Let's Party; Lawn Fawn - Chit Chat
  • Ink: Memento - Tuxedo Black; Versa Color - Rose Red, Bamboo, Lapislazuli, Orange
  • Die: Avery Elle - Dotted Border Dies

Challenge entries:

Seize the Birthday - Anything Goes (not played along with the toppings option this time)
Penny Black and More - January Challenge - Anything Goes
Darnell's NBUS Challenge #9 - Two NBU stamp sets (not played along with the optional theme this time)
Addicted to Stamps and More - Challenge #226 - Anything Goes
Please do grab our logo to display on your own blog


For my second card I used a great set of dies from MFT to make a masculine celebration card...


This was super easy to make.  I die cut the balloon base from some polka dot patterned paper, adhered it to the top of my card base and trimmed away the excess.  The bow and string were die cut from green cardstock, and the happy from blue.  These were adhered in position and the remainder of the sentiment was stamped at the base in green.

Materials used:
  • Patterned Paper: Pebbles - Sunny Side
  • Coloured Cardstock: Papermania
  • Dies: MFT Die-namics - Blueprints 26
  • Stamp: Clearly Besotted - Laugh Out Loud
  • Ink: Versa Color - Bamboo

Challenge entries:

Moving Along with the Times - Challenge #37 - Swirls and/or Curls
Happy Little Stampers - January Challenge - Anything Goes with Dies
Inkspirational - Challenge #127 - Polka Dots


Thanks so much for visiting my little space in blogland today.  For more inspiration please pop over to the main challenge blog where my teamies have worked their socks off this week to create some great cards to share.  I hope you find time to play along this week.


Sunday, 1 May 2016

Stamping Sensations May Challenge - Guest Designer!

Hi there

I'm thrilled to be joining the lovely design team over at Stamping Sensations as Guest Designer for their May challenge.  Thanks so much, Brenda for inviting me.


Please grab our logo

The theme for this month is

Anything Goes with a Stamp and Ribbon


Here's my card...


I've got sooo much ribbon in my stash but haven't used any on a card for a long time!  I stamped the flower image in black, along with the sentiment onto some Neenah white cardstock and die cut with a diagonal stitched rectangle.  I then coloured the Cosmos flowers with ProMarkers.  To continue with my love of creating clean and simple designs I took a small piece of yellow grosgrain ribbon, twisted it and adhered it behind my panel.  This panel was then adhered to some polka dot patterned paper using 3D foam before being adhered to my card base.

Materials used:
  • Stamps: Uniko - Pure Florals Cosmos, All Occasion Sentiments #6
  • Ink: Memento - Tuxedo Black
  • Coloured with ProMarkers
  • Die: MFT Die-namics - Inside and Out Diagonal Stitched Rectangles
  • Patterned Paper: Pebbles - Basics Cardmaking Pad 2
  • Ribbon: American Crafts

Challenge entry:

I Love ProMarkers - Challenge #307 - Pastel Colours 


Thanks for visiting today.  And why not play along at Stamping Sensations, the challenge will run until almost the end of the month :)


Saturday, 30 April 2016

CAS with Designer Paper

Hi guys

We've whizzed around to another Saturday morning so it's new challenge time at Less is More.  As there are five Saturdays in April that means this month we have a Lucky Dip challenge for you and our theme is...


Use Designer Paper in a CAS Way


With every Lucky Dip challenge comes a Guest Designer and this week we have one of our fabulous LIMettes, the lovely Esther of The Carnelian Wood.  Esther participates every week and shows so much support by visiting so many of our entries!  It's a pleasure to have you as our Guestie this week, Esther xx


So, this week I have three cards to share with you.  Here's the first...


I wanted to create the look of a wrapped present for this card.  I took some red gingham patterned paper and cut two strips.  I also used a die set to create the bow.  As the bow had a stitched edge detail I used a straight stitched detail die to die cut along both edges of my two strips.  On a white cardstock panel I adhered the two strips and topped with the bow before stamping my sentiment.  The panel was then adhered on 3D foam.  I was really pleased with how this one turned out, it looks so much like gingham ribbon!

Materials used:
  • Patterned Paper: Pebbles - Sunny Side
  • Dies: Frantic Stamper - Small Solid Bow; Paper Smooches - Stitched
  • Stamp: Clearly Besotted - Celebrating You
  • Ink; Versafine - Onyx Black

Challenge entries:

613 Avenue Create - Challenge #173 - Anything Goes
Time Out - Challenge #55 - Celebrations with optional twist of die cutting/fussy cutting


I used some digi paper for this next card...


I started by printing the designer paper.  I then cut two strips of white cardstock, and a strip of the paper the same length.  I adhered the paper flat to the cardbase and the two white panels on 3D foam.  I then cut the scribble die cut from some pink cardstock and on a strip of green cardstock heat embossed the sentiment in white.  These were then adhered across the aperture.

Materials used:
  • Digi Paper: Pink Petticoat - Perfect Papers
  • Stamp: Personal Impressions - Mix & Match
  • Ink: VersaMark
  • Embosssing Powder: Wow! - Opaque Bright White
  • Die: MFT Die-namics - Scribble

Challenge entry:


And a super simple design for my third card...


I die cut the balloon three times from polka dot papers.  I temporarily placed them where I wanted them and stamped the sentiment and strings, then adhered the balloons on 3D foam.

Materials used:
  • Die: Clearly Besotted - Make a Wish
  • Patterned Paper: Lawn Fawn - Let's Polka
  • Stamps: Lawn Fawn - Scripty Sayings
  • Ink: Versafine - Onyx Black

Challenge entry:

Seize the Birthday - Anything Goes


I don't use designer paper nearly enough and I have a fair amount piled up in my stash.  But I must say, I thoroughly enjoyed creating these this week.  Why not have a rummage and join in the fun this week!


Wednesday, 1 April 2015

Addicted to Stamps and More #138

Hi there

I'm here to share my DT card for the next challenge at Addicted to Stamps and More.  A new challenge has just started and this week the theme is...


Holiday
Your creation must have a holiday theme: this could be a national holiday or a holiday/vacation theme


Our sponsor this week is Stitchy Bear and the prize they are offering is 3 images up to the value of $10!

Here is my DT card...


I started by cutting a kraft cardstock panel slightly smaller than my card base and die cut a curved rectangle aperture.  I stamped the sentiment in VersaMark and heat embossed with white embossing powder.  I then stamped the flowers on the card base also in VersaMark (after marking out where the aperture would be positioned), and also heat embossed these with white embossing powder.  I die cut the bunny from some polka dot cardstock and adhered some short pieces of thin twine to create the whiskers.  I then popped up the panel and the bunny on 3D foam.

Materials used:
  • Cardstock: Neenah - Dessert Storm; Pebbles - Basics Cardmaking Pad 2 (polka dot)
  • Dies: MFT Die-namics - Stitched Rounded Rectangles (negative); Clearly Besotted - Woodland Pals Die Collection
  • Stamps: Uniko Studio - Background Builders Flower Power; Clearly Besotted - Sweet Little Sentiments
  • Ink: VersaMark
  • Embossing Powder: Wow! - Opaque Bright White
  • Twine: Hemptique - Ruby collection

I'd like to link this card up at the following challenge blogs:

Sweet Stampin' Challenge - Easter
Fantasy Stampers - Challenge #33 - Easter Time
My Time to Craft - Challenge #285 - Easter Animals
Addicted to CAS - Challenge #60 - Cute
Uniko Studio - Challenge #19 - Anything Goes
CAS(E) this Sketch - Challenge #116


I hope you'll join in with this week's challenge.  If you need some inspiration why not pop on over to the ATSM blog where the rest of the Design Team are also sharing their projects.

Happy crafting and I hope I'll see you again soon.


Sunday, 8 March 2015

Not Just a Year Older, but a Year Better

Hi guys

Today I've got a card to share with you which I made for my Brother's fiancee's birthday.  And I've managed to combine a few challenges too.

Here it is...


I die cut two tags, one from white cardstock and one from green polka dot cardstock.  I layered these at an angle and adhered them to my card base.  Next I stamped the daisy and bow images and die cut these with their co-ordinating dies.  These are from a Clearly Besotted set that's been on my wishlist for ages and I finally treated myself a couple of days ago.  I coloured the daisies with ProMarkers and added some Wink of Stella to the flower centres.  I adhered these images at an angle over the tag and finished with the sentiment in black, also from the same set, and a Doodlebug Sprinkle over the hole of the tag.

Materials used:

  • Stamps: Clearly Besotted - Celebrating You
  • Ink: Memento - London Fog, Dandelion; Versafine - Onyx Black
  • Dies: Clearly Besotted - Scalloped Tag Die, Celebrating You
  • Cardstock: Anna Marie Designs - white; Pebbles - Basics Cardmaking Pad 2 (green polka dot)
  • Coloured with ProMarkers
  • Accents: Doodlebug Sprinkles - Bumblebee; Wink of Stella - Clear

Challenge entries:

Less is More - Week 214 - Yellow and Green
A Gem of a Challenge - Challenge #139 - Clean and Simple
Brown Sugar - Challenge #136 - Spring
Cute Card Thursday - Challenge #363 - Die Cuts & Punches
Crazy 4 Challenges - Challenge #276 - Put a Bow On

That's all for the moment.  I should be back to making cards on a more regular basis now as I've claimed back my crafting table!  Literally everything in the flat has been covered in a fine dust from the kitchen renovation but I'm gradually working my way around, it's probably having the best Spring clean it's ever had! haha

Thanks for being patient with me over the last couple of months, and thank you as always for popping by and for leaving such encouraging comments. 


Wednesday, 16 July 2014

Addicted to Stamps and More #104

Hi guys

It's Wednesday morning and that means there is a fresh new challenge over at Addicted to Stamps and More. We have a different genre each week and this week's theme is...

Addicted to CAS
We want to see your Clean and Simple creations


CAS style is fast becoming my favourite and although I've been creating many one layer cards lately, I've used a few layers on today's card while also keeping within the clean and simple theme.


Our sponsor this week is Eureka Stamps and they are offering the fabulous prize of 3 digis.

For my card I used one of the Eureka Digi Stamps, Kitty Peeker, and coloured him with ProMarkers and FlexMarkers before fussy-cutting him out.  I then stamped the Happy Birthday onto a white cardstock panel slightly smaller than my card base and also coloured this in with my markers.  I added a little touch of Wink of Stella to the ribbon on the parcel.  Next I die cut the label square and adhered some patterned cardstock to the card base in the position of the aperture before popping the panel up on 3D foam strips.  The cute kitty was also then popped up on 3D foam and positioned peeking out of the window.

Materials used:
  • Digi: Eureka Stamps - Kitty Peeker
  • Stamp: Papermania - Typography Happy Birthday
  • Die: Spellbinders Nestabilities - Labels One
  • Patterned Cardstock: Pebbles - Basics Cardmaking Pad 2
  • Coloured with ProMarkers and FlexMarkers
  • Accents: Wink of Stella

There are some fab creations by my fellow Design Team members over at ATSM so why not pop over and grab some inspiration.  We'd love to see your CAS creations this week.  If you're unsure of the challenge rules you can find them here.

I'd also like to enter this card into the following challenges:

A Gem of A Challenge - Challenge #123 - Animal
The Cutie Pie Challenge - Challenge #73 - Use a Cute Digi
Charisma Cardz - Challenge #15 - Anything Goes
CASology - Week 104 - Pet


Thanks for popping by today and as always, I'd love for you to leave a comment and let me know what you think of today's card.

Bye for now


Sunday, 20 April 2014

A Little Note

Hi guys

I'm back to share a card I've made to combine a few different challenges.


I started by stamping the notepad image.  I stamped this off onto some scrap paper first as I wanted it to be faint.  I then cut this out using a rectangular die.  The stamp does include impressions for the holes but on this occasion I chose to punch these out.  I then chose some patterned paper and cut this out using the same rectangular die.  Next I stamped the flower and sentiment image before colouring in with ProMarkers, choosing colours to co-ordinate with the paper.  I then added a metal button brad through the top hole before laying up and adhering the rectangles.

Materials used:
  • Stamps: Clearly Besotted - Just a Note; Pink Petticoat - free stamps with a publication
  • Ink: Versa Color - Sky Gray; Memento - Tuxedo Black
  • Patterned Paper: Pebbles - Sunny Side
  • Die: Spellbinders Nestabilities - Classic Rectangles Large
  • Coloured with ProMarkers
  • Brad from stash
  • Single hole puncher

Challenge entries:

CASology - Week 91 - Note
Addicted to Stamps and More - Challenge #91 - Anything Goes
Keep It Simple - Challenge #38 - Bright Sparks
Crafty Catz - Challenge #227 - B is for... (in this case B is for brights, button and brad)
Retro Sketches - Sketch #111


Thanks for popping by, folks.  I hope you are all having a lovely Easter Sunday whatever you're up to.

Hope to see you again soon.


Sunday, 9 March 2014

Fabulous 40

Hi guys

Sorry I'm so late in the day and also for not managing to share anything with you this week, its just been one of those weeks!

Tonight, I'd like to share the card I made for my brother's girlfriend who turned 40 yesterday, and who also became my brother's fiancee on Friday!  That's one big celebration!


I recently received some new goodies from Clearly Besotted Stamps (yes, I'm addicted!) so I used a few of them on this card.  I firstly stamped the hounds tooth background.  I then layered up a die cut doily and some patterned paper die cut with a flag die, onto which I stamped the sentiment.  Next I stamped two of the butterflies from the new Elegant Butterflies stamps set, so glad I managed to get these, they are absolutely gorgeous.  These were then cut out with their co-ordinating dies and I covered these with Glossy Accents and left them to dry.  These were finally added to the card on 3D foam.  I then added a few gemstones to finish.  I also decided to stamp the corner of the inside of the card and an envelope to match.

Materials used:

  • Stamps: Clearly Besotted Stamps - Background Builder III, Elegant Butterflies, Say It In Style, Basic Numbers
  • Dies: Clearly Besotted Stamps - Geometric Doily Die, Elegant Butterflies; MFT Die-namics - Fishtail Flag Stax
  • Ink: Versa Color - Magenta and Celadon; Versafine - Onyx Black
  • Cardstock: Bazzill Basics Premium Cardstock (teal); white cardstock from stash
  • Patterned Paper: Pebbles - Sunny Side 6 x 6 paper pad
  • Gemstones from stash

Challenge entries:
Stampin' for the Weekend - Sparkle and Shine
Seize the Birthday - Anything Goes Birthday
Crafty Creations - Challenge #258 - Happy Birthday
Totally Papercrafts - Challenge #209 - Female Birthday, must have a number or birthday sentiment
Totally Gorjuss - Challenge 226 - Pink and Green
Dream Valley Challenges - Challenge 77 - Big Birthdays
Muse Challenge - #57
I took my inspiration from the butterfly, doily and flag sentiment strip


Thanks so much for popping by.  I hope you've had a lovely weekend, and if in the UK what a lovely sight to see the sun this weekend, its about time!

See you soon

Related Posts Plugin for WordPress, Blogger...