Saturday, 21 December 2013

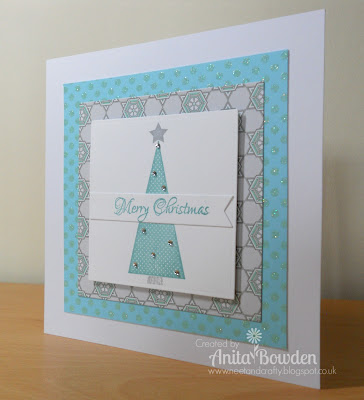
Aqua Bling

Hi guys

I'm back today with another quick post to share another of my Christmas cards.

Apologies again for the poor photography, not liking these dark winter days!


Materials used:
  • Stamps: Clearly Besotted Stamps - Modern Christmas
  • Ink: Versa Color - Celadon and Silver
  • Paper: Stampin' Up - Winter Frost Designer Series Paper
  • Cardstock: Kanban - Sherbert Pips; white cardstock from stash
  • Bling from stash

Challenge entries:

A Gem of a Challenge - Anything Goes
Addicted to Stamps and More - Anything Goes
Charisma Cardz Challenges - Anything Goes
Crafty Creations - Anything Goes
Creative Inspirations - Anything Goes
Dream Valley - Christmas
Papertake Weekly Challenge - Christmas
Simon Wednesday Challenge - Bling It On!
Stampin' for the Weekend - Anything Goes
Totally Papercrafts - Christmas - Non Traditional Colours


That's all from me at the moment, I have another couple of cards to share very soon. 

I hope you're having a lovely weekend, the weather down here in the South West is horrendous so I don't think I'll be venturing outside anytime soon!

Take care


Wednesday, 18 December 2013

Traditional Poinsettia

Hi guys

Just a quick post this evening to share the Christmas card I made for my best friend.


I stamped the card base with some diagonal stripes before placing a square of white cardstock over the top.  The poinsettia was created by stamping with VersaMark onto some thick red and green vellum.  I then heat embossed with some red and green embossing tinsel.  I used the co-ordinating die to cut these out and layered them up, fussy cutting away some of the leaves.  After stamping and die cutting the sentiment using a flag die, I then layered up the poinsettia, adhering with silicone glue.  I finished off with some glitter glue in the centre of the bloom, some dew drops and another sentiment.
 
Materials used:
  • Stamps: Clearly Besotted Stamps - Pretty Poinsettia, Basic Stripes, Signature Christmas and For Everyone
  • Ink: VersaMark; Versa Color - Rose Red and Green; Versafine - Onyx Black
  • Embossing Powder: Heat It Up Embossing Tinsel - Red and Green
  • Glitter Glue: Stickles - Silver
  • Cardstock, vellum and dew drops from stash
 
Challenge Inspiration:
 
Creative Card Crew Challenge 51 - Holly or Poinsettia
 
 
That's all for now.  Thanks for visiting and I hope to see you soon.


Tuesday, 17 December 2013

Inspired by....#3

Hello again

I'm back today with another card I've made for my 'Inspired by...' series.  About time!

I'm forever looking at things around me, items around the home or colours I see which inspire me to create something.

Here is my card, please scroll down to see what it was that inspired me to make this one...

(Apologies for the not great photography, I had to use my daylight lamp for these)


And this is where my inspiration came from...


This pretty tissue box!
 
 
Materials used:
  • Stamps: Clearly Besotted Stamps - Basic Stripes; Uniko Studio - Flower Power #3 and Natures Treasures #1
  • Ink: Versa Color - Laurel Leaf, Green and Magenta; Versafine - Onyx Black
  • Accents: Liquid Pearls by Ranger - Mint Green
 
Challenge entries:
 
A Gem of a Challenge - Anything Goes
Crafty Catz - Anything Goes
 
Thanks for taking the time to visit my blog.  I'll have a few more Christmas cards to share once they have been given to the recipients, just two or three left to make.
 
Take care


Five Gold Rings

Hi there

Ever since I saw the latest challenge at Less is More the cogs of my brain have been turning, albeit not very well!  The challenge set by Chrissie and Jen is to make a One Layer Card, always a challenge, but with the theme of 'The 12 Days of Christmas'.

The idea for my card popped into my head while I was at work yesterday and I came home to attempt to create it.  I have nothing in my stash to fit the '12 Days of Christmas' theme but then I thought, Five Gold Rings, that'll be easy as I must have a circular stamp in my stash.  Nope, don't have one! 

Anyway, here is my card, and read on to find out how I created it...


For such a simple card this took me AGES to make!  As no 'ring' stamp was anywhere to be found I set about finding another way to make my rings.  I used a circular die and a slightly smaller circle punch.  I die cut a circle from a post it note, and then punched out the smaller circle, also from the sticky edge of a post-it note, and placed this in the centre, creating a ring aperture.  I then raided my stamp collection to find something that would cover the aperture, this ended up being a vase stamp, just the right size to cover the area. 
 
I first drew a pencil line along the card, marking five evenly spaced positions for my rings.  Then I placed the ring aperture, five times along the card, and stamped through the aperture using my vase stamp with VersaMark ink.  When all five were stamped I covered them in gold embossing powder and heated.
 
I then used some alphabet stamps to stamp 'MERRY' inside the rings and finished off with a sentiment and a little holly accent, coloured with Promarkers.
 
The card became warped from the heat embossing so I heated it again slightly and then placed it under a heavy box overnight and its now straightened itself out.
 
And, as I've used gold on this card I'm also linking it up to the latest challenge at Card Crafter's Circle.
 
This isn't my best work but after all, it is for some challenges so I thought I may as well share it.
 
Materials used:
  • Stamps: Clearly Besotted Stamps - Basic Alphabet and Signature Christmas; Holly is from an unknown stamp set
  • Ink: VersaMark; Versa Color - Rose Red; Versafine - Onyx Black; Impress - Jet Black
  • Embossing Powder: Rubber Stampede - Gold
  • Tonic Corner Rounder
 
Thanks for popping by and I'll be back shortly with another card for my much abandoned 'Inspired By...' series.


Sunday, 15 December 2013

My Christmas Card Design 2013

Hi guys

Once again, apologies for my lack of posts on here this week.  As I work full time I only have time to craft in the evenings and this week I just haven't found any time at all. 

I have finally managed to put my Christmas decorations up, after countless trips up and down the loft ladder, and have spent a little time writing out my Christmas cards which are now all in the mail...phew, I thought it was never going to happen this year!

So, as my cards are now on their way to the recipients I thought I would share my design with you.  I like to make Christmas cards for challenges and these I just add to my stash.  But as I need to send quite a few cards I have decided to choose a design each year and make multiples of it, this way I know that no-one will be getting a similar card the following year.

So this year I made six variations, ten of each, all based around the same design, just changing a few images and colours.  I chose to use Clearly Besotted Stamps 'Signature Christmas' and 'Signature Christmas Additions' as my main focus, and used Clearly Besotted Stamps 'Merry Little Christmas' and 'Basic Stripes' for additional elements.  I have used some die cut elements but to keep mailing costs down I have adhered these directly to the card rather than popping up on 3D foam.  I used Versafine Onyx Black for all the sentiments and I've detailed below the different ink colours I used for each batch.

 
Versa Color - Green Tea and Cardinal


Versa Color - Winter Green and Boysenberry


Versa Color - Lavender and Celadon


Versa Color - Sky Blue and Mint


Versa Color - Tropical Green and Pink


Versa Color - Evergreen, Sage and Bronze


I'm entering these into the following challenges:
 
CAS on Sunday #23 - Christmas
Creative Inspirations - Traditional Christmas Colours (red and green card)
Stampin' for the Weekend - Use some red (first card)
Sweet Stampin' Challenge - Last Minute Christmas
Totally Papercrafts - Christmas using Non Traditional Colours
 
 
I had great fun making these.  I did miscalculate how many I needed though so had to use a few extras from my stash.  There's just a handful left to make for my nearest and dearest and then I'll be finished.
 
Thanks for popping by, hopefully I can get back into the flow of regular crafting again now and enter a few challenges, I've missed out on far too many these last few weeks!  Note to self, start A LOT earlier next year! :D
 
I hope all your Christmas plans are coming together.
 
Take care


Saturday, 7 December 2013

On Your Wedding Day

Hi there

Apologies for being a bit quiet on the blog this week.

I've certainly not been quiet crafting-wise, I've made 70 Christmas cards this week!  Once these have gone out in the mail I will share them with you, I just need to find the time to write them now!  I've also got a few to make for an order so hopefully I can get those made tomorrow.

This morning I've made a wedding card ready for a reception we are attending this evening.  It was actually really refreshing not reaching for anything Christmas related!

Last week I purchased some gorgeous stamp sets from Uniko Studio which have been on my wish list for far too long so I've used two of these to create this card.


I think this card is fairly self-explanatory.  All the stamps were from the Flower Power #3 set apart from the solid leaves which were from Flower Power #1.

Materials used:
  • Stamps: Uniko Studio - Flower Power #1 and Flower Power #3
  • Ink: Versa Color - Boysenberry and Laurel Leaf; Versafine - Onyx Black
  • Die: Xcut - Nested Hearts
  • Cardstock: Papermania Premium Textured Cardstock (colour); white card from stash

That's all from me today, I've got a really busy day as I need to get a serious wiggle on and do some Christmas shopping and then come back and pretty myself up for tonight.

As always, thanks so much for dropping by.

Sunday, 1 December 2013

Something a Little Different...

Hi guys

Today I'd like to share something I've made for my very best friend, Hazel.  She's opened it this morning so I can share it with you all now!

She loves everything about Christmas so this year I decided to make her an Advent present, so that she can enjoy the approach to Christmas even more :)

Here it is...

 
I made 24 little boxes from kraft cardstock the same way that I made my storage boxes for my card scraps here but adjusting the measurements slightly to create a top flap closure.

 
Each box was stamped with a design from Clearly Besotted Stamps Signature Christmas and Signature Christmas Additions stamp sets.  I kept the traditional red and green theme throughout.


I created the tags using a die from Clearly Besotted Stamps Tag Along set and stamped the numbers using Dovecraft Numbers stamp set in Versafine Onyx Black.  I attached the tags to some green florists twine I had in my stash and tied this in a bow around each box to secure.

 
I placed all the boxes randomly in a Christmas decoration box I found at Dunelm Mill, similar to this one.  It was purely a fluke that the boxes fitted perfectly!
 
 
Each little box contains a small gift but obviously I can't share the contents with you as Hazel is one of my followers!  I've been collecting gift items for the past two or three months, you've no idea how difficult it was to find things small enough to fit in the boxes but I managed it in the end! 
 
 
On a separate note, I finally made a start last night making my main batch of Christmas cards.  Once these have been posted out I'll share them with you.
 
That's all for now, I hope you are all having a lovely Sunday.  I'm off out shortly to enjoy a nice carvery lunch.
 
Take care


Related Posts Plugin for WordPress, Blogger...