Sunday, 16 June 2013

Scrap Storage Idea

Good evening fellow crafters

After making some cards this weekend I realised that I was probably wasting a lot of cardstock as I always tend to go straight to my full sheets of cardstock when looking for a colour I want to use.  I had my scraps/offcuts sorted into colours and kept in cello bags in a box.  I then realised that because they are out of sight I never look there first so this afternoon I've been crafting to make a solution.

I've made some boxes out of A4 sheets of card and only time will tell if this will work for me.  So, I thought I would share with you how I made them.

I had some 200gsm card that I bought for stamping but its not as good as I thought it would be so I didn't mind using a few sheets for this.

I started with an A4 sheet and marked the centre point on the longest side.  I decided to make the width of my boxes 3cm which I think is about right for storing scraps, so I then marked 1.5cm either side of the central point and scored two lines, as below...

I then scored 3cm in from each side, lengthways.  Whatever width you decide on for the box, this measurement will need to be the same, as below...


Next, I made two small cuts along the score lines which will form the two small internal edge flaps, then folded all the score lines inwards...


The next step is to turn the whole thing over and add double sided tape to the small edge flaps, and the two side flaps at one end...
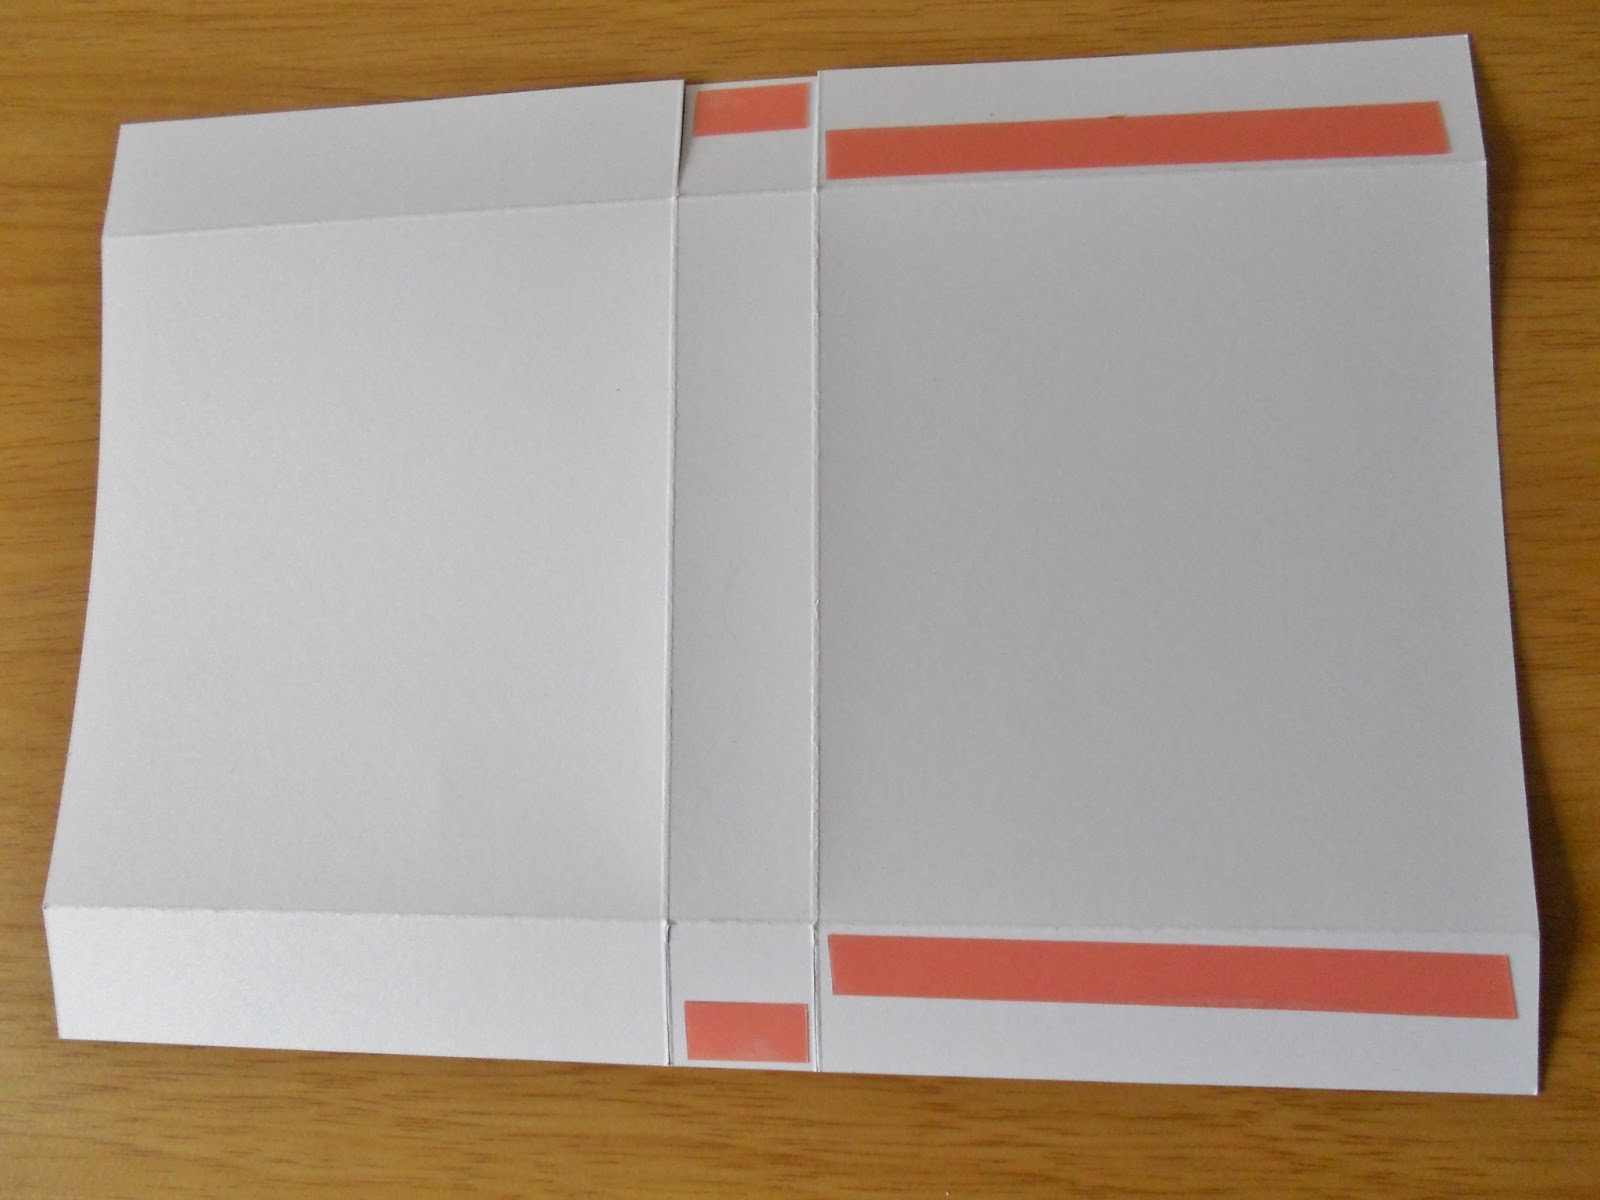

Then you need to stick the small flaps to the inside of two taped sides...


and then stick the untaped sides around the outside of the taped sides to form a box, open at the top...


I then coloured in some labels with Flexmarkers to indicate the colour range contained within each box...


And here's my finished set.


I need to make a couple more for my gold/silver scraps, and perhaps my creams as I currently have these in with my whites but for now I'm pretty pleased with this and once I'd worked out how to make the first one, I completed the set in no time :)

I just now need to make a mental note to look here first before cutting into my large cardstock unnecessarily. 

Hopefully this may give you some inspiration if you are looking for your own solution, and its a nice inexpensive one too!

Bye for now


Sketch Saturday Week #263

Hi guys

Go me, three posts in less than 24 hours!

While I had my hexagon hat on I thought I'd have my first go at a Sketch Saturday challenge which this week features a hexagonal design.

Here is my card...

 
and here is Jen's sketch...


I started by flipping through some of my patterned paper pads as I was initially going to die cut the hexagons, then I looked through one of my new pads and found a page which was a hexagonal design.  So I cut out a section to use and then matched up the upper and lower background papers using sheets from the same pad.  A bit of matting and layering, stamping a sentiment and a few dew drops later and it was complete.

I'm not entirely happy with this but I think its because its quite masculine.  I prefer girlie cards but as my stock of male cards is pretty much non-existent, I'll add it to my stash :)

Materials used:
  • Design Paper: Echo Park - Sweet Day (6x6 paper pad)
  • Cardstock: Bazzill Basics Premium Cardstock (lime green)
  • Stamp: Clearly Besotted Stamps - Honeycomb (sentiment)
  • Ink: Versafine - Onyx Black
  • Dew drops from stash


As always, thanks for dropping by.

Take care and see you soon :)


Clearly Besotted Challenge #1 & Less is More Week 124 - Take 2!

Hi guys

I had another play this morning with some more of my Clearly Besotted stamp sets and dies. 

I think this has to be one of my favourite cards I've made so far.  I'm really happy with it, its the kind of design I'd love to receive myself.  It took quite a while for me to put this together, mainly because I don't have a craft room so I'm constantly back and forth from the lounge table to my craft cupboard in the hall, getting out the bits and pieces I need. 

Anyway, moan over, here's my card...


This is my second entry in the first Clearly Besotted Challenge, the theme being 'Anything Goes', where the only rule is to use at least one Clearly Besotted product (not difficult for me!).  This is also card number two I'm submitting this week over at Less is More where the theme is 'Hexagons'.
 
I had this idea in my head last night, to make it look like the vase of flowers is sitting on a hexagonal tiled surface, I think it works quite well :)  I masked off the bottom third of the square panel and stamped the hexagons but because they weren't touching, where it was masked didn't really create a neat line so I added a length of thin satin ribbon to create a better finish.  The ribbon came from my stash of little offcuts, these being the annoying little bits of ribbon that are sewn into the shoulders of clothes.  I use anything I can get for free! :)
 
The vase and flowers were stamped and die cut and then popped up on 3D foam.  The sentiment was actually a straight one which I curved before sticking to my acrylic block, to follow the shape of the flowers.  The square was then framed with some coloured cardstock before adhering to the card base.
 
Materials used:
  • Stamps: Clearly Besotted Stamps - Flower Arrangement, Honeycomb and For Everyone (sentiments)
  • Dies: Clearly Besotted Stamps - Flower Arrangement
  • Ink: Versa Color - Sage, Grape, Peony, Orchid, Petal Pink; Versafine - Onyx Black
  • Cardstock: Papermania Premium Textured Cardstock (purple); white card from stash
  • Ribbon from stash
 
Thanks for popping by, I really appreciate your comments. 
 
See you soon


Saturday, 15 June 2013

Clearly Besotted Challenge #1 & Less is More Week 124

Hi guys

I'm back this afternoon with a card I've made for two challenges.

I'm so pleased that Stephanie Wincott has launched her first Clearly Besotted Challenge, the first one being 'Anything Goes'.  I've been collecting quite a few of these stamp sets and dies and haven't had a lot of time to get creating lately but I LOVE this range and I'm aiming to start crafting more and really want to get these inked up. 

The challenge this week at Less is More is to use Hexagons so I thought I would combine the two challenges and came up with this card...


I've used a few Clearly Besotted products here, Butterfly Wishes, Building Blocks II and Honeycomb.  First I chose which patterned paper to use for the butterflies which is from a paper pad by Pebbles, then I chose the rest of the colours for the card based on the patterned paper.  I usually do most of my stamping on a white background so this made a nice change to use the coloured card :)

I popped the main card front up on 3D foam, and also did the same with the die cut butterflies to give them some dimension, and sat these on the honeycomb die cuts.

Materials used:
  • Stamps: Clearly Besotted Stamps - Building Blocks II and Honeycomb (sentiment)
  • Ink: Versa Color - Royal Blue
  • Dies: Clearly Besotted Stamps - Bufferfly Wishes and Honeycomb
  • Cardstock: Bazzill Basics Premium Cardstock (aqua and pink)
  • Design Paper: Pebbles - Sunny Side
  • Twine: Doodlebug - Bright Assortment

Thanks for popping by, I hope to have a little play with some more of the Clearly Besotted products this week so may be back with more cards for the first challenge.

Take care


Personalised Stamp

Hi guys

I was going to post this a while ago but completely forgot.

For years I've placed little labels on the back of my cards but thanks to a blog post from Michelle at The Card Grotto last year, she led me to a wonderful website, Stamping All Day, where I was able to order this stamp (acrylic block not included) to personalise my cards :)


The service I received from Nicky at Stamping All Day was outstanding.  She sent me a proof by email almost immediately, allowed me to make a few changes to the layout/font, etc. and I received my stamp within two days of ordering!

The stamps are great value and I think mine adds a really nice touch to my cards, I'm really pleased with the result. 

(Stamping All Day is currently closed - it will re-open on 1 July 2013)


Thanks for visiting and I hope this has given you some inspiration. 


Saturday, 8 June 2013

Muse Challenge #20

Morning everyone

And what a glorious morning it is here in South Devon :) 

I've got a busy day today but found time last night to make a card for this week's challenge over at Muse.  This week's muse is Laurie Willison and I love the card she has created for us this week.  Its the colour combination that first caught my eye.

Its mainly the colours that I mirrored in my card, together with the sentiment in black, but I also loosely recreated the layout, the stitched 'ribbon' and the trio of images.

Here is my card...


I wanted to try something a little different so when I mentioned 'ribbon', its obviously not actually ribbon.  I used one of my faux stitching stamps which I stamped with VersaMark and then heat embossed with white embossing powder. 

Here is a closer view...


I didn't have any ornate style stamps like the one Laurie used in her card (below) so I stuck with the 'rule of three' and used a trio of little flower heads.  I finished off with three little gems to give the card some balance.

Materials used:
  • Stamps: Clearly Besotted Stamps - Flower Arrangement; Hot Off The Press - Stamped Stitches
  • Ink: Versa Color - Orange and Canary; Versafine - Onyx Black; VersaMark
  • Embossing Powder: Stampin' Up - White
  • Cardstock: Papermania Premium Textured Cardstock (aqua), White cardstock from stash
  • Gems from stash

This is Laurie's beautiful creation we were to take our inspiration from...


I'll be back to have a look through all your other creations for this challenge, at first glance it looks like there are some real beauties! :)

Well that's all from me today.  I'm off to a local Beer Festival in Paignton this afternoon and so glad the sun is shining.  Last year it was a complete wash-out and I had to nip out a buy some last minute wellies!  Looking forward to lots of local beer and cider, live music, food, friends and sunshine...what a fab combination!  I may wake with a sore head tomorrow but a good time has got to be had, eh! haha

Thanks so much for popping by, you've no idea how appreciative I am of your comments, they never fail to put a smile on my face :)

Take care and have a lovely weekend wherever you are.


Saturday, 1 June 2013

Muse Challenge #19

Hi guys

I didn't think I was going to get a chance to take part this week but I managed it with a few hours to spare.

This week's muse over at the Muse Challenge blog is Michelle Williams who has created a cute little card with the sentiments framed within lots of colourful images. 

I decided to use the same idea and layout for my card...


When I saw Michelle's card I knew I wanted to use one of my new Stampin' Up stamp sets, 'Stacks of Wishes' which is a hostess set.  I then went in search of images from other stamp sets to match the sentiments.  I was hoping I would find smaller images to create more of a frame but no luck.  So the finished card isn't how I initially visualised it would be, but I still quite like it :)
 
I used Versa Color ink to stamp the images and finished off a few areas with ProMarkers (parcel and flames).  I then added some Stickles glitter glue to the parcel ribbon and added my new favourite craft item, Glossy Accents, to the icing on the cupcakes.
 
Materials used:
  • Stamps: Stampin' Up - Stacks of Wishes (sentiment); Uniko Studio - Label Love: Birthday (balloon); Penny Black - Salutations (candle); Clearly Besotted Stamps - Merry Little Christmas (small starburst); parcel and cupcake - unknown brand stamp set
  • Ink: Versa Color - Heliotrope, Pink, Canary, Sky Blue, Mint, Silver; Versafine - Onyx Black
  • Accents: ProMarkers; Ranger - Glossy Accents; Stickles - Star Dust
 
This is the inspiration card created by Michelle...


Thanks for visiting my blog today, and thanks in advance if you leave a comment, they are always greatly appreciated :)

Have a lovely weekend


Related Posts Plugin for WordPress, Blogger...