Showing posts with label Promarkers. Show all posts

Monday, 21 December 2020

Christmas Card Multiples - Rooftop Reindeer

Hi guys

More Christmas makes, and this time four cuties from a set I bought recently from Clearly Besotted called Prancing Plushies.

I have some lovely sets that require colouring so I really must make an effort to start my cards earlier next year.  Although I love colouring and need lots of practice using my markers, I do find colouring very time-consuming so these weren't ideal for quick last minute makes.  This set also doesn't currently have matching dies so the fussy cutting also took some time.


I masked off rectangular sections on my card bases and blended with two shades of Distress inks and then added water droplets and blotted away the colour to create snow.  I then stamped all the images onto one sheet of cardstock before colouring and fussy cutting them all.  To make these mail friendly I used glue dots rather than 3D foam for less bulk.

And it's not until now looking at the photos that I've realised I never added the sentiments to the bottom!  I purposely masked the rectangles to leave a larger border at the bottom and then must have completely forgotten - doh!


Materials used:
  • Stamps: Clearly Besotted - Prancing Plushies
  • Ink: Memento - Tuxedo Black; Distress Ink - Dusty Concord, Faded Jeans
  • Coloured with ProMarkers and Copics


Still lots more to share with you, so I'll be back again very soon.


Saturday, 4 July 2020

Less is More Challenge #423

Good morning

Less is More is back with a new challenge today and we have a Colour challenge for you this time.  Here are the details...


Our generous sponsor for the month of July is CAS-ual Fridays Stamps so by playing along will put you in the running for our monthly prize.


I found this colour combo a bit daunting when I first saw it but then ended up making two cards!  Here's the first one, super simple...


I'm a bit addicted to using a stitched upper panel aren't I!  All of the images and sentiment were from the same set, all stamped here in black, and the images were coloured with ProMarkers.  The panel was adhered on foam and...that's it!

Materials used:
  • Stamps: MFT - Adorable Elephants
  • Ink: Memento - Tuxedo Black
  • Die: Create a Smile - Cool Cuts Double Stitched Rectangles
  • Coloured with ProMarkers


Now, this next one took a while but I love the result...


I had this stamp set on my wish list for a very long time and eventually bought it (together with lots of other bits that fell into my online basket!).  This layering set is beautiful but there are so many different parts to stamp, and I didn't manage to align some parts perfectly in places but overall I'm happy with it and will be trying it with different colour combos.  Once stamped the flowers and leaves were die cut with the co-ordinating dies.  They were layered onto a die cut rectangular panel (shocker!) and the sentiment was stamped in a matching grey before popping the panel up on fun foam.

Materials used:
  • Stamps: Altenew - Build-a-Flower: Peruvian Lily; Simon Says Stamp - Birthday Messages
  • Ink: Altenew - Razzleberry, Rubellite, Pinkalicious, Warm Sunshine, Maple Yellow, Honey Drizzle, Sunkissed, Paper Bag, Lava Rock, Industrial Diamond, Silver Stone, Limestone
  • Dies: Altenew - Build-a-Flower: Peruvian Lily; Create a Smile - Cool Cuts Double Stitched Rectangles


As always, the challenge linky will stay open for a fortnight.  And if you need more inspiration, please do pop over to the main challenge blog and take a look at the great makes from my teamies.  I'm looking forward to seeing the gallery of this colour combo!

Thursday, 21 May 2020

Honey Doo Crafts - May 2020 Release - Floral Arch and Around the Table

Hi there

In this post I'm sharing my final two sample cards using the new stamps from Honey Doo Crafts.

All the new products will be launched on Create & Craft TV tomorrow, 22 May 2020, the shows being at 11.15am and 3.45pm.  And they are also already available to purchase over at the Honey Doo Crafts store, here.


First up is a card I've made using the new Floral Arch stamp set...


The Bride and Groom image I shared yesterday is designed to fit within this arch but I chose to use the arch on its own here.  I stamped the image onto some clear vellum and heat embossed it in white before fussy cutting it out.  I then coloured in the wooden arch and voile swag on the reverse using Zig markers.  For my beach scene die cut panel I firstly blended the sand, the sea, and then the clouds with Distress Inks, using a stencil for the clouds (even through I covered most of them up!).  I then added the additional details to create the sand - a metallic and a black/white embossing powder, which I sprinkled on and then heat from the underside so it didn't get blown away by the heat gun.  And for the breaking waves I used embossing enamel, again heat from the reserve side.  A closer view of the 'sand' can be seen in the next photo...


To finish, I stamped the sentiment from the same set, adhered the panel on fun foam, and then adhered the arch using clear glue dots.

Materials used:

  • Stamps: Honey Doo Crafts - Floral Arch
  • Die: Create a Smile - Cool Cuts Double Stitched Rectangles
  • Ink: VersaMark; Distress Ink - Tea Dye, Salty Ocean, Tumbed Glass
  • Stencil: MFT - Mini Cloud Edges
  • Embossing Powder: Wow! - Aztec Glintz, Salt & Pepper; Stampendous - Deep Impressions Embossing Enamel
  • Vellum from Stash
  • Coloured with Zig Clean Color Real Brush Markers


And my second card uses a new set called Around the Table...


I began with a gentle blend of Distress Inks on my card base and then stamped the table and chairs image and coloured with ProMarkers.  I created a frame using a stitched rectangular die and adhered this flat to the card.  I used the Honey Doo Palm Leaves die and trimmed a section out to lay over one corner.  I finished with an embossed sentiment from the same set and popped this up on 3D foam.

Materials used:

  • Stamps: Honey Doo Crafts - Around the Table
  • Ink: Distress Ink - Tumbled Glass, Pumice Stone; Memento - Tuxedo Black; VersaMark
  • Dies: Create a Smile - Cool Cuts Double Stitched Rectangles; Honey Doo Crafts - Palm Leaves
  • Embossing Powder: Altenew - Pure White
  • Coloured with ProMarkers


There is one extra new stamp set for which, unfortunately, I didn't find time to make a sample.  It's called Beach Hut and you can find it here.


Thanks so much for visiting and for taking a look at my sample cards.  I'll be back again on Saturday morning to introduce the next challenge over at Less is More.

(AD - some products kindly gifted for design team purposes)

Wednesday, 20 May 2020

Honey Doo Crafts - May 2020 Release - Bride & Groom

Good evening, folks

Tonight I'm sharing more sample cards using the new stamps from Honey Doo Crafts.

And just as a reminder, Amanda will be launching the new products on Create & Craft TV this Friday, 22 May 2020, the shows being at 11.15am and 3.45pm.


The new stamp set in focus here is called Bride & Groom.

This sample card is very simple but I love these neutral/vintage tones...


I began with a die cut panel and stamped both the image and sentiment, which is included in the stamp set, in a neutral shade of pigment ink then heat embossed it all in a pearl shade.  I added a minimal amount of colour to the happy couple, again in neutral shades, popped the panel up with dimensional foam and called this card done.


Materials used:

  • Stamps: Honey Doo Crafts - Bride and Groom
  • Die: Create a Smile - Cool Cuts Double Stitched Rectangles
  • Ink: Versa Color - Vanilla
  • Embossing Powder: Wow! - White Pearl
  • Coloured with ProMarkers


For my second sample I paired the stamp set with an existing stencil from the Honey Doo product range...


I started by stamping the bride and groom image on a die cut panel of white cardstock and then stamped it again on a couple of post-it notes to make a mask.  I used a heart die from my stash to create an aperture in a scrap piece of cardstock and blended through with a pale shade of Distress Ink.  I then laid the Honey Doo Floral Display stencil over the heart aperture and blended through with a different shade of Distress Ink.  I stamped the sentiment from the same set with a co-ordinating shade of pigment ink and heat embossed in clear.  The panel was adhered to the card base using fun foam for dimension and I finished by adding some shimmer to the bride's dress using a glitter pen.


Materials used:

  • Stamps: Honey Doo Crafts - Bride and Groom
  • Stencil: Honey Doo Crafts - Floral Display
  • Dies: Create a Smile - Cool Cuts Double Stitched Rectangles; MFT Die-namics - Stitched Heart Stax
  • Ink: Versafine - Onyx Black; Distress Ink - Tattered Rose, Victorian Velvet; Versa Color - Ash Rose
  • Embossing Powder: Wow! - Clear Gloss
  • Accents: Spectrum Noir Sparkle Pen - Clear


Thanks for visiting, I'll be back again tomorrow with more samples ahead of the shows on Friday.

(AD - some products kindly gifted for design team purposes)

Tuesday, 19 May 2020

Honey Doo Crafts - May 2020 Release - Cherry on Top

Hi guys

I'm back tonight to share a couple more sample makes using another of the new stamp sets from Honey Doo Crafts.

And if you missed Amanda's Facebook live earlier this evening where she was sharing all the new products and samples, you can watch it back over on their Facebook page, here.


Ok, these are my cards using the new Cherry On Top stamp set...


I began by stamping both the image and sentiment in VersaMark ink on kraft cardstock but only heat embossed the sentiment at this stage.  VersaMark ink leaves a tone on tone watermark of the image.   Next I coloured in the cupcake by painting with a mix of Honey Doo mica powders and water.  These create a lovely shimmery effect.  Once dry I then re-stamped the cupcake in VersaMark (by leaving the stamp in my MISTI I was able to stamp in the exact same spot) and then heat embossed in white.  The panel was then popped up on 3D foam.


Materials used:

  • Stamps: Honey Doo Crafts - Cherry on Top
  • Ink: VersaMark
  • Embossing Powder: Altenew - Pure White
  • Mica Powders: Honey Doo Crafts - Berry Red, White Opal, Purple Topaz, Green Emerald
  • Cardstock: Neenah - Desert Storm


For this next card I used the Cherry on Top stamp again, and some other existing Honey Doo products...


The cupcake was stamped in black and coloured with ProMarkers, I then fussy cut this out.  I used some stitched dies to create a frame and also used the Honey Doo Encircle die and laid a section behind the frame and adhered them all together.  I then added some patterned paper to the card base and popped the frame up on 3D foam.  The cake was then adhered over the top and a stamped sentiment strip added to finish, this sentiment being from the Honey Doo Just in Case stamp set.

Materials used:

  • Stamps: Honey Doo Crafts - Cherry on Top, Just in Case
  • Dies: Honey Doo Crafts - Encircle; Clearly Besotted - Frame It; MFT Die-namics - Stitched Sentiment Strips
  • Ink: Memento - Tuxedo Black
  • Coloured with ProMarkers
  • Patterned Paper: Hot Off The Press - Floral Cardmakers Ultimate Pack (years old!)


Thanks so much for visiting, I'll have more samples for you tomorrow.


(AD - some products kindly gifted for design team purposes)

Thursday, 14 May 2020

Perfectly CAS - May 2020 Challenge

Hi there

I don't know about you but since we've been in lockdown I'm finding that these weeks are flying by so fast!

It's time for another new challenge over at Perfectly CAS and our theme for May is...


I've used one of my go to layouts for super simple cards for this one...


I often use this double frame design, the top die cut being popped up on foam.  The image was stamped using Memento ink, which doesn't bleed with alcohol markers, and coloured with ProMarkers.  I'm still toying with the idea of purchasing some Copics, I soooo want some but just don't know if it's and expense I can commit to, it would take me forever to purchase a decent selection!  The sentiment was simply stamped in black below the matted die cuts.


Materials used:

  • Stamps: Clearly Besotted - Under The Weather
  • Ink: Memento - Tuxedo Black; Versafine - Onyx Black
  • Dies: MFT Die-namics - Pierced Square Stax
  • Coloured with ProMarkers


Thanks so much for popping by, I hope you are all well and managing to keep yourselves occupied at home.  I have plenty I can be doing but seem to have been in a very unenthusiastic mood for the last week or so.  Hopefully I'll find some motivation again soon.

Saturday, 9 May 2020

Less is More Challenge #419

Hi guys

Another fortnight has whizzed by so it's new challenge day at Less is More.  And this time we have a Colour challenge for you...


A bit of trial and error was required for this one and it took three attempts for me to make this card, but I got there in the end, I think!


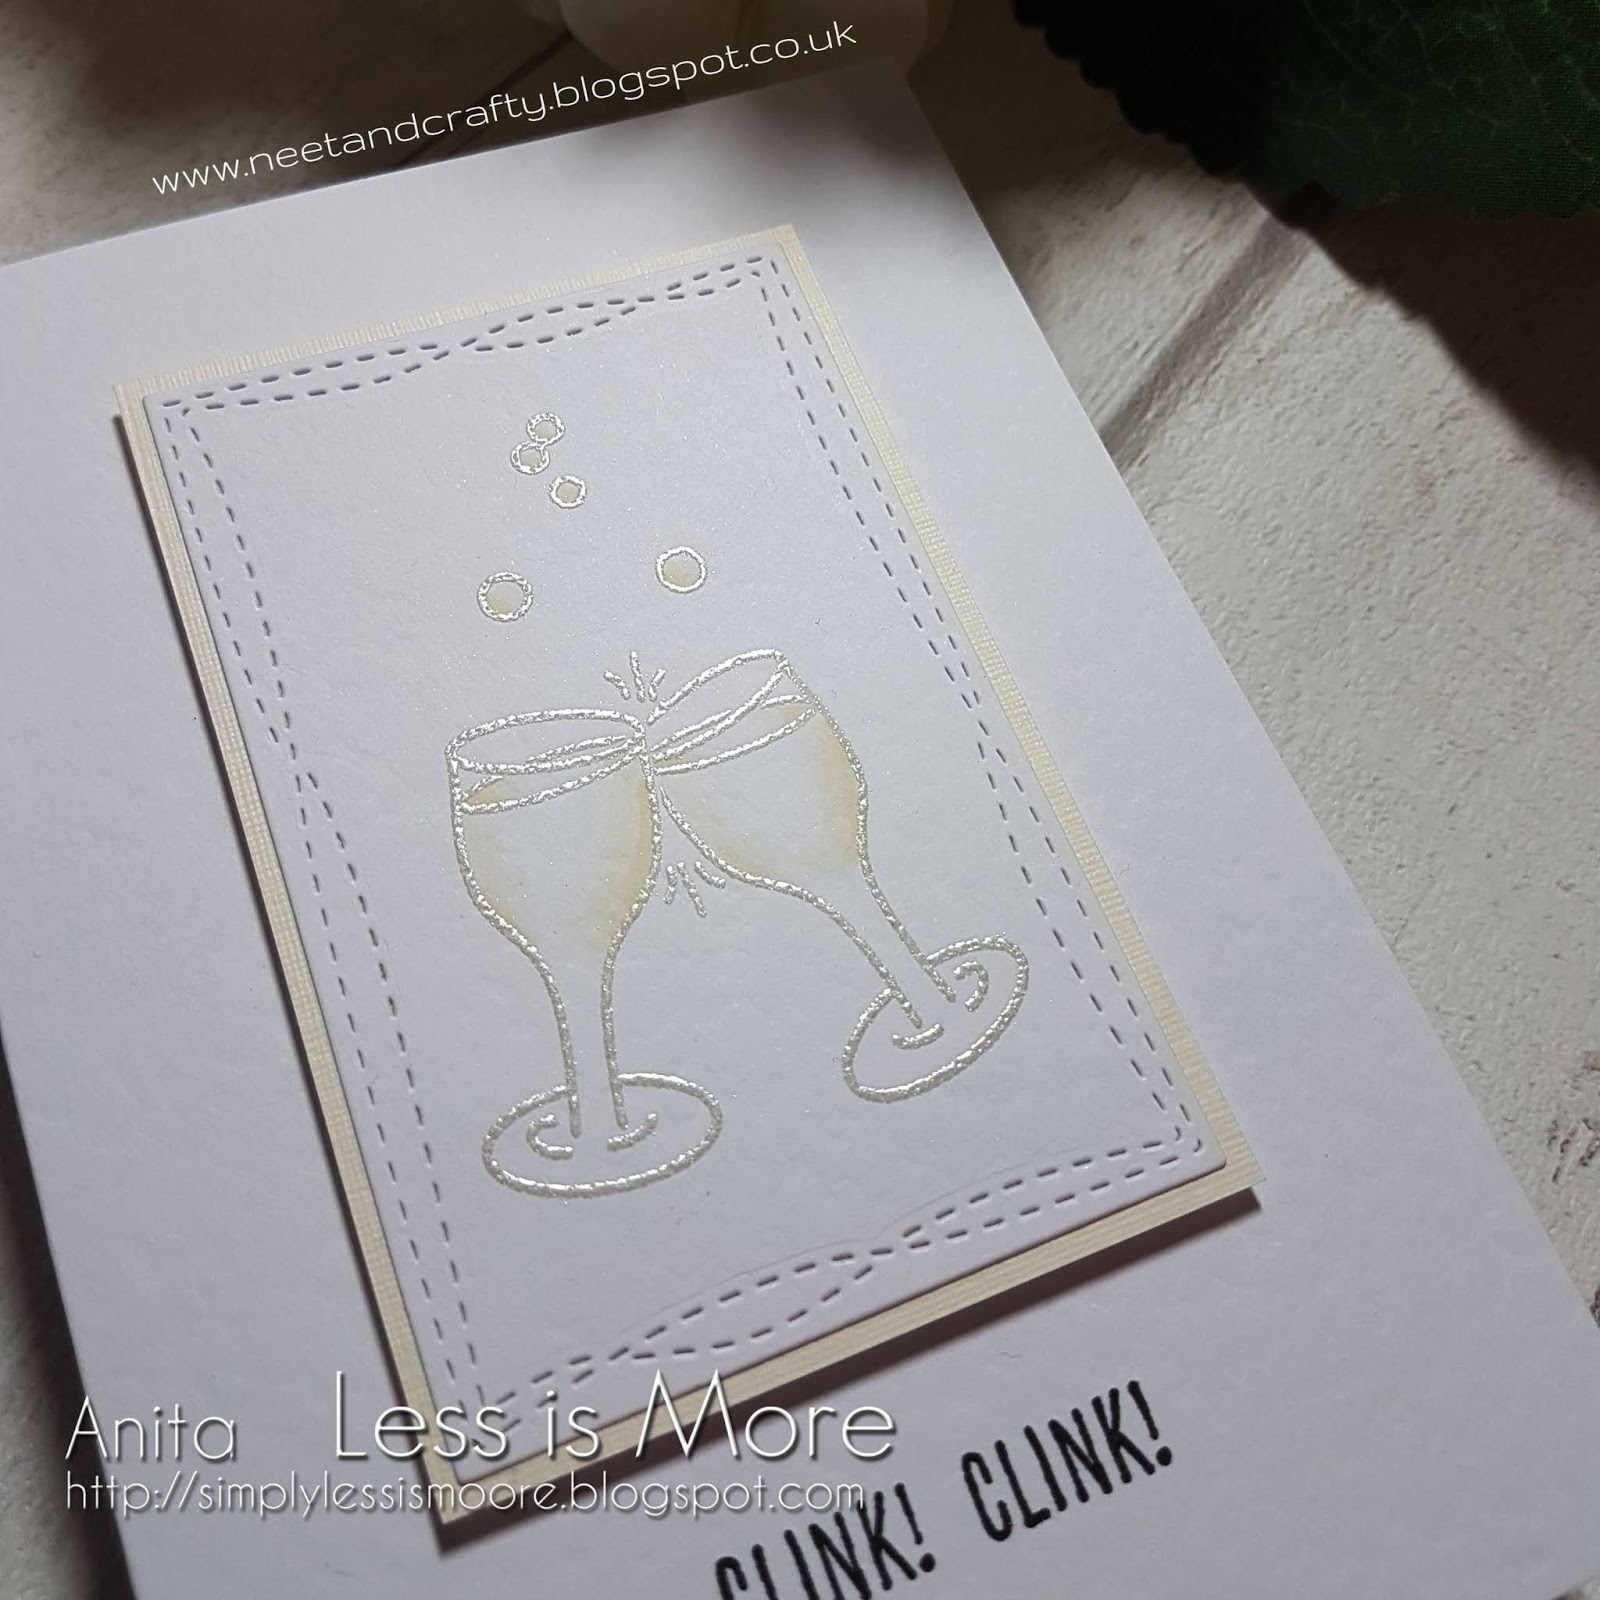
The problem I had was achieving a cream hue for my focal image.  The first ink I tried was far too yellow and the second one I tried was too beige, so I had to try a few ink colours and embossing powder combos before I got this result.  I used hammered cardstock for the base and image panel although it's difficult to catch on camera.  I used a stitched rectangle die for my image panel and stamped and embossed the glasses and bubbles.  I then added some colour using ProMarkers.  This was then mounted onto a mat of cream linen cardstock and both were popped up onto the base using fun foam.  I finished with a sentiment stamped in black.


Materials used:

  • Die: MFT Die-namics - Wonky Stitched Rectangle Stax
  • Stamps: Avery Elle - Sip Sip Hooray; Reverse Confetti - Clink
  • Ink: Versa Color - Vanilla; Versafine - Onyx Black
  • Embossing Powder: Wow! - White Pearl
  • Coloured with ProMarkers
  • Cardstock from stash

Challenge entries:

Crafty Cardmakers - Challenge #256 - Celebrations


Thanks so much for visiting.  And don't forget that we had new members joining the Design Team last time so there's lots of inspiration over at the main Less is More challenge blog, here.

Saturday, 2 May 2020

Happy Little Stampers May 2020 CAS Challenge

Hi there

I hope you're all keeping well during these very odd times!

I'm here tonight to introduce the May CAS Challenge at Happy Little Stampers.  And our cue word for this month is...


I think we could all do with lots of those right now!  I kept my card super simple but with some ombre stamping...


I started by die cutting a stitched rectangle and then, using my MISTI, stamped the smile sentiment multiple times in graduating shades, but didn't stamp the 'tittle' of the i.  Thanks goes to Laura Bassen for me knowing the dot was called a tittle!  When doing ombre stamping my preference is to use pigment ink, I find I get a better gradient that way rather than using dye inks.  To finish I stamped the smile emoji in place of the tittle and coloured it in with a ProMarker.  The panel was then popped up on fun foam.

Materials used:

  • Die: Create a Smile - Cool Cuts Double Stitched Rectangles
  • Stamps: Happy Little Stampers - Smile; Clearly Besotted - Text Me
  • Ink: Versa Color - Canary, Marigold, Orange, Opera Pink; Memento - Tuxedo Black

I'm looking forward to seeing lots of happy cards in our gallery this month so I hope you'll find time to play along.  As always, the challenge link will remain open until the end of the month.

Thursday, 2 April 2020

Happy Little Stampers April 2020 CAS Challenge

Hi guys

I'm back this evening to introduce the April CAS challenge over at Happy Little Stampers.  Here's the cue word...


I used a stamp set I asked for and received at Christmas, I just love it...


I began with a stitched die cut panel and stamped the chicken and the 'hey' first.  After creating the sentiment strip, which I wanted the chicken to stand on, I realised his feet didn't look right so I stamped him again, coloured him with ProMarkers and fussy cut him out so I could then perch him on top, popped up on 3D foam.  I'm calling the chicken a he, I suppose it could be a she, who knows? :)

Materials used:

  • Dies: Create a Smile - Cool Cuts Double Stitched Rectangles; MFT Die-namics - Fishtail Flag Stax
  • Stamps: Gerda Steiner - Chicken Scratch
  • Ink: Memento - Tuxedo Black
  • Coloured with ProMarkers


As always, and with all the Happy Little Stampers challenges, the linky will be open until the end of the month so plenty of time to play along.

Saturday, 29 February 2020

Less is More Challenge #414

Good morning

Apologies for being quiet here for a couple of weeks, I've just been super busy with no time to craft.  I do have some fairly recent card makes to share but I've not found the time to sit down and write posts either.  I'll share them very soon I promise :)

It's still our birthday month (just) over at Less is More, and how great that three Saturdays fall in the month of February so we have a Lucky Dip challenge for you this time.  Here are the details...


Uniko is our wonderfully generous sponsor for this month so please do play along for a chance to win our monthly prize.


For my card today I have used a stamp that's been in my stash for quite some time but was awaiting inking up, so it's now had its first outing...


Isn't this the cutest little pair?!  On a die cut panel this was simply stamped, I then masked the images to blend the background, then coloured the cuties with ProMarkers.  A simple sentiment was then stamped before popping the panel up on fun foam.

Materials used:

  • Stamps: Wags 'n Whiskers - Ellie and Squeak; Clearly Besotted - Take Flight
  • Ink: Memento - Tuxedo Black; Versafine - Onyx Black; Distress Ink - Mowed Lawn, Tumbled Glass
  • Die: Create a Smile - Cool Cuts Double Stitched Rectangles
  • Coloured with ProMarkers

Challenge entries:

AAA Birthday - Game #10 - Cute


That's all from me today but I hope to be back very soon to share those other cards with you.  Enjoy your weekend.

Saturday, 15 February 2020

Less is More Challenge #413

Hi guys

I've never known two weeks to fly by so fast and can't believe we're back with another new challenge at Less is More.  And of course we're still celebrating our 9th Birthday this month!


Ok, this time we're back with a Recipe challenge.  You may remember that our last challenge was all about 'Less'.  So naturally, our new challenge has to be...


This time we want you to use lots of small images/sentiments but still keep your design clean and simple.


And don't forget that the awesome Uniko is our March sponsor.  As well as generously donating our monthly prize there's lots going on at Uniko too as they are celebrating their 8th Birthday.


Ok, here's my sample card for this challenge...


On a panel of white cardstock I drew a circle with pencil as a guideline off the edge and then stamped lots of small images from the same stamp set within the circle.  I then stamped the sentiment to follow the curve of the circle before erasing the pencil line.  I coloured the images with ProMarkers before die cutting the panel and adhering onto the card base popped up on fun foam.

Materials used:

  • Stamps: Altenew - Doodle Blooms, Beautiful Lady
  • Ink: Memento - Tuxedo Black
  • Coloured with ProMarkers
  • Die: Create a Smile - Cool Cuts Double Stitched Rectangles


As usual, the linky will be open for the next two weeks.  And for more inspiration from my teamies please do pop over to the main challenge post at Less is More and follow their links.

Thursday, 2 January 2020

Happy Little Stampers January 2020 CAS Challenge

Happy New Year!

I hope you're all well rested and ready to get back into your craft rooms/spaces.  The crafty challenges of 2020 are all starting to launch and today is the turn of the CAS Challenge over at Happy Little Stampers.

Here's the cue card for this month, just remember to keep your entries clean and simple...


All the guidelines are detailed over on the main challenge post.


There are lots of options with this theme and for my DT card I decided to use a stamp set I've had in my stash for ages but not yet inked up...


On a die cut rectangular panel I stamped cupid then masked him so I could stamp the other cloud images.  With the mask still in place I ink blended the clouds using a stencil and Distress Oxide ink.  I then stamped the sentiment, coloured the images with ProMarkers and popped up the panel on fun foam.

Materials used:
  • Stamps: Clearly Besotted - Call Cupid
  • Ink: Memento - Tuxedo Black; Distress Oxide - Spun Sugar
  • Stencil: MFT - Cloud
  • Die: Create a Smile - Cool Cuts Double Stitched Rectangle
  • Coloured with ProMarkers

As with all the Happy Little Stampers challenges (many will be commencing over the next few days), the link ups will remain open for the entire month, so plenty of time to play along.  I hope you can join us.

Thanks so much for visiting.

Sunday, 29 December 2019

Winter Bunnies

Good morning

I was a awake at silly o'clock this morning with no hope of getting back to sleep so I thought I'd come on here and share another card with you.


This is the Christmas card I made for my next door neighbour.  She has house bunnies so I knew exactly which stamp I wanted to use...


On a die cut stitched rectangle panel this image was simply stamped and I coloured it with ProMarkers.  I did try to colour the bunnies to look like her actual bunnies, fairly unsuccessfully due to my lack of markers!  Oh well, the thought was there and she loved it!  To finish I used a glitter pen to add some shimmer to the snow.


Materials used:

  • Stamp: Lili of the Valley - Bunnies Ho Ho Ho
  • Ink: Memento - Tuxedo Black
  • Die: Create a Smile - Cool Cuts Double Stitched Rectangles
  • Coloured with ProMarkers
  • Accents: Spectrum Noir Glitter Pen - Clear

Challenge entries:

Crafty Hazelnut's Christmas Challenge - Challenge #470 - Anything Goes
Christmas with the Cuties - Challenge #34 - Christmas Cuties
CASology - Week 358 - Branch
Passion for ProMarkers - Challenge #523 - Mega Christmas Challenge


I still have a handful of Christmas cards to share and these will all be up between now and the New Year :)

Related Posts Plugin for WordPress, Blogger...