Showing posts with label Inktense. Show all posts

Friday, 25 April 2025

Uniko April 2025 Release - Introducing...Originally Organic Flower Garden

Hi there

Continuing with the new introductions from Uniko.

Today we are introducing a new addition to the Originally Organic series...Originally Organic Flower Garden.  It works brilliantly with the existing products in the range too.

Here's my first card using one of the main images from the set...


I chose to stamp and heat emboss the image in white on some watercolour cardstock and then watercoloured the image using my Derwent Inktense pencils.  I die cut a stitched panel, stamped a sentiment, which is also from the set, and adhered onto a pink card base.


Materials used:
  • Stamps: Uniko - Originally Organic Flower Garden
  • Ink: VersaMark; Versafine Clair - Nocturne
  • Embossing Powder: Brutus Monroe - Alabaster White
  • Watercoloured with Derwent Inktense pencils
  • Die: Create a Smile - Cool Cuts Double Stitched Rectangles


And my second card I used other images from the set...


I stamped the flowers first, then masked them before in turn stamping and masking the leaves.  I then coloured the images with Copics.  A greeting from the set was stamped in black and I finished with some pale yellow sprinkles.

Materials used:
  • Stamps: Uniko - Originally Organic Flower Garden
  • Ink: Memento - Tuxedo Black; Versafine Clair - Nocturne
  • Coloured with Copics
  • Accents: Little Things from Lucy's Cards - Sprinkles: Cornfield Circles


As always, the team have lots more for you to see over at the Uniko blog, here.  I'll be back tomorrow morning to introduce another fantastic new stencil set.

And don't forget, all the new products from this release will be available to purchase from Uniko from Sunday 27 April 2025.


Friday, 31 March 2023

Uniko 11th Birthday Release In Review Brand Ambassador Blog Hop & Giveaway!

Hi there, Happy Friday!

Do you remember the wonderful Uniko release from right back at the beginning of March?  Well, today the team are revisiting it with a Release in Review Blog Hop and Giveaway!  Some of the team didn't receive their goodies in time to be able to join in with showcasing the new products so we're sharing lots of inspiration again here on this blog hop.

So, take a look at the Uniko blog post, here, for links to visit the whole team and for details of the fabulous giveaway.  Just comment along the way for a chance to win.


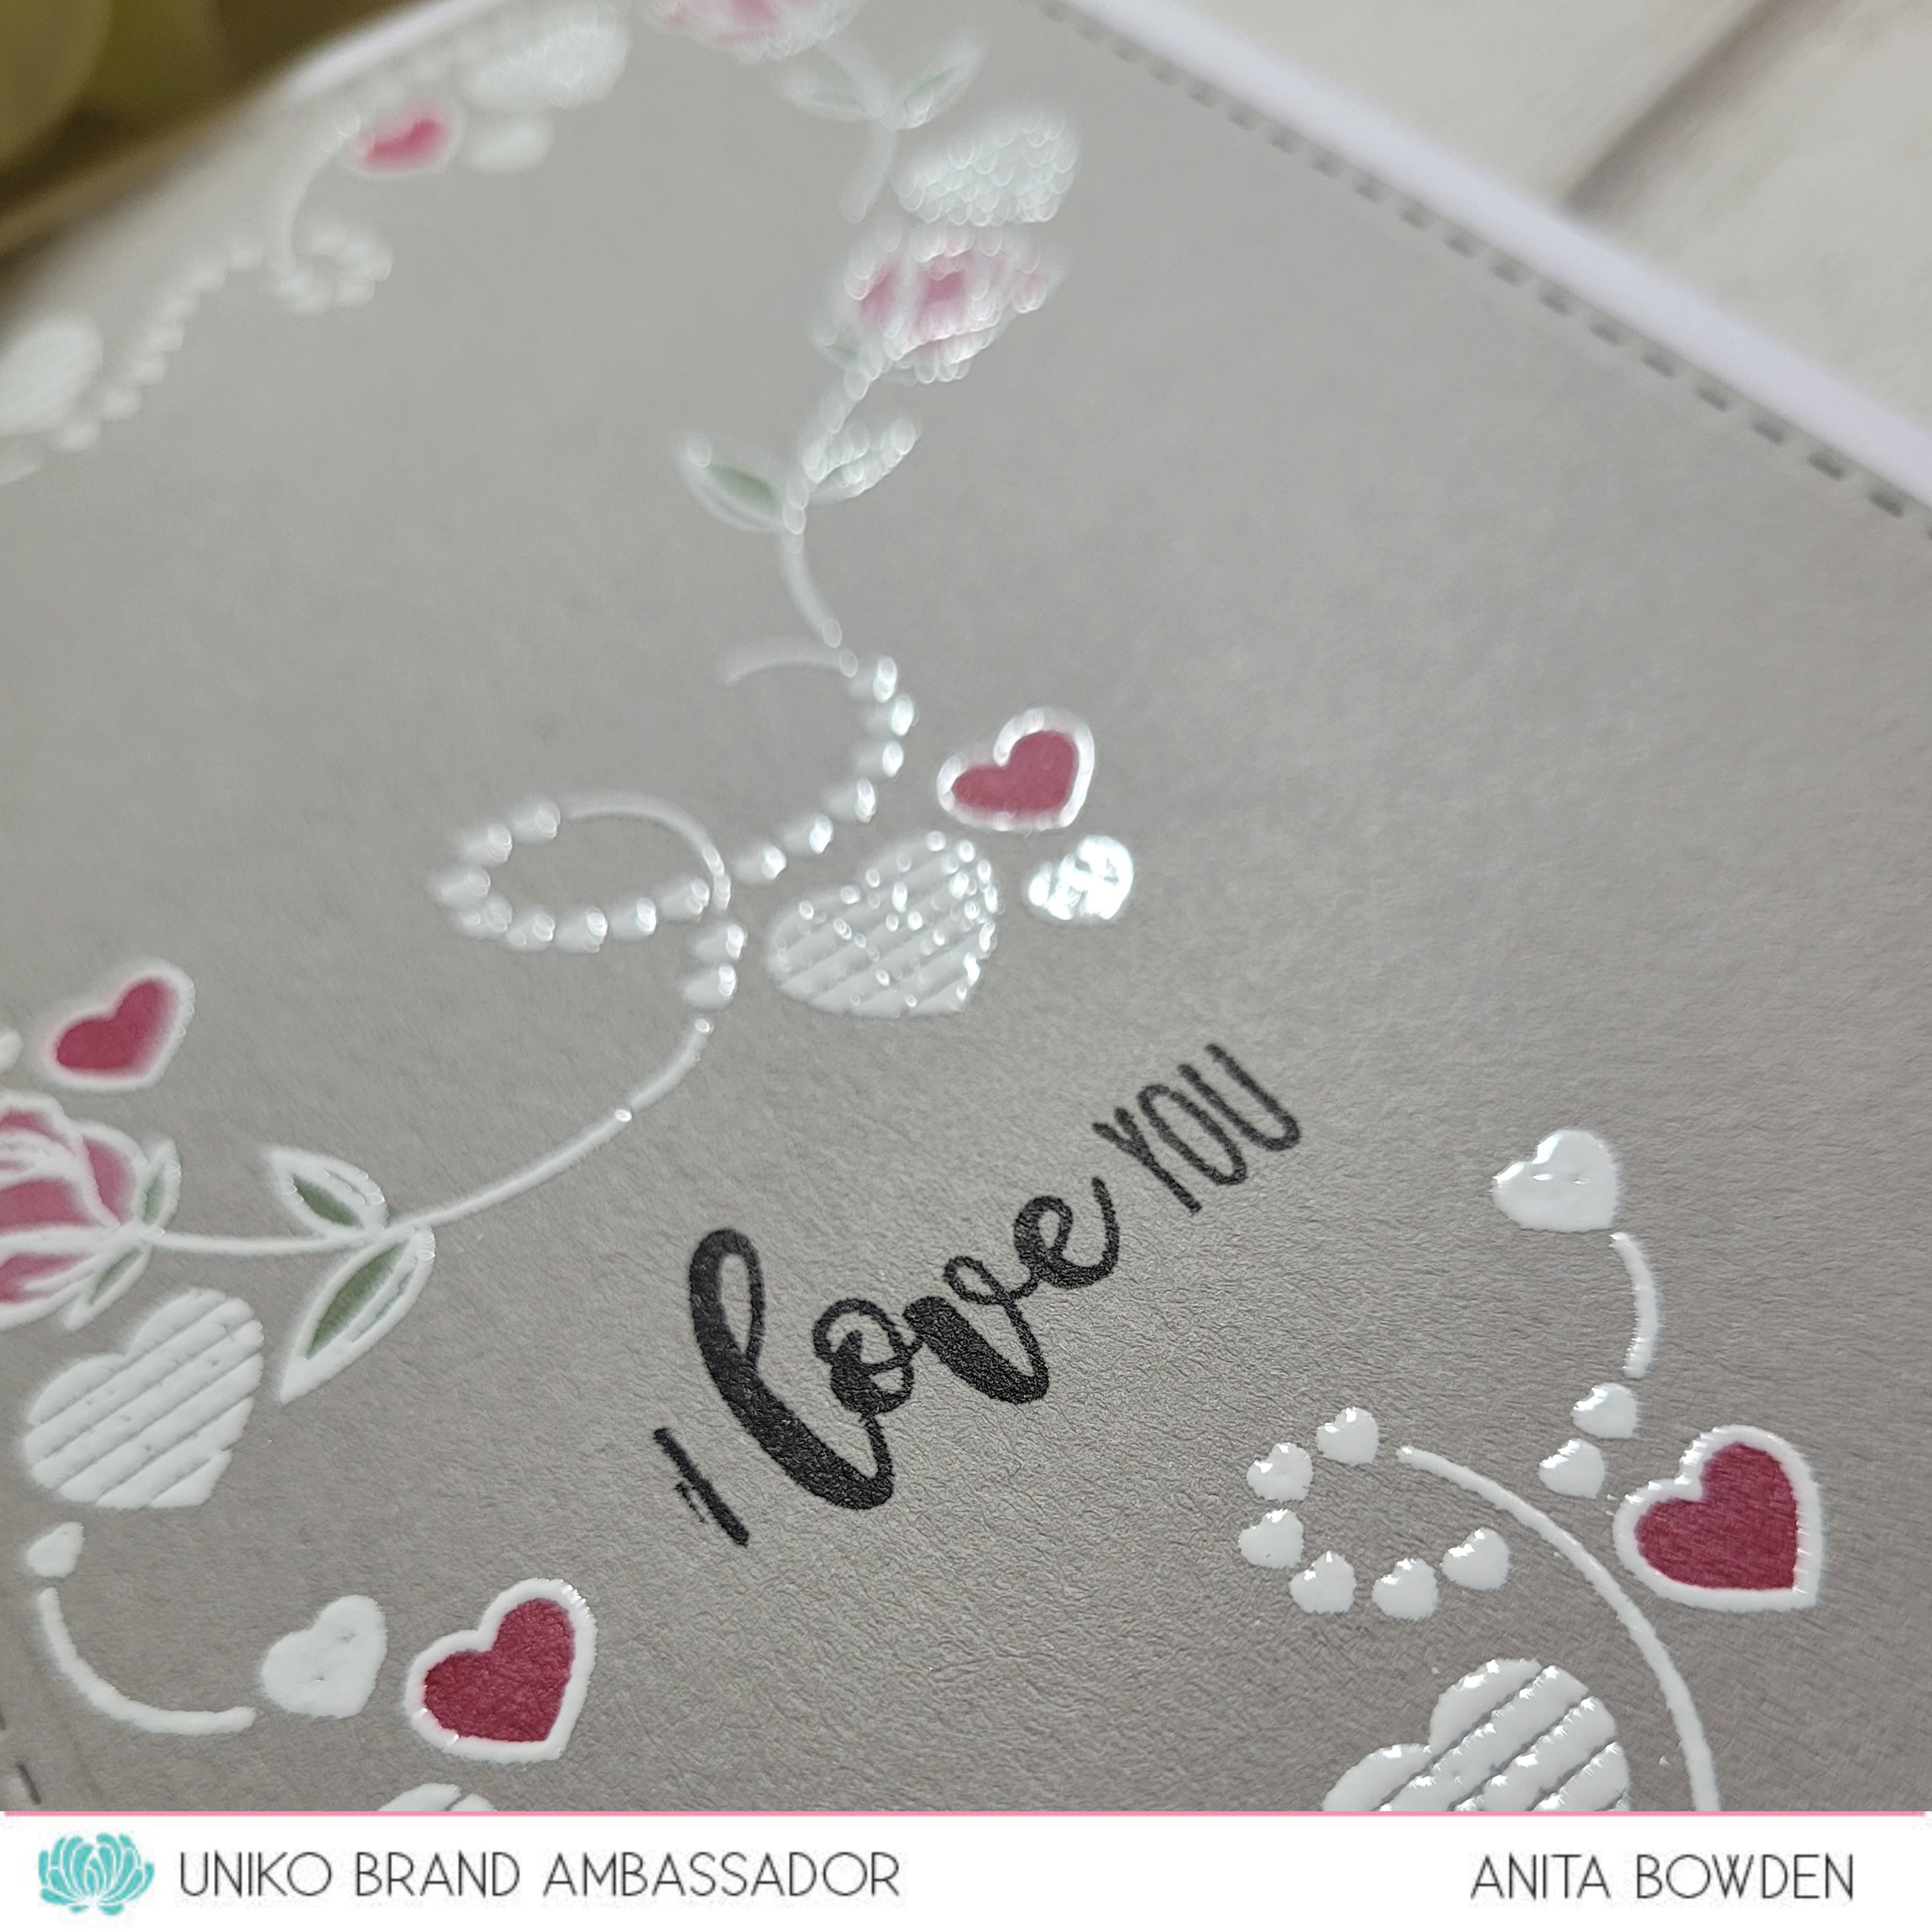
The first of my cards is showcasing the new Falling Hearts Serenade stamp set, which I hadn't received in time for the release...


On a grey die cut panel I stamped the image in a pale ink and coloured in the roses, leaves and hearts with Copics.  Then, with the stamp still in my MISTI, I restamped the image in VersaMark and heat embossed in white.  The sentiment, also from the set was stamped in black.


Materials used:
  • Stamps: Uniko - Falling Hearts Serenade
  • Ink: Distress Ink - Antique Linen; VersaMark; Versafine Clair - Nocturne
  • Coloured with Copics
  • Embossing Powder: Wow! - Opaque Bright White
  • Die: Create a Smile - Cool Cuts Double Stitched Rectangles


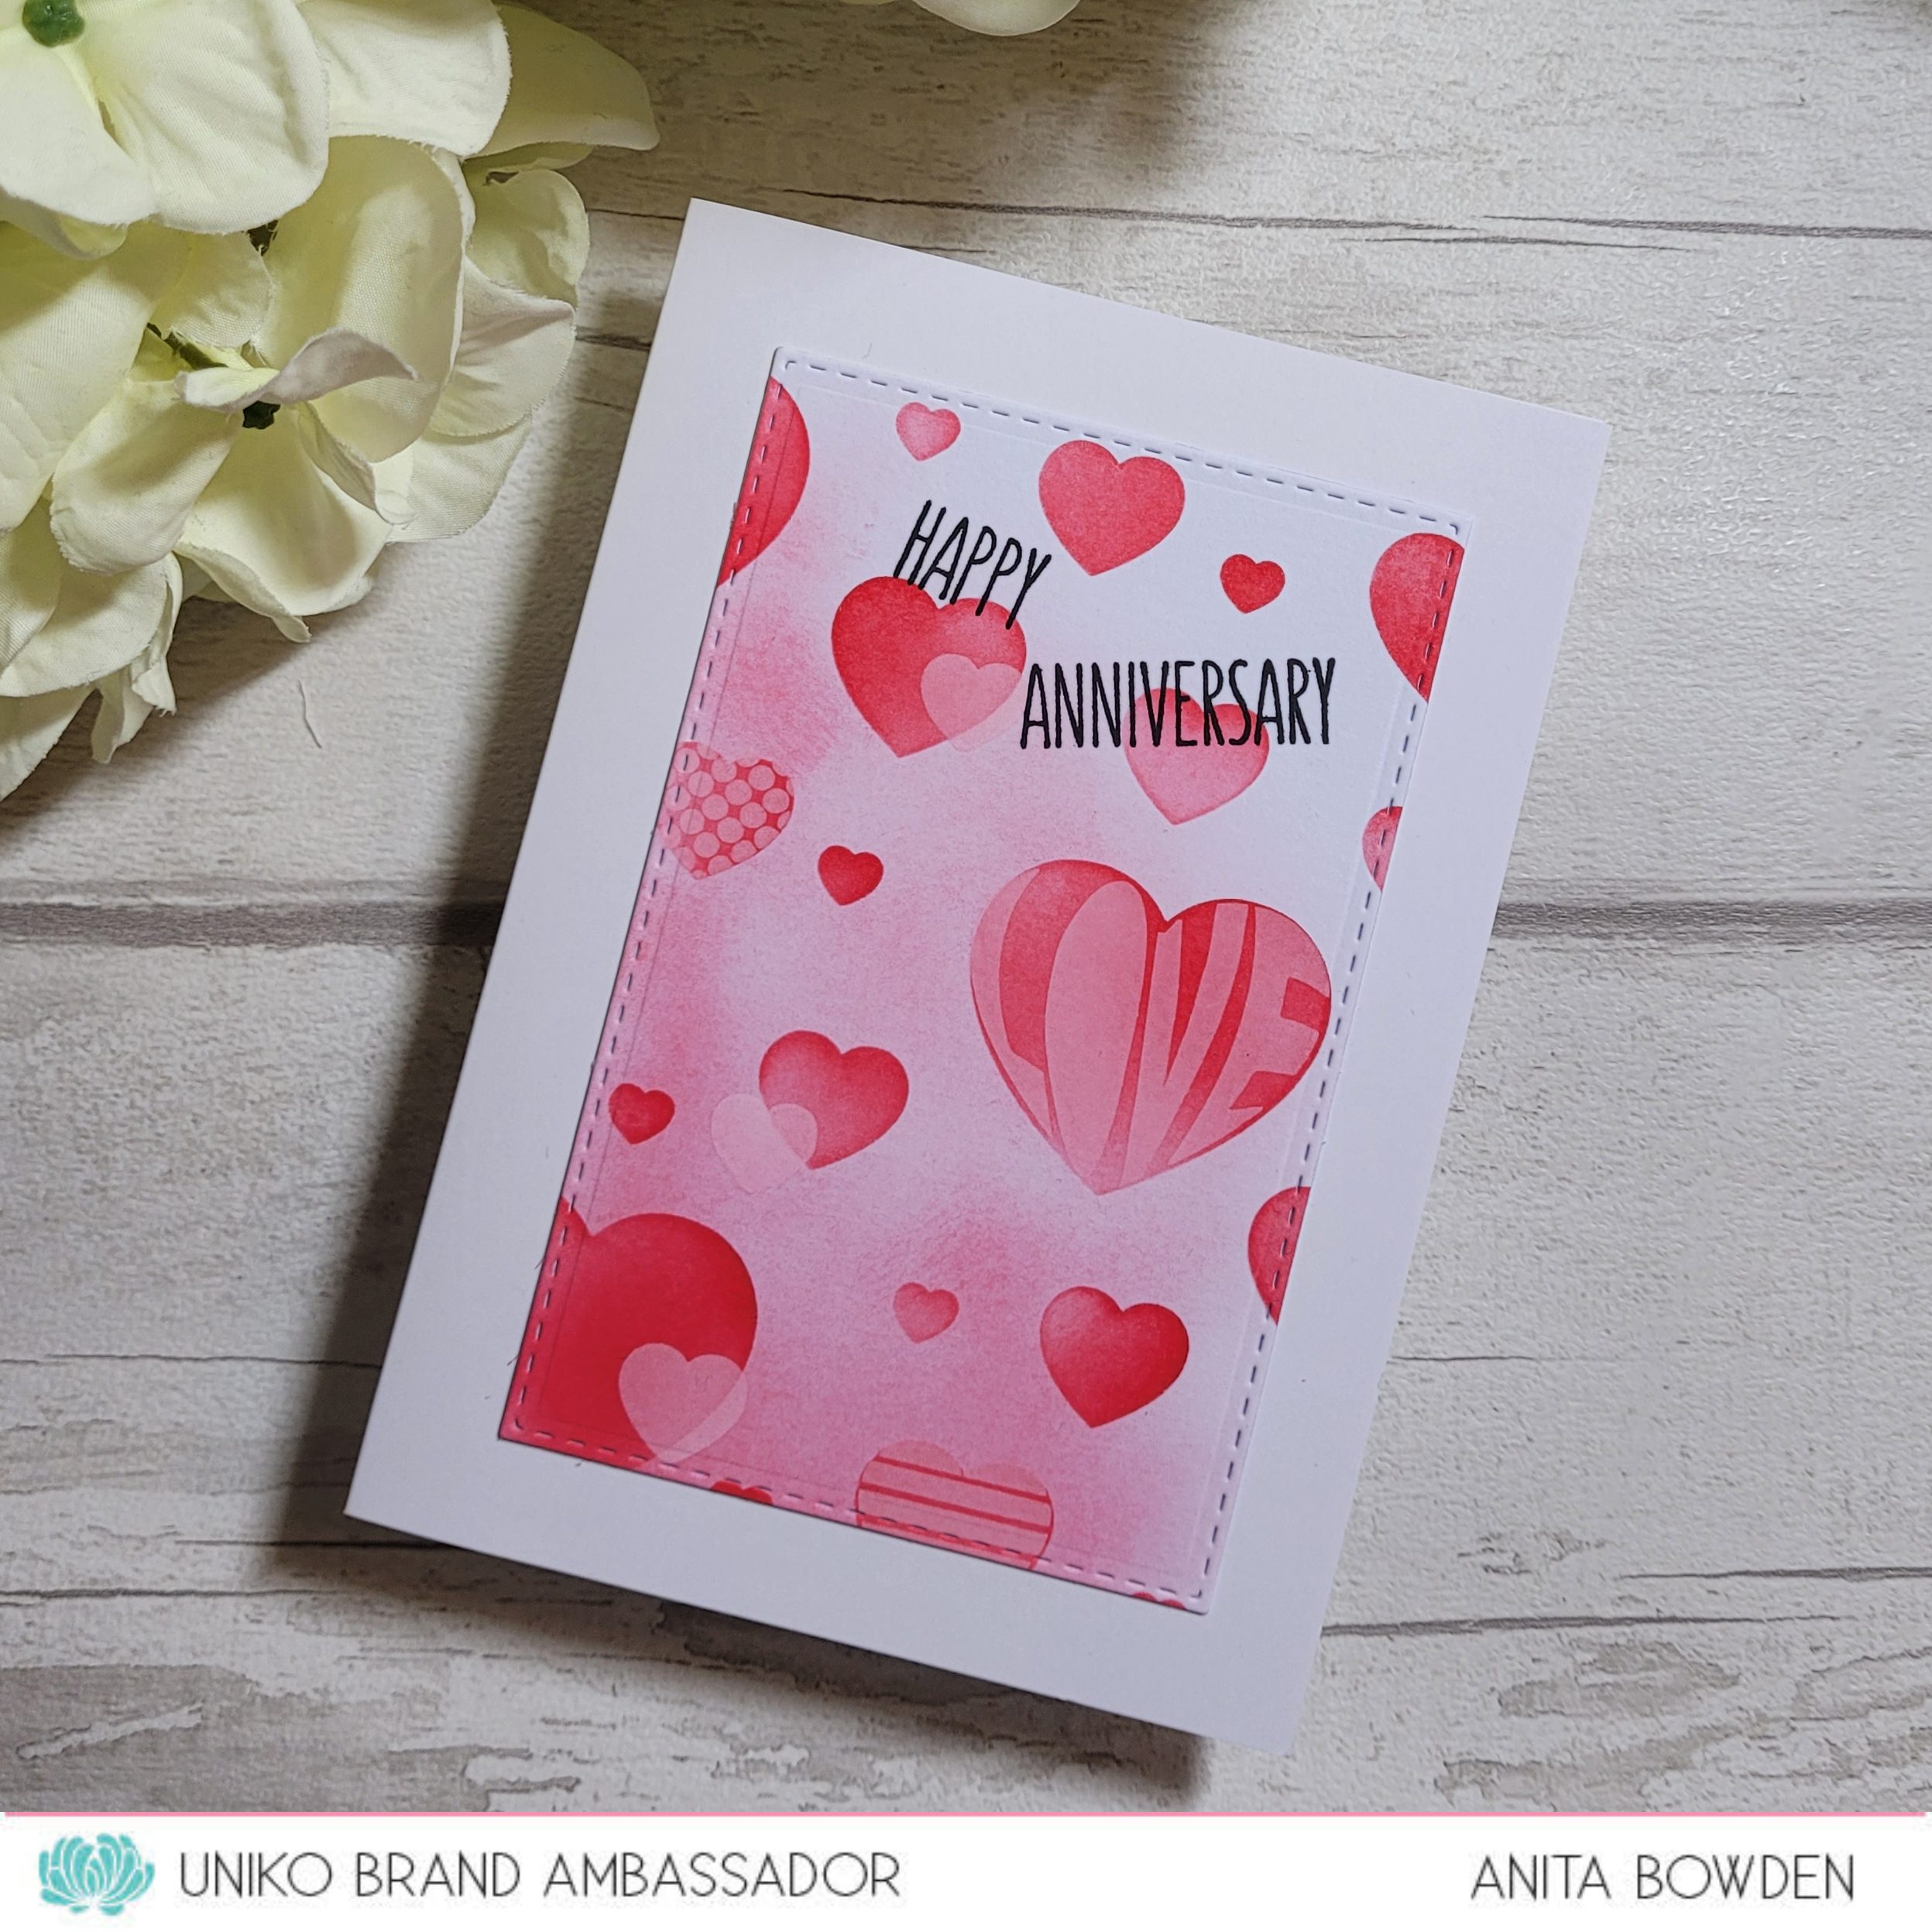
Next up is the stencil set I also didn't get a chance to play with for the release, Bokeh Layering Hearts, which I've paired with a sentiment from the new Everyday Love Sentiments stamp set...


I roughly blended a background with Distress Ink, fading it out and then randomly blended through one stencil to create the pink/red hearts.  Once dried a little I then blended over the top through the second stencil, using white pigment ink.  I die cut the panel with a stitched rectangle die and then stamped the sentiment in black before adhering the panel flat to the card base.

Materials used:
  • Stencils: Uniko - Bokeh Layering Hearts
  • Stamps: Uniko - Everyday Love Sentiments
  • Ink: Distress Ink - Worn Lipstick, Festive Berries; Hero Arts - Unicorn; Versafine Clair - Nocturne
  • Die: Create a Smile - Cool Cuts Double Stitched Rectangles


Next is my favourite stamp set from the release, Spring Botanicals Crocus...


I chose to use a panel of watercolour card for this one.  I stamped the crocus and heat embossed in white before then watercolouring with my Inktense pencils.  Finished with a sentiment from the set stamped in black.


Materials used:
  • Stamps: Uniko - Spring Botanicals Crocus
  • Ink: VersaMark; Versafine Clair - Nocturne; Derwent - Inktense
  • Embossing Powder: Wow! - Opague Bright White


The next card uses the Up & Away stamp set combined with the Cloud 9 stencil...


Here I stamped the balloon and masked the negative space to then be able to blend the ink within the balloon.  I stamped the basket, coloured with Copics, and then masked the positive sections to be able to ink blend the clouds using the stencil.  The sentiment from the stamp set finishes the card, a one layer with dimension due to the masked image.

Materials used:
  • Stamps: Uniko - Up and Away
  • Stencil: Uniko - Cloud 9
  • Ink: Memento - Tuxedo Black; Distress Oxide - Saltwater Taffy, Abandoned Coral; Tumbled Glass


And last up is the cute Hoppy Easter set...


Here I used the bunny image and paper pieced them using various co-ordinating papers.  I stamped a border in black along the top edge of the striped paper, this from the Background Builders: Classics stamp set.  The sentiment was stamped on black cardstock and heat embossed in white.

Materials used:
  • Stamps: Uniko - Hoppy Easter, Background Builders Classics
  • Ink: Versafine Clair - Nocturne; VersaMark
  • Embossing Powder: Wow! - Opaque Bright White
  • Patterned Paper: Dovecraft - Back to Basics IV


I hope you've enjoyed seeing a review of this release.  Please do pop over to the main Uniko post to join the blog hop and see lots of other products by my fellow Brand Ambassadors.  Good luck with the giveaway!


Monday, 6 June 2022

Uniko June 2022 Release - Introducing...Organically Zesty

Hi there

Between now and Friday I will be sharing some cards using products from the new June Release at Uniko, along with my fellow Brand Ambassadors.  You can find links to their blogs over at the main Uniko blog, here.

The whole release will be available to purchase from the Uniko shop this coming Friday from 9pm, BST.

Today, we are introducing the brand new Organically Zesty stamp set, it's a large set with two main images and lots of sentiments.   

I used the fabulous orange image for my first card...


On some smooth white card I stamped the image and then masked a section at a time and used ink blending to colour the fruit and leaves, then used Copic markers to add some subtle colour to the flowers.  This was then fussy cut out.  I then ink blended some blue and black ink around the edges of a panel of navy cardstock and die cut it out, then stamped and heat embossed the sentiment in white.  The fussy cut image was adhered to the panel before adhering the panel to the card base on fun foam.


Materials used:
  • Stamps - Uniko - Organically Zesty
  • Ink: Memento - Tuxedo Black; Distress Ink - Carved Pumpkin, Ripe Persimmon, Barn Door, Twisted Citron, Rustic Wilderness, Blueprint Sketch, Black Soot; VersaMark
  • Embossing Powder: Wow! - Opaque Bright White
  • Die: Create a Smile - Cool Cuts Double Stitched Rectangles

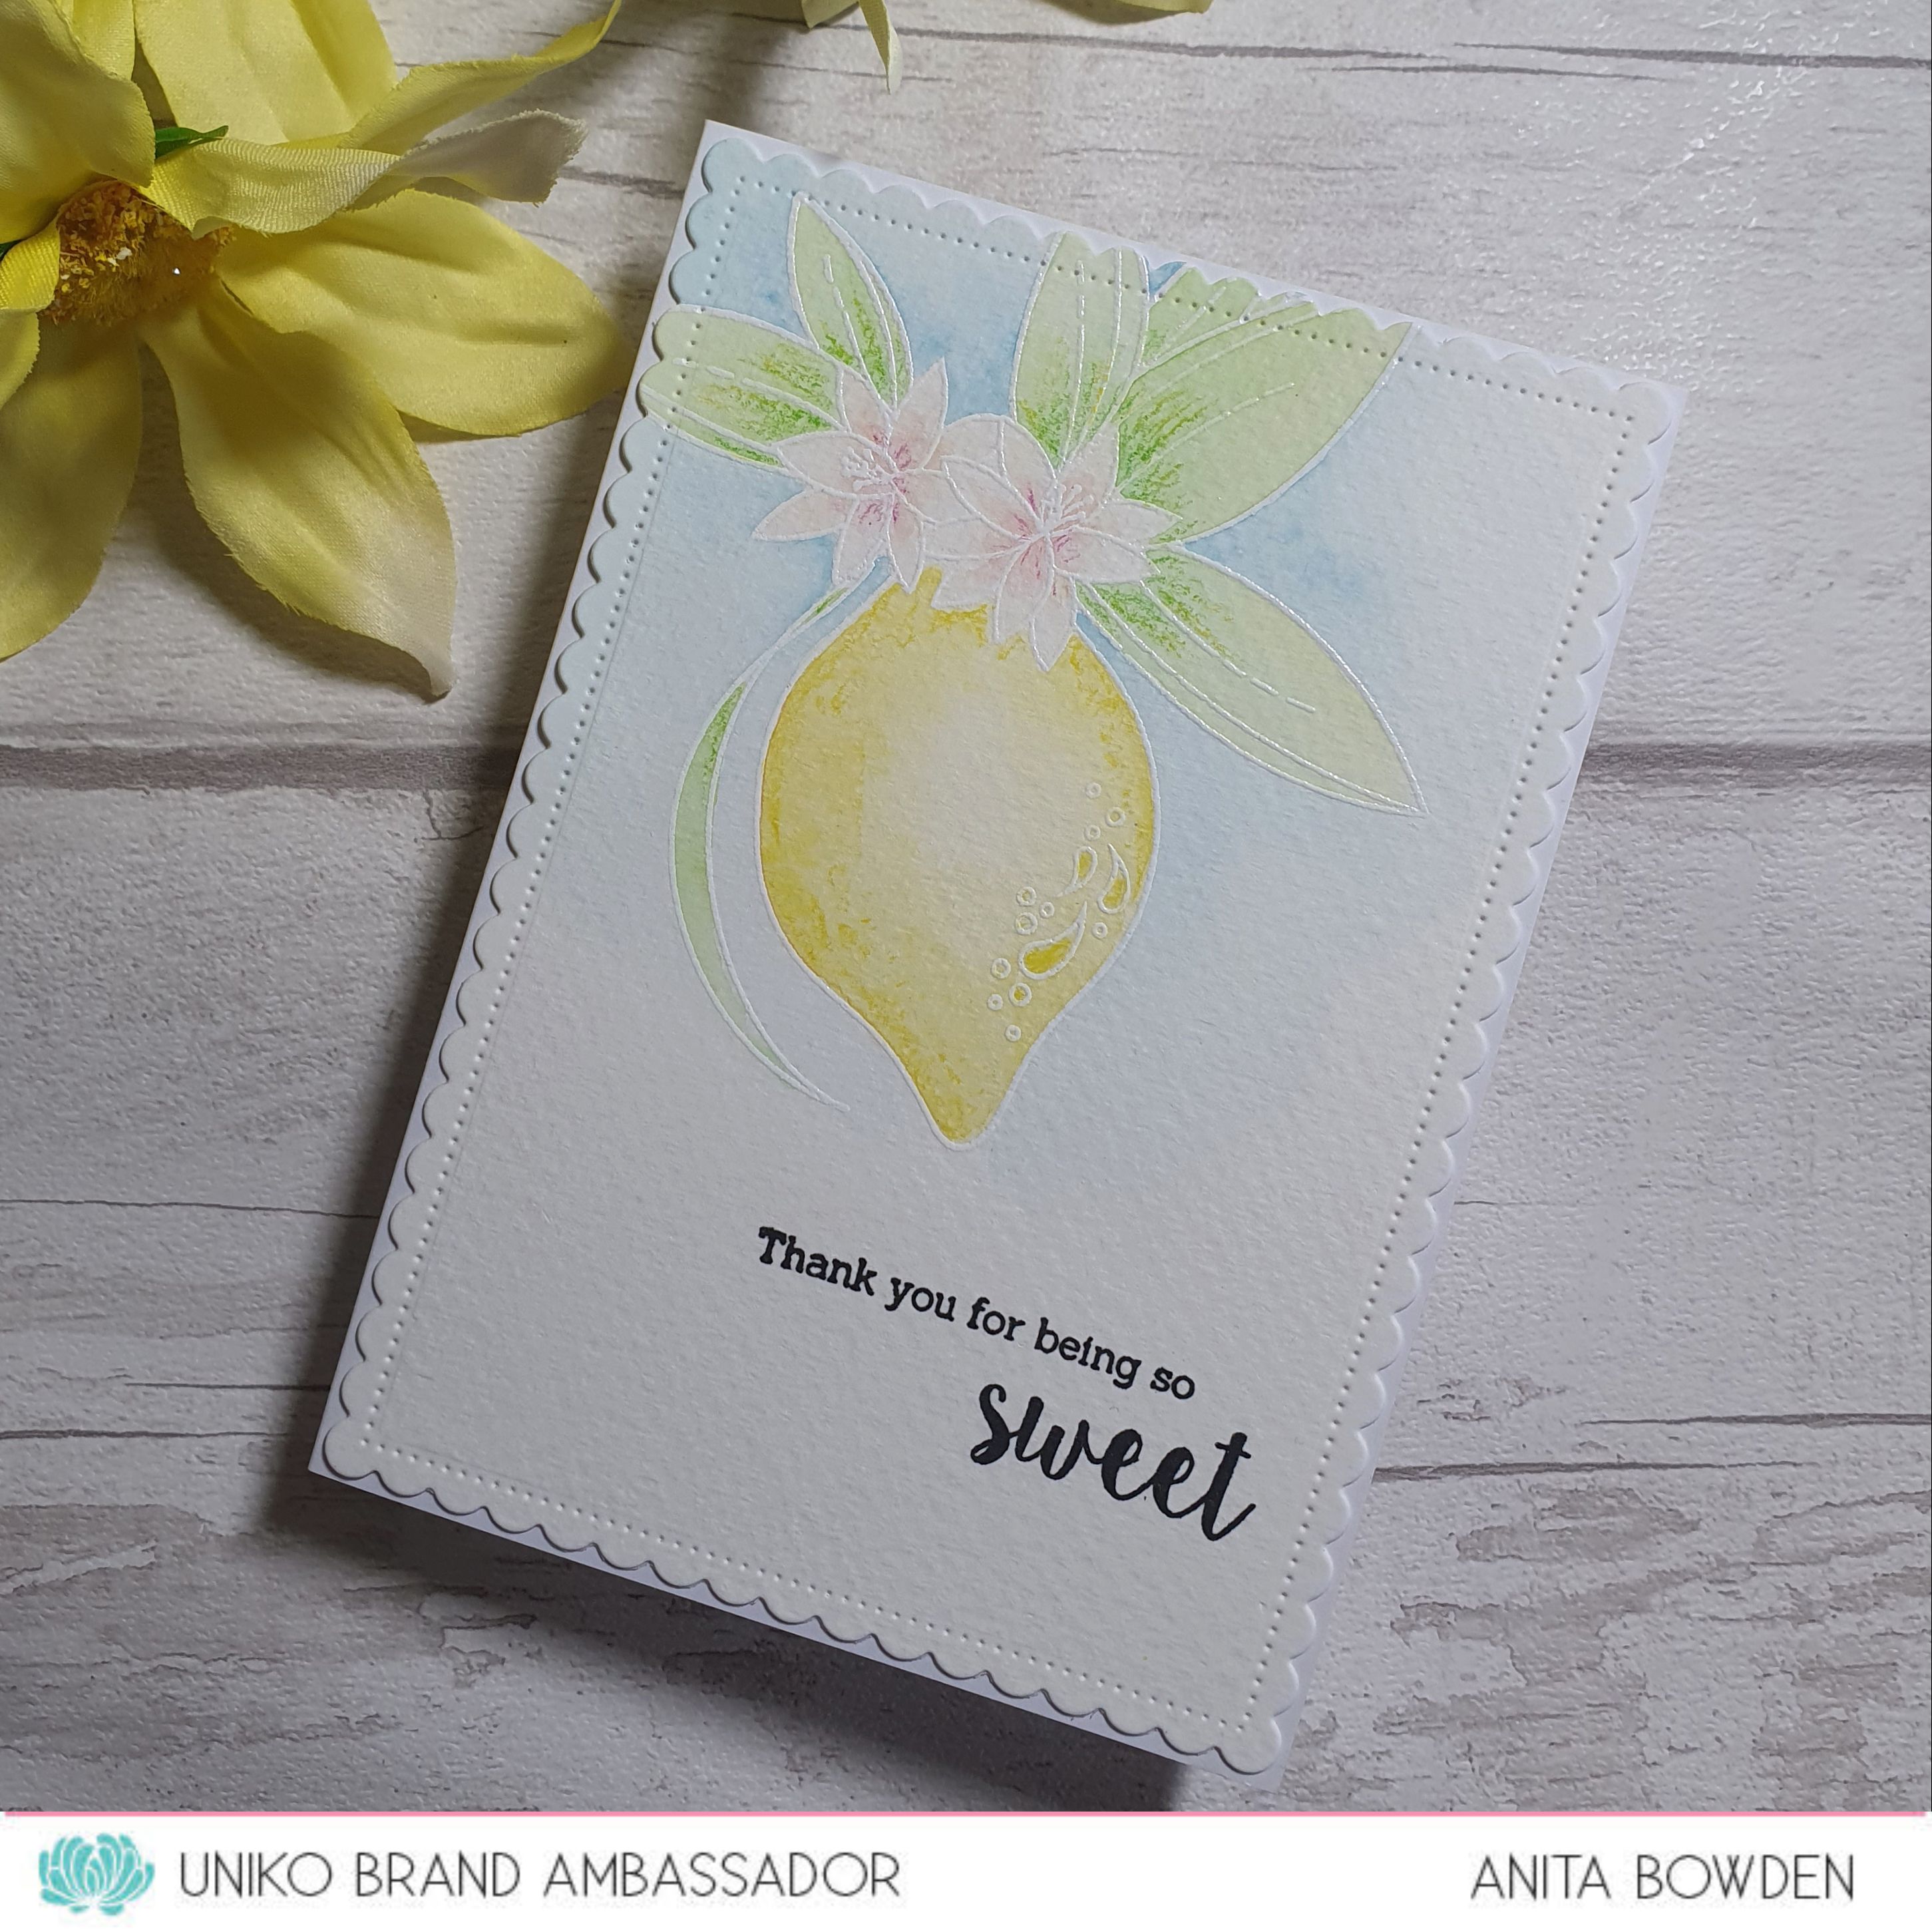
I then used the lemon image for my second card and gave it a softer feel with some watercolouring...


On some watercolour paper I stamped the image and heat embossed it in white.  I then watercoloured using Inktense pencils, by adding water to the paper then picking up colour from the pencil tips onto my brush.  Once dry I then added a few extra details using the same pencils but dry, just to add some definition.  I die cut the panel using a scalloped rectangle and then stamped the sentiment before adhering flat to the card base.


Materials used:
  • Stamps: Uniko - Organically Zesty
  • Ink: VersaMark; Versafine Clair - Nocturne; Derwent - Inktense pencils
  • Embossing Powder: Wow! - Opaque Bright White
  • Die: Create a Smile - Cool Cuts Scalloped Rectangles


And I've only just realised I probably should have swapped these sentiments around as lemon's aren't actually that sweet!  Never mind, you get the idea! :)

Thanks for taking a look today.  Please do pop back tomorrow for more projects using the new products, and on Friday we'll be revealing the release in its entirety so be sure to check that out.

Wednesday, 2 February 2022

February 2022 Bullet Journal Set Up

Hi there

Sorry I've not shared any cards with you so far this year, I hope to find time to get creative very soon.  I've just been trying to catch on boring things at home so crafting has unfortunately been at the bottom of the list since Christmas.

But, I do have another bullet journal set up to share with you today, my February pages.

Once again I used some stamps from my stash for these spreads.  As February is Valentines month I chose a roses and flowers theme, and again, kept it all very simple.


I used a mix of stamps from Altenew and Skull and Cross Buns for these spreads.  It was all going great until I coloured the images.  I tried to watercolour with my Zig Clean Color Real Brush Markers and, although these pages are thick enough to take water, the mix of the ink used for the stamped images, water and the colouring medium caused the colour to bleed through the page.


So, as you can see below, I had to patch up a section!  I had some pages left in my 2021 journal so I cut a section from there and used my glue runner to adhere in place.  Yes, I can see it but it doesn't bother me as much as the big pink blob!

So for the remaining spreads I used my Derwent Inktense pencils with minimal water to add some very sketchy colour to the flowers and leaves.

Just a simple monthly layout here, I really don't need anything more detailed.


Next up are my weekly spreads.  Last month I used two pages for each week but I just don't need that much space at the moment.  So, here, the days of the week are big enough sections for appointments, birthdays, etc. (I don't have a whole lot going on right now!), and the weekly rolling task list still works perfectly for me.


...and pretty much the same layout for the last two weeks of February.  I even managed to squeeze the rogue Monday in at the bottom!


Materials used:
  • Stamps: Altenew - Amazing You, 365; Skull and Cross Buns - Days and Months, Planner Banner
  • Ink: Versafine - Onyx Black (waterproof once dry)
  • Coloured with Derwent Inktense pencils

Thank you for popping by, I hope to be sharing projects more regularly very soon.


Wednesday, 10 July 2019

Designing for Honey Doo Crafts - Daisy May and Fleur

Hello again

I'm back to share a couple more cards using more products from Honey Doo Crafts.

Don't forget, you can see these stamp sets, and a lot more, over on Hochanda this coming Friday, 12 July at 10am and 3pm.

So, for these two I've been playing with two floral sets called Daisy May and Fleur, and also used sentiments from other sets in the Honey Doo range too.

First up is Daisy May...


This set features a lovely daisy image and I've stamped it a few times around the edge of a kraft cardstock panel and then heat embossed in white.  I then coloured the petals by watercolouring with Inktense pencils.  I used a wet paint brush to take colour from the tip of the pencils and added to the card, as it's not watercolour cardstock I didn't want to overload the surface with water, and with this technique it keeps the colours opaque.  The plan was to also colour the leaves but I loved it just as it was with the blue and white so I heat embossed a sentiment and popped the panel onto the base using fun foam.  To finish I embellished with a few iridescent jewels.


Materials used:

  • Stamps: Honey Doo Crafts - Daisy May, Birthday Sentiments
  • Ink: VersaMark
  • Embossing Powder: Wow! - Opaque Bright White
  • Watercoloured with Derwent Inktense pencils
  • Accents: Little Things from Lucy's Cards - Jewels: Clear Iridescent mix

Challenge entries:

Stamping Sensations - July Challenge - The Earth Laughs in Flowers
The Flower Challenge - Challenge #34 - Pretty Pastels
STAMPlorations - Summer Challenge - Stamps and Anything Goes
Time Out - Challenge #139 - Inspired by Words


Next up I used the Fleur set and paired this with a sentiment, also from Honey Doo, and one of their stencils...


I made a circular mask using a scrap of thin cardstock and blended through the aperture with Distress Oxide Ink.  I then added the stencil and blended through with a darker shade.  I simply stamped the flowers and leaves from the set through the aperture.  After removing the mask I manipulated the sentiment stamp to follow the curve of the circle and stamped in black.  I loved the simplicity of this design so called it done :)

Materials used:

  • Stamps: Honey Doo Crafts - Fleur, Daffodils (sentiment)
  • Ink: Distress Oxide - Cracked Pistachio, Peacock Feathers; Versafine - Onyx Black
  • Stencil: Honey Doo Crafts - Mesh

Challenge entries:

Addicted to Stamps and More - Challenge #349 - CAS
STAMPlorations - Summer CAS Card Challenge - CAS


I'll be back to share more with you tomorrow, have a lovely evening :)

Monday, 1 April 2019

Guest Designer for Honey Doo Crafts - Selection Two

Hi guys

I'm back tonight to share my next batch of samples for the new release at Honey Doo Crafts.

Earlier, Amanda held a Facebook Live video showing the ten new stamp sets, along with all the samples from the whole design team which you can find, here.

And don't forget Honey Doo will be on Hochanda (Sky 673 / Freeview 85) this coming Wednesday 3 April 2019 so tune in if you can, if not, set your planners as I believe Amanda will be doing lots of demos along with showcasing the products.


Ok, on to my next few samples.

First up I used a stamp called Smell The Roses which is a truly beautiful image...


To create this one I heat embossed the image in white on watercolour paper and watercoloured it with Inktense pencils.  I added a little pale blue watercolour around the edge of the image just to lift it off the background a little.  I then used a paper trimmer to slice away part of the panel and fussy cut around the edge.  I stamped the sentiment and then popped the panel up over the card base which had a black strip adhered to the right hand side.  This is a CASE of a previous card I made, here, which used partial die cutting to create the same look.  So you don't need the co-ordinating dies to create this effect.


Materials used:

  • Stamps: Honey Doo Crafts - Smell The Roses, Happy Times
  • Ink: VersaMark; Versafine - Onyx Black
  • Embossing Powder: Altenew - Pure White
  • Watercoloured with Derwent Inktense pencils

Challenge entries:

Addicted to Stamps and More - Challenge #334 - CAS
Creative with Stamps - Challenge #37 - Birthday


Next up I used the new Daisy May stamp set.  I was inspired by a card by the super talented May Park, here.  The stamps I used were a linear design as opposed to May's card which used solid images, so I chose to emboss it in gold and pair with orange tones.  I paired this with a sentiment from an existing Honey Doo set called Cheers...


I began with a panel of orange cardstock and stamped and heat embossed the daisy image in gold multiple times to create a frame.  I then blended Distress Inks in from the edge in co-ordinating shades to create ombre effect.  I finished by stamping the sentiment in black ink and heat embossed it in clear.

Materials used:

  • Stamps: Honey Doo Crafts - Daisy May, Cheers
  • Orange cardstock from stash
  • Ink: VersaMark; Distress Ink - Ripe Persimmon, Barn Door, Black Soot; Versafine - Onyx Black
  • Embossing Powder: Wow - Metallic Gold Rich, Clear Gloss


Next up is this gorgeous floral cluster image called Roses and Lilies...


I stamped and heat embossed the floral image in white onto vellum and coloured on the reverse with ProMarkers.  I then did some partial trimming, cutting away a vertical section but stopping where the image was and fussy cutting around the edge.  The vellum panel was then wrapped around an embossed panel and secured on the reverse.  The panel was popped up on fun foam and I finished with a sentiment embossed in white on textured lilac cardstock, die cut with a pierced square.


Materials used:

  • Stamps: Honey Doo Crafts - Roses and Lilies, Birthday Sentiments
  • Ink: VersaMark
  • Embossing Powder: Altenew - Pure White
  • Coloured with ProMarkers
  • Embossing Folder: We R Memory Keepers - Next Level (Wave)
  • Die: MFT Die-namics - Pierced Square Stax

Challenge entries:

The Paper Players - Challenge #435 - Tic-Tac-Toe (die-cut / embossing / floral)
Just Us Girls - Challenge #481 - Embossing Folder


Finally, the last one for this post is a really simple card I made using the new Oopsie Daisy set...


For this one I grabbed some scraps of cardstock and cut strips of varying widths and adhered these alternately to a piece of thinner cardstock.  The daisy image was then stamped across the strips.  I then die cut the pierced curve from each side of the strip  I also did the same from the front edge of the card base, and adhered the striped panel aligning with the edge.  I then stamped the sentiment vertically on the inside of the card but as it's cut away it shows when the card is closed.  I love this sentiment, it could be ideal for an 'oopsie I forgot' belated card, or perhaps to send to someone who has had some sort of mishap, or if you've messed up and want to apologise.  So lots of uses :)

Materials used:

  • Stamps: Honey Doo Crafts - Oopsie Daisy
  • Ink: Versafine - Onyx Black
  • Die: Avery Elle - Dotted Borders Dies
  • Card scraps from stash


Thanks so much for stopping by.  I'l be sharing my last few samples with you tomorrow, ahead of the shows on Hochanda on Wednesday.  If you can't wait until then, all the new sets are available to buy direct from the Honey Doo website, here.

Monday, 28 May 2018

Clearly Besotted June Release Teasers: Happy Hibiscus & Mix It Up - Guest Designer!

Hi guys

Well I'm super excited this morning!

I've been asked once again to Guest Design for Clearly Besotted, and if you follow my blog (and look in my stash!) you can tell that I'm a huge Clearly Besotted fan!  So to be asked to join the team with the June Release teasers is an absolute honour!  The June Release products will be available to purchase from Clearly Besotted from 8pm BST on 1 June 2018 and also from Simon Says Stamp.

Thanks so much Jenny and Stephanie for having me and for letting me have an early play with these fabulous sets.  The members of the CBS Design Team are amazing so I hope my creations are up to scratch!

So let's get to it, and for Teaser Day One I have two cards using two of the new mini A7 sets.

Clearly Besotted create fabulous floral designs and this first little set, Happy Hibiscus, is yet another gorgeous one...


I began by stamping the floral image using VersaMark ink onto watercolour card before embossing in white with Altenew Pure White embossing powder.  I then used my Derwent Inktense pencils to watercolour the image.  I carefully then used my trimmer to cut away the side of the cardstock, and cut around the edge of the design, much like partial die cutting.  I adhered a strip of burgundy cardstock to the edge of the card base, to co-ordinate with the centres of the flowers.  The sentiment, from this same set was then stamped in Versafine Onyx Black ink and the panel popped up on 3D foam.

Challenge entry:

Stamping Sensations - May Challenge - Close to Nature
Happy Little Stampers - May Watercolour Challenge - Anything Goes (CAS)


My second card uses a mini set called Mix It Up which features some fun fruity cocktails, and I've used a single flower from the Happy Hibiscus set with this one too...


I chose Neenah Desert Storm kraft cardstock for my base and panel here.  I stamped the pineapple cocktail from the set in Versafine Onyx Black ink and then masked it to stamp the hibiscus.  I then coloured the images using Faber Castell Polychromos pencils (never coloured a pineapple before, that was challenging!) before restamping to make the outlines crisp.  I have a mini and a standard MISTI so I left the stamps in position to restamp afterwards.  I die cut the images using a pierced square die by MFT Die-namics and used another larger die to emboss the card base before popping up the smaller one on 3D foam.  The sentiment, also from the Mix It Up set was also stamped in Versafine Onyx Black.


Thanks so much for visiting today.  I'll be sharing more tomorrow morning so please do pop back, and of course visit the fabulous Design Team whose links you can find over at the CBS blog, here.

Saturday, 23 December 2017

Watercoloured Snowman

Good afternoon

Back today to share another card I made last month whilst staying with Sarah up north.  This snowman stamp was an absolute bargain from The Works.  It was £1...and also buy one get one free!  So he, along with another little Christmas stamp obviously fell straight into my basket!


I stamped the image on watercolour cardstock in VersaMark before heat embossing in white.  I then watercoloured him using my Derwent Inktense pencils.  I used a stitched rectangle die to cut him out, and mounted it on a larger rectangle cut from the same stack.  Before mounting I added some score lines to my card base to add a detailed frame, then adhered the panels with a sentiment flag underneath.

Materials used:

  • Stamps: DoCrafts - Mini Clear Stamp: Christmas Assortment; Happy Little Stampers - Mixed Christmas Sentiments
  • Ink: VersaMark
  • Embossing Powder: Wow - Opaque Bright White
  • Dies: MFT Die-namics - Stitched Rectangle Stax; Stitched Sentiment Strips 
  • Coloured with Derwent Inktense pencils

Challenge entries:

Creative Inspirations - Challenge #284 - Winter/Christmas
Christmas Cards All Year Round - December Challenge - Anything Goes
Uniko - Challenge #44 - Christmas


I'm just sorting through photos of cards I've not yet shared so I'll be back with more very soon :)

Monday, 4 December 2017

Muse Challenge #245 - Partial Die Cut Rose

Hi there

I'm thrilled to be your designer over at Muse again for this week's new challenge.

I made this card whilst at the Happy Little Stampers craft retreat last month when one of the techniques we were having fun with was partial die-cutting.

I hope there are a few different elements to inspire you this week.  I've included partial die-cutting, heat embossing, watercolouring and contrasting cardstock.  Or perhaps the floral theme, colours or layout will be your inspiration.


I started by stamping the rose in VersaMark ink onto some watercolour card and heat embossed in white.  I then watercoloured using my Derwent Inktense pencils.  I then partially die cut the rose with it's co-ordinating die and then made a vertical cut between the image with my trimmer.


I adhered some black cardstock to the card base and stamped the sentiment on the rose panel before adhering it popped up on 3D foam.

Materials used:
  • Stamps: Clearly Besotted - Merci Beaucoup (and co-ordinating die)
  • Ink: VersaMark; Versafine - Onyx Black
  • Embossing Powder: Wow! - Opaque Bright White
  • Watercoloured with Derwent Inktense pencils
  • Cardstock: Daler Rowney - Aquafine, black from stash

Challenge entries:

Penny Black and More - December Challenge - CAS


Thanks so much for visiting today, and I hope I've inspired you to play along at Muse this week.

Related Posts Plugin for WordPress, Blogger...