Showing posts with label Lawn Fawn. Show all posts

Friday, 8 April 2022

Kitty Love

Hi guys

Apologies for being so quiet on here lately.  I've had a bit of a crafty dry spell lately so, hopefully, I'll get back to creating a lot more very soon.

Just stopping by today to share a card I made a while ago.  I've just found the photo and realised I forgot all about sharing it.  And as it's just a love themed card, it could be sent at any time, not specifically for Valentine's Day.

Here it is...


On a die cut panel I stamped the kitten first, before masking and them stamping the "love" for him to lie upon.  These were then simply coloured with Copics before adhering the panel flat to the card base.  I die cut the "you" and the hearts from red cardstock, adhered to the panel and then added some sparkle to the hearts using a shimmer pen.


Materials used:
  • Stamps: Clearly Besotted - Pawfect Plushies, On the Shelf
  • Ink: Memento - Tuxedo Black
  • Dies: MFT Die-namics - Twice the Thanks (you); Lawn Fawn - Hearts; Create a Smile - Double Stitched Rectangles
  • Coloured with Copics
  • Accents: Spectrum Noir Sparkle Pen - Clear

Challenge entries

Addicted to CAS - Challenge #217 - Animals
STAMPlorations - April CAS Challenge - Anything CAS Goes
Moving Along with the Times - Challenge #141 - Baby Animals


Thanks for taking a look.  Wishing you a lovely weekend.


Friday, 30 July 2021

Sundae Duo

Hi guys

If one sundae wasn't delicious enough I've got two for you today!

Just popping by to share a couple of same but different simple cards I made for two of my lovely friends' birthdays earlier this month.

These both use images and a sentiment from the same stamp set and patterned papers from the same pad.


I stamped and coloured the images with Copics before die cutting them with a pierced square die.  These were then adhered onto die cut papers using the next size up die from the same set.  The stacks were then adhered flat to the card bases and the sentiment stamped below.  Super simple!


Materials used:
  • Stamps: Clearly Besotted - Sunny Sundae
  • Ink: Memento - Tuxedo Black
  • Coloured with Copics
  • Dies: MFT Die-namics - Pierced Square Die Stax
  • Patterned Paper: Lawn Fawn - Let's Polka Mon Amie


Thanks so much for taking a look.

I've been a bit slack with my crafting lately, mainly because my craft space is a bit of a mess!  I don't have any plans this weekend so I'm going to make a real effort to get organised and tidy and make it a space I want to be in again!

Have a lovely weekend whatever you're up to.


Saturday, 20 March 2021

Less is More - Challenge #439

Hi there, Happy Saturday!

It's new challenge day over at Less is More and we're back with a Recipe challenge this time.  


We're looking for any kinds of inking, used in a clean and simple way .

It's been a while since I did the ghosting technique on a card and it's one of my favourite techniques.  I've also added quite a few new stencils to my stash in recent months so wanted to use one here...


I began by die cutting a small stitched rectangle and I masked off around all the edges before blending the area with three shades of Distress Inks.  Although Distress Oxides also react with water, I much prefer using the original Distress Inks for this technique.  I laid down my stencil over the inked area and spritzed with a fine mist of water, keeping the spray quite far away.  I then lifted the stencil away and blotted with a paper towel to lift away the colour.  Once completely dry I stamped and heat embossed the sentiment in white, using an anti-static powder tool first.  Before adhering in place on the card base, I scored one line, as if continuing the line of the sentiment design.


Materials used:
  • Die: Create a Smile - Cool Cuts Double Stitched Rectangles
  • Ink: Distress Ink - Twisted Citron, Peacock Feathers, Blueprint Sketch; VersaMark
  • Stencil: Funky Fossil - In a Spin
  • Stamp: Lawn Fawn - Scripty Sayings
  • Embossing Powder: Brutus Monroe - Alabaster White

Challenge entries:

My Time to Craft - Challenge #453 - Stencil It!
Addicted to Stamps and More - Challenge #401 - Make Your Mark
Addicted to CAS - Challenge #193 - Shapes
Happy Little Stampers - March Stencil Challenge - Anything Goes
NBUS - Challenge #24 - (New stencil)
STAMPlorations - March CAS Challenge - Anything Goes


If you need more inspiration for this challenge, please do pop over to the main LIM challenge post where my teamies are sharing their projects, and if you click on their individual links they may have even more to share.

Thanks so much for visiting, have a wonderful weekend.


Friday, 12 March 2021

Feline 50

Hi there

This is a card I made earlier in the year for a friend celebrating her 50th birthday.  

She is a cat-lover so a kitty just had to feature in the design...


I began with a die cut panel and stamped the kitty image off the bottom edge, then the sentiment which is part of a longer stamp.  Next I stencilled the balloon off the top edge, adding light and shade with the blending, before then stamping the numbers on the balloon.  I used a black fine liner pen to hand draw the balloon string ties around the balloon and the cat's tail.  To finish, I coloured the cat and the box with Copic markers and adhered the panel flat to the card base.

Materials used:
  • Stamps: Simon Says Stamp - Furry Cat & Box; Lawn Fawn - Scripty Sayings; Clearly Besotted - Got Your Number
  • Ink: Memento - Tuxedo Black; Versafine - Onyx Black; Distress Ink - Picked Raspberry
  • Stencil: MFT - Big Balloons
  • Die: Create a Smile - Cool Cuts Double Stitched Rectangles
  • Coloured with Copics

Challenge entries:

Cupcake Inspirations - Challenge #514 - Cats
NBUS - Challenge #24 - First use of the kitty stamp which I bought in a de-stash sale
STAMPlorations - March Theme & Photo Challenge - 'Stamps and Numbers'


Thanks so much for popping by, I'll be back very soon with more to share.


Saturday, 23 January 2021

Less is More Challenge #435

Good morning

It's Saturday and time for another new challenge over at Less is More.  This time we have a Recipe challenge for you.  So as always, just follow the CAS guidelines and follow the theme which is...


We have a wonderful Guest Designer joining us for this challenge, Caroline Paton of KISS - Keep It Sweet and Simple, who was our November challenge winner.  She has made a really cute 'In a Row' card so please do take a look and say hi.

Ok, on to my card and I've used a die to create my row, one that's been in my stash for some time but so far unused...


Although this looks super simple it did take a bit of time to create as it was quite fiddly.  I die cut the row of flowers, keeping the flower centres off to one side, and left a wide section below to stamp the sentiment.  I then coloured all the flowers with Copics, together with those little yellow centres.  Once trimmed to the exact width of my card base I added a wide strip of 3D foam behind the sentiment section and then individual tiny pieces of 3D foam behind each flower head.  I adhered the strip to my card base and the sticky sections which showed through the blue flowers then allowed me to adhere the yellow centres back in place.


Materials used:
  • Die: Lawn Fawn -Straight Flower Border
  • Stamp: Altenew - Happy Mail
  • Ink: Versafine - Onyx Black
  • Coloured with Copic markers

Challenge entries:

AAA Cards - CAS Game #181 - Up to One Third
Happy Little Stampers - January Anything Goes with Dies challenge
NBUS - Challenge #22 - first use of this die


As always, the challenge will be running for the next fortnight, so there's plenty of time to get your entries in.


Thursday, 31 December 2020

Cute Merry Kissmas


Hi there

Today I'm sharing the last of my Christmas cards made in 2020, and this is the card I made for my other half.

This one was super quick to make and I used an image from another stamp set that was new to me this year, Christmas Plushies.


I stamped the bear with the mistletoe image and coloured it in with Copics, including the background, where I used a colourless blender to create the falling snow.  The sentiment was stamped below before die cutting with a pierced square die.  I then die cut some patterned paper using a slightly larger die from the same stacking set, adhered that piece flat before adhering the top piece on fun foam.  That was it, super simple.

Materials used:
  • Stamps: Clearly Besotted - Christmas Plushies, Kiss Me Quick
  • Ink: Memento - Tuxedo Black
  • Coloured with Copic Markers
  • Dies: MFT Die-namics - Pierced Square Stax
  • Patterned Paper: Lawn Fawn - Let's Bokeh in the Snow

Challenge entries:

Sweet Stampin' - Last Minute Christmas
AAA Cards - CAS Game #180 - Made in Minutes (Option: Christmas)
Use You Stuff - Challenge #412 - Winter/Snow/Christmas
NBUS - Challenge #21 - new stamp set 


As that's all my Christmas cards now shared and considering the date, I'd like to take this opportunity to wish you all a wonderful New Year celebration (however you are able to celebrate) and all the best for 2021.  To be honest, it can only get better can't it after the awful year we've all had?  I'll be at home with a few glasses of fizz and a takeaway (if we manage to get one as I imagine demand will be through the roof!), and no doubt asleep well before the clock strikes twelve!  

Thank you all for your amazing support during 2020 and for leaving such wonderful, encouraging comments, I appreciate them all so much.  Stay safe and sending crafty hugs to each and every one of you xx 


Tuesday, 15 December 2020

Christmas Card Multiples - Watercolour and Glittered Die Cuts

Hi there

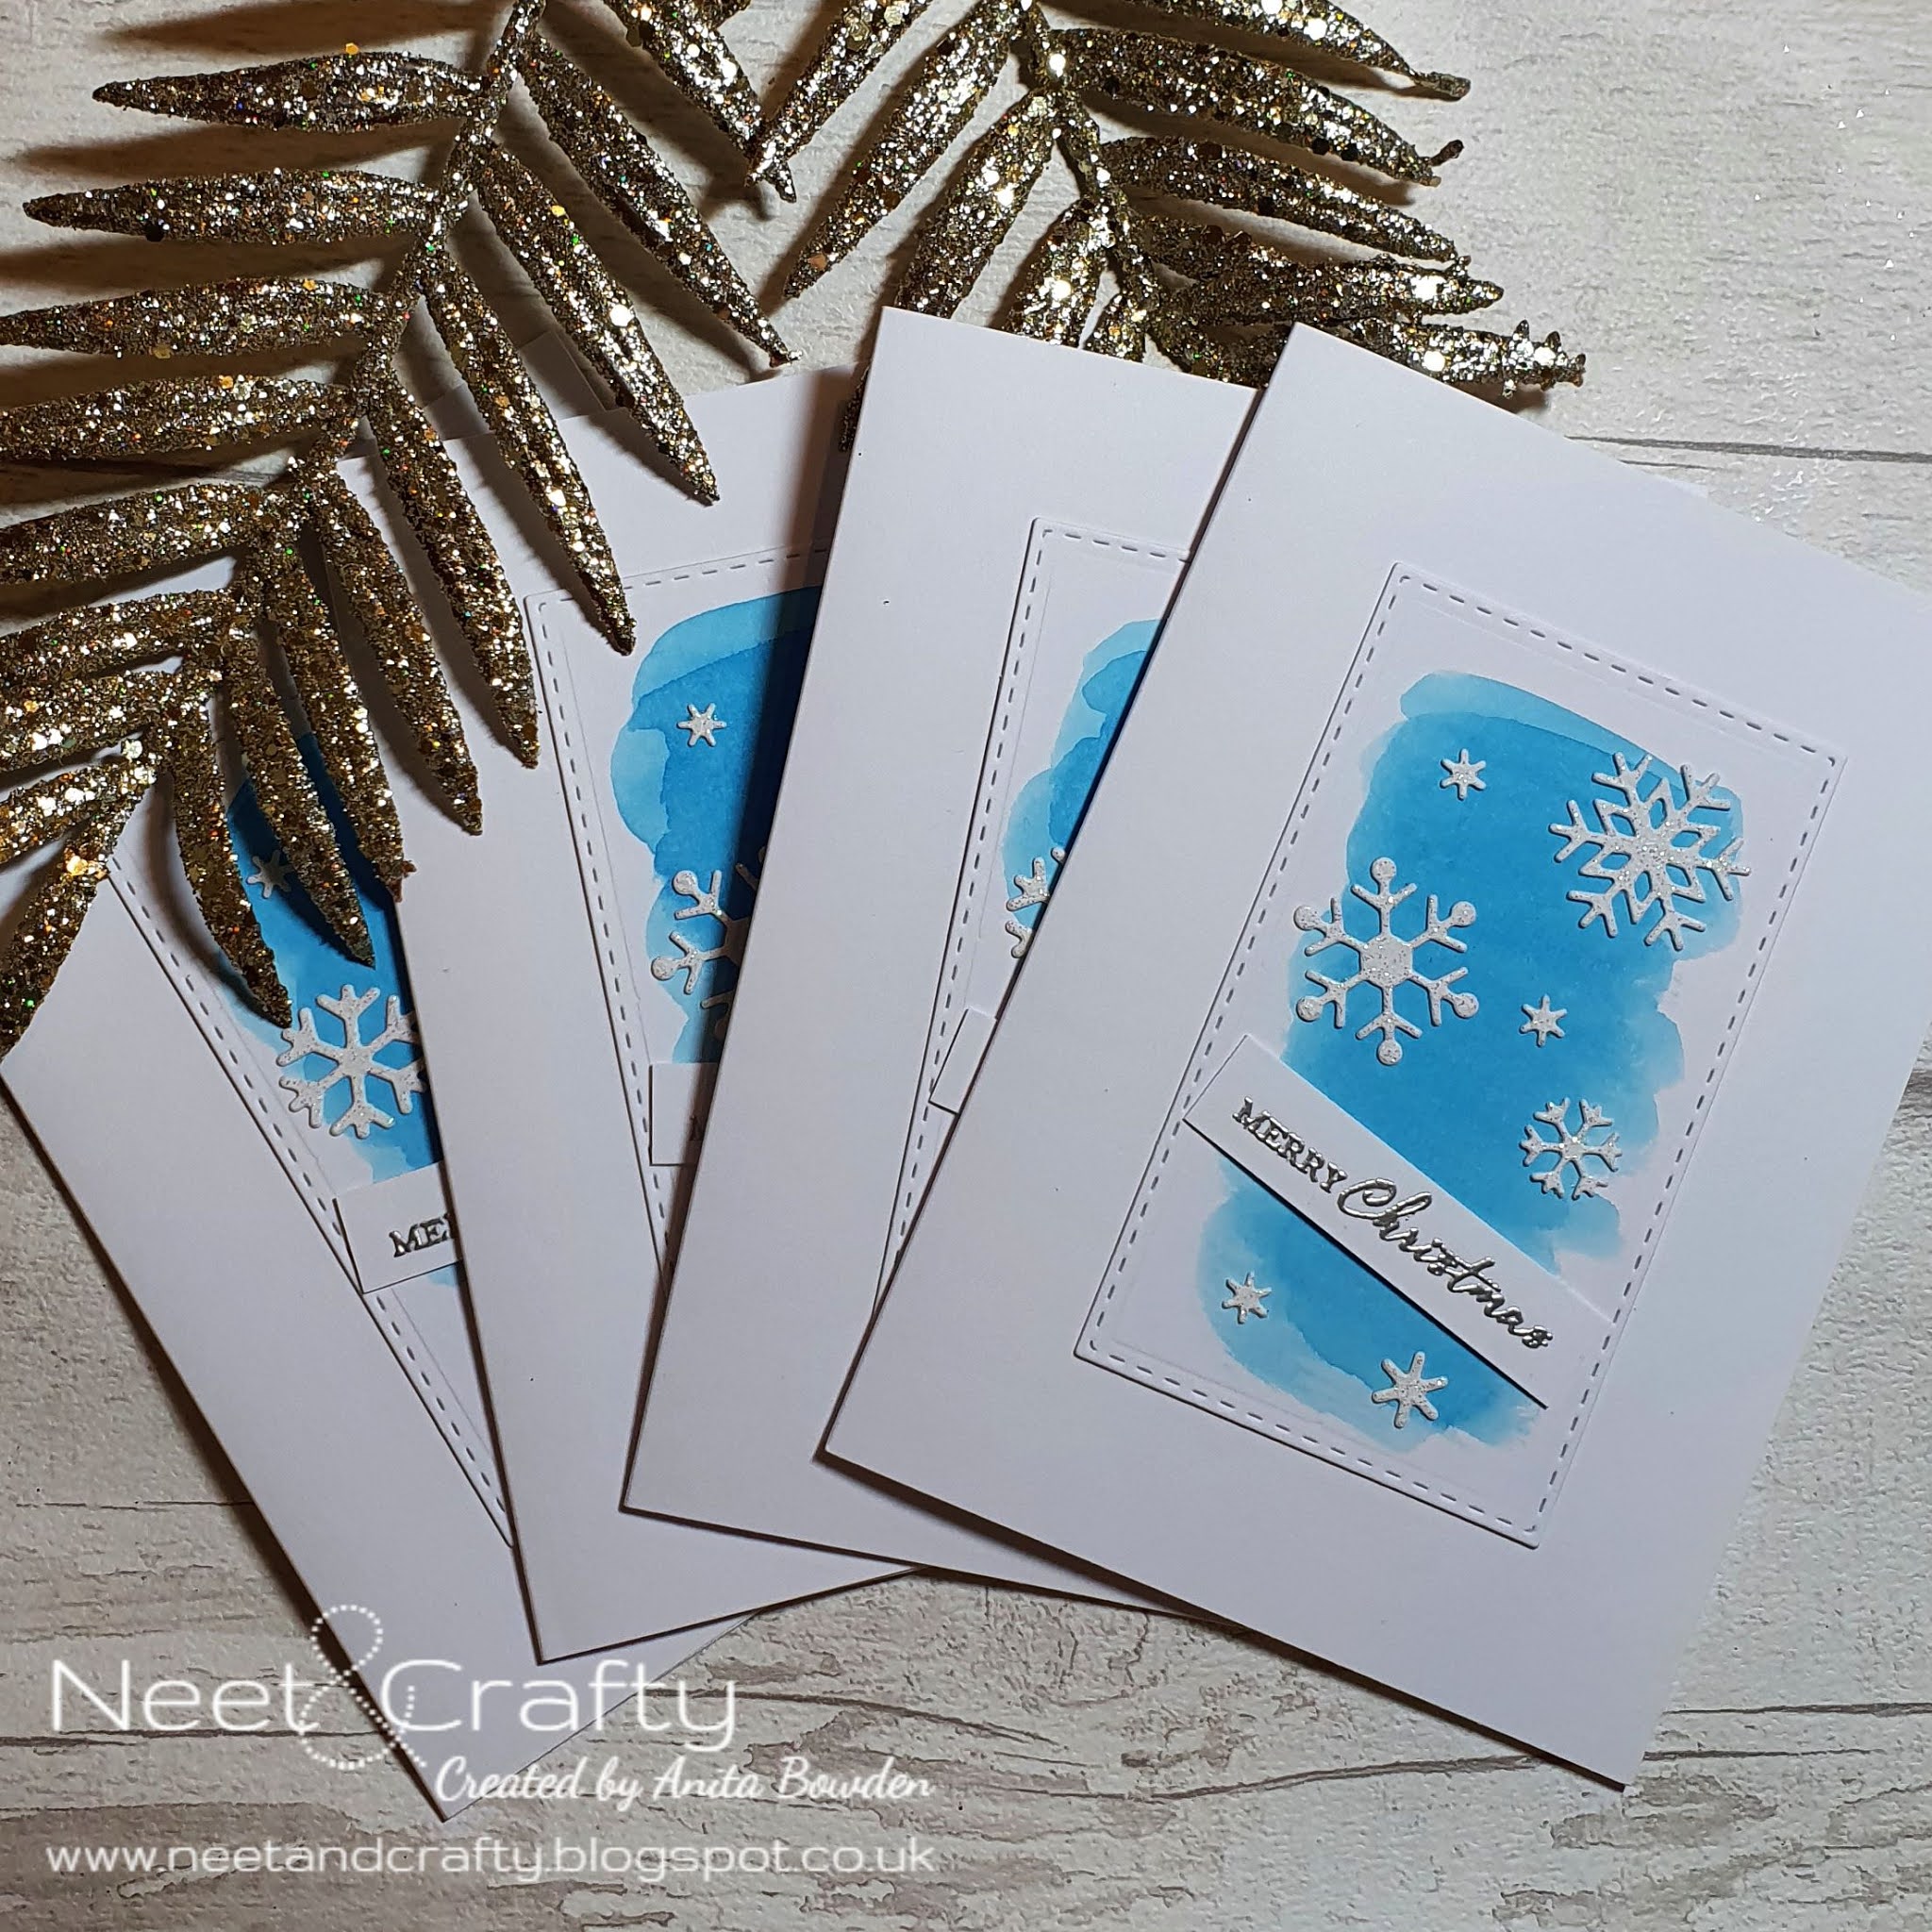
More multiple makes for you today.  I made four each of four different versions of a similar design.  I just changed up the colours and die cuts for each.


I started with some white card bases and stitched die cut rectangles.  I mixed Distress Inks with water and roughly watercoloured some brush strokes onto the panels and left to dry.  I then die cut poinsettias, holly leaves, bells and snowflakes from some white glitter cardstock and adhered these over the panels onto the bases.  To finish I stamped and heat embossed some sentiments in gold and silver and cut down the sentiment strips and adhered on glue dots rather than foam to make the finished cards more mail friendly.


Red Poinsettia


Materials used:
  • Dies: Create a Smile - Cool Cuts Double Stitched Rectangles; Poppy Stamps - Small Posh Outline
  • Ink: Distress Ink - Candied Apple; VersaMark
  • Stamp: Clearly Besotted - Brushed Sentiments
  • Embossing Powder: Wow! - Metallic Gold Rich


Green Holly Leaf


Materials used:
  • Dies: Create a Smile - Cool Cuts Double Stitched Rectangles; Tonic - Holly Leaf
  • Ink: Distress Ink - Pine Needles; VersaMark
  • Stamp: Clearly Besotted - Brushed Sentiments
  • Embossing Powder: Wow! - Metallic Gold Rich


Blue Snowflakes


Materials used:
  • Dies: Create a Smile - Cool Cuts Double Stitched Rectangles; Lawn Fawn - Mini Snowflakes
  • Ink: Distress Ink - Salty Ocean; VersaMark
  • Stamp: Clearly Besotted - Brushed Sentiments
  • Embossing Powder: Wow! - Metallic Silver


Lilac Bells


Materials used:
  • Dies: Create a Smile - Cool Cuts Double Stitched Rectangles; Xcut - Filigree Bell
  • Ink: Distress Ink - Dusty Concord; VersaMark
  • Stamp: Clearly Besotted - Brushed Sentiments
  • Embossing Powder: Wow! - Metallic Silver

Challenge entries:

Dream Valley - Challenge #238 - Christmas
Try It On Tuesday - Christmas Sparkle
STAMPlorations - December CAS Challenge - Anything CAS Goes
STAMPlorations - December Theme & Photo Challenge - Stamps and Shimmer


I'll be back again soon with more festive makes, thanks for taking the time to visit :)


Sunday, 4 October 2020

Clouds and Rainbows Bookmarks

Hi there

I've been busy making more bookmarks this weekend.  This little collection I started yesterday and the first few took me a little time to make while I figured out the best way to put them together.  I then continued with a few more today and those came together a little quicker.


They all follow the same basic design, but all differ slightly in the placement of the stencilling and die cuts, have different designs on the reverse and I've added a selection of ribbons and twine.

For each I began by inking up the cloudy backgrounds using a stencil.  I then die cut the rainbow from six different pastel shades of textured paper, and put these all together in different sequences of rainbow order. I adhered the rainbow strips in different positions on the backgrounds and die cut the tall tag to create the base of each bookmark.  I then partially die cut more tags, just using the bottom half and used cloud dies to cut different variations which were then layered up on the base of each bookmark.  I die cut more tall tags from different patterned papers and adhered these to the back.  Each was finished with grosgrain ribbon and some twine.


The next three were the ones which I made today and I changed up the backgrounds by stencilling the clouds in different pastel shades, and placing the rainbows lower down to show more of the background.


Materials used:
  • Dies: MFT Die-namics - Tall Tags Duo, Stitched Rainbow; Lawn Fawn - Puffy Cloud Borders
  • Stencil: MFT - Cloud
  • Ink: Distress Ink - Tumbled Glass, Shaded Lilac, Spun Sugar
  • Coloured Cardstock: Papermania
  • Patterned Paper: DoCrafts - Designstax: Boofle
  • Accents: Grosgrain Ribbon - American Crafts; Twine - Doodlebug

Thanks so much for looking.  I'm having great fun making these bookmarks, I hope you like them.  

Related Posts Plugin for WordPress, Blogger...