Showing posts with label Papermania. Show all posts

Tuesday, 29 October 2024

Uniko October/November 2024 Release - Re-introducing...Christmas Pop

Good morning

Welcome to Day 1 of the introductions for the upcoming October/November festive release at Uniko.

Bev is re-introducing Christmas Pop, a fabulous stamp set featuring modern, triangular Christmas trees with decorative elements, which can also be used together with the Christmas Pop Trio stencil. 

I have four cards using this stamp set, and for the first one I've combined the set with a bold greeting from the Festive Sentiments stamp set...


I stamped the striped tree from the set in three bright colours, masking off the bright pink one so the other two trees appeared to be behind it.  Once the ink was dry I stamped the sentiment in black ink and then finished with three little stars from the set in the same three bright colours.

Materials used:
  • Stamps: Uniko - Christmas Pop, Festive Sentiments
  • Ink: Altenew - Rubellite, Aqualicious, Bamboo; Versafine Clair - Nocturne


And for my second card I kept it super simple, just using the solid triangular tree with embossed decorative elements...


On a die cut panel I stamped the solid triangle three times in shades of green.  Once completely dry I applied anti-static powder before stamping the decorative elements in VersaMark ink and then heat embossing in gold.  I wanted to keep this one super modern so I didn't even add the tree trunks at the base.


Materials used:
  • Stamps: Uniko - Christmas Pop
  • Ink: Altenew - Emerald, Evergreen, Galactic Stream; VersaMark
  • Embossing Powder: Wow! - Metallic Gold Rich
  • Die: Create a Smile - Cool Cuts Double Stitched Rectangles


Next up I combined an element from the set with the Christmas Pop Trio stencil and a sentiment from the second stamp set which is being re-introduced, more info tomorrow...


On a small die cut panel I stamped and heat embossed the decorative triangle pattern in white, and then blended pink and blue ink over it through one of the tree stencils.  I adhered the panel on 3D foam and added a pink star topper, before stamping the sentiment in pink.

Materials:
  • Stamp: Uniko - Christmas Pop, Pure Florals Poinsettia
  • Stencil: Uniko - Christmas Pop Trio
  • Ink: Distress Oxide - Kitsch Flamingo, Tumbled Glass
  • Die: Create a Smile - Cool Cuts Double Stitched Rectangles
  • Accents: Papermania - Sparkling Stars Assorted Pastels


And finally, I used the trees to create a modern winter scene...


I used a panel of pale blue cardstock and blended Distress Ink from the top edge in purple and pink.  I then stamped three triangle trees overlapping in shades of grey and black.  To create the snow I sprinkled chunky embossing enamel over the panel and heated it from underneath so as not to blow it off the surface.  The sentiment is from the second set being re-introduced in this release.


Materials used:
  • Stamps: Uniko - Christmas Pop, Pure Florals Poinsettia
  • Ink: Distress Ink - Dusty Concord, Kitsch Flamingo; Altenew - Pure Graphite, Industrial Diamond; Versafine Clair - Nocturne
  • Die: Altenew - Featured Sentiments
  • Accents: Stampendous - Chunky White Deep Impression Embossing Enamel


To see more projects and this stamp set in action my fellow Brand Ambassadors are sharing more makes over at the main Uniko blog, here.

This set, along with all the products being introduced this week will be available from 9am GMT on Sunday 3 November 2024. 

I'll be back tomorrow with another re-introduction so please do pop back to take a look.



Thursday, 12 January 2023

Uniko January 2023 Mini Release - Introducing...Mid Century Modern Purrfect Day & MOD Background Builder Circles Stencil

Hi there

It's Day 3 of the introductions from latest Uniko release.

Today it's all about the new Mid Century Modern Purrfect Day stamp set and the MOD Background Builder Circles stencil.


Here's my first card, a simple one layer card using the stamp set...


I began by stamping with the cat's facial features stamp and then masked the eyes before stamping the solid image of the cat so the eyes remained white.  I then used the diamond shape image and stamped it multiple times in three shades, and then used the star burst stamp from the Mid Century Modern Florals set.  I inked through one shape from the Mid Century Modern Shapes stencil and then finished by stamping the sentiment, the white part heat embossed.

Materials used:
  • Stamps: Uniko - Mid Century Modern Purrfect Day, Mid Century Modern Florals
  • Stencil: Uniko - Mid Century Modern Shapes
  • Ink: Versafine Clair - Nocturne; Altenew - Teal Cave, Autumn Blaze, Honey Drizzle; VersaMark
  • Embossing Powder: Brutus Monroe - Alabaster White


Next up I used the new MOD Background Builder Circles stencil.  I think this is my favourite of my cards for this release and although super CAS, it was quite fiddly to create, but certainly worth the effort...


I masked off a section of the main stencil and then, using quite a few bits of masking paper, inked through the various shapes, colour by colour, masking off the shapes alongside each one.  I then finished with a simple sentiment, which is from the Mid Century Modern Frames set which was introduced yesterday.

Materials used:
  • Stencil: Uniko - MOD Background Builder Circles 
  • Stamp: Uniko - Mid Century Modern Frames
  • Ink: Altenew - Desert Night, Sand Dunes, Dew Drops, Pink Diamond; Versafine Clair - Nocturne


And for my third card today I combined the two...


I began by stamping the cat silhouette and then randomly inked through various shapes of the stencil in muted colours.  I finished the card by stamping the diamond and then the star burst and sentiment from the Mid Century Modern Frames set.  The final details were a few square green gems for the cats collar.

Materials used:
  • Stamps: Uniko - Mid Century Modern Purrfect Day, Mid Century Modern Frames
  • Stencil: Uniko - MOD Background Builder Circles
  • Ink: Versafine Clair - Nocturne; Altenew - Dew Drops, Sand Dunes, Moss, Misty Moor, Orange Cream
  • Accents: Papermania - Mosaics: Emerald & Jade


There's plenty more over on the main Uniko blog, here.  Please do pop back tomorrow for the full reveal.

The new products will be available to purchase from the Uniko website tomorrow at 10am GMT.


Wednesday, 29 December 2021

Christmas Card Multiples - Solitary Twiggy Tree


Hi there

I hope you've all had a wonderful Christmas with your nearest and dearest and a well-earned break.  The approach to Christmas seems so long yet it's all over so fast isn't it?  I'm just enjoying a couple of days leave from work before returning again on Friday.  

Over the next few posts I'll be sharing the remaining Christmas cards I made this year.  

Every year I say I'll start much earlier but this year I was worse than ever, I didn't start the bulk of my Christmas makes until a week into December!  I always make my individual cards from sheets of cardstock as the quality of the card is far superior to ready-made cards, but I do have a box full of card and envelope sets I've accumulated over the years so that's what I now use when making batches of Christmas cards.

I decided I had to go super simple with my main multiples this year and I made 55 of this design all in an hour and a half one evening, and each also had a paper insert!  The MISTI was definitely my best friend here!

For the majority I used kraft card bases...


The solitary tree and the sentiment stamp were both stamped at the same time with black ink.  I just slotted one card after another into the corner of my MISTI and off I went.  I then added different colour smooth adhesive stars to the top of each tree.  And that was it!  I love the design of this tree, I think it's perfect for CAS designs.


Materials used:
  • Stamps: Woodware - Mini Tall Twiggy Tree; Clearly Besotted - Simple Script
  • Ink: Versafine Clair - Nocturne
  • Accents: Papermania Adhesive Gems - Sparling Stars Assorted Brights
  • Card bases from stash

I then had a rummage through my box of cards and envelopes and found some coloured bases, so cracked on and made more of the same design.  I love that these aren't traditional Christmas colours.

Mint bases with pink stars...


and pink bases with blue stars...


Challenge entries:

AAA Cards - Game #205 - Christmas
Happy Little Stampers - December Christmas Challenge - Anything Goes
NBUS - Challenge #33 - tree stamp is new
Sweet Stampin' - Anything Christmas
CHNC - Challenge #574 - Anything Goes Christmas


Thanks for popping by to take a look, I'll be back later with more of my Christmas makes


Sunday, 4 October 2020

Clouds and Rainbows Bookmarks

Hi there

I've been busy making more bookmarks this weekend.  This little collection I started yesterday and the first few took me a little time to make while I figured out the best way to put them together.  I then continued with a few more today and those came together a little quicker.


They all follow the same basic design, but all differ slightly in the placement of the stencilling and die cuts, have different designs on the reverse and I've added a selection of ribbons and twine.

For each I began by inking up the cloudy backgrounds using a stencil.  I then die cut the rainbow from six different pastel shades of textured paper, and put these all together in different sequences of rainbow order. I adhered the rainbow strips in different positions on the backgrounds and die cut the tall tag to create the base of each bookmark.  I then partially die cut more tags, just using the bottom half and used cloud dies to cut different variations which were then layered up on the base of each bookmark.  I die cut more tall tags from different patterned papers and adhered these to the back.  Each was finished with grosgrain ribbon and some twine.


The next three were the ones which I made today and I changed up the backgrounds by stencilling the clouds in different pastel shades, and placing the rainbows lower down to show more of the background.


Materials used:
  • Dies: MFT Die-namics - Tall Tags Duo, Stitched Rainbow; Lawn Fawn - Puffy Cloud Borders
  • Stencil: MFT - Cloud
  • Ink: Distress Ink - Tumbled Glass, Shaded Lilac, Spun Sugar
  • Coloured Cardstock: Papermania
  • Patterned Paper: DoCrafts - Designstax: Boofle
  • Accents: Grosgrain Ribbon - American Crafts; Twine - Doodlebug

Thanks so much for looking.  I'm having great fun making these bookmarks, I hope you like them.  

Saturday, 26 September 2020

Rainbow Clouds Bookmark


Yes, you've guessed it, I have another bookmark for you! lol

I went a bit crazy last weekend and couldn't stop making them :)

This one is so fun and perfect for all the rainbow themes that are so popular and relevant at the moment.

This one kind of just evolved as I was making it, I didn't have the whole design in my mind when I started it so just went with the flow.


On a piece of thin cardstock I added some adhesive and then cut and adhered strips of cardstock in rainbow order, before die cutting with the faux stitched tag die.  I also then die cut a piece of white cardstock and adhered this back to back to create a better finish on the reverse.  I wanted to add a cloud to the top, to appear from both the upper and reverse views but the cloud dies I had weren't symmetrical, so when adhered together they didn't line up.  That's where the foam came in.  I found that when die cutting foam it didn't matter which side of the die cut was uppermost, unlike the finish you get with die cut cardstock.  So I sandwiched the top of the bookmark between the two larger clouds and adhered these in place.  To finish, I adhered another single smaller cloud, adding a slim piece of double sided foam tape to secure the overhanging part.  I think this could look cute poking out of the top of a book!


Materials used:
  • Cardstock: Papermania - Textured Cardstock
  • Dies: MFT Die-namics - Tall Tag Duo, Cloud Trio; Clearly Besotted - Cloudy Days Die Collection
  • Fun Foam

Still a couple more to share, will post those very soon.

Leopard Print Bookmarks


Hi there

More bookmarks, and these were quick and easy makes.


All of these use the same animal print stencil which is the part inked in black.  The brown ink on two of the designs was added using an ink dauber.


For this traditional colourway, I cut the reverse layer from some darker brown cardstock...
Materials used:
  • Stencil: Skull and Cross Buns - Leopard Animal Print
  • Ink: Distress Ink - Black Soot, Rusty Hinge
  • Die: MFT Die-namics - Tall Tag Duo
  • Cardstock from stash
  • Accents: Ribbon - American Crafts; Twine - Hemptique

For this one, I stencilled directly onto some watercolour-effect patterned paper, and backed it with plain white cardstock...


Materials used:
  • Stencil: Skull and Cross Buns - Leopard Animal Print
  • Ink: Distress Ink - Black Soot
  • Die: MFT Die-namics - Tall Tag Duo
  • Patterned Paper: Papermania - Capsule Elements: Pigment
  • Accents: Ribbon - American Crafts; Twine - Hemptique

This one has the additional brown ink added with a dauber and the back panel is cut from the same pink cardstock...


Materials used:
  • Stencil: Skull and Cross Buns - Leopard Animal Print
  • Ink: Distress Ink - Black Soot, Rusty Hinge
  • Die: MFT Die-namics - Tall Tag Duo
  • Cardstock from stash
  • Accents: Ribbon - American Crafts; Twine - Hemptique

I hope I'm not boring you with these! lol  There are a few more individual ones still to come :)


Mermaid Bookmarks


Hi there

Back again with more bookmarks, these all have a mermaid theme.


All of these were created in the same way, the panel ink blended with Distress Oxides and then stencilled using silver pigment ink.  All were backed with the same patterned paper and have the same ribbon and twine accents.


This one used a mermaid scales stencil...
Materials used:
  • Stencil: Skull and Cross Buns - Small Mermaid Scales
  • Ink: Distress Oxide - Wilted Violet, Mermaid Lagoon, Peacock Feathers; Versa Color - Silver
  • Die: MFT Die-namics - Tall Tag Duo
  • Patterned Paper: Papermania - Capsule Elements: Pigment
  • Accents: Ribbon - American Crafts; Twine - Doodlebug

This one was splattered with water droplets as well as being stencilled...
Materials used:
  • Stencil: Funky Fossil - Mermaids
  • Ink: Distress Oxide - Wilted Violet, Mermaid Lagoon, Peacock Feathers; Versa Color - Silver
  • Die: MFT Die-namics - Tall Tag Duo
  • Patterned Paper: Papermania - Capsule Elements: Pigment
  • Accents: Ribbon - American Crafts; Twine - Doodlebug

and this one had water droplets added for interest too...
Materials used:
  • Stencil: Funky Fossil - Mermaids
  • Ink: Distress Oxide - Wilted Violet, Mermaid Lagoon, Peacock Feathers; Versa Color - Silver
  • Die: MFT Die-namics - Tall Tag Duo
  • Patterned Paper: Papermania - Capsule Elements: Pigment
  • Accents: Ribbon - American Crafts; Twine - Doodlebug


Thanks once again for taking a look.  I'll be back very soon with more, yes, I made quite a few last weekend!

Friday, 9 November 2018

Guest Designer for Honey Doo Crafts - Selection Two

Good morning

I'm back today to share more makes using the wonderful products from Honey Doo Crafts which will be showcased on Hochanda tomorrow.

Honey Doo Crafts have some absolutely stunning floral stamps, some simple outlines which are great for colouring, and others which are super detailed.

My first card today features a flower and leaves from the Cherry Blossom set, together with co-ordinating dies, and a background using the super cool Brush Strokes set...


This is one of my favourites using these products.  Directly on the card base I stamped the same brush stroke image in two different shades of dye ink to create a kind of plaid effect.  The flower and leaves were stamped and embossed in white and I used co-ordinating Distress Inks to blend the colour.  These were then die-cut with their co-ordinating dies.  The leaves were adhered flat, the flower was popped up on 3D foam and I stamped the sentiment in black, positioned to balance the design.  I finished with a single glittered enamel dot for the flower centre.

Materials used:

  • Stamps: Honey Doo - Brush Strokes, Cherry Blossom, Birthday Sentiments
  • Dies: Honey Doo - Cherry Blossom
  • Ink: Altenew - Lagoon, Sea Breeze; Versafine - Onyx Black; Distress Ink - Broken China, Peacock Feathers, Cracked Pistachio
  • Enamel dot from stash


Next up I've used another of the gorgeous floral sets called Fleur, which I've also paired with Brush Strokes for background detail...


I love grey and blush together so chose that colour palette for this one.  I started on the card base and stamped one of the brush stroke images three times to add interest to the background.  The flowers and leaves were stamped and heat embossed in white onto grey and blush cardstock and fussy cut.  These were really easy to cut out just by following the embossed edges.  Before adhering these I used the handle of a paint brush to add a slight curl to the leaves and petals, then popped some up on glue dots.  The dimension can be seen more clearly below...


The sentiment was stamped in a co-ordinating grey ink and to add some interest to the card base I created some double score lines around the edge.

Materials used:

  • Stamps: Honey Doo - Brush Strokes, Fleur, Birthday Sentiments
  • Ink: Altenew - Blush; Hero Arts - Soft Granite; VersaMark
  • Embossing Powder: Wow! - Opaque Bright White
  • Coloured Cardstock: Papermania - Midnight Blush


On this next card I used Fleur again for an autumnal theme...


I began with some kraft cardstock and stamped and heat embossed the sentiment in white.  I then used the different leaves from the set and also heat embossed these in white.  I then used coloured pencils to add the shading to the leaves.  The panel was then trimmed down with a stitched rectangle die. 


Before adhering the panel flat, I stamped the flowers in a soft neutral shade to add interest to the border of the card base.

Materials used:

  • Stamps: Honey Doo - Fleur, Birthday Sentiments
  • Ink: VersaMark; Altenew - Morning Frost
  • Embossing Powder: Wow! - Opaque Bright White
  • Die: MFT Die-namics - Wonky Stitched Rectangles
  • Coloured with Faber Castell Polychromos
  • Kraft Cardstock - Neenah - Desert Storm


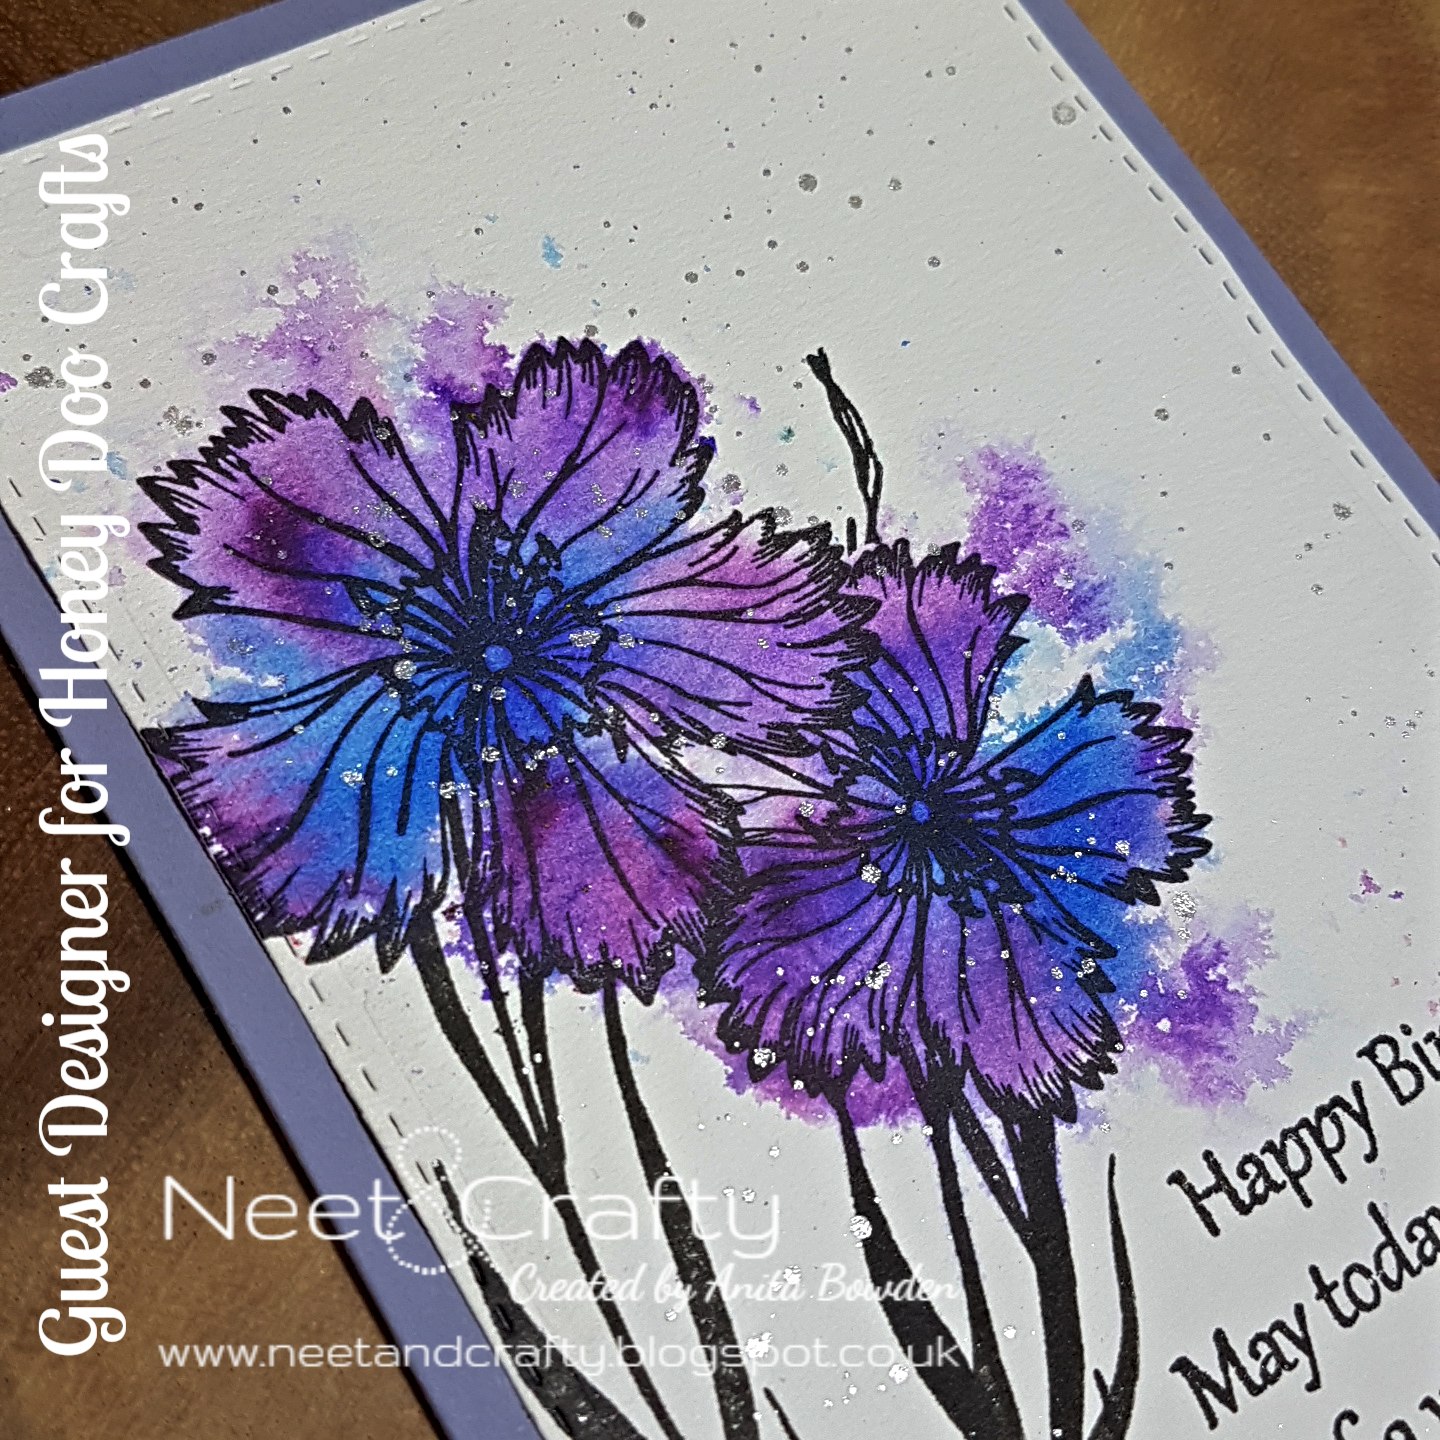
For this card I used the gorgeous Carnation set...


On a panel of watercolour cardstock I stamped the stems and the flower heads, with a little masking to place one behind the other.  Once the ink was dry I covered the majority of the card, just leaving the area of the flower heads visible, and very lightly sprinkled some Brusho crystals in two shades before spritzing with water.  I used a paint brush to manipulate some of the colour then left to dry. I then die cut the panel with a stitched rectangle and stamped the sentiment in the same black ink.


To finish, I mixed some silver mica powder with water and gently splattered my panel to add some shimmer and sparkle.  The panel was then adhered to a co-ordinating coloured card base.

Materials used:

  • Stamps: Honey Doo - Carnation, Birthday Sentiments
  • Ink: Versafine - Onyx Black; Brushos - Purple, Ultramarine
  • Die: Create a Smile - Double Stitched Rectangles
  • Mica Powder: Honey Doo - Silver Sparkle
  • Cardstock from stash


Don't forget, Honey Doo Crafts have two upcoming shows on the craft shopping channel, Hochanda (Freeview 85 / Sky 673) this coming Saturday, 10 November 2018, a 10am and 2pm GMT.


Thanks so much for popping by.  I'll be sharing more of my makes shortly.
Related Posts Plugin for WordPress, Blogger...