Showing posts with label BoBunny. Show all posts

Saturday, 18 June 2016

Less is More Week 281

Good morning, crafters!

Less is More has a great challenge for you this week.  We're back with a Theme challenge and this time the technique we would like to see on your submissions is...


Faux Bleach


I find this technique works best with Distress Inks.  These inks react so well with water and the colour lifting results can be really great.  If you don't have any Distress Inks just try what you have, you never know until you experiment!


My first card uses more stamps supplied by STAMPlorations, one of our lovely June sponsors.  Thanks again, Shery! x


On the card base I started by blending two tones of Distress Ink.  I then spritzed the butterfly stamp with water before stamping over the ink.  I held it there for a few seconds for the water to take effect and then blotted with a paper towel to remove the colour.  I then added a few splatters in coral and black to add some interest.  I die cut a white cardstock panel with a stitched landscape die to add a fun edge, stamped the sentiment in black and adhered the panel flat over the card base.

Materials used:

  • Ink: Distress Ink - Dried Marigold and Abandoned Coral; Versafine - Onyx Black
  • Stamps: STAMPlorations - Blossom Like a Butterfly
  • Die: Poppy Stamps - Stitched Landscapes

Challenge entries:

Cute Card Thursday - Challenge #430 - Little Bugs/Butterflies
CAS on Sunday - Challenge #85 - Butterflies


For my second card I used a tiny amount of selected faux bleaching...


On a panel of white cardstock I masked off the corner section with some post-it notes, hand cut with wavy edges.  The water droplets were then stamped with a waterproof black ink.  I then took a paint brush and some plain water to paint inside each water droplet and blot away the colour.  Some accents were then added with a white pen.  The sentiment was stamped in black before the panel was adhered on 3D foam.

Materials used:
  • Stamps: Inkylicious - Water Drops; BoBunny - Sentiments
  • Ink: Distress Ink - Shaded Lilac, Salty Ocean, Chipped Sapphire; Archival - Jet Black; Versafine - Onyx Black
  • Accents: Signo Uni-ball pen - white

Challenge entries:

STAMPlorations - June CAS Card Challenge - Anything Goes (Blue)
CASE this Sketch - Challenge #177 (I flipped the sketch)
Inkspirational - Challenge #111 - Masking


I used a stencil for the faux bleaching on my final card...


I blended three Distress Inks to create quite a bold inked area which I faded out across the cardstock panel.  Instead of placing the stencil down onto my project and then spritzing with water, I spritzed the stencil itself and then placed this over the inked area.  I wanted the positive design to be bleached instead of the negative design, you can get some great effects by using stencils either way. I carefully lifted the stencil and blotted away the watery ink with a paper towel to reveal the bleached design.  I trimmed the panel down slightly to trim away the dark inked edges (and a splodge I'd created from an inky finger! grrrr) and then stamped the sentiment in black before adhering the panel to the card base on 3D foam.

Materials used:

  • Ink: Distress Ink - Picked Raspberry, Wilted Violet, Blueprint Sketch; Versafine - Onyx Black
  • Stencil: MFT - Funky Florals
  • Stamp: Altenew - Label Love

Challenge entries:


Virginia's View - Challenge #22 - All About Colours
613 Avenue Create - Challenge #180 - Anything Goes (create your own challenge - A2/Birthday/Stencils)
Seize the Birthday - Anything Goes
Penny Black and More - June Challenge - Flower Power


And, just for fun I'm also going to link these up over at Happy Little Stampers, June CAS Challenge which is ghosting - no entry as I'm on the DT!


My LIM teamies will no doubt also have more inspiration on their personal blogs so if you have the time, please swing by and see what they've been creating.

Can't wait to see what you create this week :)


Saturday, 19 September 2015

Let's Get Technical!

Good morning

It's Less is More new challenge time and this week we have a theme challenge for you.  And the theme for this week is...


Technology

Please remember to keep you creations clean and simple.


Not only did I struggle with the theme this week, my creative mojo decided to go for a wander to who knows where!  I did manage to create three cards to share with you though, so here they are...


I stamped the phone in pink and die cut with the co-ordinating die.  The rest of the images were stamped separately in various inks and the headphones onto a white cardstock panel.  I rounded the bottom corners of the card base and the panel to echo the shape of the phone, adhered the phone flat to the panel, and the panel was popped up on 3D foam


Materials used:

  • Stamps: Clearly Besotted - Text Me (and co-ordinating die set)
  • Ink: Versa Color - Opera Pink, Canary, Heliotrope, Turquoise, Sky Gray; Versafine - Onyx Black
  • Tools: Tonic Corner Rounder


Challenge entries:

Seize the Birthday - Anything Goes
CAS-ual Fridays - Challenge #143 - Musical


I had the idea for this next card in my mind for a while after I saw the challenge theme.  It took three attempts for me to be able to actually translate it onto a card!


I masked off the V shape with post-its and the curves of the Wi-Fi logo were created using a straight stripe stamp which I manipulated into a curve. The three curves were embossed in platinum embossing powder.  Because I used a textured cardstock the embossing was a little uneven but I actually like the effect it created.  Instead of the usual dot at the bottom of the logo I changed this for a heart and this was also heat embossed.  The coloured cardstock was cut with a stitched rectangle and the computer generated sentiment (font - Frosting for Breakfast) was cut with a tag die.  As I changed the dot for a heart I thought this sentiment could perhaps be used for a Valentine's card, maybe?  A few glazed gems were added to accent.

Materials used:

  • Stamps: Clearly Besotted - Basic Stripes; Stampin' Up - Work of Art
  • Dies: MFT Die-namics - Stitched Rectangles; Clearly Besotted - Tag Along
  • Cardstock: Bazzill Basics
  • Accents: Papermania - Glazed Gems


Challenge entries:

Just Add Ink - Challenge #280 - Glimmer


And my third card this week...


I found this cute digi image at Sliekje's Digi Stamps.  The images created by Angelique are gorgeous and have a sketchy feel so I printed this one off and coloured it in, very sketchy, using my Derwent Coloursoft Pencils.  I added a sentiment stamped in black and then cut the image down and framed it on two sides with black cardstock.  I then layered this up with some patterned paper which was cut using some fishtail dies.


Materials used:

  • Digi Stamp: Sliekje's Digi Stamps
  • Stamp: BoBunny - Sentiments
  • Ink: Versafine - Onyx Black
  • Coloured with Derwent Coloursoft Pencils
  • Patterned Paper: Lawn Fawn - Let's Polka
  • Dies: MFT Die-namics - Fishtail Flag Stax


Challenge entry:

Papertake Weekly Challenge - Animal Magic


Technology is all around us these days so there should be plenty of ideas to give you some inspiration.  And my LIMette teamies also have some great inspiration for you so if you have the time, please pop by their personal blogs.

That's all from me at the moment, have a fab weekend.


Thursday, 6 November 2014

Masculine Abstract Happy Birthday

Good morning

Today I'd like to share a masculine project, this is the card I made for Matt for his birthday yesterday.

I used a new stamp set by Inkylicious that I bought at a craft fair last month for part of this design, and I think it's a great option for a masculine card, something I always struggle to create.


I got my inspiration for this card a while ago when I spotted a similar design on Pinterest.  On a white panel I stamped the three brush stroke designs in different colours.  Then in charcoal ink I stamped the sentiment and the stripes.  This panel was then matted and layered first onto tan textured cardstock and then navy before adhering flat to the card base.  As this card was for my chap, I punched out a little heart, coloured this with a pale blue ProMarker and then adhered alongside the sentiment before accenting with Wink of Stella.

Materials used:

  • Stamps: Inkylicious - Brush Strokes; Stampin' Up - Gorgeous Grunge; BoBunny - Sentiments
  • Ink: Versa Color - Sand Beige, Atlantic, Sky Gray, Charcoal
  • Die: Lawn Fawn - heart dies
  • Cardstock: Papermania - Premium Textured Cardstock; white card from stash
  • Other: Wink of Stella; ProMarker - Powder Blue

Challenge entries:

Brown Sugar - Challenge #118 - Anything Goes
Crafty Catz - Challenge #253 - Anything Goes
613 Avenue Create - Challenge #96 - Anything Goes
Loves Rubberstamps - Challenge #125 - Anything Goes


Thanks for popping by today.  As we're off work for a couple of days me and the man are going out for breakfast today and then I want to go to one of our fairly local garden centres, they always have such lovely Christmas displays and of course, a craft section!  I'm not sure Matt will be impressed but he can make himself useful...holding my shopping basket while I fill it with pretty things! haha

Have a lovely day x


Sunday, 4 May 2014

'Out of My Comfort Zone' Grunge!

Hi guys

I woke up super early this morning so decided to get up and do a bit of crafting.

I've been wanting to have a go at the latest challenge at Addicted to CAS which is 'Grunge'.  I have a few grungy style stamps but have never made a card in that style.  So I gathered some stamps together and put my thinking cap on.

I also had a look through some other current challenges and decided to use the colours from the May Colour Challenge at Daring Cardmakers as I thought this palette would work quite well for this style of card.

For my first attempt at grunge I kept my card to one layer...


This was so easy! Six different stamps in six different inks!  I'm a bit disappointed in myself that I lined up the 'Thank You' along the horizonal lines but being a 'liner-upper' this obviously came naturally to me!  :D

Materials used:

  • Stamps: Kaisercraft - Grid; Stampin' Up - Gorgeous Grunge; Inkadinkado - Circle and Dots; BoBunny - Sentiments
  • Ink: Versa Color - Bisque, Umber, Topaz, Cyan, Lapislazuli; Memento - New Sprout

Here is the colour palette, I chose inks as close as possible from my stash.


I hope to be back with more to share later today or tomorrow.  I am going to Cornwall for a few days later in the week so want to share a bit more before I go.

Have a lovely Sunday whatever you're up to today.


Sunday, 10 November 2013

One Layer Thank You

Hi guys

After a lazy morning followed by cooking the Sunday roast I decided to spend some time crafting this afternoon.

There are three current challenges I've spotted today, all requesting One Layer Cards:

Less is More - One Layer Card: Thank you
CAS on Sunday - One Layer Wonder
My Time to Craft - One Layer or Less

*Update - thanks to Nancy I'm also entering this card into the technique challenge at Just Us Girls which is to create a background of words :)

I decided to have a go at creating a word background.  Only yesterday I watched a video tutorial by the awesome Jennifer McGuire and had this technique in mind when I created my card.  Jennifer is a-ma-zing, its well worth a visit to her blog if you haven't yet discovered her talents.


I raided my clear stamp stash and grabbed any 'thank you' stamps I could find and then used a square die as my guide and organised the stamps upside down within the square.  This is a lot more difficult than it looks!  Once sorted I transferred them onto my stamp press to keep the stamps in position.

I then used my square die with my embossing mat to create an embossed square on my card base, without cutting through.  I then stamped the various thank you images in four different ink colours.

I'm not entirely happy with the layout but not bad for a first attempt!  With so many different fonts, some having scroll details, it was quite a task to find a layout that worked so what looks like a simple card actually took a while to create.

Materials used:
  • Stamps: Clearly Besotted Stamps - Butterfly Wishes, Butterfly Wishes Additions, Honecomb; Woodware - Salutations; BoBunny - Sentiments Stamp; Marion Emberson Designs - It's all in the Words; Penny Black - Salutations; Wild Rose Studio - Everyday Greetings; Hot Off The Press (name of set unknown)
  • Ink: Versa Color - Magenta, Turquoise, Violet and Split Pea
  • Die: Xcut - Nested Squares

I think I need a few more attempts at this technique but I'm really happy with the embossed square frame, great for adding interest to one layer cards.

Thanks for popping by and I hope to see you again very soon.


Saturday, 19 October 2013

Sketch Saturday #281 - Guest Designer!

Hi guys

It's Saturday morning so that means it's time for a fresh sketch at Sketch Saturday

I'm loving my October Guest Designer role and really enjoyed making my card based on this week's great new sketch.

Before I share my card with you I just wanted to remind you that there is still plenty of time to link up at the Sketch Saturday blog for a chance to win their Thank You Candy.  To celebrate their 2000 followers milestone they are offering loads of fab prizes and all you have to do is become a follower, add your details to the Linky and spread the word.  The deadline is 31 October.

So back to this week's sketch...


And here's my card...


I'm disappointed with the colour of these photographs.  Whenever I take photos of purple tones they always seem to come out very blue.
 
I recently purchased a Stampin' Up stamp set from eBay and tried the 2-step stamping technique for the first time and gave my Stamp-a-ma-jig its first outing.  I stamped the first image by colouring onto the stamp with some markers in lilac and green.  I then used my Stamp-a-ma-jig to line up the second stamp which I coloured with a darker purple marker.  This was then die cut with a circle die. 
 
I layered up the base card with two shades of purple/lilac cardstock and then cut the green cardstock to size before running it through my Big Shot in an embossing folder.  I stamped the sentiment and popped up the circular image on 3D foam for some dimension.
 
Materials used:
  • Stamps: Stampin' Up - Simply Soft (Hostess set); BoBunny - Sentiments Stamp
  • Ink: Whispers Strokes; Versa Color - Imperial Blue
  • Die: Xcut - Nested Circles
  • Embossing Folder: Craft Concepts - Cherry Blossoms
  • Cardstock: Bazzill Basics Premium Cardstock; Stampin' Up - Lucky Limeade and Wisteria Wonder
 
So, why not join in the challenge this week, I'd love to see what creations you come up with.
 
Sorry for being a bit quiet on the blog this week, I've had a busy week with no time for crafting but I've got the weekend to myself at home so hopefully I'll have more cards to share shortly.
 
See you soon


Sunday, 23 June 2013

Less is More Week 125 - Happy Birthday

Morning lovelies

I woke up really early this morning and no matter how hard I tried I just couldn't get back to sleep so I ended up getting up and got stuck in to some more crafting.

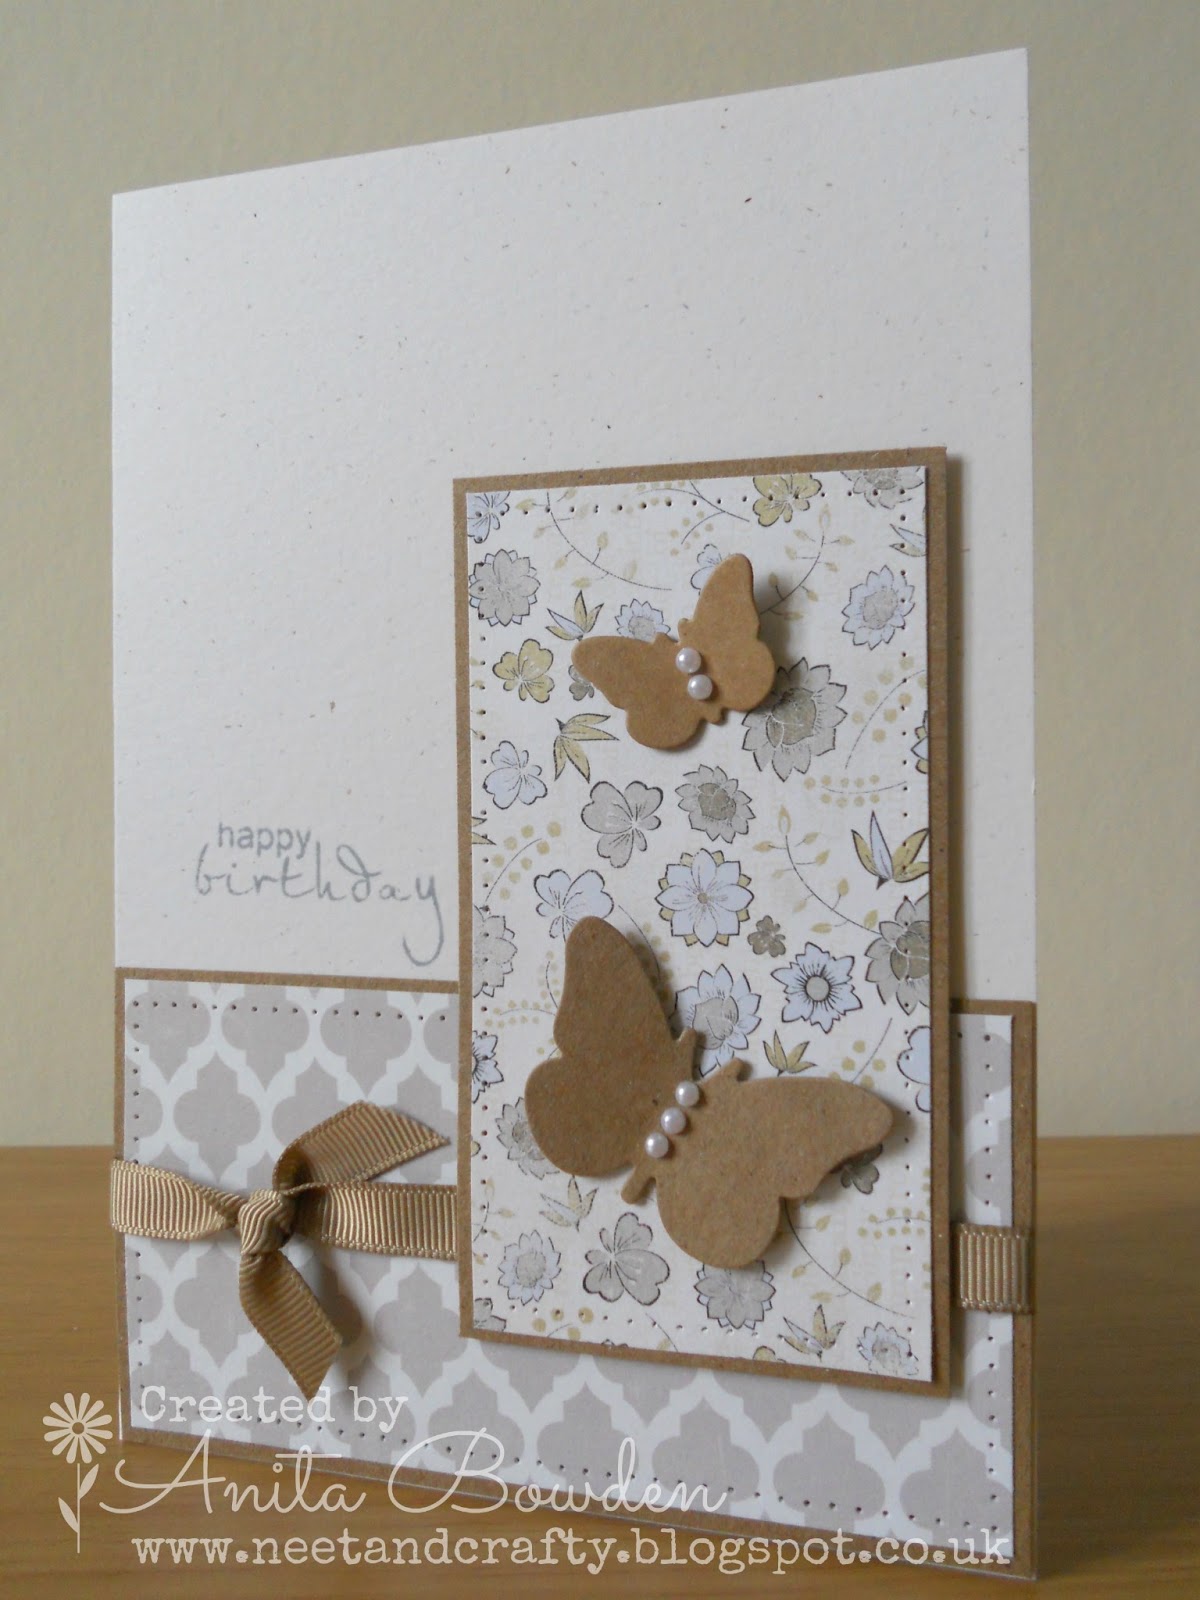
It's Jen Nelson's birthday so the challenge at Less is More this week is to make a card that Jen would like.

'Happy Birthday, Jen, I hope you had a lovely time celebrating in Istanbul' :) xx

I tried to create something in a 'Jen Stylie' and here's what I came up with...


I recently purchased a paper pad by Fancy Pants and I love these designs, aren't they gorgeous, so I knew I wanted to use these for this card and I also chose a natural card base.  Jen loves butterflies so I incorporated these as well as a bit of matting and layering and, instead of stitching, which Jen loves to do (I don't have a sewing machine to hand), I edged my mats with some paper piercing. 

I love these neutrals combined with the kraft, I think this paper pad will be making lots more appearances!

Happy Birthday, Jen, I hope you like it! :)

Materials used:
  • Design Paper: Fancy Pants Designs - Country Boutique
  • Card Base: From stash
  • Cardstock: Papermania - Kraftstax
  • Stamp: BoBunny - Sentiments Stamp set
  • Ink: Memento - London Fog
  • Ribbon: American Crafts - Premium Grosgrain
  • Pearls: Hobbycraft - 3mm White Pearl Gem Stones
  • Tools: Stampin' Up - Paper Piercing Kit

That's all for now folks, thanks for popping by and see you very soon :)

Related Posts Plugin for WordPress, Blogger...