Showing posts with label Layered Emboss Resist. Show all posts

Thursday, 31 August 2023

Uniko Brand Ambassador Inspiration - Fantastic Foliage


Good morning

I'm over on the Uniko blog, here, today with some Brand Ambassador Inspiration and I have two cards for you, both using different Uniko foliage sets, Framed - Floral Vines and the Large Background Sketched Foliage stamp.

You can find full details of how these were made over on the Uniko blog post.

Card 1...


Materials used:

  • Stamps: Uniko - Framed - Floral Vines, Birthday Wishes
  • Ink: Distress Ink - Antique Linen (initial stamping prior to embossing); VersaMark; Versafine Clair - Nocturne
  • Coloured with Copic Markers
  • Embossing Powder: Wow! - Opaque Bright White
  • Cardstock from stash


Card 2...


Materials used:
  • Stamps: Uniko - Large Background Sketched Foliage, Simply Said
  • Ink: Distress Oxide - Twisted Citron, Mowed Lawn, Rustic Wilderness, VersaMark; Versafine Clair - Nocturne
  • Embossing Powder: Wow! - Clear Gloss
  • Die: Create a Smile - Cool Cuts Double Stitched Rectangles


Thanks for popping by today.  I have a little time off work next week so I may be back sooner with more inspiration for you.


Wednesday, 23 February 2022

Uniko February 2022 Release - Introducing...Background Blocks Cogs, Background Blocks Splatters and Everyday Sentiments

Hi there

Welcome to the first of the introductions for Uniko's 10th Birthday Release. 

I'll get straight to it, I'm sure you'd rather see the products in action than have me waffling on!  And don't forget to pop on over to the Uniko blog where you will find more inspiration from the rest of the team too.

First up is the new Background Blocks Cogs stamp and I've used a sentiment from the new Everyday Sentiments set...


Masculine cards are the kind I find most difficult so I had to have a think and plan this one out.  I decided on layered emboss resist.  I've only used this technique a handful of times but the effects are great.  I masked off a central rectangle and then blended with a few earthy tones of Distress Ink.  After making sure the ink was completely dry and adding some anti-static powder, I stamped the cogs image with VersaMark ink,removed the masks and heat embossed in clear.  I replaced the masks and then blended over the entire background with a darker shade, which then reveals the previous ink colours trapped underneath the embossing.  The sentiment was stamped in a brown shade below.


Materials used:
  • Stamps: Uniko - Background Blocks Cogs, Everyday Sentiments
  • Ink: Distress Ink - Pumice Stone, Rusty Hinge, Brushed Corduroy, Frayed Burlap; VersaMark; Altenew - Moon Rock
  • Embossing Powder: Wow! - Clear Gloss
  • Die: Create a Smile - Cool Cuts Double Stitched Rectangles


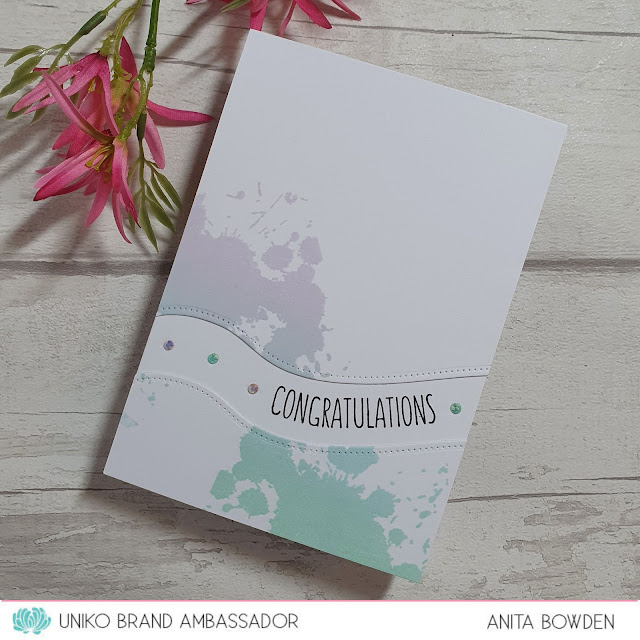
And for my second make I used the new Background Blocks Splatters stamp and another from Everyday Sentiments...


I began with a panel the same size as my card base and stamped the image twice, once with lilac fading into blue ink, and again with blue fading into green ink, to create a continuous flow of colour.  I then used a border die to cut a section away.  The two panels were then adhered to the card base and the sentiment stamped between, curved slightly to follow the shape of the die cuts.


Materials used:
  • Stamps: Uniko - Background Blocks Splatters, Everyday Sentiments
  • Ink: Altenew - Soft Lilac, Sea Glass, Mountain Mist; Versafine Clair - Nocturne
  • Die: Avery Elle - Dotted Border Dies
  • Accents: Little Things from Lucy's Cards - Jewels: Shimmering Pool Mix and Grape Mix


Thanks so much for stopping by today.  I'll be back tomorrow morning to share more makes using more products from this new release.

(AD - some products kindly gifted for Design Team purposes)


Thursday, 8 November 2018

Guest Designer for Honey Doo Crafts - Selection One

Hi guys

I'm super excited to announce that I've been invited to be a Guest Designer for Honey Doo Crafts!


They have two upcoming shows on the craft shopping channel, Hochanda (Freeview 85 / Sky 673) this coming Saturday, 10 November 2018, a 10am and 2pm GMT.

I've been lucky enough to have a play and create some samples with the wonderful products which will be showcased on the shows and will be sharing these makes in my next few post.


So, without further ado, here are my first few samples, these using some of the great Honey Doo stencils.

First up, Floral Display...


I absolutely adore how this card turned out, using the shifted stencilling technique.  When trying this technique previously, I added white ink first and then colour, but on this one I switched it around and LOVE this effect.  So I placed the stencil onto some kraft cardstock and blended through with two shades of Distress Oxide ink.  I then cleaned off the stencil, shifted it slightly and then used a dauber to add the white pigment ink.  Next I die cut the kraft panel with a stitched die.  I masked off part of a sentiment, stamped and embossed it in white onto a strip of vellum and wrapped it around the panel.  The panel was then popped up on fun foam.


Materials used:

  • Stencil: Honey Doo - Floral Display
  • Ink: Distress Oxide - Wilted Violet, Mermaid Lagoon; Hero Arts - Unicorn; VersaMark
  • Die: Create a Smile - Double Stitched Rectangles
  • Stamp: Honey Doo - Birthday Sentiments
  • Embossing Powder: Wow! - Opaque Bright White
  • Vellum and Cardstock from stash


For this next card I've done some layered emboss resist using the Cogs stencil, great for the guys...


This technique is quite time consuming as you need to ensure your panel is dry between each layer, otherwise the embossing powder will stick where you don't want it.  I started with a kraft panel and used VersaMark ink through a few areas of the stencil and heat embossed in clear gloss.  I then inked over the whole panel with Distress Ink, let it dry, used anti-static powder and then repeated the process with a few more cogs.  I then blended over with a slightly darker shade, and so on with three colours.  You need to start with the lightest shade and work your way to the darkest shade for this technique.


The sentiment was heat embossed onto vellum which I die cut with a decorative mat die and then affixed to the panel with tiny silver brads.  The panel was then adhered to the base with 3D foam strips.

Materials used:

  • Stencil: Honey Doo - Cogs
  • Ink: VersaMark; Distress Ink - Pumice Stone, Brushed Corduroy, Ground Espresso
  • Embossing Powder: Wow! - Clear Gloss, Platinum
  • Stamp: Honey Doo - Birthday Sentiments
  • Die: Clearly Besotted - Frame Mat Die
  • Brads and Cardstock and Vellum from stash


For the following card I used the ghosting technique with the Floral Display stencil...


On a white cardstock panel I blended Distress Oxide inks, placed the stencil over the top, spritzed with water and then blotted away the colour.  I die cut the panel, first with a stitched square and then with an angled border die.  I adhered a vellum die cut butterfly and added some white Nuvo drops.  The sentiment was stamped in the corner of the card base to finish.

Materials used:

  • Stencil: Honey Doo - Floral Display
  • Ink: Distress Oxide - Squeezed Lemonade, Spiced Marmalade, Abandoned Coral; Versafine - Onyx Black
  • Stamp: Honey Doo - Birthday Sentiments
  • Dies: Clearly Besotted - Butterfly Duo Die Collection; MFT Die-namics - Stitched Basic Edges; Create a Smile - Double Stitched Rectangles
  • Accents: Nuvo Drops - Simply White


Last card for this post, this one using the Mosaic stencil and one of the stamp sets being featured, Cherry Blossom...


I began by stamping and masking the flowers and leaves, then with the masks still in place I inked through the stencil with two shades of Distress Ink.  I removed the stencil and spritzed the panel to create some water splatters then removed the masks from the flowers.  Ensuring that the panel was dry I then stamped the sentiment in black and added some subtle colour to the centres of the flowers.  I really like leaving images mainly uncoloured and adding colour to the background.  I have previously used this technique on some cards which you can find here and here.

Materials used:

  • Stamps: Honey Doo - Cherry Blossom and Birthday Sentiments
  • Stencil: Honey Doo - Mosaic
  • Ink: Versafine - Onyx Black; Distress Ink - Victorian Velvet, Worn Lipstick


I hope you like my samples so far.  If you have time, please do pop back tomorrow when I'll be sharing more of the stamps being featured on Saturday's shows.


Monday, 2 October 2017

Muse Challenge #236 - Autumnal Thank You

Hi there

We're at the start of another month which means I'm your designer over at Muse.  As autumn has now taken hold here in the UK I thought I would create a card with a seasonal feel.

My card designs are predominantly CAS but every now and then I want to stretch myself and play around with more in depth techniques which is what I've done here, although the layout is still pretty clean and simple.  The idea at Muse is to take the designer's project and use it as inspiration for your own design.  You can use the layout, theme, colours, technique, etc.  Hopefully with this one there are lots of elements to inspire you.


For my main background panel I created the leaf pattern using layered emboss resist.  So I started with a piece of cream cardstock and stamped the first four images (the lightest images) using VersaMark ink before heat embossing  in clear.  I then blended over the whole background with Scattered Straw Distress Ink, revealing the first leaves.  This is quite a lengthy process as you have to ensure every ink layer is dry before proceeding to the next.  So I zapped the panel with my heat gun and then used anti-static powder to ensure it was ready to go again.  I stamped and clear heat embossed the next few images, trapping the Scattered Straw Ink underneath, before blending the next layer with orange and green.  I then repeated the process again, preserving the orange and green, and then finished with the brown tone.  This technique does take some time but you can get some really interesting results. 

I added some water splats to the panel, cut it down and then mounted it onto some copper cardstock.  I used the same copper cardstock to die cut the 'thank you' which I intended to adhere directly to the panel but it was getting a little lost in the background so I wrapped a strip of vellum around the panel and adhered the die cuts on this, and the leaf design still shows through.  The panel was then adhered flat to a cream card base.

Materials used:

  • Stamps: Altenew - Freeform Greenery
  • Ink: VersaMark; Distress Ink - Scattered Straw, Spiced Marmalade, Peeled Paint, Frayed Burlap
  • Embossing Powder: Wow! - Clear Gloss
  • Dies: MFT Die-namics - Twice the Thanks
  • Vellum and copper cardstock from stash

Challenge entries:

Penny Black and More - October Challenge - Close to Nature
Stamping Sensations - October Challenge - Autumn Glory
Uniko - Challenge #43 - Autumn/Fall


Thanks so much for stopping by today, and I'd love to see your creations in the Muse gallery this week. I'll be back this evening to share the next CAS challenge over at Happy Little Stampers.

Monday, 13 June 2016

Muse #170 - Let Your Dreams Take Flight

Hi there

I'm delighted to be your designer over at Muse this week and hope that my card will inspire you to play along.

I chose some Distress Ink colours I've not used before and decided to make a background using the layered emboss resist technique. There are a few steps involved with this technique but you can get some great results.  So I hope the colours, design, technique or perhaps layout will give you some inspiration to create and link up this week.


I started with a panel of white cardstock, stamped some butterflies in VersaMark and heat embossed in clear powder.  I then blended over the entire panel with Distress Ink in Tattered Rose, resisting the original butterflies which popped out in white.  I then made sure the ink was completely dry with a little help from my heat gun, and free of static by using an EK Success powder tool before stamping more butterflies, again embossed with clear powder.  I then blended over the entire panel once more, this time with Distress Ink in Victorian Velvet, making the pink/peach butterflies pop up from the background.  Finally, after making sure the ink was dry and free of static I stamped the final layer of butterflies and heat embossed in clear.  These give a tone on tone effect over the final background colour.  The panel was then cut down slightly and matted onto some peachy cardstock and a sentiment strip was made from the same cardstock, with the sentiment embossed in white.

I liked the glossy butterflies here but I've also seen tutorials of this technique where, at the end you can remove the gloss of the embossing by using the 'ironing off' technique.  I've not yet tried this but as I understand it you place your embossed panel face up on a cloth or towel, cover with some paper and then iron over it, and the embossing powder transfers to the paper leaving your project with a matt finish.

Materials used:

  • Stamps: Honey Doo Crafts - Beautiful Butterflies; Clearly Besotted - Flutterby Dreams
  • Ink: VersaMark; Distress Ink - Tattered Rose and Victorian Velvet
  • Embossing Powder: Rubber Stampede - Clear; Wow! - Opaque Bright White
  • Coloured Cardstock: Papermania Solid Cardstock

Thanks so much for visiting today, I hope I've inspired you to play along at Muse this week.


Related Posts Plugin for WordPress, Blogger...