Showing posts with label Brutus Monroe. Show all posts

Thursday, 26 February 2026

Uniko 14th Birthday February 2026 Release - Introducing...Background Blocks My Favourite Colour is Rainbow

Hi there

I have another introduction from the upcoming Uniko release for you.

Today the team are showcasing another new Background Blocks addition...Background Blocks My Favourite Colour is Rainbow.

I kept this one super simple...


I simply stamped and heat embossed the sentiment and images from the stamp set and heat embossed in white, before letting the emboss resist technique do its magic, blending four shades of Distress Oxide to create the six rainbow shades.

Materials used:
  • Stamps: Uniko - Backgound Blocks - My Favourite Colour is Rainbow
  • Ink: VersaMark; Distress Oxide - Squeezed Lemonade, Tumbled Glass, Kitsch Flamingo, Festive Berries
  • Embossing Powder: Brutus Monroe - Alabaster


The team are sharing lots of products showcasing this new stamp set today, which you can find over on the Uniko blog, here.  I'll be back tomorrow to introduce the final stencil set of this release.

All the new products will be available from Saturday 28 February 2026 at 9am GMT.

Thanks so much for visiting today.


Thursday, 16 October 2025

CASE Me a Christmas Card with Michelle Lupton

Hi there

My lovely crafty friend from across the pond, Michelle Lupton has invited me to join her once again in her CASE Me a Christmas Card Series.  I'm so happy to be part of Michelle's series again.


CASE can either stand for 'Copy and Share Everything' or 'Copy and Selectively Edit'.  This year, the series features ten creative hops in October - two on YouTube and eight on Instagram - where we’ll CASE cards from fellow crafters.


So, to join us, make your own unique Christmas card inspired by someone in the hop, upload it via Inlinkz on @michelle_lupton ’s blog (link in Michelle’s IG profile), and you could even snag a prize from one of our awesome sponsors. Just look at this line up...


Or leave a comment on the stops on the hop (either on IG or on YT)! It's all about sharing ideas, connecting with other cardmakers, and sparking your creativity for the holidays!

I was inspired by Beth Opel, here's her gorgeous card...


I was inspired by the monochrome design, the embossed background with the white accents and the bows.

And here is my festive take, using Beth's card as the inspiration...


Beth embossed her background using pink cardstock and used white ink to highlight the raised elements. I started with white cardstock and inked up the background part of this festive embossing folder with dark green ink, thereby leaving the raised parts white. I too added a white sentiment on a die cut coloured background, mine being on a tag which I ink blended to match the background. And I added a white die cut bow cut from white glitter cardstock.


Materials used:

  • Embossing folder: Spellbinders - 3D Pine Cones & Berries
  • Ink: Altenew - Evergreen; VersaMark
  • Embossing Powder: Brutus Monroe - Alabaster
  • Dies: The Greetery - Fit to be Tied; MFT Die-namics - Stitched Traditional Tag Stax
  • Stamp: Clearly Besotted - Eat Drink Be Merry


The full list of my fellow crafters on this particular Instagram hop is as follows:
@michelle_lupton
@pocono.pam
@little.finn.crafts
@tinstar05
@craftyneet - THIS IS ME
@bopels
@hannelie.bester
@joy_in_a_jar
@thealtcardmaker

Thank you so much for taking a look and thank you once again to Michelle for inviting me to take part.  
CASEing cards is a great way to craft if you need a creative nudge, just remember to give credit to the original designer.



Saturday, 9 August 2025

Uniko August 2025 Release - Introducing...Stencils Layering Retro Stripes and Ink & Flip Mid Century Leaves

Happy Saturday

It's the final day of the Uniko August Release introductions.  The entire release will be revealed tomorrow at 9am BST and will then be available to purchase via the Uniko online store.

We're showcasing stencils today...Layering Retro Stripes which is a five stencil set, and Ink & Flip Mid Century Leaves.  Both of these products have a retro vibe, like the rest of this release.  I think you'll agree that Bev's design skills have been amazing with these new products.

I'll start with the leaves...


Now, I didn't actually flip the stencil when making this card.  There are so many ways you can use it.  Firstly I inked up the beige and green leaves then, instead of flipping it, I cleaned the stencil and just moved it so that the leaves were below the ones I had just inked.  I then inked up the teal and orange leaves.  I then grabbed an image from the Mid Century Modern Florals set and stamped those in grey.  A greeting from the Bauhaus Blocks set, embossed in white on a black die cut strip finished the card.

Materials used:
  • Stencils: Uniko - Ink & Flip Mid Century Leaves
  • Stamps: Uniko - Mid Century Modern Florals, Bauhaus Blocks
  • Ink: Altenew - Sand Dunes, Teal Cave, Autumn Blaze, Forest Glades; Versafine Claire - Morning Mist; VersaMark
  • Embossing Powder: Brutus Monroe - Alabaster
  • Die: MFT Die-namics - Stitched Sentiment Strips


Now for the fabulous retro stripes, and I paired these with a greeting from the Mid Century Modern Everyday Sentiments set...


I decided for this I wanted the sets of stripes in different coloured gradients.  These stencils are super easy to line up but I had to mask sections to do the different colours on each stencil.  My Altenew inks are in sets of four so I had to try to find a fifth colour that would work, I think I've done ok here.  The two lightest blues look the same here but the inner colour is a touch lighter so I think it works ok.  I trimmed the panel down slightly and mounted it onto a frame in creamy beige.

Materials used:
  • Stencils: Uniko - Layering Retro Stripes
  • Stamp: Uniko - Mid Century Modern Everyday Sentiments
  • Ink: Altenew - Dark Night, Nimbus, Cloudy Sky, Misty Morning, Polar Bear, Marigold, Snapdragon, Chamomile, Sunray, Buttercream; Versafine Clair - Nocturne
  • Cardstock from stash


Aren't these fab?!  You can see how the other Brand Ambassadors have used these stencils if you check out the Uniko blog, here.  I'll be back tomorrow with a reveal of the full release.

Thank for visiting, as always x


Friday, 8 August 2025

Uniko August 2025 Release - Introducing...Background Blocks Swiss Dots

Good morning

More from Uniko this morning and it's the introduction of a stamp which I think will be super useful in any crafter's stash - Background Blocks Swiss Dots.

I have two cards for you today, one using the stamp as a background and another using it as the main focal point.

Here's the first and I've used it with the floral image from Pure Florals Cosmos and a greeting from Organic Blooms...


I began by stamping the Cosmos on a white cardstock panel and colouring with Copics.  I then masked the image before stamping the background dots in a gradient of three shades of aqua/teal.  I then stamped the greeting in black ink before matting and layering onto some co-ordinating lilac cardstock, flat to the card base.

Materials used:

  • Stamps: Uniko - Background Blocks Swiss Dots, Pure Florals Cosmos, Organic Blooms
  • Ink: Memento - Tuxedo Black; Altenew - Dew Drops, Aqualicious, Teal Cave; Versafine Clair - Nocturne
  • Coloured with Copics
  • Cardstock from stash


For my second card I made the dots the focus and added a sentiment from the Simply Said Blocks II set...


On a die cut panel I started by stamping and heat embossing the dots in white.  I then masked around the rectangle and ink blended with three shades of Distress Oxides, the dots resisting the ink.  I then wiped over the design with a soft cloth to remove any excess ink on the dots.  The panel was adhered flat to the card base and I then stamped and cut out the sentiment and finished with some co-ordinating enamel dots.

Materials used:
  • Stamps: Uniko - Background Blocks Swiss Dots; Simply Said Blocks II
  • Ink: VersaMark; Distress Oxide - Kitsch Flamingo, Tumbled Glass, Cracked Pistachio; Versafine Clair - Nocturne
  • Embossing Powder: Brutus Monroe - Alabaster
  • Die: Create a Smile - Cool Cuts Double Stitched Rectangles
  • Accents: Doodlebug Sprinkles - Limeade, Blue Jean and Bubblegum Assortments


To see more projects using this versatile stamp, pop on over to the Uniko blog, here.  I'll be back tomorrow to introduce the final two products included in this release.

All the new products will be available from this coming Sunday, 10 August 2025 at 9am BST.

I hope you're enjoying these showcases and would love you to pop back tomorrow.


Sunday, 27 July 2025

Uniko Christmas in July 2025 - Introducing...Background Blocks Merry Christmas Scramble

Hi there

Back for day two of the new release introductions from Uniko and today it's a fun new addition to the Background Blocks collection...Background Blocks Merry Christmas Scramble.

Here's my first card and I chose the emboss resist technique...


I began by inking up the image in VersaMark and then heat embossing in white.  I then ink blended the background using three shades of Distress Oxide ink to create a frosty vibe.  To add a snowy feel I splattered with some water droplets and then blotted with a paper towel which lifted away the colour.  I used a stitched rectangle to die cut from the inked panel and then adhered this flat to my card base.


Materials used:
  • Stamp: Uniko - Background Blocks Merry Christmas Scramble
  • Ink: VersaMark; Distress Oxide - Salvaged Patina, Peacock Feathers, Mermaid Lagoon
  • Embossing Powder: Brutus Monroe - Alabaster White
  • Die: Create a Smile - Cool Cuts Double Stitched Rectangles


And now my second card, I embossed it again but this time in gold...


I stamped and heat embossed the image in gold in the top left corner of my card base.  I then ink blended down from the corner using two shades of Distress Ink, fading it out.  I'm not entirely happy with this one.  I ran out of my white cardstock and couldn't find the same brand again.  This new pack I bought is a lovely weight but obviously not as smooth as you can see from the ink blending.  It's great when using Oxides but not such a great result with dye inks.  I'll have to continue my hunt for A4 cardstock which is great for ink blending and Copic colouring!


Materials used:
  • Stamp: Uniko - Background Blocks Merry Christmas Scramble
  • Ink: VersaMark; Distress Ink - Candied Apple, Aged Mahogany
  • Embossing Powder: Wow! - Metallic Gold Rich


Don't forget to check out the Uniko blog, here where my fellow Brand Ambassadors are sharing their fabulous makes.  You'll find so much more inspiration there.  I'll be back tomorrow to introduce more from the release - in fact it's two new products tomorrow!

All the new products will be available from Thursday 31 July 2025.

Thanks for visiting.


Friday, 25 April 2025

Uniko April 2025 Release - Introducing...Originally Organic Flower Garden

Hi there

Continuing with the new introductions from Uniko.

Today we are introducing a new addition to the Originally Organic series...Originally Organic Flower Garden.  It works brilliantly with the existing products in the range too.

Here's my first card using one of the main images from the set...


I chose to stamp and heat emboss the image in white on some watercolour cardstock and then watercoloured the image using my Derwent Inktense pencils.  I die cut a stitched panel, stamped a sentiment, which is also from the set, and adhered onto a pink card base.


Materials used:
  • Stamps: Uniko - Originally Organic Flower Garden
  • Ink: VersaMark; Versafine Clair - Nocturne
  • Embossing Powder: Brutus Monroe - Alabaster White
  • Watercoloured with Derwent Inktense pencils
  • Die: Create a Smile - Cool Cuts Double Stitched Rectangles


And my second card I used other images from the set...


I stamped the flowers first, then masked them before in turn stamping and masking the leaves.  I then coloured the images with Copics.  A greeting from the set was stamped in black and I finished with some pale yellow sprinkles.

Materials used:
  • Stamps: Uniko - Originally Organic Flower Garden
  • Ink: Memento - Tuxedo Black; Versafine Clair - Nocturne
  • Coloured with Copics
  • Accents: Little Things from Lucy's Cards - Sprinkles: Cornfield Circles


As always, the team have lots more for you to see over at the Uniko blog, here.  I'll be back tomorrow morning to introduce another fantastic new stencil set.

And don't forget, all the new products from this release will be available to purchase from Uniko from Sunday 27 April 2025.


Tuesday, 22 April 2025

Uniko - April 2025 Release - Introducing...Butterfly Serenade

Hi there

It's back to work for me today after a relaxing few days at home for Easter.  I hope you've had a lovely break and you may be one of the lucky ones who also have the rest of the week off.

It's day one of the new Uniko introductions and first up is Butterfly Serenade...another lovely set to join the existing Serenade series.  The set includes the main cascading image, a couple of sentiments, as well as more individual butterflies and flowers.

Here's my first card using the set...


I used the main image on this card, stamped onto some blue cardstock with a pale ink.  I then coloured the butterflies with Copics and then restamped (left the stamp in my MISTI for placement accuracy) and heat embossed in white.  I stamped and heat embossed the sentiment in white, adhered the panel to my card base and finished by adding some small silver gems.


Materials used:
  • Stamps: Uniko - Butterfly Serenade
  • Ink: VersaMark
  • Coloured with Copics
  • Embossing Powder: Brutus Monroe - Alabaster White
  • Cardstock and gems from my stash


And now my second card, where I combined this stamp set with another, Just Because...


On a die cut panel I stamped the foliage from the Just Because set in the lower left corner.  I then stamped the large butterfly in black and coloured with Copics, and then stamped the solid butterfly images in co-ordinating shades.  I stamped the sentiment and the flowers, both from the new set, before adhering the panel to the card base using 3D foam.

Materials used:
  • Stamps: Uniko - Butterfly Serenade, Just Because
  • Ink: Altenew - Frayed Leaf, Aquaicious, Teal Lake, Deep Iris; Memento - Tuxedo Black; Versafine Clair - Nocturne; Copics
  • Die: Create a Smile - Cool Cuts Double Stitched Rectangles


For lots more inspiration from the rest of the team using this stamp set, take a look at the Uniko blog, here.  I'll be back tomorrow to introduce another of the new products.

All the new products will be available from next Sunday 27 April 2025.

I hope you'll pop back throughout the coming week.


Thursday, 2 January 2025

Uniko January 2025 Release - Introducing...Flower Power #11 and Mid Century Modern Circles & Stars Stencil

Hi there

Ok, so we're now onto day three of the new Uniko introductions.

And yes, Bev has done it - she's designed another stamp set to join the Flower Power collection - Flower Power #11!  And there is also a new stencil to join the Mid Century Modern series - Mid Century Modern Circles and Stars.

I'll start with the stamp set as I love this new flower design.  Here I've paired the set with a backdrop using the Background Blocks Solid Wonky Stripes stamp...


On a die cut panel I began by stamping the flower head and stem/leaves in a light coloured ink and then coloured them with Copics.  I then made masks to enable me to stamp the background stripes over the top but to appear behind.  I left the flower and stem stamps in my MISTI so I could then re-stamp them, this time in VersaMark and then heat embossed in white.  As I used both stamps together at the same time, there was a small gap where the flower head met the stem so I used an embossing pen to extend the stem and also heat embossed that section.  I finished by stamping the sentiment, also from the new set, and adhered the panel flat to the card base.


Materials used:
  • Stamps: Uniko - Flower Power #11, Background Blocks Solid Wonky Stripes
  • Ink: Altenew - Dew Drops; VersaMark; Versfine Clair - Nocturne
  • Embossing Powder: Brutus Monroe - Alabaster
  • Die: Create a Smile - Cool Cuts Double Stitched Rectangles


And now my second card using the new stencil...


On some mustard cardstock I inked through the stencil, using brown ink for the circles and then masking them off to ink up the blue star sections.  I then used a circle die to cut a section and adhere off the edge of the card base.  For the sentiment, I didn't have any cardstock in the right blue shade so I die cut the strip, ink blended with the same blue ink, left it to thoroughly dry and then stamped and heat embossed the sentiment, which is from the Mid Century Modern Frames set.

Materials used:
  • Stencil: Uniko - Mid Century Modern Circles & Stars
  • Stamps: Uniko - Mid Century Modern Frames
  • Ink: Distress Oxide - Vintage Photo, Uncharted Mariner; VersaMark
  • Embossing Powder: Brutus Monroe - Alabaster
  • Dies: Hero Arts - Infinity Nested Circles; Altenew - Featured Sentiments


I had some of the stencilled design leftover so I made another card...


I cut a vertical strip of the already inked design and then lined up the stencil on my card base to continue the design, which I inked up in more muted shades to create the design across the whole of the card.  I adhered the vertical strip and then added a die cut panel with a stamped sentiment using stamps from the Mid Century Modern Birthday and Mid Century Modern Everyday Sentiments sets.  This was popped up on 3D foam.

Materials used:
  • Stencil: Uniko - Mid Century Modern Circles & Stars
  • Stamps: Uniko - Mid Century Modern Birthday, Mid Century Modern Everyday Sentiments
  • Ink: Distress Oxide - Vintage Photo, Uncharted Mariner, Speckled Egg, Scattered Straw; Versafine Clair - Nocturne
  • Die: MFT Die-namics - Rounded Stitched Rectangle Stax


Take a look at the Uniko blog, here, for more inspiration from the rest of the team, the projects are all so different.

All the new products will be available from Sunday 5 January 2025.

Tomorrow I'll be introducing two more products from this new release, I hope you'll join me.


Sunday, 1 December 2024

Uniko 12 Days Of Christmas Inspiration & Giveaways 2024 - Christmas Linky Party


Good morning!

Starting this morning, Uniko is bringing you 12 Days of Christmas Inspiration and Giveaways up until 12 December, with the winners being announced on Friday 13 December.

The team are kicking things off with a Christmas Party card making style with a linky link-up.  All you have to do is make and link up a new Christmas card using Uniko products.  If, like me, you still have cards to make (super unorganised as usual!), this is the perfect opportunity to make more and you can link up three as part of this party!

Here's my card...


On a panel of white cardstock I ink blended in from the edges using some green Distress Inks, fading out in the centre which remained white.  I then inked through the Winter Foliage stencil using two shades of green.  I then stamped and heat embossed the sentiment in white on a die cut rectangle from red cardstock.  The sentiment is from the Most Wonderful clear stamp set.  I popped up the sentiment panel on 3D foam and finished with some Nuvo Crystal Drops to add some accents.

Materials used:
  • Stencil: Uniko - Winter Foliage 
  • Stamps: Uniko - Most Wonderful
  • Ink: Distress Ink - Rustic Wilderness, Pine Needles; VersaMark
  • Embossing Powder: Brutus Monroe - Alabaster White
  • Die: MFT Die-namics - Stitched Rounded Rectangle Stax
  • Accents: Nuvo Crystal Drops - Autumn Red


Linky Rules/Details...

Simply create a new Christmas card using Uniko products.  Products from other brands can also be used, so long as Uniko is prominent or the main focus of the card.  And there is a maximum of three entries per person.

Linky is open now over on the main Uniko blog, here, and will close at 23:59 GMT on Wednesday 11 December 2024.  The Uniko Brand Ambassadors will vote for their Top 3 and the prizes are as follows...

1st Prize - £25 eGift Code

2nd Prize - £15 eGift Code

3rd Prize - £10 eGift Code 

Bonus Prize For a Lucky Comment Along The Hop Above - £10 eGift Code

I look forward to seeing all your fabulous projects in the Linky gallery!  Thanks for taking a look and enjoy the rest of your weekend.


Friday, 1 November 2024

Uniko October/November 2024 Release - Introducing...BIG & BOLD Joy

Good morning.

It's time for another new introduction from the upcoming release at Uniko.

And this time it's another great addition to the Big & Bold family of stamp sets...Big & Bold Joy.  Another great set, I think you'll agree.

The focal point on my first card is all heat embossed stamping...


On a panel of raspberry coloured cardstock I planned out where I wanted the various elements.  I started by stamping and heat embossing the dove in white.  Next I masked the dove and then stamped and heat embossed the word Joy in platinum.  I then stamped and embossed the foliage in green glitter and then finally the second part of the sentiment was heat embossed in red glitter.  And finally, before adhering the panel to my card base, I blended a darker shade of red ink around the edges to give it some depth.


Materials used:
  • Stamps: Uniko - Big & Bold Joy
  • Ink: VersaMark; Distress Ink - Aged Mahogany
  • Embossing Powder: Brutus Monroe - Alabaster; Wow! - Platinum; Heat It Up Embossing Tinsel - Green and Red


Next I combined the set with stamps from the Christmas Pop set...


On the card base I stamped the tree and star to create a backdrop which was to show through an aperture.  I die cut an aperture from a panel and I then heat embossed the Joy in gold on a strip of vellum which was fussy cut and then wrapped around the panel and adhered on the reverse before adhering the panel flat to the card base.  The rest of the greeting was heat embossed in white on a grey sentiment strip and adhered on 3D foam.

Materials used:
  • Stamps: Uniko - Big & Bold Joy, Christmas Pop
  • Ink: Memento - Cottage Ivy; Versa Color - Gold; VersaMark
  • Embossing Powder: Wow! - Metallic Gold Rich; Brutus Monroe - Alabaster
  • Die: Create a Smile - Cool Cuts Double Stitched Rectangles
  • Vellum from stash


We still have another introduction tomorrow before the big reveal on Sunday so be sure to pop back if you can, and visit the main Uniko blog, here.

I'll be back tomorrow with a couple more cards using another of the new products.


Saturday, 17 February 2024

Uniko Celebrating 12 Years - Introducing...Background Blocks MOD Builder

Good morning and happy Saturday!

How have you been enjoying the Uniko new release introductions over the last few days?  Well, it's Day 4 and the last of the introductions today.  And we have an addition to the Background Blocks series for you...Background Blocks MOD Builder.

If you're a fan of Uniko this one may look familiar to you.  That's because the same design was previously released as a stencil.


Ok, I have two examples for you using this one and first up I did some emboss resist with water colouring...


I stamped and heat embossed the image in clear on some watercolour cardstock.  I then randomly watercoloured, wet on wet, over and around the image before die cutting the panel with a stitched rectangle die.  I stamped and heat embossed the sentiment, from the new Mid Century Modern Everyday Sentiments set that was introduced yesterday, on a strip of vellum and wrapped this around the panel, adhering on the reverse, before mounting the panel on the card base using 3D foam.


Materials used:
  • Stamps: Uniko - Background Blocks MOD Builder, Mid Century Modern Everyday Sentiments
  • Ink: VersaMark; Distress Ink - Peacock Feathers, Blueprint Sketch, Crushed Olive
  • Embossing Powder: Wow! - Clear Gloss, Opaque Bright White


And my second card combines the new set with sentiments from the Mid Century Modern Frames set...


I stamped the main image in the centre but off the edge of the card in grey ink and then used the repeating design to add to the image at the top and bottom.  I then used one of the co-ordinating solid images to add colour to selected parts.  I stamped and heat embossed the greetings from the Mid Century Modern Frames set on grey cardstock and die cut these before adhering them flat, nestled within the design.

Materials used:
  • Stamps: Uniko - Background Blocks MOD Builder; Mid Century Modern Frames
  • Ink: VersaMark; Altenew - Silver Stone, Soft Lilac, Minty Mint
  • Embossing Powder: Brutus Monroe - Alabaster
  • Die: MFT Die-namics - Stitched Rounded Rectangle Stax


The team are sharing more projects over on the main Uniko blog, here so be sure to check that out and follow the links.

The entire release will be available to purchase from 9am GMT tomorrow, Sunday 18 January 2024. 

I'll be back tomorrow morning to reveal the entire release and share another card.


Sunday, 4 February 2024

Uniko Brand Ambassador Inspiration - Flowers and Confetti

Good morning!

I'm over on the Uniko blog today, here, with some birthday card inspiration.  This February marks Uniko's 12th Birthday so there is lots of inspiration throughout the month as well as some fab giveaways so please do check out the blog regularly so you don't miss anything.

You can find all the details of how I made this card over on the Uniko post.  And it happens to be a special friend's birthday today and this is the card I made for her.


Materials used:
  • Stamps: Uniko - Hello Lovely, Flower Power #2 (sentiment)
  • Stencil: Uniko Party Confetti
  • Ink: Distress Ink - Squeezed Lemonade, Dried Marigold, Abandoned Coral; Versafine - Onyx Black; VersaMark
  • Embossing Powder: Brutus Monroe - Alabaster


I think the floral image, along with the swoosh of colour and confetti stencilling is a great mix for a feminine birthday card.  And I think you can tell from these sunny colours that I can't wait for Spring to arrive!

There will be lots more inspiration in the coming days and throughout the rest of February so I encourage you to check in here, and over at Uniko to see lots more from the team.

Thanks for taking a look and enjoy the rest of your weekend.


Thursday, 11 January 2024

Uniko January 2024 Non-Release Brand Ambassador Blog Hop & GIVEAWAY!

Hi there

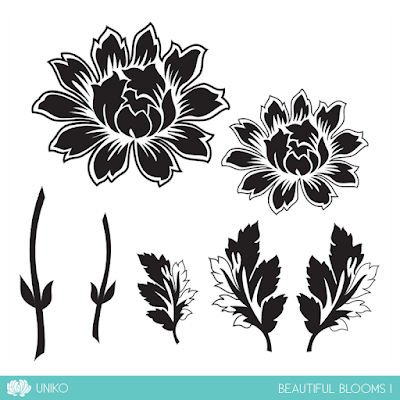
Bev at Uniko is kicking off 2024 by bringing back the Non-Release Brand Ambassador Blog Hops and Giveaways, where the team revisit the oldie but goodie products and give them some well-deserved love.  Today we are revisiting the Beautiful Blooms I stamp set and Designer Dies Beautiful Blooms I.

I have four cards for you today, all a little different to hopefully give you some crafty inspiration.  Unfortunately, I don't have the die set in my stash so where the flowers have dimension I have fussy cut them.

First up, I've used vellum for the bloom and paired the stamp set with the Birthday Wishes stamp set...


I die cut a piece of pale green textured cardstock with a scalloped die to use as my card front panel.  I stamped and heat embossed the smaller of the flowers in the set in white on vellum and then fussy cut it out.  I then placed this in position in order to work out where I wanted the leaves to be stamped.  These were then stamped in a soft green and the flower was adhered on 3D foam.  I finished by stamping the sentiment from the Birthday Wishes set in grey ink.


Materials used:

  • Stamps: Uniko - Beautiful Blooms I, Birthday Wishes
  • Ink: VersaMark; Altenew - Mountain Mist, Grey Denim
  • Embossing Powder: Brutus Monroe - Alabaster
  • Die: Create a Smile - Cool Cuts Scalloped Rectangles
  • Cardstock and vellum from stash


My second project involved a little masking of the images and I combined it with the Quilted stencil and the Simply Said stamp set...


I think this is my favourite of the four cards today, and other than the sentiment strip, it's a one layer design.  I began by stamping the first flower in two shades of yellow/orange ink.  I then masked it to stamp the second flower and lower leaves, which were also stamped in two shades of ink.  I finally masked the second flower, stamped the upper leaf and then masked all the leaves.  I then inked through the Quilted stencil in grey ink, masking off a few sections to create the stepped design.  To finish I stamped and heat embossed the sentiment in white on grey cardstock.

Materials used:
  • Stamps: Uniko - Beautiful Blooms I, Simply Said
  • Stencil: Uniko - Quilted
  • Ink: Altenew - Warm Sunshine, Orange Cream, Frayed Leaf, Forest Glades, Silver Lake


Card three uses coloured cardstock for a tone on tone effect...


I stamped the flowers in blue ink on paler blue cardstock and the leaves in green on paler green cardstock.  These were then fussy cut.  I added some score lines to create some interest on the card base without adding any layers and then positioned and adhered the flowers and leaves, which are all adhered flat apart from the large flower which is adhered on 3D foam.  I finished with a stamped sentiment from the Simply Said set.

Materials used:
  • Stamps: Uniko - Beautiful Blooms I, Simply Said
  • Ink: Altenew - Caribbean Sky, Moss; Versfine Clair - Nocturne
  • Accents: Little Things From Lucy's Cards - Sprinkles: Little Dots


And for my final card I combined Beautiful Blooms I with Background Blocks Pinstripe and a sentiment from Pure Florals: Chrysanthemum...


I began by stamping the large flower from the set in shades of pink, adding the darker inks to the stamp with a blender brush.  I then masked the flower and stamped the Background Block Pinstripe image in a darkish grey.  I cut the mask right to the flower edge and some of the ink migrated under the mask but hey, this is handmade not Hallmark, right?!  I finished with a sentiment stamped in one of the same pink shades, adhered on a sentiment strip.

Materials used:
  • Stamps: Uniko - Beautiful Blooms I, Background Blocks Pinstripe, Pure Florals Chrysanthemum (sentiment)
  • Ink: Altenew - Pinkalicious, Purple Wine, Cosmic Berry, Industrial Diamond


And this is what you get in the stamp and die sets, which can also be purchased as a bundle...


Don't forget to take a look at the main Uniko post, here, where the rest of the team are sharing their projects and if you follow the hop and comment along the way you could be the lucky winner of a £15 eGift Code!

Thanks for visiting today.

 
Related Posts Plugin for WordPress, Blogger...