Showing posts with label Creative Expressions. Show all posts

Saturday, 24 October 2020

Less is More Challenge #431

Good morning

And just like that it's the start of another new challenge over at Less is More!  I honestly don't know where the time is going this year.  Here in the UK we'll be putting our clocks back tomorrow, I can't get my head around it at all!

Anyhoooo, back to the challenge, and this time it's a Recipe challenge...


And continuing as our super generous sponsor for the month of October is


My crafty mojo has been a bit absent lately but I enjoyed making this one and I'm really pleased with the result, and I put some some of my Uniko products to use here too...


I began by stamping the pinstripes and then stencilled the largest leaves image in two shades of green ink.  I then stamped two more leaf images, in dark green and dark purple shades.  I stamped and heat embossed the sentiment in white on a sentiment flag die cut from green cardstock.  This was then popped up on 3D foam, securing two leaf die cuts, one cut from dark green cardstock and the other from vellum.


Materials used:
  • Stamps: Uniko - Background Blocks: Pinstripe II, Nature's Treasures I, Flower Power #1
  • Stencil: Uniko - Nature's Treasures II
  • Ink: Altenew - Limestone, Evergreen, Andromeda; Distress Ink - Shabby Shutters, Iced Spruce; VersaMark
  • Dies: MFT Die-namics - Blueprints 26; Creative Expressions - Olive Branch; Britannia Dies - Leaf Strip
  • Embossing Powder: Wow! - Opaque Bright White

Challenge entries:

NBUS Challenge #19 - This is the first use of the pinstripe background stamp and the sentiment strip die
STAMPlorations - October CAS Challenge - Anything CAS Goes


Thanks so much for taking a look today.  I hope you'll be inspired to play along over at Less is More, and you can find lots more inspiration on the main challenge blog, where my teamies are also sharing their projects for this foliage challenge.  As always, the link will remain open for two weeks.


Saturday, 26 September 2020

Butterflies and Flowers Bookmark


Good evening

Something that gets neglected in my craft stash is patterned papers, I just don't seem to use them very often on cards.  And after using some of them as co-ordinating back panels of some bookmarks, I thought they would be perfect used as a decorative rather than stamped or stencilled surface of a bookmark.

So that's what I did for this one...


Using a tall tag die I die cut two different designs from a glittered and glossy floral paper pad and adhered these back to back.  I then die cut two butterflies from white glitter cardstock.  The largest was adhered over a solid die cut from deep pink cardstock which I then infilled with Glossy Accents.  Once dry I adhered this to the top of the panel.  So that it didn't look untidy on the reverse I die cut another solid butterfly, from the same cardstock used for the front and adhered this on the back, mirroring the other butterfly.  The smaller butterfly was adhered over another solid die cut using the same paper used on the reverse and this was adhered over some die cut co-ordinating leaves.


This is the view from the reverse side...


Materials used:
  • Dies: MFT Die-namics - Tall Tag Duo; Clearly Besotted - Butterfly Duo Die Collection; Creative Expressions - Olive Branch
  • Patterned Paper: DecoTime (purchased from The Range)
  • Accents: Glossy Accents


I love how this turned out and I have so many lovely papers so I have a feeling a lot more of these will be made!


Friday, 10 April 2020

40 Sensational Years

Hi there and Happy Good Friday, everyone!

Today I'm sharing a commission card I was asked to make by an old work colleague, for him to give to his wife on their Ruby Wedding Anniversary last weekend.

This card is A5, so larger than the normal A6 cards that I make.


I began by embossing a piece of white cardstock with the hearts design which was then matted onto some deep red cardstock.  I then heat embossed the Happy Anniversary in silver onto a strip of vellum and wrapped this around the panel before securing on the reverse and adhering to the card base.  Two hearts were then die cut from white and red card, and one stamped and also heat embossed in silver.  These were adhered offset and I added a ribbon bow and some clear gems to finish.


Materials used:

  • Embossing Folder: Creative Expressions - Heart Strings
  • Stamps: Clearly Besotted - Happy Anniversary; Uniko - Classic Numbers
  • Ink: VersaMark
  • Embossing Powder: Wow! - Metallic Silver
  • Die: MFT Die-namics - Stitched Heart Stax


That's all from me today, I'll be back tomorrow morning to share details of the next Less is More challenge.

Saturday, 21 March 2020

A Pop of Pink and Polka Dots

Good morning

I'm going to be playing catch up this weekend and sharing some cards I've made over the last month or so but not yet found the time to share.

And although I'm still working, I think with the current crisis around the world, and the need for social distancing will mean that I'll be finding lots of time to craft in the evenings and weekends and share more makes with you.  I was also meant to be participating in my very first craft fair next month but of course it's been postponed for now, such a shame as I was getting really excited about it! :(

So this is a great opportunity for me to get more stock made for the fair ready for when it does finally take place, add more to my online shop and also do that job I've been putting off for ages....tidying my craft space!  Yikes!!!

Ok, back to it, and this is the birthday card I made for my bestie last month.  I love black and white cards with a pop of colour so that was my starting point for this one...


I began by die cutting a frame using two stitched rectangle dies, which I then backed with some black and white polka dot paper.  Next I die cut the flower twice, one from white cardstock and again from bright pink cardstock.  I adhered the white flower, minus the petals, tucking the stem into the frame, then inlaid the pink petals.  The frame was then popped up on the card base using foam and the sentiment stamped below.


Materials used:

  • Dies: Create a Smile - Cool Cuts Double Stitched Rectangles; Creative Expressions - Scribble Flowers
  • Patterned Paper: MFT - Dots & Stripes Neutrals
  • Stamps: Clearly Besotted - Beautiful Friend
  • Ink: Versafine - Onyx Black

Challenge entries:#

CAS on Friday - Challenge #176 - Birthday
Daring Cardmakers - Floral Focus
Addicted to Stamps and More - Challenge #381 - Anything Goes
Happy Little Stampers - March Anything Goes with Dies Challenge
Time Out - Challenge #157 - Birthday (optional twist: die cutting)
The Flower Challenge - Challenge #42 - Anything Goes
AAA Birthday - Game #11 - Flowers


Thanks so much for visiting, I'll be back with more very soon :)

Stay safe, everyone xx

Monday, 23 December 2019

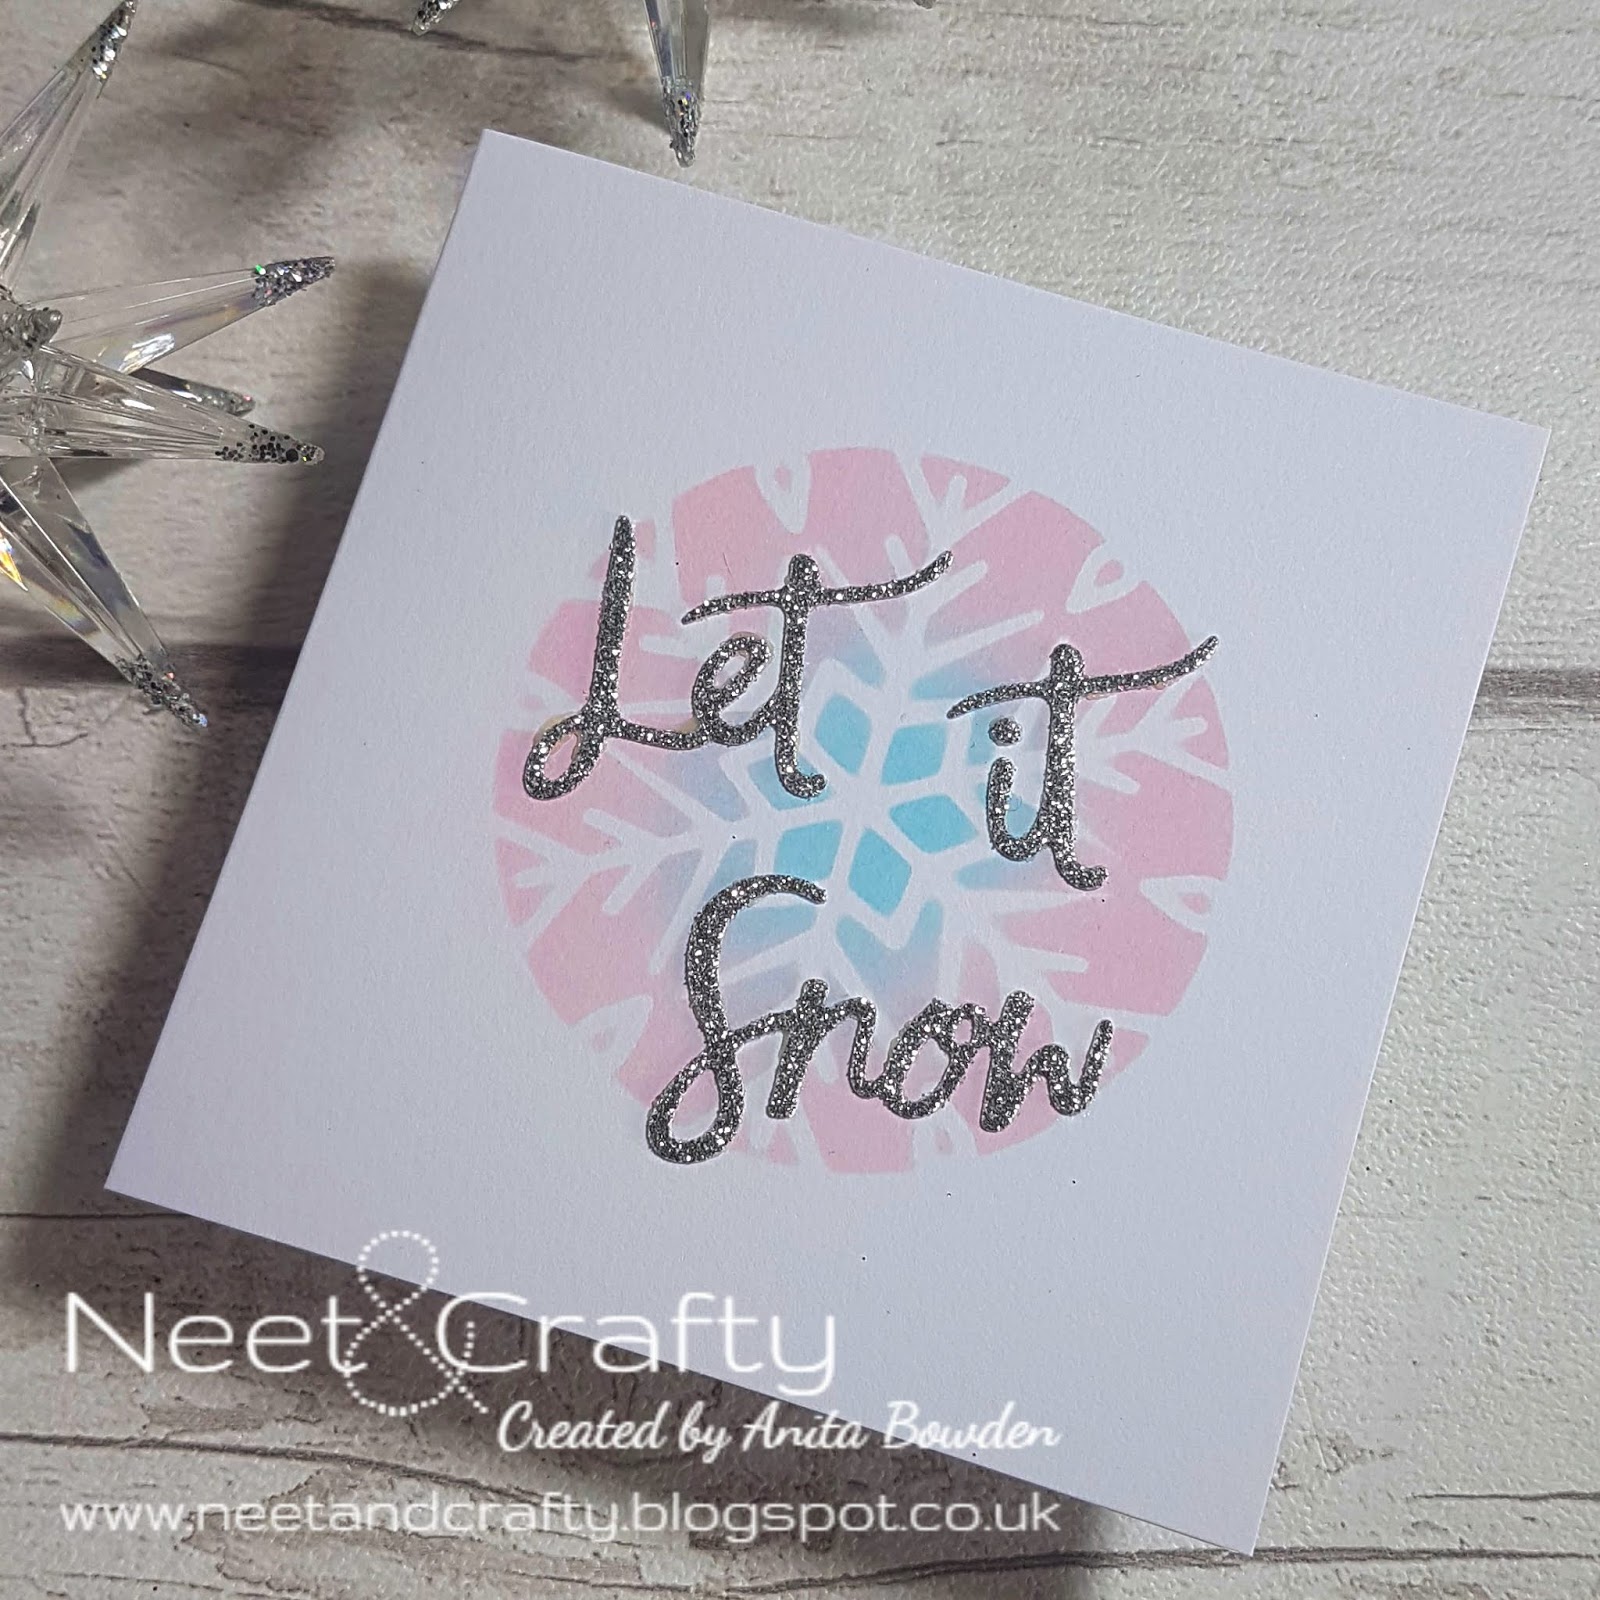
Christmas Card Multiples - Pastel Snowflakes

Good morning

Back with more of my multiple mini cards.  These were fairly quick to make, perfect when I realised I had nowhere near enough cards and time was running out!


This mini snowflake stencil is a circular design so no masking was required here.  I just blended straight through it with two shades of Distress Oxides.  All that was left was to die cut the sentiments from silver glitter cardstock and adhere straight over the design.  Simple!


Materials used:

  • Stencil: Creative Expressions - Circular Snowflake Mini
  • Ink: Distress Oxide - Spun Sugar, Tumbled Glass
  • Die: Xcut - Let It Snow
  • Silver glitter cardstock from stash

Challenge entries:

Daring Cardmakers - Pretty Pastels: Anything Crafty
Inkspirational - Challenge #202 - No Stamping
STAMPlorations - December Stencil Challenge - Anything Goes


Thanks for looking :)

Saturday, 3 August 2019

Less is More Challenge #401

Good morning!

It's two weeks since the last challenge at Less is More, so of course, we're back with a new one for you.  It's the turn of our regular Colour challenge, here are the details...


For a fresh new month we have a fresh new sponsor!  If you've followed Less is More for some time you'll no doubt be familiar with our previous Design Team member, Sarah Gray, of Funky Fossil Designs.  She is generously sponsoring our August challenges so just by playing along you'll be in with a chance of winning our monthly prize!


Not only is Sarah guest designing with us for this challenge, we also have Alli C joining us who was our June Winner.  Please do pop over to see what she's created and say hi.


Ok, I have two sample cards for you, here's the first...


For this design I die cut a circle and stamped the sentiment across the centre.  I then filled in the gaps using the leaves, flowers and a few smaller stamped elements.  I coloured the images with ProMarkers then popped the die cut up onto a slightly larger circle using fun foam.  The two die cuts were then adhered to the card base.  I felt it needed a little 'something' more, so I used a white pigment pen and added some dotty accents to the flowers.

Materials used:

  • Dies: Hero Arts - Infinity Circle Dies
  • Stamps: Altenew - Painted Greetings, Doodle Blooms
  • Ink: Versafine - Onyx Black; Memento - Tuxedo Black
  • Coloured with ProMarkers
  • Accents: Signo Uniball Pen - White

Challenge entries:

Addicted to Stamps and More - Challenge #352 - Make Your Mark
STAMPlorations - Summer CAS Card Challenge - Anything CAS Goes


For my second card I used one of Sarah's fab stencils as a background...


I die cut a panel with a stitched rectangle die then blended two shades of Distress Ink just through the central area of the stencil.  I die cut a leaf from orange cardstock and added some detail with a ProMarker.  I stamped the sentiment in black onto a stitched die cut strip then slotted it between the leaves and trimmed it off before adhering to the panel on 3D foam squares.  The who panel was then adhered to the card base on fun foam.


Materials used:

  • Stencil: Funky Fossil - Geo Diamonds
  • Ink: Distress Ink - Cracked Pistachio, Broken China; Versafine - Onyx Black
  • Stamp: Altenew - Leaf Canopy
  • Dies: Create a Smile - Cool Cuts Double Stitched Rectangles; Creative Expressions - Laurel Leaves; Clearly Besotted - Frame It Die Collection (sentiment strip)


Thanks so much for stopping by.  My teamies are sharing some great projects over on the main challenge blog so please do pop over and take a look.


I hope you have a wonderful weekend :)

Saturday, 25 May 2019

Less is More Challenge #396

Good morning, crafters!

New challenge day is upon us once again over at Less is More, and today we're back with a Recipe challenge.  Here's the cue card with details of what we want to see you creating and sharing with us...


We're specifying less than one third to be true to our challenge guidelines and our love of unpatterned/untextured white space.


Continuing as our sponsor for this month is the fabulous and generous CAS-ual Fridays Stamps


and don't forget, as well as our monthly prize, they are also offering the discount code below


So, without further ado, I'll move on to my sample cards.  And it appears my mojo has returned, I have four cards for you!!!

Here's the first, and my favourite of this batch of makes...


I began with the dragonfly die cut, cut from white cardstock.  I squidged my VersaMark pad over it, held it with tweezers and poured two different embossing powders over it.  I heated it to melt the powders then repeated the process twice more to create the glossy effect.  On the card base I blended through a leaf stencil with Distress Ink and stamped the sentiment in metallic pigment ink.  To finish I adhered the body of the dragonfly only, and manipulated the wings upwards for some dimension.


Materials used:

  • Die: Clearly Besotted - Dragonfly Die Collection
  • Embossing Powder: Wow! - Peppermint Tea, Metallic Copper
  • Stencil: Funky Fossil - Forest Foliage
  • Stamp: Clearly Besotted - Make a Wish
  • Ink: VersaMark; Distress Ink - Lucky Clover; Versa Color - Bronze

Challenge entries:

AAA Cards - CAS Game #140 - Up to One Third (not twisting this time)


Onto my second card, and some simple stamping and heat embossing...


I chose a teal card base and panel for this one.  Before stamping the images with VersaMark I treated the surface with an anti-static powder tool to avoid the embossing powder clinging to unstamped areas of the panel.  I used parts of the same floral image at the top and base of my panel, and heat embossed these along with the sentiment in white embossing powder.  Once cooled I used a soft cloth to ensure no anti-static powder remained on the panel.  It was then adhered using fun foam.


Materials used:

  • Cardstock from stash
  • Stamps: Honey Doo Crafts - Roses and Lilies; MFT - Grand Peaceful Wildflowers (sentiment)
  • Ink: VersaMark
  • Embossing Powder: Wow! - Opaque Bright White

Challenge entries:

Moving Along with the Times - Challenge #98 - Monochrome Colour


I'm not loving this next one but thought I'd share it anyway..


I used a floral corner embossing folder on a white cardstock panel here and stamped the sentiment in pigment ink.  I adhered the panel flat to the card base then added some Nuvo drops to the centre of the flowers.  My drops weren't behaving and weren't coming out evenly so the look isn't really what I was going for but it's still quite a cute card.  I thought the embossing alone wasn't enough but perhaps it needed embellishing in a different way.  I might revisit this one :)

Materials used:

  • Embossing Folder: Craft Concepts - Florette
  • Stamp: Wplus9 - Strictly Sentiments
  • Ink: Versa Color - Lagoon Blue
  • Accents: Nuvo Crystal Drops - Carnation Pink

Challenge entries:

Alphabet Challenge - E is for Embossing Folder


For my final card I embossed a panel using a die set...


I used a set of dies, a tulip square and pierced frame, to emboss a panel using an embossing mat in my Big Shot.  I trimmed around the edge of the frame then die cut a slightly larger pierced square from purple mirri card.  I adhered the mirri square flat to the base then popped up the tulip square on 3D foam strips.  I used a bold sentiment below the focal point to finish the card.


Materials used:

  • Dies: Creative Expressions - Tulip Flower Square; MFT Die-namics - Pierced Square Stax
  • White and mirri card from stash
  • Stamp: Clearly Besotted - Brushed Greetings II
  • Ink: Versafine - Onyx Black

Challenge entries:

Allsorts Challenge - Week 520/1 - Happy Birthday 
The Flower Challenge - Challenge #32 - Embossing


There are so many ways to add embossed details to your cards.  If you need some inspiration please do visit the main Less is More challenge blog, here, to see what my teamies have been creating.  I'm looking forward to seeing your creations in our gallery, and don't forget, the linky is open for a fortnight so plenty of time to play along.

Related Posts Plugin for WordPress, Blogger...