
As I mentioned in my post yesterday, I'm excited to be joining Honey Doo Crafts for the second time as a Guest Designer, showcasing their fabulous new stamps and dies for the upcoming shows on Hochanda.
Today I'm sharing more of my samples, using some of the new products.
First up is a die set called Feathered Flourishes. I'm really pleased with how this first card turned out. I chose to use a faux laser cut technique I first saw in a Jennifer McGuire video a few years ago, and have used a couple of times...

I began by masking my card base and creating an ink blended and water splattered background using Distress Oxide Inks. Next I die cut a frame using some stitched rectangle dies. To create the faux laser cut effect all you need to do is adhere various die cuts and adhere them to the edge of your aperture or frame and trim off the excess. This is a fairly easy technique, the only fiddly part is ensuring you add enough 3D foam pieces to the reverse of your die cuts so that they have enough support and don't sag when added to your card front. The photo below shows this more clearly.

I finished by stamping a small sentiment panel and backing this with a vellum panel, which was then also popped up on 3D foam to support it.
Materials used:
- Dies: Honey Doo Crafts - Feathered Flourishes; Create a Smile - Double Stitched Rectangles
- Ink: Distress Oxide - Wilted Violet, Mermaid Lagoon; Versafine - Onyx Black
- Stamp: Honey Doo Crafts - Just in Case
- Vellum from stash
Challenge entry:
Happy Little Stampers - February Anything Goes with Dies Challenge

Next up I've used the Feathered Flourishes dies once again, with the new Daisy stamp set...

I started by creating the daisies. I stamped them in VersaMark on pale yellow vellum and heat embossed in white. These were then fussy cut and the petals curled slightly using the rod of a paint brush. I then die cut some of the flourishes from green textured cardstock. On a panel of white cardstock I added some graduated score lines for some background interest and then arranged and adhered the flourishes and daisies, adding some enamel dots for the flower centres.

To finish I stamped the sentiment between two score lines and the popped the panel onto the card base using fun foam.
Materials used:
- Stamps: Honey Doo Crafts - Daisy, Just in Case
- Dies: Honey Doo Crafts - Feathered Flourishes
- Ink: VersaMark; Versafine - Onyx Black
- Embossing Powder: Altenew - Pure White
- Vellum from stash
- Accents: Doodlebug Sprinkles - Bumblebee Assortment
Challenge entry:
The Flower Challenge - Challenge #29 - Use Your Latest Stamps or Dies

Next up I've used the Daisy set again, but this time just the leaves...

I die cut a stitched panel and then, using my MISTI for alignment, stamped a row of the same leaves in rainbow order. I simply stamped the sentiment above in black and adhered the panel to the card base on fun foam. To finish, I added some co-ordinating enamel dots.
Materials used:
- Stamps: Honey Doo Crafts - Daisy, Cheers
- Ink: Versafine - Onyx Black; Versa Color - Canary, Fresh Green, Cyan, Violet, Magenta
- Die: Create a Smile - Double Stitched Rectangles
- Accents: Doodlebug Sprinkles
The next stamp set is called Budding Flourishes and I kept this one really simple...

After die cutting the rectangular panel I then used a piece of cardstock die cut with an oval die as a template to blend the sunset background. I shifted the oval down very slightly, only 1-2mm, to ensure the stamped image met the edge of the oval mask, this was simply stamped in black ink, as was the sentiment alongside. The panel was then popped up for dimension.
Materials used:
- Stamps: Honey Doo Crafts - Budding Flourishes, Hopeful & Happy Quotes
- Dies: Create a Smile - Double Stitched Rectangle; Lil Inker Designs - Stitched Ovals (used to create mask)
- Ink: Distress Oxide - Squeezed Lemonade, Spiced Marmalade, Abandoned Coral; Versafine - Onyx Black
And finally, this card uses the gorgeous new Floral Sketch stamp and the watercolour lifting technique...

I stamped the image in black pigment ink and heat embossed it using clear embossing powder. I then masked the two sides of the panel vertically and blended Distress Inks down the centre. I then 'painted' the image with water, section by section, waited a few seconds and blotted away the colour with a paper towel. So the sections within the image appear lighter than the background. I stamped the sentiment at the bottom right before adhering the panel on fun foam.
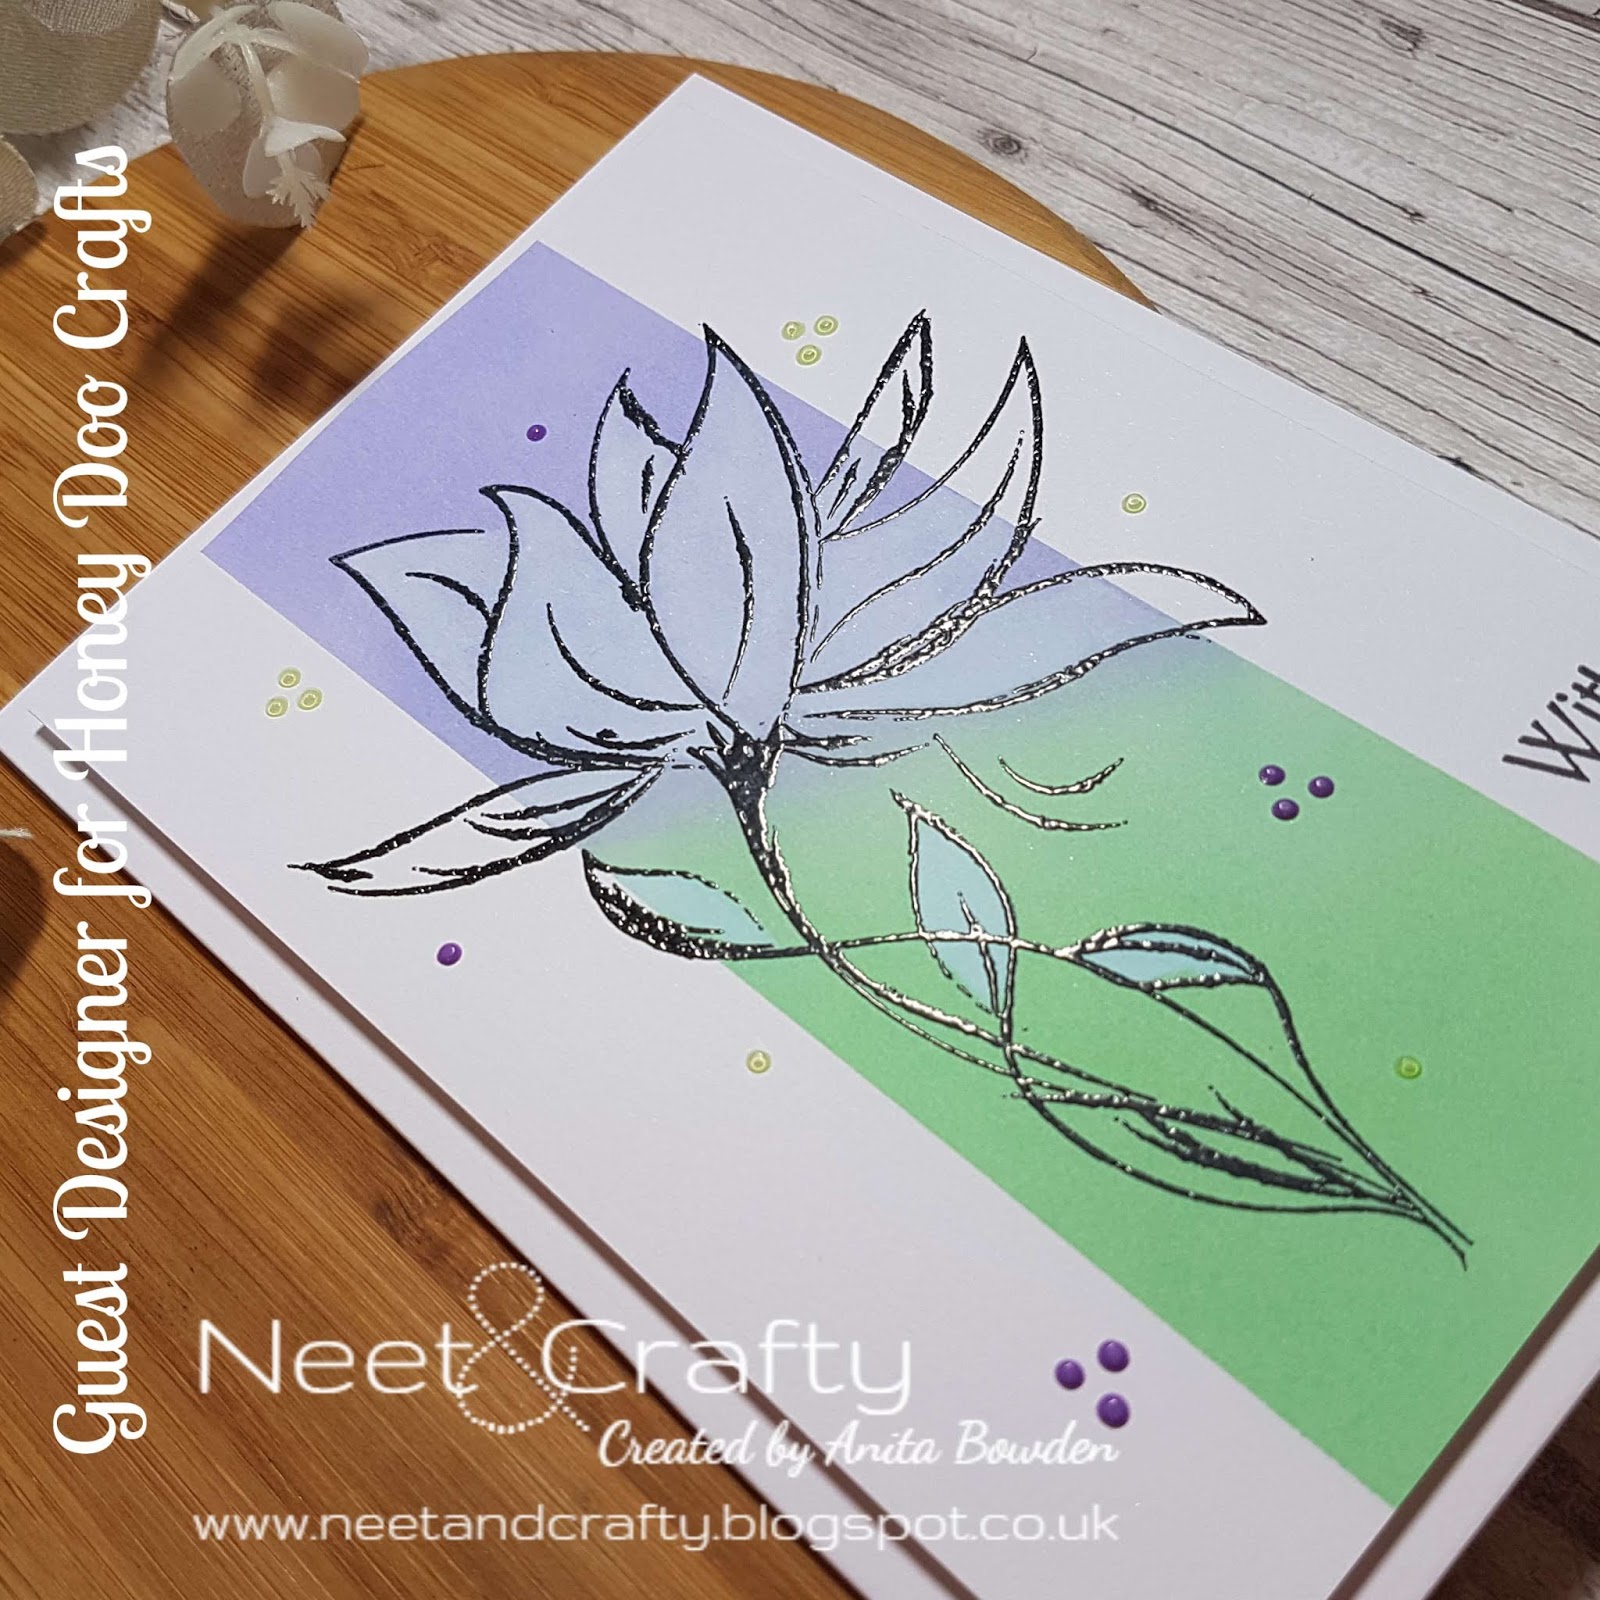
I then added some Nuvo drops in co-ordinating shades around the design, although with hindsight I think I preferred it without the drops.
Materials used:
- Stamps: Honey Doo Crafts - Floral Sketch, Just in Case
- Ink: Versafine - Onyx Black; Distress Oxide - Shaded Lilac, Cracked Pistachio
- Embossing Powder: Wow! - Clear Gloss
- Accents: Nuvo Drops
Don't forget to tune in to Hochanda tomorrow if you can (Freeview 85 / Sky 673) at 12pm and 4pm to see these great new products in more detail.

Thanks so much for popping by. I'll be back tomorrow with my final batch of samples ahead of Thursday's shows.

what a fantastic collection of cards Anita, I dont know which to mention first, they are all so perfectly made. These new die cuts look amazing on both cards and love the way you did the first with the stitched frame and those beautiful colours. Then the black stamped flowers and the beautiful colours for your blending, all absolutely eye catching.
ReplyDeleteYour second round is as awe-inspiring as the first! Love the various techniques that breathe life into these images! Thrilled to see that one doesn't 'have' to be a colouring artist to create beautiful cards! Your inked panels + stamped florals...positively swoon inducing!
ReplyDeletehugs~c
Wow so many beauties here Anita!you certainly are on a roll just now lol.Gorgeous card you entered for our challenge too, such a great design. Thanks for sharing with us over at 'The Flower Challenge' ;) Viv DT xx
ReplyDeleteGorgeous cards and I love how you used your die cuts. Excellent colors and dies! Thank you for your participation on HLS challenge.
ReplyDeleteMartha Lucia - DT HLS Challenge