Friday, 30 December 2022

Pigs in Blankets

Hi there

Back with my final little batch of Christmas cards I made this year. 

I followed the same design as the Flamingo cards in my last post, but this time used another of my new favourite Clearly Besotted stamp sets, Pigs in Blankets.

Again, I made six of these in total, using all the images stamped twice...


All the pigs were stamped in black and coloured with Copics before fussy cutting them out.  I then prepped all my card bases.  I began with a strip of masking tape just below the centre and then blended the background with blue ink.  With the masking tape still in place I inked through a snow stencil with white pigment ink.


I used my MISTI to then position and stamp all the sentiments one after the other.  I sorted the pig images and worked out where I wanted them all then added some shading with a grey marker before adhering them in place with some glue dots.  Just a slim amount of dimension so they were still flat enough to mail.


On these cards I added some shimmer amongst the snowflakes and also in the shaded areas with a sparkle pen.


Here are all six finished cards...


Materials used:
  • Stamps: Clearly Besotted - Pigs in Blankets
  • Stencil: Clearly Besotted - Snow Day
  • Ink: Memento - Tuxedo Black; Distress Oxide - Salty Ocean; Hero Arts - Unicorn; Versafine Clair - Nocturne
  • Coloured with Copics
  • Accents: Spectrum Noir Sparkle Pen - Clear

So there you have it, I've now shared all my 2022 makes.  Although I've been a lot quieter than usual this year, since stepping down from the challenge Design Teams, I hope I've managed to inspire you with some of my projects.

I'll be back next week with some new Brand Ambassador Inspiration from Uniko.


So, all that's left to say is, I wish you a


and all the best for a happy, healthy, safe and crafty 2023!


Crafty hugs,

Fa La La Mingo!

Hi there

More of my Christmas makes and I wanted to use one of my newest stamp sets, Fa La La Mingo by Clearly Besotted.

I made six of these in total, using all the images stamped twice.  These were fairly time consuming as I had to colour all the images and fussy cut them all out.


All the flamingos were stamped in black and coloured with Copics before fussy cutting them out.  I still need more practice with Copic colouring but as I was colouring feathers I think these look pretty good!  I then prepped all my card bases.  I began with a strip of masking tape just below the centre and then blended the background with blue ink.  With the masking tape still in place I inked through a snow stencil with white pigment ink.


I used my MISTI to then position and stamp all the sentiments one after the other.  I sorted the flamingos and worked out where I wanted them all then added some shading with a grey marker before adhering them in place with some glue dots.  Just a slim amount of dimension so they were still flat enough to mail.


As you've got to have sparkle at Christmas, I added some shimmer to the flamingos' hats with a sparkle pen.  Don't look too closely at the fussy cutting, not my best work when crafting to a deadline! :D 


Here are all six finished cards...


Materials used:
  • Stamps: Clearly Besotted - Fa La La Mingo
  • Stencil: Clearly Besotted - Snow Day
  • Ink: Memento - Tuxedo Black; Distress Oxide - Salty Ocean; Hero Arts - Unicorn; Versafine Clair - Nocturne
  • Coloured with Copics
  • Accents: Spectrum Noir Sparkle Pen - Clear


Just one more bundle of makes to share, not too dissimilar to these.  I'll be back very soon.

Thursday, 29 December 2022

Stencilled Let It Snow

Hi there

Sharing more festive multiples today and this design was super simple.

I chose to use more of my pearlescent square cards from my stash for these and chose stencilling again as it's so quick to get a production line going.  I made ten of these in total.


I chose a snowflake stencil with lots of detail and picked out three shades of dye ink.  I've never ink blended on pearlescent cardstock before so wasn't sure how well it would work but they turned out fine.  I laid the stencil in roughly the same position on each card front and added ink in three shades in the same areas of the stencil each time, so there was no need to clean it off throughout the process.


I then found some pearlescent silver cardstock in my stash and used that to cut the die cut sentiments.  These were adhered flat so the cards had no bulk for posting.

Here is the full set...


Materials used:
  • Stencil: Crafters Companion - Glittering Snowflakes Collection: Snow is Falling
  • Ink: Distress ink - Salty Ocean, Dusty Concord; Altenew - Volcano Lake
  • Die: Stamplorations - Let It Snow Phrase Die


So there you have it, simple and quick to create.  Thanks so much for visiting, I'll be back again, hopefully tomorrow, to share the remainder of my Christmas makes.


Wednesday, 28 December 2022

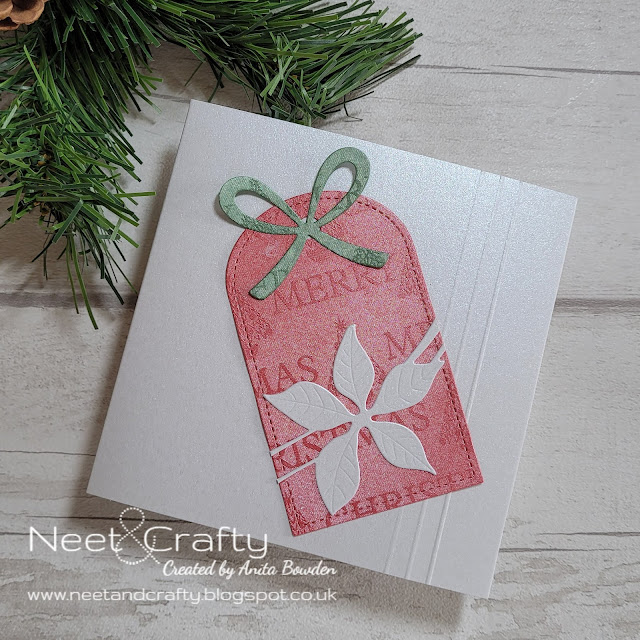
Pearlescent Christmas Tag Cards

Good evening

More of my Christmas card multiples for you today.  

No stamping on these, just die cuts cut from pearlescent cardstock and jacquard-effect papers.  I made eight of these, four in each colourway...


When I make cards I usually start with a piece of cardstock and cut and fold it myself to create the card base but I have a small stash of cards and envelopes which I'm trying to make use of so these ivory pearlescent card bases were my starting point for these.

I've also had these Merry Christmas papers in my stash for as long as I can remember, they were part of a Christmas kit I bought about fifteen years ago!  They look like jacquard fabric and are kind of pearlescent so worked perfectly with these bases.  

The blue and pink version...


I die cut the tags from the patterned paper, and also the bows from a different shade of the same paper collection.  I used a spare card base to die cut the cabin landscapes and then used the bottom part of the same tag die to trim these down, before adhering together.  Before adhering the tags I added three vertical score lines to the bases, just to add a little extra detail.  The bows were then adhered to the top of the tags.


Here's the red and green version...


The process was exactly the same but here I used a poinsettia die to create the die cuts which were adhered across the tags.


The four landscape tag cards...


And the four cards with the poinsettia die tags...


Materials used:
  • Dies: Clearly Besotted - Tag Along Die Collection; Poppy Stamps - Poinsettia Ribbon; Memory Box - Quiet Cabin Landscape
  • Pearlescent cardstock and patterned papers from stash


Thanks for taking the time to visit, I'll be back soon with more.


Monday, 26 December 2022

Skinny Rainbow Trees

Hi there

I hope you all had a wonderful Christmas Day yesterday, celebrating with your nearest and dearest.

I have no plans today so I'm just having a very chilled day at home so thought I'd pop on and start sharing my 2022 Christmas cards.  There was a point at the end of November when I really thought I wasn't going to be able to send handmade cards this year as I'd left it so late, but I knuckled down and made a few bundles of "quick to replicate" designs and was able to send all handmade again this year.

However, due to being so late and also the increasing price of postage, along with the Royal Mail strikes in the UK, I wasn't able to send any cards overseas this year.  So apologies to those of you outside the UK who usually receive a card from me, it just wasn't an option this year, unfortunately :(

Ok, onto my first design.  I made 24 of these in total and got a real production line going.  These took me about an hour and a half...


All four trees are on the same stencil but I inked up each two-toned tree separately, adding masking tape over the tree(s) beside it.  So I inked all the yellow/orange trees onto all the card bases first, before cleaning off, realigning and then inking up the red/pink trees, and so on.  Once all the trees were inked up I then stamped all the sentiments, using my MISTI for positioning and speed.


Something was missing....sparkle!  So I grabbed some glitter glue and added this to all the stars at the top of the trees.  

And there you have it, simple but certainly a merry and bright design in multiple!


Materials used:
  • Stencil: Funky Fossil Designs - Skinny Trees
  • Stamps: Clearly Besotted - Christmas Poinsettia (sentiment)
  • Ink: Distress Ink - Squeezed Lemonade, Carved Pumpkin, Abandoned Coral, Picked Raspberry, Wilted Violet, Chipped Sapphire, Peacock Feathers, Mowed Lawn; Versafine Clair - Nocturne

Thanks for taking a look.  I'll be back again before the end of the year to share more of my festive makes.

And I apologise for being so quiet in general this year, I hope to get back into more crafting again in 2023.

I'd love for you to pop back again before the year is out x

Monday, 28 November 2022

Uniko Brand Ambassador Inspiration - Snowflake Serenade

Hi there

I'm over on the Uniko blog today, here, sharing some cards using the Snowflake Serenade Clear Stamp Set.

You can find all the information on how these were made over on the Uniko post but here they are, along with the supplies used...


Materials used:

  • Stamps: Uniko - Snowflake Serenade, Rustic Christmas
  • Ink: VersaMark; Distress Ink - Rustic Wilderness
  • Embossing Powder: Wow! - Metallic Gold Rich
  • Die: MFT Die-namics - Wonky Stitched Rectangles Stax


My second card...


Materials used:
  • Stamps: Uniko - Snowflake Serenade
  • Ink: Altenew - Dust; Distress Oxide - Tumbled Glass, Broken China, Prize Ribbon; Versafine Clair - Nocturne
  • Water
  • Gems from stash


And my final make...


Materials used:
  • Stamps: Uniko - Snowflake Serenade, Background Builders Winter Wonderland
  • Ink: Versafine Clair - Nocturne
  • Glitter: Sweet Poppy - Super Fine Satin Glitter in Moss Green and Light Blue


Thanks so much for stopping by, I hope you have a lovely week.


Saturday, 12 November 2022

CASE Me a Christmas Card with Michelle Lupton

Hi there

The lovely Michelle Lupton has invited me to join her once again in her CASE Me a Christmas Card Series.  I'm so thrilled to be part of Michelle's series again.  CASE can either stand for 'Copy and Share Everything' or 'Copy and Selectively Edit'.  The aim is to take inspiration from any card made by the other and make a Christmas card.


I had a scroll through Michelle's lovely creations and landed on a card I thought would work well using a die from my stash...


I began with a die cut rectangle and found the central point and ink blended out from the centre with green ink, fading it out.  I then die cut the holly wreath from black cardstock and adhered this in place over the inked background.  I then stamped and heat embossed the large sentiment in gold on a strip of black cardstock and trimmed the edges down using the same stitched die so it would sit in position across the card front.  I thought about adding some berries to the wreath but decided to leave it as just green, black and gold.


Materials used:
  • Dies: Create a Smile - Cool Cuts Double Stitched Rectangles; Tonic - Holly Bouquet
  • Stamp: Clearly Besotted - Brushed Greetings
  • Ink: Distress Oxide - Rustic Wilderness; VersaMark
  • Embossing Powder: Wow! - Metallic Gold Rich


And here is Michelle's gorgeous card, the photo is shared with her permission... 


I changed the orientation of the card to portrait, I felt that worked better with the circular die.  Just changed up the ink colour and switched the sentiment to gold for a more festive feel.  

I'm now off to her blog to see which of my cards she chose to CASE.  You can find her post, here.


Thank you so much for taking a look and thank you once again to Michelle for inviting me to take part.  Her series has been running since October so why not take a look at

CASEing cards is a great way to craft if you need a creative nudge, just remember to give credit to the original designer.


Thursday, 3 November 2022

Uniko Stencil Release Day and Giveaway

Good morning

It's release day over at Uniko, so the four new stencils are now available for purchase, here.

If you've missed my last few posts, here are the new designs...


And I have another card for you today, using the MOD Background Builder stencil...


I love how you can use this stencil to create so many different designs.  I chose a textured teal cardstock and inked up in blue/green shades with a little white.  I finished with a sentiment from the Simply Said Blocks stamp set and some black gemstones.


Materials used:
  • Stencil: Uniko - MOD Background Builder
  • Stamps: Uniko - Simply Said Blocks
  • Ink: Distress Ink - Mermaid Lagoon, Chipped Sapphire, Evergreen Bough; Hero Arts - Unicorn; Versafine Clair - Nocturne
  • Gemstones from stash


Don't forget the giveaway.  Just pop over to the Uniko blog, here, and visit the Design Team and leave comments along the way for a chance to win the stencils.  Good luck!

Thanks so much for visiting today.

Wednesday, 2 November 2022

Uniko October/November Stencil Release - Introducing...Large Snowflake 1 and Large Snowflake 2

Good morning

It's the final day of introductions for the stencil release coming up from Uniko and Bev has triumphed with these.  Two large snowflake stencils which also include the masks so you can create with both the positive and negative images.

Here's Large Snowflake 1...


Here I used the stencil with Distress Oxides and then outlined in silver...


I inked through the stencil with two shades of Distress Oxide ink.  It needed some sparkle so, once dry, I sketched around the inside edge of the the stencil with an embossing pen and then heat embossed in silver sparkle.  I die cut to create a stitched panel and then stamped the sentiment from the Snowflake Serenade stamp set.


Materials used:
  • Stencil: Uniko - Large Snowflake 1
  • Stamps: Uniko - Snowflake Serenade
  • Ink: Distress Oxide - Salvaged Patina, Shaded Lilac; Versafine Clair - Nocturne; Embossing pen
  • Die: Create a Smile - Cool Cuts Double Stitched Rectangles
  • Embossing Powder: Wow! - Silver Sparkle


And for my second I used both the stencil and mask when ink blending...


On some linen cardstock I firstly ink blended through the stencil in pink, just in the centre, and then used the mask to cover this area and then ink blended around the edges in blue.  I stamped the sentiment from the Festive Sentiments stamp set and then mounted the panel onto a co-ordinating pink card base.

Materials used:
  • Stencil: Uniko - Large Snowflake 1
  • Stamp: Uniko - Festive Sentiments
  • Ink: Distress Oxide - Kitsch Flamingo, Tumbled Glass; Versafine Clair - Nocturne


And this is Large Snowflake 2...


I used the shifted stencil technique here to create the look of dimension...


On some blue cardstock I inked through the stencil in blue first, cleaned off the stencil and then shifted it slightly before inking through with some white pigment ink which creates the shadow effect.  I inked up more of the blue cardstock to create a co-ordinating die cut and then stamped and heat embossed the sentiment in white, which is from the Snowflake Serenade set.  I then added a few gemstones to finish.


Materials used:
  • Stencil: Uniko - Large Snowflake 2
  • Stamps: Uniko - Snowflake Serenade
  • Ink: Distress Ink - Stormy Sky; Hero Arts - Unicorn; VersaMark
  • Die: Create a Smile - Cool Cuts Double Stitched Rectangles
  • Embossing Powder: Wow! - Opaque Bright White
  • Accents: Gemstones from stash


And for my final card I used the mask to create this simple by effective card...


I chose to use a textured purple cardstock for this card front.  I couldn't get my shimmer spray to work so I made my own just by adding a little silver sparkle mica powder to a mini mister with water.  All I did here was lay down the mask and spritz the mist of sparkle and then gently lifted away the stencil.  Once dry I heat embossed the sentiment in the centre, another from the Snowflake Serenade stamp set.


Materials used:
  • Stencil: Uniko - Large Snowflake 2
  • Stamp: Uniko - Snowflake Serenade
  • Ink: VersaMark
  • Embossing Powder: Wow! - Platinum
  • Spritz made from water mixed with silver mica powder

Thanks for taking a look.  For more inspiration using this stencil please do pop over to the main Uniko blog, here, where the team are sharing more projects today.

The new stencils will be available to purchase from the Uniko website from 3 November at 9.00am GMT.  Bev is also doing a Giveaway so pop along to the blogs of each member of the team and leave a comment for a chance to win the stencils.

I'll be back tomorrow with the full release information and another card.


Related Posts Plugin for WordPress, Blogger...