Saturday, 26 November 2016

Less is More Week #304

Hi there

It's new challenge day at Less is More and this week we're back with our Recipe challenge.  This week we have a technique for you and it's one that can create some fabulous effects.  We would like to see you...


Use an Emboss Resist Technique


Apologies again, just one card for you this week.  I was away last weekend and have had two evening meetings this week as well as visiting a friend so I've struggled to make any more in the evenings.  Hopefully things will now slow down a little....I hope so, I've not really started my Christmas cards yet!  But here's one to add to my pathetically small collection so far!

I decided to use the work of the awesome Heather Telford as my inspiration.  Heather is an amazing artist and I particularly love her snowscape creations.  I've seen her previously create snow on branches using emboss resist so I decided to give it a go.  If you have time you really should pop over to her blog, you certainly won't be disappointed.


This look is created by stamping first in VersaMark, and then shifting very slightly, only a millimetre or two, before stamping again in coloured ink.  I used black here.  The MISTI was the perfect tool for this as I stamped and then just shifted my card up a touch before stamping again, you could use a stamp positioner for this too. All the stamping is then heat embossed in clear so that when you ink blend over the top the stamped images resist the ink.


I finished by stamping the sentiment and then adhering the panel to my card base on some fun foam.

Materials used:

  • Stamps: Card-io - Branching Out; Paul Pascual - Christmas Messages
  • Ink: VersaMark; Versafine - Onyx Black; Distress Ink - Stormy Sky, Tumbled Glass, Victorian Velvet
  • Embossing Powder: Rubber Stampede - Clear

Challenge entries:

Addicted to Stamps and More - Challenge #221 - Anything Goes
The Male Room - Challenge #49 - ????Scapes
Time Out - Challenge #71 - Christmas
Moving Along with the Times - Challenge #34 - Anything Goes Christmas
CASology - Challenge #225 - Soft
Inkspirational - Challenge #122 - Chill


Grab Our Badge!


I love how this turned out, although I shifted the card a little more on the lower branch than the upper  one...it was obviously snowing heavier lower down! lol :)

Thanks so much for joining me today, and please don't forget to visit my teamies over at the challenge blog for lots more emboss resist inspiration.


Sunday, 20 November 2016

Happy Little Stampers New Release Blog Hop!

Hi there

Today I'd like to welcome you to the Happy Little Stampers blog hop to celebrate the release of six new fabulous stamp sets.


My fellow Design Teamies will be sharing their projects using these new stamp sets and to be in with a chance of winning a fabulous prize of a $50 gift certificate to the HLS Shop all you have to do is join in the hop and comment along the way.  A winner will be chosen at random from all the comments left.  The hop will run for one week, finishing at 12pm AEST on 28 November.

A full list of the designers taking part is shown below, so if you've joined mid-hop you can pop to the beginning following the link.


My first card uses a lovely new Christmas set called Christmas Joy, a great mix of festive sentiments and images...


I started by die cutting a stitched oval from some Strathmore Bristol cardstock and stamped the sentiment in black ink.  I then stamped and heat embossed the poinsettias and holly in white surrounding the sentiment.  I then coloured the images with Zig markers and blended with water.  I added a little shading around the images in a blue/grey colour just to add some interest.  I then popped the oval up on some 3D foam onto a card base which had been scored horizonally across the centre.

Materials used:

  • Stamps: Happy Little Stampers - Christmas Joy
  • Ink: Versafine - Onyx Black; VersaMark
  • Embossing Powder: Wow! - Opaque Bright White
  • Coloured with Zig Clean Color Real Brush Markers
  • Die: Lil' Inkers - Stitched Oval 

I'd like to link this card up at the following challenges:

Cute Card Thursday - Challenge #452 - Christmas/Holidays
Addicted to Stamps and More - Challenge #220 - Photo Inspiration
Crafty Cardmakers - Challenge #177 - Embossing Heat or Dry
Stamping Sensations - November Challenge - Christmas Greetings
Penny Black and More - November Challenge - Anything Christmas
Happy Little Stampers - November Christmas Challenge - Watercolour


I went a bit crazy with my second card, well, crazy for me as I usually create with clean lines but I wanted to give these balloons the Brusho treatment...and Brushos like to do their own thing!  This card uses the new Simply Said set which is full of great sentiments, a balloon and a heart...


On some Derwent watercolour cardstock I stamped the balloons and heat embossed in white.  I then brushed some water over and around each balloon before sprinkling some Brusho crystals over each one.  A little more water was required to activate the crystals so I spritzed a little and that's when it got a little out of control.  But I think the design suits the fabulous bold sentiment which was heat embossed in white onto some black cardstock.  The panel was adhered over some red cardstock and adhered flat to the cardbase before the strip was popped up on 3D foam.

Materials used:

  • Stamps: Happy Little Stampers - Simply Said
  • Ink: VersaMark; Brusho - Brilliant Red, Purple, Turquoise
  • Embossing Powder: Wow! - Opaque Bright White
  • Cardstock from stash

I'd like to link this one up at the following challenge:

AAA Cards - Game #78 - Circles (may not be CAS enough, please disregard if it's not)


And finally, a one layer card uses a great new set called Wish You Were Here which has sentiments in a great font, together with some world famous images, and the female silhouette which I've used here...


I masked off a vertical panel and blended three colours of Distress Ink.  I then used the Ghosting Technique of spritzing water through a stencil and blotting away some of the colour.  I stamped the silhouette and sentiment in black ink before adding some gentle splatters using the same colours of Distress Ink mixed with a little water.

Materials used:

  • Stamps: Happy Little Stampers - Wish You Were Here
  • Ink: Distress Ink - Cracked Pistachio, Mermaid Lagoon and Blueprint Sketch; Versafine - Onyx Black
  • Stencil: Tim Holtz - Dot Fade

I'd like to link this card up at the following challenges:

Addicted to CAS - Challenge #101 - Ombre
My Time to Craft - Challenge #334 - No layers
Sweet Stampin' Challenge - Happy Birthday


Here is the order of the hop, and be sure to comment along the way to be in with a chance of winning that fabulous prize!

Thanks so much for popping by, and good luck!


Saturday, 19 November 2016

Less is More Week #303

Hi there

We're back to Saturday morning once again, and a new challenge is just beginning over at Less is More.  This week it's the turn of our Theme challenge and this week we want to see where this will take you...


Vintage


I've had a hectic week this week, with my evenings full of various blog deadlines and chores and this morning I'm off to catch a train to Bath for the weekend with a group of ladies to celebrate a good friend's 40th birthday.  So I've only got one card to share with you today...time just ran out for me!

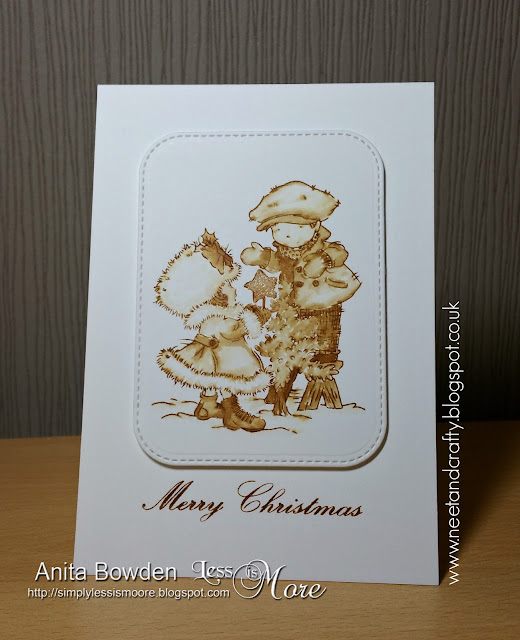
I have a handful of Lili of the Valley stamps and this one I thought was perfect for a vintage Christmas card...


This was pretty simple to create but I think the effect is great.  I used Strathmore Bristol cardstock as it works well with water.  I stamped the image with Vintage Photo Distress Ink and then used water and a brush to pull the colour in from the outlines of the image. I squidged my ink pad onto my craft mat and used this to add a little more colour in places.  I cut the image out with a stitched die and popped it up on 3D foam onto my card base.  The sentiment was stamped below using the same ink and I added a little bit of clear Wink of Stella to the star.

Materials used:

  • Stamps: Lili of the Valley - Oh Christmas Tree; Happy Little Stampers - Mixed Christmas Sentiments
  • Ink: Distress Ink - Vintage Photo
  • Die: MFT Die-namics - Stitched Rounded Rectangles
  • Accents: Wink of Stella - Clear

My teamies have done a great job this week so if you have time I'm sure they would love for you to visit them.

I think there are a few directions in which this cue word can take you so I can't wait to see what you create this week.


Wednesday, 16 November 2016

STAMPlorations Giving Thanks Blog Hop

Hi there

Today, as part of the Design Team at Less is More, I'm delighted to be joining my teamies to take part in the Giving Thanks Blog Hop with STAMPlorations!


The lovely Shery has invited us to take part in this fabulous Blog Hop and Linky Party and is offering some wonderful prizes for commenting along the hop and participating in the linky party.

Clicking HERE will take you to the beginning of the hop.


For my thank you card I used the ARTplorations Christmas Reindeer stencil by STAMPlorations...


I adhered a strip of plaid patterned paper down one side of my card base.  Then on a panel of white cardstock I blended Distress Inks in co-ordinating colours through the deer stencil.  The sentiment was then stamped in black and the panel adhered flat over the card base and paper.

Materials used:
  • Patterned paper from stash
  • Stencil: ARTplorations by STAMPlorations - Christmas Reindeer
  • Ink: Distress Ink - Pumice Stone, Gathered Twigs, Evergreen Bough, Peacock Feathers, Faded Jeans; Versafine - Onyx Black
  • Stamp: Clearly Besotted - Many thanks

Challenge entries:

AAA Cards - CAS Game #77 - Thanks / Thanksgiving
Virginia's View - Challenge #25 - Stripes and Plaid
Simon Says Stamp Monday Challenge - Thanks / Thanksgiving
Addicted to CAS - Challenge #101 - Ombre


So, click here to join the hop and comment along the way for a chance to win prizes, and why not join in the linky party too.  Have fun!


Saturday, 12 November 2016

Less is More Week #302

Hi there

Welcome to new challenge day at Less is More.  And once again it's the turn of our One Layer challenge.  And our theme for you this week is...


Books / Literature


I'll admit, this one stumped me this week, so just one sample for you this time.  And as it's a one layer challenge I decided to make a bookmark...


I started by die cutting a piece of white cardstock using a fishtail flag die.  Next I stamped the bookworm, masked him to stamp the bookshelf, and with the masks still in place I stamped the text background.  I wanted a faded look to the text so once the stamp was inked up in grey I blotted slightly with a paper towel before stamping.  I coloured the bookworm and bookshelf with ProMarkers and Flexmarkers.  The sentiment flag was stamped in turquoise flush with the edge.  I fixed an olive green eyelet to the top to co-ordinate with the worm and threaded some red ribbon through it.  For a finishing touch I added some Glossy Accents to the worm's glasses.

Materials used:
  • Die: MFT Die-namics - Fishtail Flag Stax
  • Stamps: Clearly Besotted - Bookworm, Bookworm Additions, Background Builder
  • Ink: Memento - Tuxedo Black; Versa Color - Turquoise, Sky Gray
  • Coloured with ProMarkers and FlexMarkers
  • Eyelet and ribbon from stash
  • Accents: Glossy Accents

Challenge entries:

Addicted to Stamps and More - Challenge #219 - CAS


I hope you'll play along this week.  My teamies have created some great inspiration to get you started.  Looking forward to seeing you in the gallery.


Monday, 7 November 2016

Muse Challenge #191 - Birthday Sprinkles

Good afternoon, crafters

It's new challenge time over at Muse and I'm thrilled to be your designer for this week.

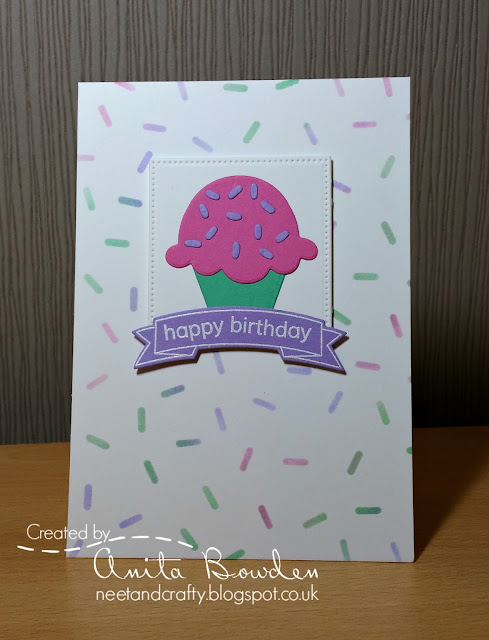
I paired up a die set (which was a wonderful birthday gift earlier in the year from the lovely Susan - thank you!) with a stencil which I think co-ordinates really well.

Hopefully my card will inspire you to play along at Muse this week...


I started by sponging Distress Inks through a stencil directly onto the card base in three different colours.  I then die cut the cupcake from cardstock in co-ordinating colours which I adhered onto a pierced square die cut.  I finished by heat embossing the sentiment and banner in white which was cut with it's co-ordinating die and then adhered with the cupcake panel on 3D foam.

Materials used:

  • Stencil: Hero Arts - Sprinkles
  • Ink: Distress Ink - Cracked Pistachio, Shaded Lilac, Picked Raspberry; VersaMark
  • Dies: MFT Die-namics - Pierced Square Stax; Paper Smooches - Mini Cupcake; Clearly Besotted - Mini Basic Banner
  • Stamps: Clearly Besotted - Mini Banners
  • Embossing Powder: Wow! - Opaque Bright White
  • Coloured Cardstock: Papermania

Challenge entry:

Seize the Birthday - Anything Goes (Stencils)


Thanks so much for visiting today.


Saturday, 5 November 2016

Less is More Week #301

Hi there lovely crafters

Unbelievably, we are back at the beginning of another month, I've never known a year fly by so fast!  So, the first Saturday of the month means that at Less is More we are back with a Colour challenge.  And this week we would like to see...


Purple and Gold


I love the colour purple but for some reason my camera doesn't, and the shades always look bluer than they actually are.  Anyway, I have two cards to share with you this week...


I decided to have another play using the ghosting techique for this card, I just love the watery bleached effect you can achieve.  So I blended out two shades of purple Distress Ink up from the corner of a piece of white cardstock then when I was happy with the blend I placed a stencil over the top, spritzed it with water, removed the stencil, left for a few moments and then blotted away the water with a paper towel, which lifted the colour.  Once dry I die cut the stitched panel from this inked piece and another slightly larger from some plain white card.  I prepped the panel with some anti-static powder before heat embossing the sentiment in gold.  The panels were then adhered to the card base, the top one being on 3D foam.

Materials used:

  • Ink: Distress Ink - Dusty Concord, Shaded Lilac; VersaMark
  • Stencil: Tim Holtz - from Mini Stencil Set 10
  • Dies: MFT Die-namics - Stitched Rectangle Stax
  • Stamp: Lawn Fawn - Scripty Sayings
  • Embossing Powder: Wow! - Metallic Gold Rich

Challenge entry:

STAMPlorations - November CAS Challenge - Anything Goes with option of Purple


For my second card I put to use some gorgeous gold glitter washi tape which I found in Sainsbury's of all places.  The photograph really doesn't show how beautiful it is...


I started by adhering a strip of the gold washi to the base of my card base.  I then cut a panel slightly shorter for the rest of the design.  I die cut the scribbles from some plum coloured cardstock (I've no idea why my camera hates purple so much, it looks really dark, almost navy here!).  I then adhered some washi strips to a scrap of cardstock and die cut the same scribbles from this.  Luckily the die didn't cut right through which made the next step so much easier.  I thought I would need to adhere the gold pieces within the purple outline but all I did was adhere the purple over the top in position! I love how these scribbles work well as flower heads.  I then stamped some stems and a leaf in grey and the sentiment in a co-ordinating purple shade.  The panel was then adhered using fun foam for dimension.

Materials used:

  • Dies: MFT Die-namics - Scribbles
  • Stamps: Woodware - Doodle a Flower; Clearly Besotted - Fancy Sayings
  • Ink: Versa Color - Sky Gray, Grape
  • Cardstock: Bazzill Card Shoppe - Purple from assorted pack
  • Washi Tape: Sainsbury's - From Impressionist Printed Craft Tapes pack

Challenge entries:

CAS on Sunday - Challenge #95 - Flowers


Thanks so much for stopping by.  My teamies have created some wonderful projects using this beautiful colour combo (and their photography is better than mine!) so please do stop by the challenge blog and follow the links.  There is also some news for you over at the main post and you may also spot a familiar face over there this week...


Wednesday, 2 November 2016

Happy Little Stampers November 2016 CAS Challenge

Good evening crafters

It's time to announce the next CAS challenge over at Happy Little Stampers.  The CASE the Designer challenge for this month is already live and the other monthly challenges, Christmas, Mixed Media and Anything Goes will follow over the next few days.

So, this is what we are looking for at the CAS challenge this month...


Happy Little Stampers will be sponsoring this challenge.


There are some tutorial links over on the challenge post if you are looking for some inspiration.


For my DT card I created some faux metal leaves from die cuts...


I started by cutting a piece of grey cardstock using a fishtail flag die and stamped the sentiment in black before adhering to my card base.  I then made the leaves.  These are normal cardstock die cuts which I heat embossed three times using metallic embossing powders.  To do this I squidged my VersaMark inkpad directly over the die cuts and then completely covered the top side with embossing powder, and repeated the process twice more.  I then arranged these over my cardstock, adhered in various places with some Glossy Accents and placed an acrylic block over the top until the glue was dry.

Here's a closer look at the leaves...


Materials used:
  • Coloured Cardstock: Bazzill Card Shoppe - from an assorted pack so no name for the shade
  • Stamp: Happy Little Stampers - Mix Mash
  • Ink: Versafine - Onyx Black; VersaMark
  • Dies: Creative Expressions - Laurel Leaves, Olive Branch, Faux Quilled Leaves
  • Embossing Powder: Wow! - Metallic Silver, Metallic Copper, Metallic Gold Rich

Challenge entries:

Crafty Catz - Challenge #344 - Anything Goes with twist of die cuts/punches
AAA Cards - Game #76 - Masculine


Thanks so much for popping by, each and every one of your visits and comments is so appreciated.


Related Posts Plugin for WordPress, Blogger...