Sunday, 28 July 2013

Muse Challenge #27

Hi all

I'm spending today at home doing bits and bobs so thought I'd have a quick break to make a card for this week's Muse challenge.  This week we have a gorgeous card created by Tracey McNeely to use as our inspiration.  Tracey's cards always have a very fresh and clean feel and this one is no exception (see Tracey's card further down in this post).

Here is my interpretation this week...


I mimicked the layout and colour scheme although decided to use clusters of small flowers taking the place of the large blooms.  The flowers didn't look finished without their centres so I opted to use Narcissus Versa Color ink which is a creamy yellow.  So, in place of the clear sequins used on the Muse card, I chose some creamy peach pearls to finish off.
 
Materials used:
  • Stamps: Clearly Besotted Stamps - Flower Arrangement and Leafy Accents
  • Dies: Clearly Besotted Stamps - Flower Arrangement
  • Ink: Versa Color - Olive, Pink, Heliotrope and Narcissus; Versafine - Onyx Black
  • Pearls from stash
  • Tools: Fiskars Corner Edgers - Rounder
 
I like the finished result of my card but don't think its a patch on Tracey's creation, below.  She has such unmistakable great style.


Thanks for dropping by and I hope I manage to make your visits worthwhile.

That's all from me today, I'm off out tonight for a long-awaited carvery.  No doubt it will ruin my diet this week but I haven't had a lovely roast in a long time and its my week off so I feel I can have a treat!  I'll just go easy on the roast potatoes :)

Take care


Saturday, 27 July 2013

Happy Retirement

Hi lovelies

No challenge entry today, just thought I'd share a card I quickly put together last night.  It's for a friend of my chap and we're off to his retirement barbecue later today...on the first rainy day since having all that gorgeous weather.  It's also the first day of my week off and I'm not in the least bit impressed that the forecast is rain for the whole week...what a let down!


I bought this stamp a while ago on eBay as I thought it would be great for this very occasion.  Unfortunately, I have no idea what brand it is as it arrived in plain packaging. 
 
Materials used:
  • Stamps: Man in hammock - unknown brand; Clearly Besotted Stamps - Happy Days
  • Ink: Memento - London Fog
  • Coloured with ProMarkers
  • Cardstock: From stash
  • Patterned paper: Hot of the Press - Cardmaker's Ultimate Pack (floral)
  • Ribbon and gems from stash
 
That's all from me today, thanks as always for visiting :)
 
Take care


Wednesday, 24 July 2013

CAS(E) this Sketch #37

Hiya

Just a quickie tonight as I can't abandon the housework any longer!

I still haven't entered many sketch challenges so thought I'd give this week's CAS(E) this Sketch challenge a go.

I bought some alphabet dies a while ago which I still haven't used and as these are the only ones I have I decided to give these their first outing.

 
A bit of die cutting, some matting and layering, a stamped sentiment and it was finished :)
 
This is the sketch we were given...
 

Materials used:
  • Dies: Spellbinders Nestabilities - Classic Ovals Large; Xcut Alphabet Die - Headliner
  • Cardstock: Papermania Premium Textured Cardstock (colours); white card from stash
  • Stamp: Clearly Besotted Stamps - Butterfly Wishes
  • Ink: Versafine - Onyx Black

Thanks for popping by and hopefully I'll be back soon after I've tidied up and cleaned this pigsty I live in! :D

Take care


Tuesday, 23 July 2013

Subtle Get Well Soon

Hi there

I came home from work tonight and thought I'd have a go at making another entry for the latest Clearly Besotted Challenge with the theme 'Seeing Spots' before the time runs out in a few hours.

I went for something a little different this time and used some of my new Versa Color inks to make this subtle design...


I first stamped the 'Leafy Accents' using Laurel Leaf ink, I think its such a beautiful grey/green shade.  I then used the 'Building Blocks' set to stamp the dots onto some white card using Ash Rose and Seashell inks.  I then used a small flower die from the 'Flower Arrangement' collection to cut the flowers from the dotted card.  At this point I really didn't think it was going to work at all.  The flowers looked too pale and a bit odd without any centres but I stuck with it and positioned them over the leafy background.  Once I gave them some glazed gem centres and added the ribbon it all started coming together.  I realised I didn't have any get well cards in my stock so that's what this became, using the sentiment, also from the 'Flower Arrangement' collection.

For a design I almost abandoned halfway through, I actually think it may be a design I return to again :)

Materials used:
  • Stamps: Clearly Besotted Stamps - Leafy Accents, Building Blocks and Flower Arrangement
  • Ink: Versa Color - Laurel Leaf, Ash Rose and Seashell
  • Die: Clearly Besotted Stamps - Flower Arrangement
  • Gems: Papermania - Glazed Gems (Iridescent)
  • Cardstock and ribbon from stash

Thanks for visiting, I really appreciate the support and I hope to see you again very soon.


Saturday, 20 July 2013

Handmade Flowers

Hi guys

Its another glorious Saturday down here in South Devon, I hope it is wherever you are too :)

I'm back today to share a card I have made for this week's challenge at Less is More, where the theme is 'Hand made Flowers'.

I was a bit stumped at first as I don't own many dies and only really have card and paper in my stash, no fabric, etc. so I had to have a little think.  Then I remembered a technique I tried when I was younger and this is what materialised...


All this involved was double-sided paper and a circle die for the flower petals.  At first I die cut some circles with a slightly larger die but the flower ended up massive! :)  So I started again with the smallest of the circle dies, ensuring it was placed in the same position on the patterned paper each time so it would be symmetrical when folded.  All you need to do is fold in two sides to create a cone shape, and repeat to create eight petals in total.  As one side of the patterned paper was pinstripes I then decided to experiment with an oval die to create the leaves, with each oval just folded in half.  I then used some strong glue to hold all the elements in place.
 
A button, some twine and a simple sentiment were added to finish.
 
Materials used:
  • Paper: Stampin' Up - Designer Series Paper Stacks (I think these are Wild Wasabi and Baja Breeze)
  • Dies: Xcut - Circles nesting dies; Spellbinders Nestabilities - Classic Ovals Large
  • Twine - Doodlebug - Bright Assortment
  • Stamp: Clearly Besotted Stamps - A Little Sentimental
  • Ink: Versa Color - Violet
  • Button from stash
That's all from me today.  I'm off to do some chores then get myself ready for a girlie night out :)
 
See you very soon


Wednesday, 17 July 2013

Retro Spots

Hi there

Earlier today I had an idea in my head of another design I could try for the current Clearly Besotted Challenge #2 which is 'Seeing Spots'.  I thought I'd try making a quick card by die cutting the 'spots' and stamping various patterns behind them, on the base card.  Yes it worked but it definitely wasn't quick! 

This is very different to anything I've made before, both in design and colour, but I actually really like it and I think its a great masculine card, my stock of which is virtually non-existent!

Here it is...


I started by adhering some white cardstock onto some lime green to create a frame, I then die cut the three circles through both layers of card.  The next part took a fair bit of planning!  I roughly pencil marked onto the base card where each of the circles would sit.  I then masked around each of them, one at a time so I could stamp the various designs.  The die cut piece was then adhered to the base card.  I curved the sentiment stamps to follow the curve of the circles and finished with some blue gemstones.
 
I am also entering this card into the latest challenge at Color Throwdown.  I thought these colours would work really well with the chevrons and stripes to create a retro feel.  I don't have the ink colours stated here but I used the closest I had in my stash.
 

Materials used:
  • Cardstock: White card from stash; Bazzill Basics Premium Cardstock (green)
  • Dies: X-cut - Nesting Circle Dies
  • Stamps: Clearly Besotted Stamps - Basic Chevrons, Basic Stripes, Building Blocks and A Little Sentimental
  • Ink: Versa Color - Cyan, Royal Blue, Khaki and Brown
  • Gems: Papermania - Adhesive Stones Blue


To make this 'quick' card, photograph it while I still had some decent daylight, and then blog it has taken a lot longer than I thought and my poor tummy is rumbling away!  So, I'm now off to the kitchen to create something else! :)

Thanks for visiting and I'll hopefully be back in a day or so to share more. 

Have a lovely evening folks x


Monday, 15 July 2013

Butterflies and Bling!

Hi guys

I'm back tonight to share a card I made for a very good friend and work buddy.  She loves pink, glitter and butterflies so I thought this little creation would be perfect for her :)


This card took ages to make, I was faffing around for ages with it!  I'm still not entirely happy with the scalloped panels but overall I think it turned out ok.
 
I started with a pearlescent card base as I thought this would itself add a feeling of bling.  Once I'd sorted the panels I then stamped some pale pink vellum (it looks white here but it is in fact very pale pink) with the polka dot stamp from the Clearly Besotted Stamps 'Building Blocks' stamp set, using silver ink.  I then die cut the butterflies from the stamped vellum and curled them slightly using my pokey tool to give them some definition.  Next came the frustrating part, my gemstones wouldn't stick to the vellum, must be something in the metallic ink, so I had to adhere each one using extra glue dots.  I then added more bling with the pink gemstones and used the same silver ink to stamp the sentiment.
 
I used three products from the Clearly Besotted Stamps range so this is my second entry in the current Clearly Besotted Challenge which is 'Seeing Spots'.
 
This will also be a second entry for this week's challenge at CAS-ual Fridays which is Polka Dots.
 
Materials used:
  • Cardstock: Pearlescent card base from stash; Kanban - Sherbert Pips (pink)
  • Vellum: Anita's - Plain Pastel Vellum
  • Dies: Spellbinders Edgeabilities - Classic Scallops; Clearly Besotted Stamps - Butterfly Wishes
  • Stamps: Clearly Besotted Stamps - Building Blocks and For Everyone stamps sets
  • Ink: Versa Color - Silver
  • Gemstones from stash
 
Thanks as always for popping by and I always appreciate your comments.  Hopefully I'll get a good night's sleep tonight as it seems a little cooler, last night was unbearable.  I hope you're all coping with this sticky heat.  I adore the sunshine but the heat just knocks me out!
 
Bye for now


Friday, 12 July 2013

Polka Dot Butterflies

Hi guys

Sorry I've not been around for a few days, I've had a very busy week at work and all I've been good for when I get home is crashing on the sofa!  However, I did make this card a few days ago for a good friend of mine to give to another good friend of mine :)


Firstly, I placed a mat of dark pink card on the white card base.  I then framed some patterned paper with white card and adhered this to the base.  I die cut some butterflies from the same patterned paper pad and then die cut some smaller butterflies from vellum and layered these over the top, adhering with small glue dots so it wouldn't be seen through the vellum.  I finished off with a die cut panel for the sentiment and embellished the layered butterflies with some gems.
 
Materials used:
  • Cardstock: Papermania Premium Textured Cardstock (pink); white cardstock from stash
  • Patterned Paper: Pebbles - Sunny Side
  • Dies: Clearly Besotted Stamps - Butterfly Wishes; Spellbinders Nestabilities - Reverse Wonky Rectangles
  • Stamps: Wild Rose Studio - Everyday Greetings
  • Ink: Versa Color - Mountain Lake
  • Gems and vellum from stash
 
Hopefully I'll be less shattered and get crafting again in the next few days, I keep missing some good challenges!  Although, I've just 'spotted' (teehee) two challenges I can enter this card for:
 
CAS-ual Fridays - Polka Dots
 
Right, I'm off to my comfy bed, promised myself an early(ish) night.
 
Bye for now x


Monday, 8 July 2013

A Little Discipline Required!

Hi guys

This has absolutely nothing to do with cardmaking but I've added a new Page Tab to my blog here, where I am intending to keep a log of my weight loss progress.

I've just re-joined WeightWatchers (hopefully for the last time!) but this time I'm doing the plan online so won't be weighed at a meeting.  So, to help me stay on track I will detail my weight progress on here.

I've got a lot of weight to lose, for my health as well as my self-confidence, so with my BIG 40 approaching next year I've decided to give it a really good shot this time.

Week 1 went well so lets hope I can keep it heading in the right direction!


Bye for now

Shades of Grey - Less is More Week 127

Hi there

Tonight I'm here to share a card I've made for this week's challenge at Less is More, which is to use at least two Shades of Grey.

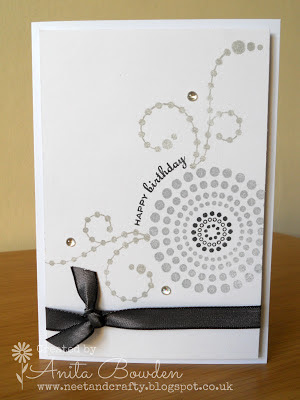
I used a newly purchased stamp set from Inkadinkado to create this...

 
I really like this stamp set, its nothing like anything else I have and I think its really great for masculine cards, particularly in these grey shades.  Thanks Less is More, I always tend to grab my very girly-coloured inks so it made a nice change to create something very different.
 
Materials used:
  • Stamps: Inkadinkado - Circle & Dots; Personal Impressions - Mix and Match (sentiment)
  • Ink: Versa Color - Chateau Gray, Sky Gray, Charcoal
  • Embellishments: Papermania - Glazed Gems (Iridescent)
  • Ribbon and cardstock from stash
 
When I first saw this new challenge on Saturday I wasn't able to make a card as I didn't have the right materials, all that changed today thanks to this little delivery...
 

Yay...don't you just love receiving parcels like these!  I promised myself that this month I would spend some money on some much needed ink.  I had a very small collection of Versa Color ink cubes and I wanted to complete this collection before starting to collect more brands.  A few were out of stock so I think I'm now about five colours away from the complete set :)

Thanks for stopping by, I hope you're all enjoying this glorious weather.  It's a shame I'm in the office all week but its still much nicer to look out at a sunny day.

Bye for now...


Thursday, 4 July 2013

Less is More Week 126

Hi there

Apologies for being a bit quiet this week, I just haven't been able to find the time to make any cards but I wanted to make at least one before the week was over so I decided to have a go at this week's challenge at Less is More before the challenge ends tomorrow.  The very talented Hannelie of Desert Diva is a Guest Designer this week, so if you're not familiar with Hannelie's fab designs go take a look here, you won't be disappointed.

The trigger word this week is SAND.  At first I drew a blank but then I remembered a stamp set I recently acquired free with Creative Stamping magazine.  The set is by Clear Impressions and features some seaside designs.

I decided to create a beach scene, why, I really don't know!  This is not in my comfort zone AT ALL!  So I found myself reaching for my chalks which have been abandoned of late and this is what emerged...


To be honest, I absolutely hated this when I first completed the chalking and stamping!  I was using a larger piece of white card to chalk the background and it looked a bit of a mess.  I then cut it down to size before deciding where to place the sentiment and by the time I matted and layered it which framed the whole picture, its now starting to grow on me a little.  I coloured the deck chair with FlexMarkers.  Initially I was just going to put it aside and not share it with you guys but then I thought 'hey, a challenge is a challenge' so here it is.

Materials used:
  • Chalks: Craf-T Products - Decorating Chalks
  • Stamps: Clear Impressions
  • Ink: Impress: Jet Black
  • Coloured with FlexMarkers
  • Cardstock from stash


As always, thanks for visiting today and hopefully I will have more cards to share with you over the weekend :)

Take care
Related Posts Plugin for WordPress, Blogger...