Saturday, 26 September 2020

Book Worm Bookmark

Hi there

You may be glad to know (!!) this is the last of my recent bookmark makes, but I had such fun making them I think some more may be created very soon! 

This little guy has been in my stamp stash for years and I've only ever used the set once before so I think he deserved an inking!  And for this one I used the tall tag die with the fishtail which came in the duo set with the other die I've been using.


I began by stamping and colouring the book on a die cut panel of white cardstock.  This was then masked and I ink blended the background in a neutral shade and then blended through a woodgrain stencil with a shade of brown.  I then stamped, coloured and die cut the book worm and adhered him onto the book.  I stamped the sentiment and then die cut a second panel from green polka dot paper and adhered this on the reverse for a cleaner finish.  I then added some gloss to his glasses.


I finished by adding some brown grosgrain ribbon through the slot and tied this with some co-ordinating green twine.  Here is the reverse view...


Materials used:
  • Stamps: Clearly Besotted - Bookworm and Bookworm Additions
  • Stencil: Funky Fossil - Woodgrain Background
  • Ink: Distress Ink - Antique Linen, Rusty Hinge; Memento - Tuxedo Black; Versafine - Onyx Black
  • Dies: MFT Die-namics - Tall Tag Duo; Clearly Besotted - Bookworm
  • Coloured with Copics
  • Accents: Glossy Accents; Ribbon - American Crafts; Twine - Hemptique


That's all from me today.  Phew!  That was a lot of posts today, thanks so much if you're still with me!

Butterflies and Flowers Bookmark


Good evening

Something that gets neglected in my craft stash is patterned papers, I just don't seem to use them very often on cards.  And after using some of them as co-ordinating back panels of some bookmarks, I thought they would be perfect used as a decorative rather than stamped or stencilled surface of a bookmark.

So that's what I did for this one...


Using a tall tag die I die cut two different designs from a glittered and glossy floral paper pad and adhered these back to back.  I then die cut two butterflies from white glitter cardstock.  The largest was adhered over a solid die cut from deep pink cardstock which I then infilled with Glossy Accents.  Once dry I adhered this to the top of the panel.  So that it didn't look untidy on the reverse I die cut another solid butterfly, from the same cardstock used for the front and adhered this on the back, mirroring the other butterfly.  The smaller butterfly was adhered over another solid die cut using the same paper used on the reverse and this was adhered over some die cut co-ordinating leaves.


This is the view from the reverse side...


Materials used:
  • Dies: MFT Die-namics - Tall Tag Duo; Clearly Besotted - Butterfly Duo Die Collection; Creative Expressions - Olive Branch
  • Patterned Paper: DecoTime (purchased from The Range)
  • Accents: Glossy Accents


I love how this turned out and I have so many lovely papers so I have a feeling a lot more of these will be made!


Rainbow Clouds Bookmark


Yes, you've guessed it, I have another bookmark for you! lol

I went a bit crazy last weekend and couldn't stop making them :)

This one is so fun and perfect for all the rainbow themes that are so popular and relevant at the moment.

This one kind of just evolved as I was making it, I didn't have the whole design in my mind when I started it so just went with the flow.


On a piece of thin cardstock I added some adhesive and then cut and adhered strips of cardstock in rainbow order, before die cutting with the faux stitched tag die.  I also then die cut a piece of white cardstock and adhered this back to back to create a better finish on the reverse.  I wanted to add a cloud to the top, to appear from both the upper and reverse views but the cloud dies I had weren't symmetrical, so when adhered together they didn't line up.  That's where the foam came in.  I found that when die cutting foam it didn't matter which side of the die cut was uppermost, unlike the finish you get with die cut cardstock.  So I sandwiched the top of the bookmark between the two larger clouds and adhered these in place.  To finish, I adhered another single smaller cloud, adding a slim piece of double sided foam tape to secure the overhanging part.  I think this could look cute poking out of the top of a book!


Materials used:
  • Cardstock: Papermania - Textured Cardstock
  • Dies: MFT Die-namics - Tall Tag Duo, Cloud Trio; Clearly Besotted - Cloudy Days Die Collection
  • Fun Foam

Still a couple more to share, will post those very soon.

Leopard Print Bookmarks


Hi there

More bookmarks, and these were quick and easy makes.


All of these use the same animal print stencil which is the part inked in black.  The brown ink on two of the designs was added using an ink dauber.


For this traditional colourway, I cut the reverse layer from some darker brown cardstock...
Materials used:
  • Stencil: Skull and Cross Buns - Leopard Animal Print
  • Ink: Distress Ink - Black Soot, Rusty Hinge
  • Die: MFT Die-namics - Tall Tag Duo
  • Cardstock from stash
  • Accents: Ribbon - American Crafts; Twine - Hemptique

For this one, I stencilled directly onto some watercolour-effect patterned paper, and backed it with plain white cardstock...


Materials used:
  • Stencil: Skull and Cross Buns - Leopard Animal Print
  • Ink: Distress Ink - Black Soot
  • Die: MFT Die-namics - Tall Tag Duo
  • Patterned Paper: Papermania - Capsule Elements: Pigment
  • Accents: Ribbon - American Crafts; Twine - Hemptique

This one has the additional brown ink added with a dauber and the back panel is cut from the same pink cardstock...


Materials used:
  • Stencil: Skull and Cross Buns - Leopard Animal Print
  • Ink: Distress Ink - Black Soot, Rusty Hinge
  • Die: MFT Die-namics - Tall Tag Duo
  • Cardstock from stash
  • Accents: Ribbon - American Crafts; Twine - Hemptique

I hope I'm not boring you with these! lol  There are a few more individual ones still to come :)


Mermaid Bookmarks


Hi there

Back again with more bookmarks, these all have a mermaid theme.


All of these were created in the same way, the panel ink blended with Distress Oxides and then stencilled using silver pigment ink.  All were backed with the same patterned paper and have the same ribbon and twine accents.


This one used a mermaid scales stencil...
Materials used:
  • Stencil: Skull and Cross Buns - Small Mermaid Scales
  • Ink: Distress Oxide - Wilted Violet, Mermaid Lagoon, Peacock Feathers; Versa Color - Silver
  • Die: MFT Die-namics - Tall Tag Duo
  • Patterned Paper: Papermania - Capsule Elements: Pigment
  • Accents: Ribbon - American Crafts; Twine - Doodlebug

This one was splattered with water droplets as well as being stencilled...
Materials used:
  • Stencil: Funky Fossil - Mermaids
  • Ink: Distress Oxide - Wilted Violet, Mermaid Lagoon, Peacock Feathers; Versa Color - Silver
  • Die: MFT Die-namics - Tall Tag Duo
  • Patterned Paper: Papermania - Capsule Elements: Pigment
  • Accents: Ribbon - American Crafts; Twine - Doodlebug

and this one had water droplets added for interest too...
Materials used:
  • Stencil: Funky Fossil - Mermaids
  • Ink: Distress Oxide - Wilted Violet, Mermaid Lagoon, Peacock Feathers; Versa Color - Silver
  • Die: MFT Die-namics - Tall Tag Duo
  • Patterned Paper: Papermania - Capsule Elements: Pigment
  • Accents: Ribbon - American Crafts; Twine - Doodlebug


Thanks once again for taking a look.  I'll be back very soon with more, yes, I made quite a few last weekend!

Autumnal Bookmarks


Hello again

After creating the cute character bookmarks I thought I'd make some which weren't so time consuming.  I love how they turned out but they were a lot of work.

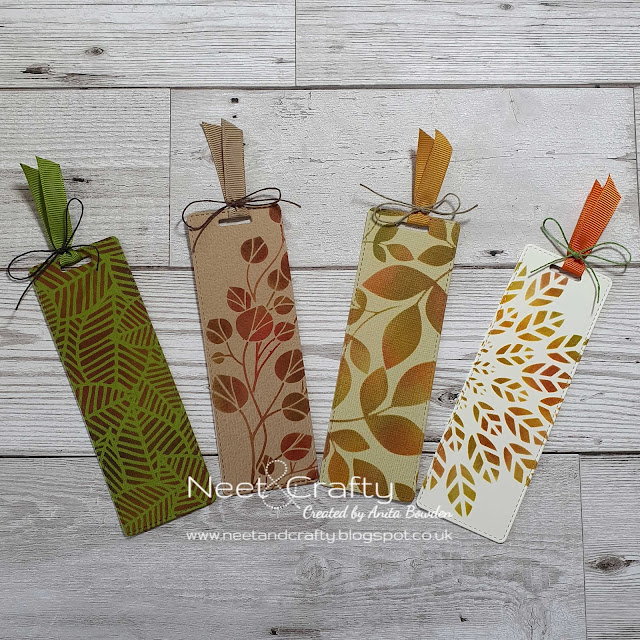
So, as summer is now over here in the UK, and there's definitely a chill in the air now, I chose to make some with an Autumnal theme, and all of these use stencils and Distress Inks...


This one has a reverse side using the same textured cardstock as the front but is left plain...
Materials used:
  • Stencil: Uniko - Natures's Treasures II
  • Distress Ink: Fired Brick, Peeled Paint, Spiced Marmalade
  • Die: MFT Die-namics - Tall Tags Duo
  • Cardstock from stash
  • Accents: Ribbon - American Crafts; Twine - Hemptique

I ink blended the whole stencil here so had enough to use the design on the reverse layer too...
Materials used:
  • Stencil: Sweet Poppy - Foliage
  • Distress Ink: Peeled Paint, Barn Door, Walnut Stain
  • Die: MFT Die-namics - Tall Tags Duo
  • Cardstock from stash
  • Accents: Ribbon - American Crafts; Twine - Hemptique

For this one I used cream cardstock and left the reverse layer plain...
Materials used:
  • Stencil: Altenew - Leaf Burst
  • Distress Ink: Forest Moss, Wild Honey, Aged Mahogany
  • Die: MFT Die-namics - Tall Tags Duo
  • Cardstock from stash
  • Accents: Ribbon - American Crafts; Twine - Hemptique

and for this one I repeated the design on the reverse but with lighter ink shades (although I didn't note down which colours I used on the reverse - apologies!)
Materials used:
  • Stencil: Funky Fossil - Leaves
  • Distress Ink: Spiced Marmalade, Old Paper, Crushed Olive
  • Die: MFT Die-namics - Tall Tags Duo
  • Cardstock from stash
  • Accents: Ribbon - American Crafts; Twine - Hemptique

I'd like to link these up at the Allsorts Challenge Blog: Week 591 - Autumn Colours.


Thanks so much for looking, more to come! :)

Cute Character Bookmarks


Hi there

I'm stopping by this afternoon to share something new I've been working on behind the scenes...Bookmarks!

I wanted to offer something different in my online shop, as well as cards, while still working with my stash of cardstock, stamps, stencils, etc.  Papercraft is what I love doing, so I thought this was a good direction to go in.

I've been making a few different styles/themes and in this first post I'm sharing a little batch featuring some cute characters.


Of all the designs I created, these were the most time-consuming as they all involved stamping, masking, ink blending, colouring and gloss accents.

They were all made in exactly the same way.  I began by stamping the four characters, which were then masked before stamping the books they are sitting on.  The books were also then masked before each background was ink blended with three shades of Distress Ink.  I removed the masked and coloured the images with Copic markers.  I then die cut each panel with a faux stitched tall tag die, as well as die cutting four different co-ordinating patterned papers which I then adhered back to back to create a cleaner finish.  I then held my breath while stamping the quotes on each one (didn't want to mess this bit up after so much work!)  Each bookmark was then finished with some grosgrain ribbon and tied with twine, and I added some gloss to the glasses and eyes.

Here's a closer view of each one, and the supplies I used for each...
Materials used:
  • Stamps: Clearly Besotted - Wise Owl, That's Genius
  • Distress Ink: Squeezed Lemonade, Dried Marigold, Abandoned Coral; Memento - Tuxedo Black; Versafine - Onyx Black
  • Die: MFT Die-namics - Tall Tag Duo
  • Coloured with Copics
  • Patterned Paper: Doodlebug - Kraft in Color: Color
  • Accents: Ribbon - American Crafts; Twine - Hemptique; Glossy Accents

Materials used:
  • Stamps: Clearly Besotted - Wise Owl, That's Genius
  • Distress Ink: Worn Lipstick, Shaded Lilac, Salty Ocean; Memento - Tuxedo Black; Versafine - Onyx Black
  • Die: MFT Die-namics - Tall Tag Duo
  • Coloured with Copics
  • Patterned Paper: Doodlebug - Kraft in Color: Color
  • Accents: Ribbon - American Crafts; Twine - Hemptique; Glossy Accents
Materials used:
  • Stamps: Clearly Besotted - Wise Owl, That's Genius
  • Distress Ink: Twisted Citron, Salty Ocean, Blueprint Sketch; Memento - Tuxedo Black; Versafine - Onyx Black
  • Die: MFT Die-namics - Tall Tag Duo
  • Coloured with Copics
  • Patterned Paper: Doodlebug - Kraft in Color: Color
  • Accents: Ribbon - American Crafts; Twine - Hemptique; Glossy Accents
Materials used:
  • Stamps: Clearly Besotted - Wise Owl
  • Distress Ink: Antique Linen, Peeled Paint, Frayed Burlap; Memento - Tuxedo Black; Versafine - Onyx Black
  • Die: MFT Die-namics - Tall Tag Duo
  • Coloured with Copics
  • Patterned Paper: Doodlebug - Kraft in Color: Color
  • Accents: Ribbon - American Crafts; Twine - Hemptique; Glossy Accents


I'm linking these up at Darnell's NBUS Challenge #18 as this tall tag die is a newbie and I'm loving using it! 


I'll be sharing all of my bookmarks today, in different posts by theme.  I hope you like them.


Less is More Challenge #429


Good morning

Welcome to Saturday and a brand new challenge over at Less is More.  And yes, we've whizzed back around and it's One Layer Challenge time again!  Here are the details...


Joining us this time as a Guest Designer is the super talented Angie Cimbalo who was our July winner. Welcome Angie!  Please do pop over to her blog to see the fab sample card she's made for this challenge and to say hi.


Ok, onto my sample card, and I've decided to combine the Cheers theme with Christmas using a stamp set I bought last year but hadn't used until now...


This one is pretty simple but involved a bit of masking.  I began by masking off the outside to leave a central rectangle and then stamped the cocktail glass.  I then stamped it again on masking paper and covered the image before ink blending the background with Distress Inks.  Next I coloured the image with coloured pencils and added some sparkle with a shimmer pen, which you can see more clearly in the image below.  I finished off with the two sentiments stamped in black.


Materials used:
  • Stamps: Clearly Besotted - Drink and Be Merry
  • Ink: Distress Ink - Shaded Lilac, Salty Ocean; Memento - Tuxedo Black; Versafine - Onyx Black
  • Coloured with Faber Castell Polychromos
  • Accents: Wink of Stella pen - Clear

Challenge entries:

Fab 'n' Funky - Challenge #495 - Christmas
NBUS Challenge #18 - First use of stamp set
STAMPlorations - Summer Challenge - Anything Goes


Thanks so much for visiting.  My teamies have some great projects for this challenge which you can find over at the main challenge blog, and they may have more over at the personal blogs too.  As always, the challenge will run for two weeks.

I've been working on something a little different recently and will be sharing those projects with you this weekend, so I'd love for you to pop back and take a look if you have time. 


Saturday, 12 September 2020

Less is More Challenge #428

Hi guys

I can't honestly believe how fast the weeks are still flying by this year!  It's certainly been the strangest year hasn't it?

Ok, it's new challenge day at Less is More and this time we have a Colour challenge for you, here's the cue card...


For my sample card this time I decided to add the challenge colours to the background...


I die cut a rectangular panel then masked off around a rectangle in the centre before ink blending with Distress Oxide Inks.  I then shifted the masking tape a little to create a slightly larger rectangle and then blended the outer edge with a lighter shade.  With the tape still in place I added water droplets and then blotted these away.  Once dry I stamped the sentiment in black and adhered the white die cut over the focal area.  The panel was then adhered on fun foam.


Materials used:
  • Dies: Create a Smile - Cool Cuts Double Stitched Rectangles; Craft Emotions - Hogweed
  • Stamp: Clearly Besotted - You Are Wonderful
  • Ink: Distress Oxide - Seedless Preserves, Wilted Violet, Shaded Lilac; Versafine - Onyx Black


The challenge linky will be open for two weeks as always, so as long as you use the challenge colours any CAS creation can be entered.  There is lots more inspiration from my teamies over at the main challenge blog.


Thursday, 3 September 2020

Skull and Cross Buns - September 2020 - Selection Four

Good evening, guys

Here is my final batch of samples for Skull and Cross Buns, using products which will be featured on the 7am show on Hochanda TV this coming Saturday, 5 September 2020.


First up is a really simple card, and it proves how versatile some stamp sets can be...


On a die cut panel I stamped the sentiment from the new Contemporary Sentiments set and the heart was actually from the Scandi Christmas set.  I simply coloured the row of hearts with Copic markers and adhered the panel to the card base on 3D foam.

Materials used:
  • Stamps: Skull and Cross Buns - Contemporary Sentiments, Scandi Christmas
  • Ink: Memento - Tuxedo Black
  • Die: MFT Die-namics - Wonky Stitched Rectangle Stax


The next card combines the existing Retro Sweets stamp set with the new Retro Sweets stencil...


On a die cut rectangle I blended the background with Distress Oxides.  Once dry I then pushed my VersaMark ink pad through the stencil and then heat embossed with white pearl embossing powder.  I cut a strip of white cardstock and used a border die to create the holes.  The sweets were stamped and coloured with Copics and the sentiment was stamped and heat embossed in silver.


Materials used:
  • Stencil: Skull and Cross Buns - Retro Sweets
  • Stamps: Skull and Cross Buns - Retro Sweets
  • Ink: Distress Oxide - Tumbled Glass, Spun Sugar, Squeezed Lemonade; Memento - Tuxedo Black; VersaMark
  • Embossing Powder: Wow! - White Pearl, Metallic Silver
  • Dies: Create a Smile - Cool Cuts Double Stitched Rectangles; Paper Smooches - Dots & Dashes


And my final card uses Contemporary Sentiments again with the already available Diamond Harlequin stencil...


On a panel of kraft cardstock I ink blended with Distress Ink and faded it out.  Using the same shade I ink blended through the stencil, again fading it out.  I shifted the stencil slightly and used a second shade of purple ink.  I stamped the sentiment in dark grey ink, then shifted the position slightly and stamped and heat embossed the sentiment in white, creating a shadow effect.  The panel was then adhered on fun foam.


Materials used:
  • Stencil: Skull and Cross Buns - Diamond Harlequin
  • Stamp: Skull and Cross Buns - Contemporary Sentiments
  • Ink: Distress Ink - Seedless Preserves, Dusty Concord; Memento - Tuxedo Black; VersaMark
  • Embossing Powder: Wow! - Opaque Bright White


Thanks as always for stopping by, I hope you can tune in to the show on Hochanda on Saturday at 7am.


Related Posts Plugin for WordPress, Blogger...