Saturday, 29 October 2016

Less is More Week #300 - Lucky Dip!

Hi there

We have five Saturdays falling in October so at Less is More this week we have a Lucky Dip challenge for you.  It also happens to be our 300th challenge so what better theme to have for our challenge this week than...


Celebrations and Festivals


As with all our Lucky Dip challenges we also have a lovely Guest Designer joining us and this time we have the super talented Julie Beech along for the ride.  I had the pleasure of meeting this truly wonderful lady in July at the Happy Little Stampers Craft Retreat, and hopefully we will meet again at some point, we had a great time.  So, as well as my LIM teamies I'm sure Julie would love it if you popped by her blog.


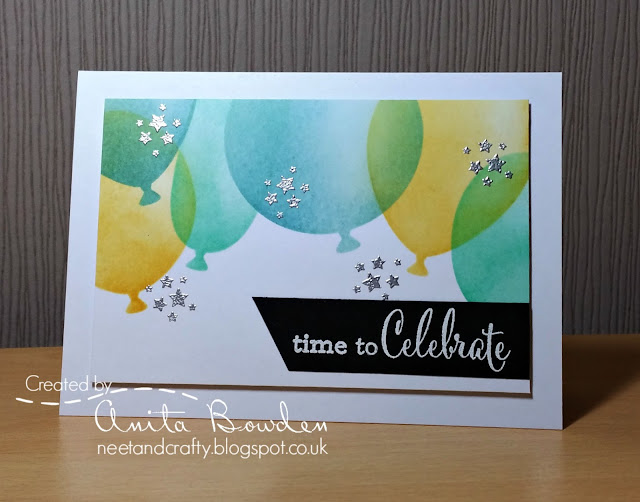
So, on to my DT card (apologies, just the one this week), and I decided to go with balloons for the celebration theme, and I chose a colour scheme which would be suitable for a guy or a girl....I find masculine cards so difficult but this one I think is a good option...


On a panel of white cardstock I sponged ink through the balloon stencil, masking each one and overlapping them.  I heat embossed the sentiment in white on a strip of black cardstock.  The stars were stamped in VersaMark and heat embossed in silver before the sentiment strip was adhered to the panel.  And then the panel was popped up on 3D foam.

Materials used:

  • Stencil: MFT - Big Balloons
  • Ink: Distress Ink - Wild Honey, Lucky Clover, Broken China; VersaMark
  • Stamps: Clearly Besotted - Fancy Sayings; Uniko - Balloon Bash
  • Embossing Powder: Wow! - Opaque Bright White and Metallic Silver

Challenge entries:

Simon Says Stamp Wednesday Challenge - Anything Goes
AAA Cards - Game #76 - Masculine
STAMPlorations - October Challenge - Stamps and Sponging


Thanks so much for visiting today.  I'm sorry it's been really quiet here lately, just been a busy time to be honest.  I'm aiming to get more crafting done soon and to find more time to return all your lovely visits.  I really appreciate all the support you give me so thank you so much xxx


Saturday, 22 October 2016

Less is More Week #299

Hi there

It's Recipe challenge time at Less is More for the next week and we have a fun one for you....and a choice.  So why not enter more than once?!  We would like to see you using...


Vellum or Acetate


I've made one of each for you so let's get to it...


This card uses some vellum I've had for absolutely ages!  It comes from a book of tone on tone vellum that was part of a larger set of books of papers I bought from QVC, in the days when I bought all my craft kits from there.  The vellum is clear and it has a slightly pearlescent design printed onto it...that wasn't my handy work folks!

So I started by cutting an angled piece of vellum and then masked off the lower part of my card base that would be showing below it. I then sponge blended some distress ink fading down from the top of my card base underneath where the vellum would be overlaid.  I stamped the sentiment in a co-ordinating ink onto the base and then adhered the vellum on the reverse where it folded over the top. A few sequins were added to finish.

Materials used:

  • Ink: Distress Ink - Cracked Pistachio, Altenew - Mountain Mist
  • Stamp: Clearly Besotted - Just Fabulous
  • Vellum: Hot Off The Press - Tone on Tone 
  • Sequins: Little Things from Lucy's Cards - Icicle Sequin Mix


Challenge entries:

Addicted to Stamps and More - Challenge #216 - Anything Goes
STAMPlorations - October Challenge - Theme / Sketch - Stamps and Sponging


And for my card using acetate I created a very CAS shaker...


I started by die cutting the flower from a panel of white cardstock.  I adhered some acetate behind the opening and then inlaid another die cut from the same die, this time from pearlescent cardstock.  I stamped the 'hi' sentiment in black and then added lots of 3D foam to the reverse of my panel, particularly around the flower head as this part was to be the shaker element.  I marked in pencil on the card base roughly where the flower head would be and then sprinkled on some sequins and beads before adhering the panel over the top.

Materials used:

  • Die: Creative Expressions - Scribble Flower
  • Stamp: Paper Smooches - Bold Buzzwords (a pre-loved set recently purchased from the lovely Michelle Short - Thanks Michelle!)
  • Ink: Versafine - Onyx Black
  • Sequins: Little Things from Lucy's Cards - True Blue Shaker Selection
  • Pearlescent cardstock from stash


Challenge entry:

The Flower Challenge - Challenge #1 - Anything Goes

We would love you to display our banner !


Thanks so much for visiting today.  If you have the time please do pop over to my fellow LIM teamies, they have some great inspiration for you.  I'm really looking forward to seeing your CAS ideas for vellum and acetate this week.


Saturday, 15 October 2016

Less is More Week #298

Hi there

It's new challenge time over at Less is More and this week we have a Theme for you which should give you lots of options.  We would like to see...


Incy Wincy Spiders / Insects


I've got two cards to share with you...


I chose this cute little bee for my first card and used it as part of my sentiment.  I stamped the bee, then masked it before gently blending the honeycomb background through a stencil.  I then positioned and stamped the sentiment in black.  The bee was then coloured with pencils and a little clear Wink of Stella added to its wings.  The panel was popped up on 3D foam.

Materials used:
  • Stamps: Clearly Besotted - Cute as a Bug, Sugar & Spice
  • Stencil: Imagination Crafts - Hexagons
  • Ink: Distress Ink - Wild Honey, Mustard Seed; Versafine - Onyx Black
  • Coloured with Derwent Coloursoft pencils
  • Accents: Wink of Stella - Clear

Challenge entries:

CAS Colours & Sketches - Sketch Challenge #195
Virginia's View - Challenge #24 - Focal Point


And what better than a Halloween card for our spider theme...


I started with a panel of white cardstock and blended some purple Distress Ink fading out from one corner.  I then die cut this with a wonky rectangle die.  I stamped the spider and sentiment next in charcoal and black ink.  I wanted to add a spider web but didn't have a stamp or stencil in my stash so I used a Quickie glue pen to draw the web and then sprinkled over some fine glitter.  I then added some splatters in green and orange before mounting the panel on 3D foam onto a black card base.

I don't know why but very often my purples seem to look bluer in photographs.  And the glitter is super sparkly in real life which I really struggle to capture.

Materials used:

  • Stamps: Clearly Besotted - In Print, Message Me
  • Ink: Versa Color - Charcoal; Versafine - Onyx Black; Distress Ink - Wilted Violet, Twisted Citron, Carved Pumpkin
  • Die: Spellbinders Nestabilities - Reverse Wonky Rectangles
  • Accents: Quickie Glue Pen; Cosmic Shimmer Diamond Frost - Frosty Dawn


Challenge entries:

Simply Create Too - Challenge #120 - Halloween
The Male Room - Challenge #46 - Halloween
Just Add Ink - Challenge #333 - Just Add 'G' (Glue and Glitter)
CASology - Challenge #219 - Spooky
Fantasy Stampers - Challenge #73 - Black Magic


 photo badge1_zpse398c447.jpg


My teamies have created some wonderful projects this week so why not pop over to the challenge blog if you need some inspiration. This theme has great scope so I can't wait to see what you create this week.


Friday, 14 October 2016

Anemones for Mum

Hi there

I've been meaning to share this card for a few days.  I made this for my lovely Mum who celebrated her birthday earlier this week.

Just super simple layered stamping...


I wanted to keep this very simple so this is purely a stamped panel popped up on 3D foam for a little dimension.

Materials used:

  • Stamps: Wplus9 - Watercolor Anemones; Altenew - Beautiful Lady; Papermania - Relations (serif)
  • Ink: Altenew - Crimson, Velvet, Rouge, Evergeen, Forest Glades; Versafine - Onyx Black


Challenge entries:

The Flower Challenge - Challenge #1 - Anything Goes
Inkspirational - Challenge #119 - Use 5 (or more) stamps
Seize the Birthday - Anything Goes
Crafty Cardmakers - Challenge #174 - Birthdays

We would love you to display our banner !


Thanks so much for popping by.  I'll be back in the morning to introduce the next challenge at Less is More.  Hope to see you then.


Saturday, 8 October 2016

Less is More Week #297

Good morning, crafters

At Less is More this week we're back with our regular, dread-evoking One Layer Challenge.  Our theme for you this week is...


Dreams


This wasn't an easy one for me this week but I do have two cards to share.

Here's the first...


I used Strathmore Bristol cardstock for my card base as I knew I'd be using my Zig markers to colour my image and they blend really well on this cardstock.  I started by stamping the cat before masking it and stamping the cushion.  I then stamped the thought bubbles, the small dots being from a leaf stamp set and the main bubble from a shadows set.  I then stamped the mouse and the sentiment in black.  To finish the card I coloured my image using Zig markers blended with water.

Materials used:

  • Stamps: Clearly Besotted - You're Purrfect, Stylish Flowers (sentiment); Paper Smooches - Leafy Greens, Shadows
  • Ink: Archival - Jet Black; Versa Color - Sky Gray; Versafine - Onyx Black
  • Coloured with Zig Clean Color Real Brush Markers

Challenge entry:

Cute Card Thursday - Challenge #446 - Anything Goes


I'm not overly happy with my second card.  The watercolouring isn't great and it was very warped from the water and heat embossing but I managed to straighten it out under some heavy books and decided I would share it anyway...


I watercoloured the central area in two 'dreamy coloured' Distress Inks.  Once dry I flicked some water onto it and lifted some colour as well as adding a few splatters.  I blasted it with my heat gun and used some anti-static powder before stamping and heat embossing the sentiment and butterflies in white.  The images and sentiment didn't stand out as much as I had hoped so I went back in and added more watercolour.  Although I like the colours I'm not so happy with the hard lines and I think it looks a little 'overworked'.  I may have another go soon with a similar design.

Materials used:

  • Ink: Distress Ink - Tattered Rose, Worn Lipstick; VersaMark
  • Stamps: Clearly Besotted - Flutterby Dreams
  • Embossing Powder: Wow! - Opaque Bright White

Challenge entries:

Addicted to Stamps and More - Challenge #214 - Clean and Simple
CAS on Sunday - Challenge #93 - Heat Embossing
Addicted to CAS - Challenge #98 - Watercolour
The Crafter's Cafe - Challenge #158 - Use Lots of Pink (Breast Cancer Awareness Month)
Time Out - Challenge #67 - Breast Cancer Awareness/Friendship + Embossing and/or Use Pink

For your blogThe Crafter's Cafe Challenge BlogGrab Our Badge!


My teamies have created some fabulous one layer cards this week so please do pop over to their blogs if you have the time.  I hope you'll join in with us this week.


Monday, 3 October 2016

Muse #186 - Neutral Leaves

Hi there

I'm thrilled that it's my turn to be your designer for this week at Muse.

The idea at Muse is to use the designer's card as your inspiration, and then create a project using one or more of the elements, e.g. layout, colours, technique, etc.  I always love seeing how you interpret our cards each week.

I had the rough idea of this card in my head and I have to say, I love how this one turned out.  I love neutrals and monochrome designs so I'm really pleased with this one.


I started with a panel of white cardstock slightly smaller than my card base and die cut a leaf from it.  After trawling through my paper pads I chose the brown/tan striped paper to use as my background.  I adhered the panel to the striped paper which I cut slightly larger, and then adhered these flat to the card base.  I then added a little gold gilding wax to the die cut leaf to give it some metallic shimmer and also cut another leaf from some clear vellum.  I arranged these around the negative leaf image and adhered the cardstock leaf.  I then heat embossed a sentiment in copper onto a strip of white cardstock, popped this up on 3D foam and used this to hold the vellum leaf in place.

Materials used:

  • Die: Memory Box - Pointed Leaf
  • Patterned Paper: Lawn Fawn - Let's Polka Mon Amie
  • Stamp: Uniko - Fontiments Birthday
  • Ink: VersaMark
  • Embossing Powder: Wow! - Metallic Copper
  • Gilding Wax: Creative Expressions - Enchanted Gold
  • Vellum from stash

Challenge entries:

Just Us Girls - Challenge #363 - Leaves
Simon Says Stamp Wednesday Challenge - Anything Goes
The Male Room - Challenge #45 - Leaves and/or Trees
Seize the Birthday - Soft and Simple

Simon Says Stamp Wednesday Challenge Blog


That's all from me today.  Hopefully my card will inspire you to play along at Muse this week.  It's a great challenge and the winners are chosen by votes from your fellow participants :)

Bye for now


Sunday, 2 October 2016

Happy Little Stampers October 2016 CAS Challenge

Hi there

I'm here to introduce this month's CAS challenge over at Happy Little Stampers.  Every month this year we have had a different technique and this month we would like to see...


There are video tutorials of variations of this technique over on the main challenge blog if you need a little inspiration or guidance.

This challenge is sponsored by Happy Little Stampers and as always
there's a great prize for one lucky winner!


For my DT card I decided to use heat embossing on coloured vellum...


I used just one stamp set on this card, Doodled Flowers by HLS.  I cut three strips of coloured vellum and stamped the images in VersaMark ink before heat embossing with white embossing powder.  I wrapped these around a white cardstock panel and secured on the reverse.  I then stamped the sentiment and simply die cut with a stitched circle die and popped this up over the strips with 3D foam.  The main panel was also popped up for dimension.

Materials used:

  • Stamps: Happy Little Stampers - Doodled Flowers
  • Ink: VersaMark; Versafine - Onyx Black
  • Embossing Powder: Wow! - Opaque Bright White
  • Die: MFT Die-namics - Double Stitched Circles
  • Coloured Vellum from stash

Challenge entries:
Cute Card Thursday - Challenge #445 - CAS
Dream Valley - Challenge #141 - Embossing Wet or Dry


Embossing on vellum can create some really lovely effects so why not join in.  The challenge will run until the end of October.


Saturday, 1 October 2016

For a Beary Special Friend

Hi guys

Today I found photos of a card I made for a friend a couple of months ago and completely forgot to share it here on my blog.  My friend is called Claire, and is also known as Bear so this stamp set was perfect to make a card for her.


I started by stamping the bear in waterproof black ink and then watercoloured with Distress Inks.  I stamped one sentiment at the top in black and then heat embossed the other sentiment in white on a strip of black cardstock which was popped up on 3D foam.  As a final touch I added some clear Wink of Stella to the balloon and the present and added Glossy Accents to the balloon which can be seen better in the next photograph.


Materials Used:

  • Stamps: MFT - Beary Special Birthday
  • Ink: Distress Ink - Ground Espresso, Brushed Corderoy, Tea Dye, Hickory Smoke, Barn Door, Wilted Violet, Salty Ocean; Versafine - Onyx Black; VersaMark; Archival - Jet Black
  • Embossing Powder: Wow! - Opaque Bright White
  • Accents: Wink of Stella - Clear; Glossy Accents

Challenge entries:

Addicted to CAS - Challenge #98 - Watercolour
Cute Card Thursday - Challenge #445 - CAS
CASology - Challenge #217 - Cute


Thanks so much for stopping by.  I hope you are all enjoying Word Cardmaking Day today.  I've made a card this morning (which I can't share until Monday), have watched a few videos, scheduled a couple of blog posts and now I'm off to make some long overdue swatches! :)


Less is More Week #296

Hi there

Happy World Cardmaking Day!

I love that there's a special day dedicated to our great hobby and wonderful community.  I hope that you manage to find some time to get creative and no doubt there will be lots going on in blogland today to inspire you.

And as it's the first Saturday of the month, at Less is More we're back with our regular Colour challenge.  This week we'd like to see the following colour combo...


Turquoise and Lilac


I've got two cards to share with you this week.  For my first I decided to go with a subtle use of these colours and made a Christmas card...


On the top half of the card base I blended Distress Inks to create the winter sky.  I then die cut another panel of white cardstock with a tree landscape die.  I heat embossed the sentiment in silver before adhering the panel to my card base.

Materials used:

  • Ink: Distress Ink - Broken China, Milled Lavender, Dusty Concord; VersaMark
  • Die: Craft Emotions - Landscape Pines
  • Stamp: Clearly Besotted - Brushed Greetings
  • Embossing Powder: Wow! - Metallic Silver

Challenge entries:

Simon Says Stamp Monday Challenge - Powder Power
Simon Says Stamp Wednesday Challenge - Anything Goes
Cute Card Thursday - Challenge #445 - CAS


I decided to use some gorgeous turquoise glitter cardstock on my second card but it was almost impossible to convey in a photograph, it's so much brighter and more sparkly in real life...


I die cut the floral image from lilac cardstock and the 'you' from glitter cardstock.  A panel of white cardstock was stamped with the sentiment and adhered to a slightly larger black panel and adhered to the card base.  The die cuts were then adhered to the panel, some shimmer added to the petals with some Wink of Stella and a few glitter enamel dots were added to finish.

Materials used:

  • Dies: Memory Box- Gorgeous Gardenia Outline; MFT Die-namics - Twice the Thanks
  • Stamp: Clearly Besotted - Thank You
  • Ink: Versafine - Onyx Black
  • Cardstock: Bazzill Basics (lilac); Papermania (black); Glitter cardstock from stash
  • Accents: Wink of Stella - Clear; Happy Little Stampers - Enamel Glitter Dots in Blue


Please do pop over to the main challenge blog to see what my teamies have created this week, you won't be disappointed.  And I'm looking forward to seeing this lovely colour combo filling up the gallery :)


Related Posts Plugin for WordPress, Blogger...