Tuesday, 30 March 2021

60th Balloons and Stars


Hi there

Tonight I'm sharing a card I made for a work colleague's 60th birthday.  

I always struggle with masculine designs but I'm liking the grey/blue/silver combo here.  And I've had some pearlescent sheets of ready cut mini envelopes in my stash for YEARS so used one of them here.  

Apologies for the lighting in these photos, I couldn't free up my usual spot on my table before this one had to go in the mail so I had to wing it at my craft desk and hope for the best!


I began by die cutting a rectangle from grey cardstock and two squares, one from white cardstock and another from polka dot paper.  I layered these up and stamped the sentiment.  I folded up the mini envelope and adhered it in place, then adhered a selection of die cut mini stars and two balloons stamped with the numbers and heat embossed in white.


Materials used:
  • Dies: Create a Smile - Cool Cuts Double Stitched Rectangles; MFT Die-namics - Pierced Square Stax, Stitched Strip (mini stars); Clearly Besotted - Got Your Number (balloons)
  • Patterned Paper: MFT - Summertime Polka Dots
  • Stamps: Clearly Besotted - Message Me, Got Your Number
  • Ink: Versafine - Onyx Black; VersaMark
  • Embossing Powder: Brutus Monroe - Alabaster White
  • Cardstock and mini envelope from stash

Challenge entries:

Happy Little Stampers - March Anything Goes with Dies Challenge
STAMPlorations - March Theme and Photo Prompt Challenge (playing with stamps/numbers option)


Thanks for visiting today, I've got a few more projects to share over the next few days so please do pop back and take a look if you can.


Saturday, 20 March 2021

Less is More - Challenge #439

Hi there, Happy Saturday!

It's new challenge day over at Less is More and we're back with a Recipe challenge this time.  


We're looking for any kinds of inking, used in a clean and simple way .

It's been a while since I did the ghosting technique on a card and it's one of my favourite techniques.  I've also added quite a few new stencils to my stash in recent months so wanted to use one here...


I began by die cutting a small stitched rectangle and I masked off around all the edges before blending the area with three shades of Distress Inks.  Although Distress Oxides also react with water, I much prefer using the original Distress Inks for this technique.  I laid down my stencil over the inked area and spritzed with a fine mist of water, keeping the spray quite far away.  I then lifted the stencil away and blotted with a paper towel to lift away the colour.  Once completely dry I stamped and heat embossed the sentiment in white, using an anti-static powder tool first.  Before adhering in place on the card base, I scored one line, as if continuing the line of the sentiment design.


Materials used:
  • Die: Create a Smile - Cool Cuts Double Stitched Rectangles
  • Ink: Distress Ink - Twisted Citron, Peacock Feathers, Blueprint Sketch; VersaMark
  • Stencil: Funky Fossil - In a Spin
  • Stamp: Lawn Fawn - Scripty Sayings
  • Embossing Powder: Brutus Monroe - Alabaster White

Challenge entries:

My Time to Craft - Challenge #453 - Stencil It!
Addicted to Stamps and More - Challenge #401 - Make Your Mark
Addicted to CAS - Challenge #193 - Shapes
Happy Little Stampers - March Stencil Challenge - Anything Goes
NBUS - Challenge #24 - (New stencil)
STAMPlorations - March CAS Challenge - Anything Goes


If you need more inspiration for this challenge, please do pop over to the main LIM challenge post where my teamies are sharing their projects, and if you click on their individual links they may have even more to share.

Thanks so much for visiting, have a wonderful weekend.


Sunday, 14 March 2021

Perfectly CAS March 2021 Challenge

Good evening

My goodness, where does the time go?  It only seems like a week ago I was sharing my last DT card for Perfectly CAS and here we are a month on and starting another challenge!

This one is super easy, just remember the challenge rule to only use one third of the card or less for your design...


Here's my sample card for this one and all I used was cardstock, dies and adhesive...


On a scrap of paper I used my glue runner to lay down some adhesive and then adhered various strips of coloured cardstock in rainbow order.  I die cut the word birthday from this and then die cut four of the word happy from white cardstock.  These were simply adhered to the cardbase and the overhanging edges trimmed away.  Simple!

Materials used:
  • Dies: Paper Smooches - Happy Birthday Word Die; Wplus9 - Happy Wishes Words Die
  • Cardstock from stash

Challenge entries:

Happy Little Stampers - March Anything Goes with Dies Challenges
Addicted to Stamps and More - Challenge #400 - Die Cuts and/or Stencils


This challenge will close a couple of days before the April challenge begins, so plenty of time to play along and link up.  Who doesn't need a stock of birthday cards?!


Mother's Day Spring Tulips

Good afternoon

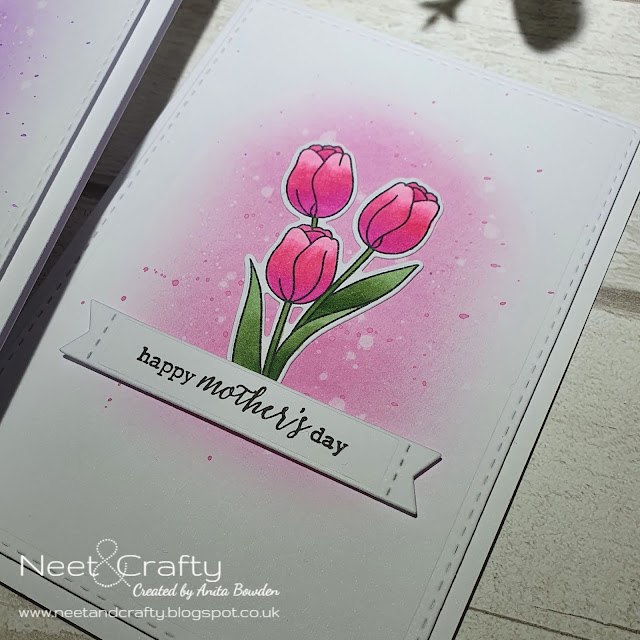
So, it's Mother's Day today here in the UK so I thought I'd share the cards that I made.

I needed to make three: one was for my lovely mum, one for my boyfriend's mum and one for a friend to give to her mum too.  

I was a bit short of time and my crafty mojo had decided to run off somewhere so I decided to use the same design in three different colourways.

This also gave me a chance to practice some Copic colouring.  I've got a lot to learn about these markers as I only started adding them to my stash last year but I'm quite happy with these results.


I stamped the tulip image three times on some white cardstock and coloured these in before die cutting with the co-ordinating die.  I then die cut three sentiment strips and stamped the sentiments in black.  I die cut three stitched rectangles and gently ink blended the centres with Distress Oxide inks in co-ordinating shades.  Next I splattered a mix of each ink and water over the panels, then did the same with some water splatters and blotted the colour away, just to add some interest to the backdrops.  I adhered the panels to the bases, adhered the tulips flat and then popped the sentiment strips up on 3D foam.

Here's a closer view of the purple card which I gave to my mum...


The yellow card which I made for my friend...


And finally the pink card which my boyfriend sent to his mum...


Materials used:
  • Stamps: Clearly Besotted - Spring Tulips, Message Me
  • Dies: Clearly Besotted - Spring Tulips; MFT Die-namics - Stitched Sentiment Strips; Create a Smile - Cool Cuts Double Stitched Rectangles
  • Ink: Memento - Tuxedo Black; Versafine - Onyx Black; Distress Oxide - Picked Raspberry, Wilted Violet, Squeezed Lemonade
  • Coloured with Copic markers

Challenge entries:

Sweet Stampin' - Spring Mood Board Challenge
Allsorts - Challenge #615 - A Stamped image
CAS on Friday - Challenge #200 - Spring
NBUS - Challenge #24 - First time using this Spring Tulips stamp set
Moving Along with the Times - Challenge #128 - Spring is Coming


Purple card:

The Flower Challenge - Challenge #54 - Shades of Purple


Yellow card:

Alphabet Challenge - Y is for Yellow


I hope, if in the UK, you are managing to have some kind of celebration for Mother's Day today.  Due to lockdown restrictions, there is little we can do, but I did meet up outdoors with my mum earlier today and we sat on a bench in the sun overlooking the sea in our home town drinking coffee and eating cake...pretty perfect!

I'll be back later this evening to introduce the March challenge at Perfectly CAS so, if you have time, I'd love for you to pop back later.


Friday, 12 March 2021

Feline 50

Hi there

This is a card I made earlier in the year for a friend celebrating her 50th birthday.  

She is a cat-lover so a kitty just had to feature in the design...


I began with a die cut panel and stamped the kitty image off the bottom edge, then the sentiment which is part of a longer stamp.  Next I stencilled the balloon off the top edge, adding light and shade with the blending, before then stamping the numbers on the balloon.  I used a black fine liner pen to hand draw the balloon string ties around the balloon and the cat's tail.  To finish, I coloured the cat and the box with Copic markers and adhered the panel flat to the card base.

Materials used:
  • Stamps: Simon Says Stamp - Furry Cat & Box; Lawn Fawn - Scripty Sayings; Clearly Besotted - Got Your Number
  • Ink: Memento - Tuxedo Black; Versafine - Onyx Black; Distress Ink - Picked Raspberry
  • Stencil: MFT - Big Balloons
  • Die: Create a Smile - Cool Cuts Double Stitched Rectangles
  • Coloured with Copics

Challenge entries:

Cupcake Inspirations - Challenge #514 - Cats
NBUS - Challenge #24 - First use of the kitty stamp which I bought in a de-stash sale
STAMPlorations - March Theme & Photo Challenge - 'Stamps and Numbers'


Thanks so much for popping by, I'll be back very soon with more to share.


Saturday, 6 March 2021

Less is More - Challenge #438

Hi there

Over at Less is More the new challenge starting today is a Theme challenge, and here's the cue card...


It's not often I have a card already lined up as my Design Team sample ahead of time but a special friend of mine gave birth to a sweet baby girl last month so this was the card I made to mark her arrival :)


This one was unusual for me as it uses an A5 card base.  The majority of my makes are A6 as I struggle to fill such a large space when making CAS cards but I was really pleased with this one, although I did faff about with it for some time! 

I die cut the focal panel with a stitched rectangle die.  'Baby' was stamped and embossed in white before ombre ink blending in pink and then I cut it out with the co-ordinating die.  Before popping this up on 3D foam I positioned it and stamped the words in black around it.  Next I printed her name and arrival date onto some cardstock and die cut it out using a stitched heart die, and cut another which I also ombre ink blended in pink.  I added a layer of cardstock with embossed stripes to the card base then adhered the focal panel on fun foam.  I layered and adhered the hearts offset and then to finish, I added some clear droplets and a button.


Materials used:
  • Stamps: Clearly Besotted - On The Shelf (baby), Special Delivery (girl); Simon Says Stamp - Baby (precious)
  • Dies: Create a Smile - Cool Cuts Double Stitched Rectangles; Clearly Besotted - On The Shelf; MFT Die-namics - Stitched Heart Stax
  • Ink: VersaMark; Distress Ink - Spun Sugar; Versafine - Onyx Black
  • Embossing Powder: Brutus Monroe - Alabaster White
  • Accents: Little Things from Lucy's Cards - Raindrops
  • Cardstock and button from stash

Challenge entries:

Addicted to Stamps and More - Challenge #400 - Die Cuts and/or Stencils


Thanks so much for visiting today, I appreciate you taking the time to look.


Tuesday, 2 March 2021

Happy Little Stampers - March 2021 CAS Challenge

Hi there

We're just into a new month so that means a flourish of new challenges over at Happy New Stampers, and today it's the turn of the CAS challenge.  Here's the March cue card...


I chose a stamp set that's been in my stash for many years and it's still one of my favourites...an oldie but goodie...


I die cut a faux stitched rectangle and separately stamped the stems and dandelion clocks from the set.  I chose to use a small sentiment which I stamped alongside a stem to preserve even more white space.  Before adhering the panel on foam I added a gentle blend of blue ink to the card base, fading it out in the centre.

Materials used:
  • Stamps: Clearly Besotted - Dandelion Dreams, Tiny Type
  • Ink: Altenew - Forest Glades, Wisteria, Pink Diamond, Arctic; Distress Ink - Tumbled Glass; Versafine - Onyx Black
  • Die: Create a Smile - Cool cuts Double Stitched Rectangles

You can find more inspiration from my teamies over at the main challenge blog so follow the link, here.  And as always, the HLS challenges will remain open until the end of the month.


Related Posts Plugin for WordPress, Blogger...