Pages

Thursday, 31 October 2024

Uniko October/November 2024 Release - Introducing...Background Blocks Snow Flurry

Hi there

Ok, so, the last two days we've been welcoming back two re-introductions at Uniko.  Today we have the first of the new introductions and it's another addition to the fabulous Background Blocks series...Snow Flurry.

In this festive design, Bev has once again used her much loved snowflake designs and I just love how this stamp is in reverse, so the emphasis is on stamping the background.

I have two very different cards for you today, here's the first, and I've combined it with stamps from the Big & Bold Snow stamp set...


I began by stamping the snow flurry stamp on the card base multiple times with three shades of ink until I achieved a nice blend of colours.  I then stamped the Snow sentiment and heat embossed it in white on vellum and die cut it with the co-ordinating die.  I adhered the vellum on tiny 3D foam pads behind just the white parts and then finished by adding the white embossed sentiment strip.

Materials used:
  • Stamps: Uniko - Background Blocks Snow Flurry, Big & Bold Snow
  • Ink: Altenew - Winter Lake, Wisteria, Pink Diamond; VersaMark
  • Embossing Powder: Wow! - Opaque Bright White
  • Die: Altenew - Featured Sentiments
  • Vellum from stash


And now my second card...


On a piece of white cardstock I randomly blended ink in pink, aqua and lime shades.  I then stamped the Snow Flurry stamp over the top in a very dark navy ink which then let the snowflakes show through in the bright colours.  I die cut three rounded squares and adhered these to the card base.  The sentiment strip, embossed in white on black and mounted on a pink frame, was then adhered on 3D foam.  This sentiment is from a set we are introducing later in the week.

Materials used:
  • Stamps: Uniko - Background Blocks Snow Flurry
  • Ink: Altenew - Pinkalicious, Aqualicious, Bamboo, Dark Night; VersaMark
  • Embossing Powder: Wow! - Opaque Bright White
  • Die: MFT Die-namics - Stitched Rounded Rectangles


Take a look at the Uniko blog, here, for more inspiration from the rest of the team.  It's amazing what different projects have been created using the same background stamp.

All the new products will be available from Sunday 3 November 2024.

I hope you'll pop back tomorrow where myself and the team will be introducing another new stamp set.


Wednesday, 30 October 2024

Uniko October/November 2024 Release - Re-introducing...Pure Florals Poinsettia

Good morning

Pure Florals Poinsettia is a beautiful stamp set which is making a comeback as part of the upcoming release from Uniko at the weekend.

The set features a beautiful poinsettia bloom, together with many two-part sentiments.

So I'll get straight to it with my first card...


I began by stamping the bloom image on some hammered red cardstock and then added some shading with some Copic markers.  With my stamp still in place in my Misti, I restamped the image in VersaMark ink and heat embossed it in gold.  I then die cut around the flower with a stitched rectangle die.  The sentiment from the same set was heat embossed in gold on black cardstock and die cut into a sentiment strip.


Materials used:
  • Stamps: Uniko - Pure Florals Poinsettia
  • Ink: VersaMark
  • Coloured with Copic Markers
  • Embossing Powder: Wow! - Metallic Gold Rich
  • Dies: Create a Smile - Cool Cuts Double Stitched Rectangles; MFT Die-namics - Stitched Sentiment Strips


And for my second card I kept it fairly simple, just heat embossing the linear image...


On a die cut panel I stamped and heat embossed the poinsettia bloom using a pink metallic embossing powder.  I stamped the sentiment in white on a raspberry coloured sentiment strip and adhered this on 3D foam.  To finish, I added some pink Stickles to the centre of the flower.


Materials used:
  • Stamps: Uniko - Pure Florals Poinsettia
  • Ink: VersaMark
  • Embossing Powder: Wow! - Strawberry Sundae, Opaque Bright White
  • Dies: Create a Smile - Cool Cuts Double Stitched Rectangles; Altenew - Featured Sentiments
  • Accents: Stickles - Pink


As always, my teammates are sharing more makes over at the main Uniko blog, here, to showcase this set.  Why not take a look at their individual blogs too, there may be even more projects being shared.

This set, along with all the products being introduced this week will be available from 9am GMT on Sunday 3 November 2024. 

Please do pop back tomorrow if you can when I'll be introducing one of the new products from the release.


Tuesday, 29 October 2024

Uniko October/November 2024 Release - Re-introducing...Christmas Pop

Good morning

Welcome to Day 1 of the introductions for the upcoming October/November festive release at Uniko.

Bev is re-introducing Christmas Pop, a fabulous stamp set featuring modern, triangular Christmas trees with decorative elements, which can also be used together with the Christmas Pop Trio stencil. 

I have four cards using this stamp set, and for the first one I've combined the set with a bold greeting from the Festive Sentiments stamp set...


I stamped the striped tree from the set in three bright colours, masking off the bright pink one so the other two trees appeared to be behind it.  Once the ink was dry I stamped the sentiment in black ink and then finished with three little stars from the set in the same three bright colours.

Materials used:
  • Stamps: Uniko - Christmas Pop, Festive Sentiments
  • Ink: Altenew - Rubellite, Aqualicious, Bamboo; Versafine Clair - Nocturne


And for my second card I kept it super simple, just using the solid triangular tree with embossed decorative elements...


On a die cut panel I stamped the solid triangle three times in shades of green.  Once completely dry I applied anti-static powder before stamping the decorative elements in VersaMark ink and then heat embossing in gold.  I wanted to keep this one super modern so I didn't even add the tree trunks at the base.


Materials used:
  • Stamps: Uniko - Christmas Pop
  • Ink: Altenew - Emerald, Evergreen, Galactic Stream; VersaMark
  • Embossing Powder: Wow! - Metallic Gold Rich
  • Die: Create a Smile - Cool Cuts Double Stitched Rectangles


Next up I combined an element from the set with the Christmas Pop Trio stencil and a sentiment from the second stamp set which is being re-introduced, more info tomorrow...


On a small die cut panel I stamped and heat embossed the decorative triangle pattern in white, and then blended pink and blue ink over it through one of the tree stencils.  I adhered the panel on 3D foam and added a pink star topper, before stamping the sentiment in pink.

Materials:
  • Stamp: Uniko - Christmas Pop, Pure Florals Poinsettia
  • Stencil: Uniko - Christmas Pop Trio
  • Ink: Distress Oxide - Kitsch Flamingo, Tumbled Glass
  • Die: Create a Smile - Cool Cuts Double Stitched Rectangles
  • Accents: Papermania - Sparkling Stars Assorted Pastels


And finally, I used the trees to create a modern winter scene...


I used a panel of pale blue cardstock and blended Distress Ink from the top edge in purple and pink.  I then stamped three triangle trees overlapping in shades of grey and black.  To create the snow I sprinkled chunky embossing enamel over the panel and heated it from underneath so as not to blow it off the surface.  The sentiment is from the second set being re-introduced in this release.


Materials used:
  • Stamps: Uniko - Christmas Pop, Pure Florals Poinsettia
  • Ink: Distress Ink - Dusty Concord, Kitsch Flamingo; Altenew - Pure Graphite, Industrial Diamond; Versafine Clair - Nocturne
  • Die: Altenew - Featured Sentiments
  • Accents: Stampendous - Chunky White Deep Impression Embossing Enamel


To see more projects and this stamp set in action my fellow Brand Ambassadors are sharing more makes over at the main Uniko blog, here.

This set, along with all the products being introduced this week will be available from 9am GMT on Sunday 3 November 2024. 

I'll be back tomorrow with another re-introduction so please do pop back to take a look.


Monday, 28 October 2024

Uniko October/November 2024 Release Sneak Peeks!

Good morning!

Bev at Uniko has been a busy bee behind the scenes again and is bringing you another release next Sunday, 3 November 2024.

This upcoming release is full of festive delights and, as it's now less than two months until Christmas, I guess many of you will be looking for some new goodies to inspire you if you've not yet finished making your Christmas cards.  As is always the case, Bev's designs are such that they work brilliantly with so many Uniko products already available.

In this release there are two very much missed stamp sets which are being re-introduced, as well as three new sets.

So, without further ado, here are the sneak peeks.  And I'll begin with the two re-introductions, two very different but beautiful Christmas sets...


And next we have a festive addition to the brilliant Background Blocks series...


...as well as another set to join the Big & Bold series of stamp sets...


And then there is an additional set to join the Framed series...


So, be sure to check out the Uniko blog, here, over the next few days to see the introductions by the Brand Ambassadors and to see the new products in action.  I'll be back tomorrow with the first of the reintroductions.


Saturday, 5 October 2024

Uniko - Let's Have Some FLIPPIN' Seasonal Fun - Release Day, Brand Ambassador Blog Hop & GIVEAWAY

Good morning and Happy Card Making Day!

What a way to mark the end of the FLIPPIN' week....it's World Card Making Day AND it's release day over at Uniko.  The two new Ink & Flip Layering stencils are now available.

I made another card using the new Ink & Flip Layering Cobweb stencil and paired it with the cat from the Mid Century Modern Purrfect Day stamp set, and a couple of elements from other brands...


For the cobweb this time, I used ink through the first side then, once flipped, I used some glimmer paste.  Be sure to clean off your stencil straight away if using pastes, they dry quickly!  Once dry, I stamped the cat, the sentiment and the spider in black ink and then added the spider's thread using a silver pen.  These spiders are far too small for this design but it's all I had in my stash and my drawing skills are zero! :D 


Materials used:
  • Stencil: Uniko - Ink & Flip Layering Cobweb
  • Stamps: Uniko - Mid Century Modern Purrfect Day; Clearly Besotted - Simple Script; Card-io - Field Day
  • Ink: Versa Magic - Oasis Green; Versafine Clair - Nocturne
  • Paste: Nuvo Glimmer Paste - Moonstone
  • Accents: Uniball Signo pen - Silver


So, let's now take a look at the two additions to the Ink & Flip stencil series in full.

Ink & Flip Layering Cobweb...


and Ink & Flip Layering Geometric Christmas Tree...


Aren't these great?  As you can see from the projects shared by the team, they can be used in so many ways.  Be sure to leave some comment love either on the Brand Ambassador blogs or social media.  You can find all the links over at the Uniko bloghere.

Make sure you have commented along the hop as Bev will be giving away 3 Ink & Flip Stencils of the winner's choice. Comments will close for the chance to win at midnight on Sunday 13th October 2024 BST, with the winner announced on Monday 14th October 2024.

The products are available from the Uniko store now, here.  

Thanks for visiting today.


Friday, 4 October 2024

Uniko - Let's Have Some FLIPPIN' Seasonal Fun - Introducing...Ink & Flip Layering Geometric Christmas Tree

Good morning!

It's time to introduce the second of the new Ink & Flip stencils from Uniko.

This one is a great layering set, it's the Ink & Flip Layering Geometric Christmas Tree.  As you can see from the two makes I'm sharing today, both of the flip stencils can be used independently to create the Christmas tree, or both together.

On this first one I've used just the stencil which creates the central design and combined it with stamps from the Pattern Building Christmas Tree stamp set...


I used two shades of green Distress Ink to ink up the tree using both sides of the stencil, making the ink more concentrated towards the centre of the tree.  I then used Memento ink, which is Copic friendly, to stamp the string of lights four times.  I purposely used Distress Inks so that I could add water to the light bulbs and blot away the colour, before then colouring them in with Copics.  It's not perfect but it worked pretty well.  I die cut using a stitched rectangle die and finished by stamping the sentiment and adhering the panel flat to the card base.

Materials used:
  • Stencil: Uniko - Ink & Flip Layering Geometric Christmas Tree
  • Stamps: Uniko - Pattern Building Christmas Tree
  • Ink: Distress Ink - Rustic Wilderness, Pine Needles; Memento - Cottage Ivy; Versafine Clair - Nocturne
  • Coloured with Copics
  • Die: Create a Smile - Cool Cuts Double Stitched Rectangles


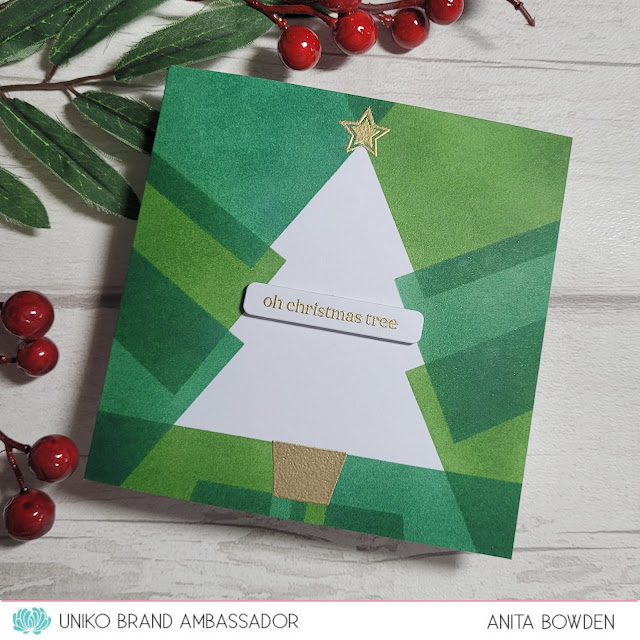
And for my second card I used just the stencil that creates the outer background detail, with stamped elements once again from the Pattern Building Christmas Tree stamp set...


I inked and flipped with two shades of green ink.  This then leaves the central tree white.  I then used my heat gun and anti-static powder tool to ensure that the ink was fully dry before stamping and heat embossing the star and tree base in gold.  I used the same gold embossing powder for the sentiment on a die cut sentiment strip.

Materials used:
  • Stencil: Uniko - Ink & Flip Layering Geometric Christmas Tree
  • Stamps: Uniko - Pattern Building Christmas Tree
  • Ink: Distress Ink - Rustic Wilderness, Pine Needles; VersaMark
  • Embossing Powder: Wow! - Metallic Gold Rich
  • Die: Altenew - Featured Sentiments


Please do pop over to the main Uniko blog, here to see what my fellow team-mates have been creating.  

This stencil set and the new Cobweb set which was introduced yesterday will be available to purchase tomorrow, Saturday 5 October 2024. 

I'll be back tomorrow to show the full reveal of the new products.


Thursday, 3 October 2024

Uniko - Let's Have Some FLIPPIN' Seasonal Fun - Introducing...Ink & Flip Layering Cobweb

Good morning, folks

Today it's the first of two introductions from Uniko.

Bev has done it again and come up with two new Ink & Flip layering stencil designs.  The second you'll have to wait until tomorrow to see but today we are introducing the new Ink & Flip Layering Cobweb stencil set.

I have two cards for you and on this first one I've used both of the stencils together with stamps from the Mid Century Modern Purrfect Day and Alphabet Outlined sets...


Although this is a one layer card it took quite some time to create.  I began by stamping just the eyes from the MCM Purrfect Day set and the letters from the Alphabet Outlined set in Copic friendly ink, coloured them in then stamped and cut masks for all the elements.  I then inked up the first flip stencil which creates the outer area surrounding the cobweb in a purple and blue/grey ink.  With the masks still in place I then inked through the central cobweb stencil in two shades of grey.  Once the masks were removed I added some Glossy Accents to the eyes.


Materials used:
  • Stencil: Uniko - Ink & Flip Layering Cobweb
  • Stamps: Uniko - Mid Century Modern Purrfect Day, Alphabet Outlined
  • Ink: Altenew - Nimbus, Ultraviolet, Limestone, Industrial Diamond; Memento - Tuxedo Black
  • Coloured with Copics
  • Accents: Glossy Accents


And for my second card I used just the central cobweb stencil, along with stamps from the Alphabet Outlined set...


Here I inked through both sides of the stencil in the same shade of Distress Oxide on dark grey cardstock.  I then stamped and embossed the spider in black ink and clear embossing powder.  I finished the design by stamping the letters and heat embossing in white.

Materials used:
  • Stencil: Uniko - Ink & Flip Layering Cobweb
  • Stamps: Uniko - Alphabet Outlined; Clearly Besotted - In Print
  • Ink: Distress Oxide - Lost Shadow; VersaMark; Versafine Clair - Nocturne
  • Embossing Powder: Wow! - Clear Gloss, Opaque Bright White


To see more projects and this stencil set in action my fellow Brand Ambassadors are sharing more makes over at the main Uniko blog, here.

This stencil set will be available to purchase on Saturday, 5 October 2024. 

I'll be back tomorrow to introduce the other new Ink & Flip set so please do pop back to take a look.


Wednesday, 2 October 2024

Uniko - Let's Have Some FLIPPIN' Seasonal Fun - Sneak Peeks

Good morning!

Continuing with Uniko's Flippin' Seasonal fun, today we have sneak peeks for you!

Yes, Bev has cleverly designed two more stencil sets to join the Ink & Flip series.  So, without further ado, here they are...


Bev has certainly been very sneaky with these peeks, she's not giving much away.  If you want to see more, please check back tomorrow and Friday when we will be introducing these two new sets.

These two new Ink & Flips will be available to purchase on Saturday 5 October at 9am BST, along with our traditional Release Day Blog Hop & Giveaway. 


Tuesday, 1 October 2024

Uniko - Let's Have Some FLIPPIN' Seasonal Fun - Day 2

Hi there

We're having more flippin' fun over at Uniko today as we are revisiting the Ink & Flip Snowflake stencil.

This stencil is great for creating impactful Christmas and winter cards and an easy way to create a striking background.  I have two cards for you today.

First up, I've just used part of the stencil to ink up part of the card base and paired the stencil with stamps from the Snowflake Serenade stamp set...


For this design I concentrated on inking up just the central part of the stencil, off the edge of the card base to create a clean and simple, one layer card, retaining some white space.  First inked in pink, flipped and then inked in blue.  I finished by stamping the snowflakes and sentiment which are all from the Snowflake Serenade stamp set.

Materials used:
  • Stencil: Uniko - Ink & Flip Snowflake
  • Stamps: Uniko - Snowflake Serenade
  • Ink: Distress Ink - Kitsch Flamingo, Speckled Egg; Altenew - Winter Lake


For my second card I chose grey cardstock and paired the stencil with a sentiment from the Stunning Snowflakes stamp set...


I love how Distress Oxides create a chalky finish so are perfect for inking on darker cardstock.  I love how this card still looks wintery even though I only used white on the sentiment.  I used two shades of Oxide to blend the background and then heat embossed the sentiment in white on a die cut strip.  I added some smooth silver gems to finish the card.


Materials used:
  • Stencil: Uniko - Ink & Flip Snowflake
  • Stamp: Uniko - Stunning Snowflakes
  • Ink: Distress Oxide - Lost Shadow, Salvaged Patina; VersaMark
  • Embossing Powder: Wow - Opaque Bright White
  • Die: Altenew - Featured Sentiments
  • Cardstock and gems from stash

My fellow Brand Ambassadors are sharing their projects over on the Uniko blog, here.  And be sure to pop back tomorrow where we will be sharing some sneak peeks of two new Ink & Flip stencils which will be introduced later in the week.