Pages

Friday, 30 December 2022

Pigs in Blankets

Hi there

Back with my final little batch of Christmas cards I made this year. 

I followed the same design as the Flamingo cards in my last post, but this time used another of my new favourite Clearly Besotted stamp sets, Pigs in Blankets.

Again, I made six of these in total, using all the images stamped twice...


All the pigs were stamped in black and coloured with Copics before fussy cutting them out.  I then prepped all my card bases.  I began with a strip of masking tape just below the centre and then blended the background with blue ink.  With the masking tape still in place I inked through a snow stencil with white pigment ink.


I used my MISTI to then position and stamp all the sentiments one after the other.  I sorted the pig images and worked out where I wanted them all then added some shading with a grey marker before adhering them in place with some glue dots.  Just a slim amount of dimension so they were still flat enough to mail.


On these cards I added some shimmer amongst the snowflakes and also in the shaded areas with a sparkle pen.


Here are all six finished cards...


Materials used:
  • Stamps: Clearly Besotted - Pigs in Blankets
  • Stencil: Clearly Besotted - Snow Day
  • Ink: Memento - Tuxedo Black; Distress Oxide - Salty Ocean; Hero Arts - Unicorn; Versafine Clair - Nocturne
  • Coloured with Copics
  • Accents: Spectrum Noir Sparkle Pen - Clear

So there you have it, I've now shared all my 2022 makes.  Although I've been a lot quieter than usual this year, since stepping down from the challenge Design Teams, I hope I've managed to inspire you with some of my projects.

I'll be back next week with some new Brand Ambassador Inspiration from Uniko.


So, all that's left to say is, I wish you a


and all the best for a happy, healthy, safe and crafty 2023!


Crafty hugs,

Fa La La Mingo!

Hi there

More of my Christmas makes and I wanted to use one of my newest stamp sets, Fa La La Mingo by Clearly Besotted.

I made six of these in total, using all the images stamped twice.  These were fairly time consuming as I had to colour all the images and fussy cut them all out.


All the flamingos were stamped in black and coloured with Copics before fussy cutting them out.  I still need more practice with Copic colouring but as I was colouring feathers I think these look pretty good!  I then prepped all my card bases.  I began with a strip of masking tape just below the centre and then blended the background with blue ink.  With the masking tape still in place I inked through a snow stencil with white pigment ink.


I used my MISTI to then position and stamp all the sentiments one after the other.  I sorted the flamingos and worked out where I wanted them all then added some shading with a grey marker before adhering them in place with some glue dots.  Just a slim amount of dimension so they were still flat enough to mail.


As you've got to have sparkle at Christmas, I added some shimmer to the flamingos' hats with a sparkle pen.  Don't look too closely at the fussy cutting, not my best work when crafting to a deadline! :D 


Here are all six finished cards...


Materials used:
  • Stamps: Clearly Besotted - Fa La La Mingo
  • Stencil: Clearly Besotted - Snow Day
  • Ink: Memento - Tuxedo Black; Distress Oxide - Salty Ocean; Hero Arts - Unicorn; Versafine Clair - Nocturne
  • Coloured with Copics
  • Accents: Spectrum Noir Sparkle Pen - Clear


Just one more bundle of makes to share, not too dissimilar to these.  I'll be back very soon.

Thursday, 29 December 2022

Stencilled Let It Snow

Hi there

Sharing more festive multiples today and this design was super simple.

I chose to use more of my pearlescent square cards from my stash for these and chose stencilling again as it's so quick to get a production line going.  I made ten of these in total.


I chose a snowflake stencil with lots of detail and picked out three shades of dye ink.  I've never ink blended on pearlescent cardstock before so wasn't sure how well it would work but they turned out fine.  I laid the stencil in roughly the same position on each card front and added ink in three shades in the same areas of the stencil each time, so there was no need to clean it off throughout the process.


I then found some pearlescent silver cardstock in my stash and used that to cut the die cut sentiments.  These were adhered flat so the cards had no bulk for posting.

Here is the full set...


Materials used:
  • Stencil: Crafters Companion - Glittering Snowflakes Collection: Snow is Falling
  • Ink: Distress ink - Salty Ocean, Dusty Concord; Altenew - Volcano Lake
  • Die: Stamplorations - Let It Snow Phrase Die


So there you have it, simple and quick to create.  Thanks so much for visiting, I'll be back again, hopefully tomorrow, to share the remainder of my Christmas makes.


Wednesday, 28 December 2022

Pearlescent Christmas Tag Cards

Good evening

More of my Christmas card multiples for you today.  

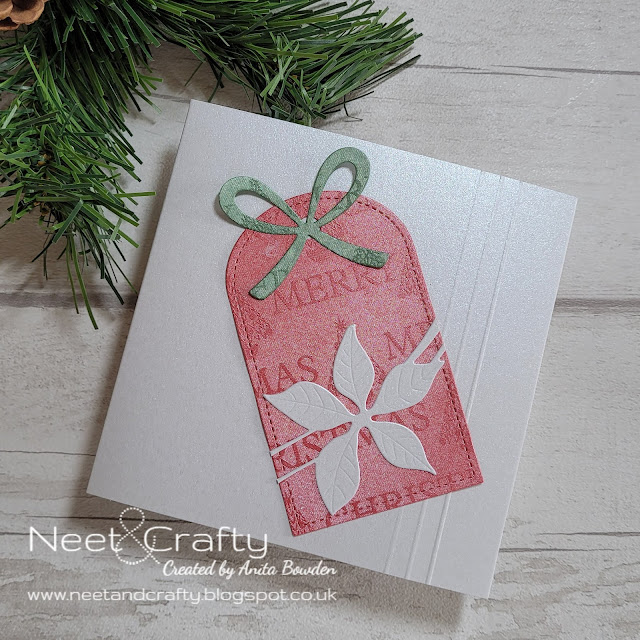
No stamping on these, just die cuts cut from pearlescent cardstock and jacquard-effect papers.  I made eight of these, four in each colourway...


When I make cards I usually start with a piece of cardstock and cut and fold it myself to create the card base but I have a small stash of cards and envelopes which I'm trying to make use of so these ivory pearlescent card bases were my starting point for these.

I've also had these Merry Christmas papers in my stash for as long as I can remember, they were part of a Christmas kit I bought about fifteen years ago!  They look like jacquard fabric and are kind of pearlescent so worked perfectly with these bases.  

The blue and pink version...


I die cut the tags from the patterned paper, and also the bows from a different shade of the same paper collection.  I used a spare card base to die cut the cabin landscapes and then used the bottom part of the same tag die to trim these down, before adhering together.  Before adhering the tags I added three vertical score lines to the bases, just to add a little extra detail.  The bows were then adhered to the top of the tags.


Here's the red and green version...


The process was exactly the same but here I used a poinsettia die to create the die cuts which were adhered across the tags.


The four landscape tag cards...


And the four cards with the poinsettia die tags...


Materials used:
  • Dies: Clearly Besotted - Tag Along Die Collection; Poppy Stamps - Poinsettia Ribbon; Memory Box - Quiet Cabin Landscape
  • Pearlescent cardstock and patterned papers from stash


Thanks for taking the time to visit, I'll be back soon with more.


Monday, 26 December 2022

Skinny Rainbow Trees

Hi there

I hope you all had a wonderful Christmas Day yesterday, celebrating with your nearest and dearest.

I have no plans today so I'm just having a very chilled day at home so thought I'd pop on and start sharing my 2022 Christmas cards.  There was a point at the end of November when I really thought I wasn't going to be able to send handmade cards this year as I'd left it so late, but I knuckled down and made a few bundles of "quick to replicate" designs and was able to send all handmade again this year.

However, due to being so late and also the increasing price of postage, along with the Royal Mail strikes in the UK, I wasn't able to send any cards overseas this year.  So apologies to those of you outside the UK who usually receive a card from me, it just wasn't an option this year, unfortunately :(

Ok, onto my first design.  I made 24 of these in total and got a real production line going.  These took me about an hour and a half...


All four trees are on the same stencil but I inked up each two-toned tree separately, adding masking tape over the tree(s) beside it.  So I inked all the yellow/orange trees onto all the card bases first, before cleaning off, realigning and then inking up the red/pink trees, and so on.  Once all the trees were inked up I then stamped all the sentiments, using my MISTI for positioning and speed.


Something was missing....sparkle!  So I grabbed some glitter glue and added this to all the stars at the top of the trees.  

And there you have it, simple but certainly a merry and bright design in multiple!


Materials used:
  • Stencil: Funky Fossil Designs - Skinny Trees
  • Stamps: Clearly Besotted - Christmas Poinsettia (sentiment)
  • Ink: Distress Ink - Squeezed Lemonade, Carved Pumpkin, Abandoned Coral, Picked Raspberry, Wilted Violet, Chipped Sapphire, Peacock Feathers, Mowed Lawn; Versafine Clair - Nocturne

Thanks for taking a look.  I'll be back again before the end of the year to share more of my festive makes.

And I apologise for being so quiet in general this year, I hope to get back into more crafting again in 2023.

I'd love for you to pop back again before the year is out x