Pages

Saturday, 27 April 2019

Less is More Challenge #394

Good morning, guys

It's time for a new challenge over at Less is More and it's the one that's dreaded by many.  Yes, we're back with a One Layer Challenge.


And our definition of One Layer Cards, as well as more of our clarifications, can be found here.


The awesome Seven Hills Crafts continues as our sponsor for the month of April, and by playing along will give you a chance to win the monthly prize.


I have two sample cards for you today, and for both of these I chose to use hammered cardstock for the first time in ages!  Although, the camera hasn't picked this up too well.

Here's the first..


I blended through a flower stencil off the edge of the card base with two shades of Distress Ink.  I then roughly masked off the white space and splattered with a mix of mica powder and water.  The sentiment was stamped in black to finish.


Materials used:
  • Stencil: purchased from Stamposaurus but no name
  • Ink: Distress Ink - Spun Sugar, Picked Raspberry; Versafine - Onyx Black
  • Stamp: Altenew - Build a Flower: Anemone
  • Accents: Honey Doo Crafts Mica Powder - Purple Topaz

Challenge entry:

Moving Along with the Times - Challenge #96 - Floral


And card two...


The stem and bud were stamped first.  Then the sentiment, where I masked off part of a 'buddy' stamp.  I then added some debossed score lines for some interest on two edges.  Super simple and I think the hammered cardstock and the score lines give it a classy finish.


Materials used:

  • Stamps: Clearly Besotted - Sweet Rose, Budgie Buddies
  • Ink: Altenew - Evergreen, Sunkissed, Orange Cream; Versafine - Onyx Black
  • Accents: Score lines

Challenge entries:

Always Fun Challenges - Challenge #107 - CAS
AAA Cards - CAS Game #138 - Along the Edge
Alphabet Challenge Blog - C for Clean and Simple


My teamies have some great inspiration for you which you can find over at the main challenge blog, here.  And by following their links they may have even more to share on their personal blogs too.

I'm looking forward to seeing your projects in the gallery, and please don't be daunted by one layer cards, why not give it a go :)

Saturday, 13 April 2019

Less is More Challenge #393

Good morning folks!

It's Saturday morning and it's been two weeks since our last challenge over at Less is More which can only mean one thing...we've got a new one for you :)

It's the turn of our Colour challenge and this time we want to see...


The awesome Seven Hills Crafts returns as our sponsor for this month so make sure you play along during this and the next challenge to be in with a chance of winning the LIM monthly prize!


We have a wonderful designer joining us for this challenge, the super talented Milla who was one of our birthday month winners.  Please do pop over to her blog to say hi.


Ok, onto my samples and I have two for you today.  I was obviously in a friendly mood as both feature friend sentiments.  Here's the first...


This was super easy to make.  On a panel of white cardstock I blended two shades of Distress Ink in from the corner.  I very rarely use either of these colours but I adore how great they look together here.  I then used a doily die which is new to my stash to cut a white die cut and adhered it over the edge of the panel and trimmed off the excess.  To finish I stamped the sentiment before adhering the panel on fun foam.


Materials used:

  • Ink: Distress Ink - Iced Spruce, Milled Lavender; Versa Color - Laurel Leaf
  • Stamp: Wplus9 - All Year Cheer (available from our sponsor's store)
  • Die: Sweet Dixie - Doily Five


For my next card I chose coloured cardstock for my top panel...


I chose this soft green shade and began by inking through a leaf stencil using white chalk ink.  I then found a teeny flower stamp and stamped these around the leaves with a peachy shade.  I chose a slightly darker soft green shade to stamp my sentiment and adhered the panel flat to my card base.


Materials used:

  • Coloured cardstock from stash
  • Stencil: Uniko - Natures Treasures II
  • Ink: Versa Magic - Cloud White; Versa Color - Cinnamon, Olive
  • Stamps: Uniko - Background Builders Vines; Altenew - Thinking of You (available from our sponsor's store)

Challenge entries:

Addicted to Stamps and More - Challenge #336 - Anything Goes
AAA Cards - CAS Game #137 - Made in Minutes
Uniko - Challenge #52 - Spring


Thanks so much for popping by.  Looking forward to seeing all your subtle colour creations.  And don't forget to pop over to the main LIM challenge post for more inspiration from my fellow teamies.


Tuesday, 2 April 2019

Guest Designer for Honey Doo Crafts - Selection Three

Hi guys

Tonight I'm sharing the last few of my makes for my Guest Designer spot with Honey Doo Crafts

The new sets will be showcased on TV shopping channel, Hochanda tomorrow, 3 April 2019 at 12pm and 4pm BST so please do tune in if you can (Sky 673 / Freeview 85).


So, my cards today have used three more of the new sets I've yet to share.

First up is a shaker card I made using a lovely set called Peony Crest...


To begin I blended a little pale pink ink on the card base and stamped the sentiment.  I then created the offset oval shaker window using a oval stitched die, backed with acetate, and edged the panel with a stitched rectangle die.  The panel was popped up on 3D foam strips, trapping the confetti shaker bits inside.  I then stamped, coloured and fussy cut the main peony crest image and adhered to the panel.


Materials used:

  • Stamps: Honey Doo Crafts - Peony Crest
  • Ink: Distress Ink - Spun Sugar; Memento - Tuxedo Black
  • Dies: Create a Smile - Cool Cuts Double Stitched Rectangles; Lil Inkers - Stitched Ovals
  • Coloured with ProMarkers
  • Shaker Contents: Nuvo Pure Sheen Confetti - Diamond Harlequin; Little Things from Lucy's Cards - Itty Bitty Stars (Neon Bright)


For this next card I used the small images from a new set called Garden Peony to create a background pattern...


I stamped and coloured the panel the same size as the card base.  I then used a border die to cut away an inner section (I can use the cut away part on another card).  The remaining two parts of the panel were popped up on fun foam and the sentiment stamped between, directly onto the card base.  Simples!

Materials used:

  • Stamps: Honey Doo Crafts - Garden Peony, Peony Crest (sentiment)
  • Ink: Memento - Tuxedo Black
  • Coloured with ProMarkers
  • Die: Avery Elle - Dotted Border Dies


And a nice sunny card to complete my selection, using a set called Hello Sunshine...


I masked the card base and blended ink through a sun ray stencil for the central background.  I then created a frame using two rectangle dies and stamped the sentiment along the top before popping up on foam strips.  I then stamped the sunflowers onto watercolour paper and watercoloured with my Zig markers.  The image was then fussy cut out, adhered over the base, using foam pads to pop up the parts within the frame, and then the edges were trimmed to align with the card base.

Materials used:

  • Stamps: Honey Doo Crafts - Hello Sunshine
  • Ink: Distress Ink - Squeezed Lemonade, Spiced Marmalade; Versafine - Onyx Black; Zig Clean Color Real Brush Markers
  • Stencil: MFT - Sun Ray
  • Dies: Create a Smile - Cool Cuts Double Stitched Rectangles

Challenge entry:

Allsorts - Challenge #513 - Use Yellow


Thanks so much for all your lovely visits and comments, I appreciate each and every one of you.  And I hope you love these new stamps and enjoy the show tomorrow if you are able to watch it, unfortunately I'll be at work during both shows so I'll be catching up afterwards.

Happy Little Stampers April 2019 CAS Challenge

Hi guys

Over at Happy Little Stampers the April challenges are kicking off and today it's the turn of the CAS challenge.  Here are the details...


For all the challenge rules please pop over to the main HLS challenge post.


Ok, onto my DT card, and this is the card I sent to my dear mum for Mother's Day, which in the UK took place on Sunday...


This card is purely just masking and stamping.  I masked the base leaving the square exposed.  I began by blending some blue Distress Ink in from the edges of the square.  Next up was the turn of the script stamp which I stamped in grey.  I then stamped the flower which consisted of the outline, the base colour and two further detailed layers.  The linear images were then stamped in black before removing the masks and stamping the sentiment.

Materials used:

  • Stamps: Stampin' Up - En Francais; Altenew - Beautiful Day; Clearly Besotted - Brushed Sentiments
  • Ink: Distress Ink - Salty Ocean; Memento - London Fog; Altenew - Arctic, Caribbean Sky, Persian Blue; Versafine - Onyx Black

Challenge entries:

My Time to Craft - Challenge #393 - Mother's Day / For a Female


All of the Happy Little Stampers challenges run until the end of the month.  The Watercolour challenge is already live and the rest of the April challenges will launch over the next few days.  I hope you can join in and play along.

Monday, 1 April 2019

Guest Designer for Honey Doo Crafts - Selection Two

Hi guys

I'm back tonight to share my next batch of samples for the new release at Honey Doo Crafts.

Earlier, Amanda held a Facebook Live video showing the ten new stamp sets, along with all the samples from the whole design team which you can find, here.

And don't forget Honey Doo will be on Hochanda (Sky 673 / Freeview 85) this coming Wednesday 3 April 2019 so tune in if you can, if not, set your planners as I believe Amanda will be doing lots of demos along with showcasing the products.


Ok, on to my next few samples.

First up I used a stamp called Smell The Roses which is a truly beautiful image...


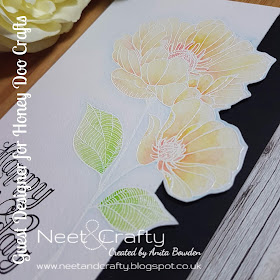
To create this one I heat embossed the image in white on watercolour paper and watercoloured it with Inktense pencils.  I added a little pale blue watercolour around the edge of the image just to lift it off the background a little.  I then used a paper trimmer to slice away part of the panel and fussy cut around the edge.  I stamped the sentiment and then popped the panel up over the card base which had a black strip adhered to the right hand side.  This is a CASE of a previous card I made, here, which used partial die cutting to create the same look.  So you don't need the co-ordinating dies to create this effect.


Materials used:

  • Stamps: Honey Doo Crafts - Smell The Roses, Happy Times
  • Ink: VersaMark; Versafine - Onyx Black
  • Embossing Powder: Altenew - Pure White
  • Watercoloured with Derwent Inktense pencils

Challenge entries:

Addicted to Stamps and More - Challenge #334 - CAS
Creative with Stamps - Challenge #37 - Birthday


Next up I used the new Daisy May stamp set.  I was inspired by a card by the super talented May Park, here.  The stamps I used were a linear design as opposed to May's card which used solid images, so I chose to emboss it in gold and pair with orange tones.  I paired this with a sentiment from an existing Honey Doo set called Cheers...


I began with a panel of orange cardstock and stamped and heat embossed the daisy image in gold multiple times to create a frame.  I then blended Distress Inks in from the edge in co-ordinating shades to create ombre effect.  I finished by stamping the sentiment in black ink and heat embossed it in clear.

Materials used:

  • Stamps: Honey Doo Crafts - Daisy May, Cheers
  • Orange cardstock from stash
  • Ink: VersaMark; Distress Ink - Ripe Persimmon, Barn Door, Black Soot; Versafine - Onyx Black
  • Embossing Powder: Wow - Metallic Gold Rich, Clear Gloss


Next up is this gorgeous floral cluster image called Roses and Lilies...


I stamped and heat embossed the floral image in white onto vellum and coloured on the reverse with ProMarkers.  I then did some partial trimming, cutting away a vertical section but stopping where the image was and fussy cutting around the edge.  The vellum panel was then wrapped around an embossed panel and secured on the reverse.  The panel was popped up on fun foam and I finished with a sentiment embossed in white on textured lilac cardstock, die cut with a pierced square.


Materials used:

  • Stamps: Honey Doo Crafts - Roses and Lilies, Birthday Sentiments
  • Ink: VersaMark
  • Embossing Powder: Altenew - Pure White
  • Coloured with ProMarkers
  • Embossing Folder: We R Memory Keepers - Next Level (Wave)
  • Die: MFT Die-namics - Pierced Square Stax

Challenge entries:

The Paper Players - Challenge #435 - Tic-Tac-Toe (die-cut / embossing / floral)
Just Us Girls - Challenge #481 - Embossing Folder


Finally, the last one for this post is a really simple card I made using the new Oopsie Daisy set...


For this one I grabbed some scraps of cardstock and cut strips of varying widths and adhered these alternately to a piece of thinner cardstock.  The daisy image was then stamped across the strips.  I then die cut the pierced curve from each side of the strip  I also did the same from the front edge of the card base, and adhered the striped panel aligning with the edge.  I then stamped the sentiment vertically on the inside of the card but as it's cut away it shows when the card is closed.  I love this sentiment, it could be ideal for an 'oopsie I forgot' belated card, or perhaps to send to someone who has had some sort of mishap, or if you've messed up and want to apologise.  So lots of uses :)

Materials used:

  • Stamps: Honey Doo Crafts - Oopsie Daisy
  • Ink: Versafine - Onyx Black
  • Die: Avery Elle - Dotted Borders Dies
  • Card scraps from stash


Thanks so much for stopping by.  I'l be sharing my last few samples with you tomorrow, ahead of the shows on Hochanda on Wednesday.  If you can't wait until then, all the new sets are available to buy direct from the Honey Doo website, here.