Pages

Wednesday, 29 April 2015

Addicted to Stamps and More #142

Hi guys

It's that time of the week again where we have a brand new challenge at Addicted to Stamps and More.  This week we're back with another challenge where we would like you to...


Make Your Mark
Please use materials such as markers, paints, watercolours, chalks, sponging, etc. to make your mark on your project.


This week's sponsor is the fabulous A Day for Daisies and the prize for one lucky entry will be a $12 gift certificate!

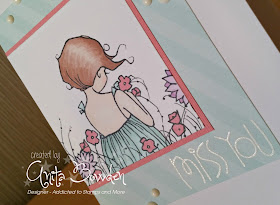
Here is my DT card using one of our sponsor's digi images called Flowers In My Garden...


I've not used my ProMarkers and FlexMarkers for a while so I enjoyed colouring in this image.  I decided to layer up the image against the left side of the card, no idea why, I just went with the flow! Before adhering everything I first stamped the sentiment at the base of the patterned paper panel and heat embossed with white embossing powder.  Then to finish I added a few Doodlebug Sprinkles.

Materials used:
  • Digi Image: A Day for Daisies - Flowers in my Garden
  • Stamp: Paper Smooches - Sentiment Sampler
  • Ink: VersaMark
  • Embossing Powder: Wow! - Opaque Bright White
  • Patterned Paper: Avery Elle - The Sorbet Collection
  • Cardstock: - Bazzill Basics (pink)
  • Coloured with ProMarkers and FlexMarkers
  • Accents: Doodlebug Sprinkles - Lily White

I'm linking this card up at the following challenges:

My Time to Craft - Challenge #289 - Spring Flowers
Cute Card Thursday - Challenge #370 - Clean and Simple
Brown Sugar - Challenge #143 - Anything Goes


Why not pop on over to ATSM to see what else my teamies have to inspire you this week.  There are lots of ways to Make Your Mark so I hope you'll join us for this week's challenge.


Sunday, 26 April 2015

Ombre Hugs

Hi there

I've got a really quick post for you this evening.  I made this card this afternoon to combine a few challenges.

This is only the second time I've used my Distress Inks and I think I'm getting the hang of this blending business as I'm really happy with how this one turned out.  I'm desperately waiting for pay day as I NEED to add some more colours to my collection of ink pads!


On a panel of white cardstock I masked off a horizontal panel and used my mini blending tool to blend two pink inks to create an ombre effect.  I then used a word die to cut out the word hugs from the panel.  Originally I was going to just inlay a second word die but I decided to stack them so I didn't really have to cut it out after all!  The top word die is cut from another panel of blended cardstock but with the colour fading in the opposite direction, from bottom to top instead of top to bottom.  The panel was adhered to my card base using 3D foam and I added an epoxy heart sticker to finish.

Materials used:

  • Cardstock: Anna Marie Designs
  • Ink: Distress Ink - Spun Sugar and Seedless Preserves
  • Die: Lawn Fawn - Scripty Hugs
  • Accent: Stampin' Up - Itty Bitty Accents Epoxy Stickers

Challenge entries:


CASology - Week 143 - Ombre
CAS on Sunday - Challenge #57 - White and one other colour
Happy Little Stampers - April Sketch Challenge


That's all for now, thanks so much for visiting.


Saturday, 25 April 2015

Less is More - Guest Designer!

Hi there

Eeeek...I'm very excited this morning as I recently received a happy email and I've been invited to be a Guest Designer at Less is More!


I absolutely love this challenge as it was one of the very first I discovered in blogland and I try to enter as often as I can so I'm absolutely honoured to be joining Chrissie, Sarah and Anne this week.

So, without further ado, this week the challenge is...

Add a Tag

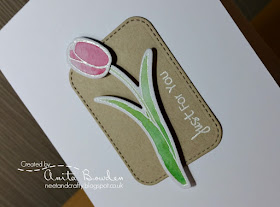
Here is my card...


I stamped the flower on vellum and heat embossed in white before fussy cutting it out.  I then drew some sketchy lines on the reverse using a white Inktense pencil.  I then used the same vellum to die cut the leaves.  The tag outline and sentiment was also embossed in white on kraft cardstock and die cut with the co-ordinating tag die.  I cut a kraft panel and punched out some notches before wrapping around with some thin green twine.  Next the elements were layered up with more twine and the flower was adhered with silicone glue so the adhesive wouldn't show through.  A scattering of gems were added to finish.

Materials used:
  • Stamps: Clearly Besotted - Tag Along; Uniko Studio - Beautiful Blooms II
  • Dies: Clearly Besotted - Tag Along and Leafy Accents
  • Ink: VersaMark
  • Embossing Powder: Wow! - Opaque Bright White
  • Derwent Inktense Pencil - Antique White
  • Cardstock: Neenah - Desert Storm
  • Twine: Hemptique - Vintage
  • Gems from stash

There are lots of ways to incorporate tags into your projects so we would love for you to join us and can't wait to see what you come up with.


A Thank You

Before I go I'd like to say a massive thank you to all of you that sent lovely messages about my little fur baby, Elmo.  He came home later on last Sunday and is recovering well from his surgery, it's amazing how quickly animals bounce back from medical procedures. Nothing was done during the surgery but he was given antibiotics and anti-inflammatories to calm down whatever was causing him the pain.  The vet said there's lots going on that doesn't look good so, unfortunately, there isn't much that can be done other than taking biopsies of various organs that are abnormal and giving him treatment which might not even help him, or possibly harm him elsewhere.  He also has a lymphoma and treatment for that is highly likely to be unsuccessful, not to mention extremely expensive. So, as long as he's pain free, that's my main priority right now.

He's been having lots of gentle cuddles.  I need to be careful as he has lots of stitches in his tummy which will be coming out next week.  Apart from being a bit tentative about climbing up on the bed and sofa, etc. he doesn't really seem bothered about the wound at all.  I find it amazing how resilient he is!

I'll leave you with a little pic...here he is, back in his favourite spot on my bed, such a brave boy xxx


Thank you so much for popping by today, I hope to see you again soon.


Sunday, 19 April 2015

Christmas Silhouettes

Hi guys

I was hoping to have a crafty weekend as I had no real plans this weekend but that all changed on Friday night when my little kitty, Elmo was taken ill.  The painkillers he was given only lasted through the night so I whisked him off to the vet again yesterday morning where he did some X-rays and carried out an internal investigation yesterday afternoon.  He's a very poorly boy with lots wrong with his little body so it's not looking good.  Any healing vibes you can send his way will be great right now :(

I didn't sleep well last night and was up really early this morning so I decided to make a card to try to take my mind off things.  I've managed to combine a few challenges with this little Christmas card (I know....making Christmas cards in April!)


I used Michele Ferguson's card from this week's Muse challenge as my starting point (shown below) but went for a completely different theme as I also wanted my card to fit in with this week's challenge at Less is More which is 'Up, Up and Away'.  I was looking through my stamps for things like balloons and aeroplanes and then 'bingo', I found Santa's sleigh.  This may be a bit busy for Less is More but I'm hoping the snowbanks provide enough white space!

So, after lots of masking and blending I managed to create this little scene.  I love this little bunny on its hind legs, such a cute image.  After matting the panel on blue cardstock I then added some fine glitter to the snowbanks.

Materials used:

  • Stamps: Card-io - Winter Walks, Greenery 1 and Christmas Scenery 2
  • Ink: Versa Color - Indigo; Versafine - Onyx Black
  • Die: Xcut - Nested Circles (used as a mask for the moon)
  • Cardstock: Papermania Premium (blue); Anna-Marie Designs (white)
  • Glitter: Stampin' Up - Dazzling Diamonds

Here is Michele's card where I took the colours and landscape panel as inspiration...


I am also going to enter my card into the following challenges:

Crafty Hazelnuts Christmas Challenge - Challenge #225 - Something beginning with F (festive, foliage, Father Christmas)
613 Avenue Create - Challenge #120 - Anything Goes with option of Diamonds (I used SU Dazzling Diamonds!)
ColourQ - Challenge #287


That's all for now, thanks so much for visiting today x


Wednesday, 15 April 2015

Addicted to Stamps and More #140

Hi there

Well, I'm back with my regular late night post which can mean just one thing....it's time for a brand new challenge at Addicted to Stamps and More!  And for this week's challenge we've whooshed back around to a...

Photo Inspiration Challenge
Please take your inspiration from any element of the fab photo below
(e.g. a specific item, colours, theme, etc.)


We have two fab sponsors this week:
Bugaboo Digi Stamps - offering a prize of 7 digis!
Rosey Hearts - offering a prize of 5 digis!


Here is my DT card
I was inspired by the diamond pattern of the table, the white and putty grey colours, and the pink flowers


I stamped the stitched diamond pattern on white cardstock and cut this down before matting onto some grey/putty coloured cardstock.  I then stamped and die cut the vase and lots of elements from the Fresh Cut Florals set (first outing for this one...I love it!) and arranged these before individually adhering to the stamped panel.  The panel was adhered flat to the card base before stamping the sentiment below.

Materials used:
  • Stamps: Visible Image - unknown name; WPlus9 - Fresh Cut Florals; Clearly Besotted - Flower Arrangement (vase)
  • Dies: WPlus9 - Fresh Cut Florals; Clearly Besotted - Flower Arrangement
  • Ink: Versa Color - Chateau Gray, Peony, Petal Pink, Opera Pink, Orchid, Sage, Olive, Green Tea

I'd like to enter this card at the following challenge blogs:

Virginia's View - Challenge #14 - Layers and Dimensions
Simon Says Stamp Wednesday Challenge - April Showers and/or Spring Flowers
A Gem of a Challenge - Challenge #142 - Spring is in the Air
AAA Cards - Game #37 - It's Springtime


My fellow teamies at ATSM have created some great cards this week, all inspired by the photo in different ways.  So, why not pop over for some inspiration, and leave some love too.

I'd love you to enter and see how you interpreted the photo this week.


Saturday, 11 April 2015

Celebrate with Splatters

Hi guys

I've found a little crafty time today and I've got a one layer card to share with you.

My initial inspiration for this card was the new challenge at Less is More which is to create a one layer card with splatters.

I recently made a purchase of my very first distress inks, a few packs of the mini ink pads.  I don't know how I've managed to last this long without purchasing any!  I've still got lots to collect but I wanted to use some of them for the first time today.

Here's what I created...


I started by blending some lilac ink through a stencil to create the vertical lines.  I then watered down the pink ink on an acrylic block and splattered this on the card by tapping a paint brush.  I then did the same with the green ink.  I was then impatient waiting for the watery ink to dry but didn't want to use my heat gun for fear of warping the card so I picked it up and wafted it around like a fan...what a great idea as I then created the runs in the green ink!  Once completely dry I stamped the sentiment and little sunburst flowers in black ink.

Materials used:

  • Stencil: Memory Box - Scraped Paint
  • Ink: Distress Ink - Shaded Lilac, Spun Sugar, Evergreen Bough; Versafine - Onyx Black
  • Stamps: Clearly Besotted - Sunburst

I am also linking this card up at the following challenges:

Fantasy Stampers - Challenge #34 - CAS
Brown Sugar - Challenge #141 - Distress
Happy Little Stampers - April CAS Challenge - Stenciling
One Layer Simplicity - Challenge #15 - Blowin' in the Wind (hopefully wafting the card to help it dry will count! lol)


I'm hoping to create more this weekend so I may be back again later.


Monday, 6 April 2015

Weight Loss Motivation

Hi there

This morning I have something a little different to share with you.

I've had a constant battle with my weight for as long as I can remember so anything that can give me a little more motivation is very welcome.  I wanted something that would allow me to see my weight coming off.  After a disastrous few months I'm back to where I started, AGAIN, so I thought now was a good time to make something that would be visually appealing.

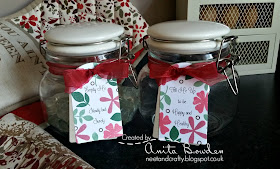
I bought two clip top jars recently for this purpose but they looked a little bare and boring.  And as I now have a nice sparkly new kitchen I decided to decorate them to co-ordinate with my kitchen textiles (as close as I could!)


The jar on the left has a tag saying 'Empty Me, Slowly but Surely' and is filled with glass nuggets, each one representing half a pound of the weight I need to shift (yes, I have a mountain to climb!).  After years of yo-yo dieting I know that 'slowly but surely' is the way to go so thought I would use this as a reminder.  Hopefully, each week I will be able to put at least one nugget into the other jar.


To make these I printed the two statements onto white card using a font I downloaded called 'Frosting for Breakfast' - haha not a good idea in these circumstances!  I then die cut four tags, two from the printed statements, and two from kraft cardstock.  I then stamped the flowers and leaves in colours to co-ordinate with my kitchen textiles.  I adhered the stamped tags onto the kraft tags at an angle and then finished by tying these around my jars with some red organza ribbon.

Materials used:

  • Stamps: Paper Smooches - Reflections
  • Ink: Memento - Lady Bug and Rhubarb Stalk; Versa Color - Olive, Evergreen and Pine Cone
  • Die: Clearly Besotted - Rounded Tag Die
  • Cardstock: Anna-Marie Designs - Super Smooth Printer Card; Neenah - Desert Storm
  • Ribbon from stash

Challenge entries:

The Paper Players - Challenge #239 - To 'Die' For
Crazy 4 Challenges - Challenge #276 - Put a Bow On


Fingers crossed I can make progress this time.  Matt and I decided not to buy Easter eggs this year so at least I won't be eating up chocolate for weeks!

Thanks for your visit today, I hope you have a lovely Easter Monday everyone.


Sunday, 5 April 2015

Sunrise Poppies

Hi there

As promised, here is my second card I made this morning.


I made a stencil from a scrap of cardstock using a circle die and then blended two inks to create the sun.  Next I stamped the poppies.  I took the sentiment stamp and curved it to follow the contour of the stem to the right before stamping in the same black ink and I finished off by stamping the birds.  A super simple, one layer card.

Materials used:

  • Die: Clearly Besotted - Geometric Style II (I used one of the circles to make the stencil)
  • Ink: Memento - Tangelo, Cantaloupe; Versafine - Onyx Black
  • Stamps: Kanban - Spring Meadow; Personal Impressions - Mix & Match

Challenge entries:

Less is More - Week 218 - Colour Challenge - Predominantly Black
Happy Little Stampers - April CAS Challenge - Stenciling
Muse - Challenge #111 - CASing Kristie (I used the sunset and the silhouette as my inspiration)


Thanks so much for popping by.  I'm now off out for a few hours to my brother's house as he's creating some mouthwatering BBQ food...he takes part in BBQ competitions and needs feedback from us, can't complain at that!

Hope to see you again soon, Happy Easter x


Single Spring Bloom

Hi guys

Happy Easter!  I hope you all have a lovely day whatever you are doing.

I was wide awake far too early this morning and just couldn't get back to sleep so I got up and managed to make two cards before 8.30am! (the second card will be coming up shortly)

So here's my first make of the day.  This was super simple as I took leftover snippets from other cards which have been lying on my table waiting to be used up.


The die cut tulip was leftover from this card, and the kraft panel was taken from the card in my last post here, where I created the aperture.  So all that was left to do was stamp the sentiment in VersaMark which was then heat embossed using white embossing powder.  This was adhered flat to the card and the tulip was popped up on 3D foam.  The final touch was to round the corners of the card base.

Materials used:

  • Stamps: Clearly Besotted - Spring Blooms and Flower Arrangement (sentiment)
  • Ink: VersaMark
  • Embossing Powder: Wow! - Opaque Bright White
  • Watercolours: Daler-Rowney
  • Dies: Clearly Besotted - Spring Blooms; MFT Die-namics - Stitched Rounded Rectangles
  • Tools: Tonic - Corner rounder

Challenge entries:

CASology - Week 140 - Spring
Just Us Girls - Challenge #287 - Spring
My Time to Craft - Challenge #286 - Get Krafty
Ooh La La Creations - Challenge #177 - Spring/Easter
AAA Cards - Game #38 - Easter Colours


And as I made this card out of leftovers I'm also linking up at Pixie's Snippets Playground Week 171.

Thanks for popping by, I'll be back shortly to share my other card from this morning's crafty session.


Wednesday, 1 April 2015

Addicted to Stamps and More #138

Hi there

I'm here to share my DT card for the next challenge at Addicted to Stamps and More.  A new challenge has just started and this week the theme is...


Holiday
Your creation must have a holiday theme: this could be a national holiday or a holiday/vacation theme


Our sponsor this week is Stitchy Bear and the prize they are offering is 3 images up to the value of $10!

Here is my DT card...


I started by cutting a kraft cardstock panel slightly smaller than my card base and die cut a curved rectangle aperture.  I stamped the sentiment in VersaMark and heat embossed with white embossing powder.  I then stamped the flowers on the card base also in VersaMark (after marking out where the aperture would be positioned), and also heat embossed these with white embossing powder.  I die cut the bunny from some polka dot cardstock and adhered some short pieces of thin twine to create the whiskers.  I then popped up the panel and the bunny on 3D foam.

Materials used:
  • Cardstock: Neenah - Dessert Storm; Pebbles - Basics Cardmaking Pad 2 (polka dot)
  • Dies: MFT Die-namics - Stitched Rounded Rectangles (negative); Clearly Besotted - Woodland Pals Die Collection
  • Stamps: Uniko Studio - Background Builders Flower Power; Clearly Besotted - Sweet Little Sentiments
  • Ink: VersaMark
  • Embossing Powder: Wow! - Opaque Bright White
  • Twine: Hemptique - Ruby collection

I'd like to link this card up at the following challenge blogs:

Sweet Stampin' Challenge - Easter
Fantasy Stampers - Challenge #33 - Easter Time
My Time to Craft - Challenge #285 - Easter Animals
Addicted to CAS - Challenge #60 - Cute
Uniko Studio - Challenge #19 - Anything Goes
CAS(E) this Sketch - Challenge #116


I hope you'll join in with this week's challenge.  If you need some inspiration why not pop on over to the ATSM blog where the rest of the Design Team are also sharing their projects.

Happy crafting and I hope I'll see you again soon.