Wednesday 30 October 2013

On Your Special Day

Hi there

Tonight I am sharing a card I've made to fit four challenges.  It's not very often I manage to combine challenges, I'm usually rushing just to get a card made before the deadline! 

I made this little card and used the 'On your special day' sentiment so it can be suitable for more than just a birthday.


This was quite easy to put together.  I die cut the heart in the white cardstock and stamped the leaves and butterfly on the coloured cardstock, where it would show through the aperture.  A bit of layering up and some little gems and it was complete.
 
Materials used:
  • Cardstock: Stampin' Up - Wisteria Wonder; White cardstock from stash
  • Stamps: Marion Emberson Designs - Just Because and On your Special Day
  • Ink: Versa Color - Imperial Blue
  • Gemstones from stash
 
 
I'm entering this card into the following challenges:
 
Dynamic Duos #76 - Monochromatic Shades of Purple
Addicted to Stamps and More # 69 - Clean and Simple
My Time to Craft #240 - Butterflies
Sweet Stampin' - Wood, Trees or Leaves
 
 
I'm feeling a bit sorry for myself tonight as I've got a horrible cold and I'm sat here in my PJs with hot honey and lemon for company!  So this little bit of crafting has cheered me up.
 
Take care and thank you so much for popping by my little space in blogland :)


Welcome Baby

Hi there

Just thought I'd pop by and share a card which was an order for a friend who has just become an Auntie for the first time. 

She wanted a personalised baby girl card, and wanted it pink and sparkly and very simple.


She wanted a larger card so I used a C5 hammered card base.  The rest was fairly straightforward. 
 
My Kanban Sherbert Pips cardstock made yet another appearance here, I love the glossy glittered polka dots.  A few die cuts and a little bit of stamping and it was finished.  I also stamped 'Congratulations' on the inside.  I popped some of the die cuts up on some shallow 3D foam, I didn't want to make the card too bulky as it was being sent overseas.
 
Materials used:
  • Dies: Xcut - Nested Squares; Clearly Besotted Stamps - Baby Love and Tag Along
  • Stamps: Clearly Besotted Stamps - Baby Love and Basic Alphabet
  • Ink: Versafine - Onyx Black; Versa Color - Petal Pink
 
Thanks for popping by and thank you for you comments and continued support xxx


Sunday 27 October 2013

You Are In My Thoughts - Muse Challenge #40

Hi there

I was hoping to do lots of crafting this weekend but it didn't happen until about an hour ago when I decided to make a card for this week's Muse challenge.

This week they have a Guest Muse, none other than the fabulous Darnell.  As October is Breast Cancer Awareness month, Darnell has made her card with this in mind.  Darnell is a wonderful crafter and her blog posts lift everyone's spirits, so pop over and show your appreciation, you won't be disappointed.

So, here is my card...


and here is Darnell's gorgeous card...

 
As you can see I've kept the pink and green colour palette and used pretty much the same vertical layout.  When I first started making cards this was a regular 'go to' layout for me.  Using patterned paper to co-ordinate with the stamped image is great, and now that I have a few more ink colours in my stash its becoming easier to match things up.  The floral paper I used has an off-white background so I decided to use an ivory card base rather than white.  The rose is a wood mounted stamp but the sentiment is a clear stamp so I curved it very slightly to follow the line of the stem.  I rounded off the corners to finish.
 
Materials used:
  • Patterned paper: Dovecraft - Garden Party
  • Stamps: Stampin' Up - Both Way Blossoms; Personal Impressions - Mix and Match
  • Ink: Versa Color - Pink and Olive
  • Corner rounder: Tonic
 
Thanks for popping by.  There are a few more challenges I've seen that I hope to enter in the next day or two so hopefully I'll be back very soon.
 
Take care and stay safe, the storm that is forecast for the UK tonight and tomorrow sounds like it will be quite nasty.  I'm on the south coast of Devon which I think is going to take quite a battering :( 
 
Bye for now


Saturday 26 October 2013

Quick question re Bloglovin'

Hi there

I'm here to pick your brains!

When I first started blogging I added all the blogs I read to my Blogger reading list which worked well for months.

As my list increased I was finding it difficult to find current challenges, etc. without trawling through a lengthy list so I started using Bloglovin' so I could put them into categories, and I have now transferred the same blogs over.

On many occasions I find that the most recent blog posts don't always show up in my Bloglovin' feed but are showing in my Blogger reading list.  Even when I click on the actual blog link from my Bloglovin' follow list, the most recent post still isn't there.

Is there sometimes a time delay with Bloglovin'? 

I really want to make the switch to use Bloglovin' as my main reader but at the moment I'm apprehensive just in case I miss something I really want to see.

Any help/info would be greatly appreciated.

Thanks guys

Sketch Saturday #282 - Guest Designer!

Hi guys

Welcome back to new challenge at Sketch Saturday and I'm really sad to say this is my last week as Guest Designer.  I've had a brilliant time creating my cards throughout October and I want to say a massive thank you to Lizy of Lizy's House of Cards for thinking of me and inviting me to be part of the team - THANK YOU!

Before I share this week's sketch I wanted to remind you that there's still time to link up for a chance to win some fabulous candy at Sketch Saturday.  To celebrate reaching 2000 followers they are offering multiple prizes to say thank you.  You have until 31 October so what are you waiting for? 

So, on to this morning's sketch and what a fabulous design this is, I really love this one...


And here's my card.  I had great fun having more practice with my Promarkers...


Not much explanation required for this one.  I chose the patterned paper first and then coloured my image, this one is from The Greeting Farm, using similar colours to co-ordinate.  The white cardstock panel is popped up on 3D foam for some dimension.  I finished with the sentiment banner, some buttons and twine, and some glitter glue.  No Christmas card is complete without a little bit of sparkle!
 
Materials used:
  • Patterned Paper: Dovecraft - Christmas Blues
  • Stamps: The Greeting Farm - Rain Snow Shine; Clearly Besotted Stamps - Modern Christmas
  • Ink: Impress - Jet Black; Versafine - Onyx Black
  • Coloured with ProMarkers and FlexMarkers
  • Buttons: Stampin' Up - Designer Subtles Collection
  • Die: MFT - Fishtail Flag Stax
  • Glitter Glue: Stickles - Star Dust
  • Jute twine from stash
 
Click here to visit the Sketch Saturday challenge blog to see what fabulous cards have been created by the Design Team.  And while you're there, don't forget to follow and link up for a multiple chance to win some fantastic prizes.
 
Have a lovely weekend and I hope to be back very soon.


Monday 21 October 2013

Masculine Birthday

Hi there

Tonight I thought I would share with you a card I made last week but couldn't share until now in case the recipient saw it!

I really struggle with making cards for men so I'm not completely happy with this one but thought I'd share it anyway.


I used a few stamp sets from Clearly Besotted Stamps for this one.  I started with a white panel cut smaller than the card base and repeatedly stamped the chevron design to create the background.  Next I stamped the parcel, balloon and tag and die cut these with their matching dies.  I stamped the balloon string onto the background before mounting the parcel and balloon on top.  I then tied some ribbon (this was the hanging ribbon taken from one of my jumpers!) around the tag before mounting this on 3D foam.  I smothered the balloon in Glossy Accents to give it lots of shine, I remembered this after seeing this fab card by Michelle Short at The Card Grotto.  Unfortunately, as I'm far too impatient, I touched the balloon before it was dry (when will I ever learn?!) and ended up with a lovely finger print on it so I smothered a second layer over the top which did the trick and then left it overnight to dry!
 
I really must try more masculine cards, no matter how hard I try I never really end up liking them, they're just not pretty enough! :D
 
Materials used:
  • Stamps & Dies: Clearly Besotted Stamps - Basic Chevrons, Make a Wish and Tag Along
  • Ink: Versa Color - Cement, Indigo and Pacific; Versafine - Onyx Black
  • Ranger - Glossy Accents
  • Cardstock, dew drops and ribbon from stash
 
That's all for now folks.  Thanks so much for dropping by, your visits and comments are appreciated so much.
 
Bye for now
 

Sunday 20 October 2013

<a href="http://www.bloglovin.com/blog/5779503/?claim=ehc5njh6rfs">Follow my blog with Bloglovin</a>

Pretty Garden Butterflies

Hi there

Here is a card I've made this afternoon.  No challenge this time but I wanted to use one of my new embossing folders.

This embossing folder is part of a set of two by Sizzix and is named 'Basket Weave'.  My initial thought was that if embossing on white cardstock it would look like a white washed brick garden wall.  So that's the direction I went in when creating this card.


I cut down some white cardstock slightly smaller than the card base.  I stamped the climbing leaves and the sentiment first, before embossing the panel.  I stamped three butterflies and cut these out with their matching dies.  I adhered these to the panel on some thin 3D foam, bending slightly to add dimension.  These were trimmed with some bling to finish.

Materials used:
  • Embossing folder: Sizzix - Basket Weave
  • Stamps: Clearly Besotted Stamps: - Leafy Accents, Butterfly Wishes and A Little Sentimental
  • Dies: Clearly Besotted Stamps - Butterfly Wishes
  • Ink: Versa Color - Sage, Petal Pink, Opera Pink and Heliotrope; Versafine - Onyx Black
  • Cardstock and gems from stash

Thanks so much for visiting, I've had a fun day of crafting while the weather outside is awful down here today.  Hope to see you again soon.

Take care


Clearly Besotted Challenge #5 - Colour Inspiration/Autumn Theme

Hi guys

I've been trying to find the time to make a card for this month's Clearly Besotted Challenge since Stephanie announced it a while ago but I've finally managed to do it this morning. 

I find it a challenge in itself to craft in the dark evenings as colours are more difficult to see properly in artificial light, so as this was a colour challenge I've left it until this weekend to stamp this one.

For the Clearly Besotted challenges the rule is to use at least one CBS product.  For this card I've used stamps from six stamp sets!  Can you tell I love them?! :)

Here is my card...


And here is the photo inspiration we were given...


I wanted to create my own background paper for this one before die cutting the strips.  So I used stamps from the two Building Blocks sets to create the background and then over-stamped with various stamps from other sets, using ink colours as close as I could find to the colour palette.  I'm really pleased with how this one turned out and by stamping your own paper you can pretty much guarantee it will be unique.

Materials used:
  • Stamps: Clearly Besotted Stamps: Building Blocks, Building Blocks II, Leafy Accents, Autumn Flowers, Happily Ever After and A Little Sentimental
  • Ink: Versa Color - Bisque, Cinnamon, Charcoal, Umber, Brown and Sky Gray
  • Die: MFT Die-namics - Fishtail Flags Stax
  • Gems: Papermania - Capsule Sunshine

Hopefully I'll be back with more later today.  As I only have my lounge table to work on I have to make sure I tidy away the carnage I create before starting the next card! I need to win the lottery so I can buy a bigger home with space for a craft room!

Bye for now


Saturday 19 October 2013

Festive Washi Tree

Hiya

I'm back this evening after making a second card for this week's challenge at Less is More where the theme is Trees.


I used some cream jacquard paper to cover the card base.  I've had this set of paper in different colours for years and have no idea where I bought it from.  I love how it catches the light.
 
Next, I laid some strips of washi tape over some cardstock and cut a triangle at a slight angle to create the tree.  I topped the tree with a star shaped gem.
 
As the background paper has an embossed sentiment I decided not to add another.
 
Materials used:
  • Washi Tape: Dovecraft - Tis The Season Greens
  • Paper and gem from stash
 

That's all for today, I've just opened a bottle of wine so probably not a good idea to try to create anything else tonight! :D
 
Take care


Embossed with Glitter

Hi there

I'm back this afternoon to share a card I've made for the latest challenge at Less is More.  The theme this week is Trees.

I was going to automatically reach for my stamps to see what inspired me but then I remembered a stencil I had used to create some cards a few years ago, before I discovered Blogland, so I set about recreating the same design again.


I started by mounting a piece of white cardstock onto a slightly larger lime green cardstock.  Next, I secured the stencil with some low tack tape and spread some embossing paste over it to create the embossed tree on my card.  Once the stencil was removed I covered the paste with very fine glitter in three different shades, lime green, turquoise and purple/blue.  I made a bit of a mess with it, it gets everywhere!  Next I stamped the sentiment in turquoise ink.  The panel was then gently adhered to the card base.
 
Materials used:
  • Stencil: Lasting Impressions
  • Embossing Paste: Dreamweaver
  • Stamp: Clearly Besotted Stamps - Modern Christmas
  • Ink: Versa Color - Turquoise
  • Glitter from stash
 
I'm not usually a big fan of glitter but these fine glitters are great, even if they are a little messy!  And you need a bit of bling on Christmas cards, don't you agree? :)
 
I'm hoping to spend some more time crafting this weekend so hopefully I'll be back soon with another card to show you.  I hope you're having a lovely Saturday and as always, thank you so much for visiting my little space in blogland x


Sketch Saturday #281 - Guest Designer!

Hi guys

It's Saturday morning so that means it's time for a fresh sketch at Sketch Saturday

I'm loving my October Guest Designer role and really enjoyed making my card based on this week's great new sketch.

Before I share my card with you I just wanted to remind you that there is still plenty of time to link up at the Sketch Saturday blog for a chance to win their Thank You Candy.  To celebrate their 2000 followers milestone they are offering loads of fab prizes and all you have to do is become a follower, add your details to the Linky and spread the word.  The deadline is 31 October.

So back to this week's sketch...


And here's my card...


I'm disappointed with the colour of these photographs.  Whenever I take photos of purple tones they always seem to come out very blue.
 
I recently purchased a Stampin' Up stamp set from eBay and tried the 2-step stamping technique for the first time and gave my Stamp-a-ma-jig its first outing.  I stamped the first image by colouring onto the stamp with some markers in lilac and green.  I then used my Stamp-a-ma-jig to line up the second stamp which I coloured with a darker purple marker.  This was then die cut with a circle die. 
 
I layered up the base card with two shades of purple/lilac cardstock and then cut the green cardstock to size before running it through my Big Shot in an embossing folder.  I stamped the sentiment and popped up the circular image on 3D foam for some dimension.
 
Materials used:
  • Stamps: Stampin' Up - Simply Soft (Hostess set); BoBunny - Sentiments Stamp
  • Ink: Whispers Strokes; Versa Color - Imperial Blue
  • Die: Xcut - Nested Circles
  • Embossing Folder: Craft Concepts - Cherry Blossoms
  • Cardstock: Bazzill Basics Premium Cardstock; Stampin' Up - Lucky Limeade and Wisteria Wonder
 
So, why not join in the challenge this week, I'd love to see what creations you come up with.
 
Sorry for being a bit quiet on the blog this week, I've had a busy week with no time for crafting but I've got the weekend to myself at home so hopefully I'll have more cards to share shortly.
 
See you soon


Saturday 12 October 2013

Button Blooms

Hi there

This is my second post today.  For my Sketch Saturday post please scroll down.

The next card I'm sharing with you is for this week's Muse challenge and the latest challenge at Dream Valley Challenges.

When I saw this week's Muse card by Therese Calvird I loved the little flower clusters and after a recent trip to my local craft shop I'd purchased some mini buttons so I thought I'd put these to use.  And the latest Dream Valley challenge is to use buttons so I'm combining the two.

Here is my card...


This is the beautiful inspiration card by Therese...


I kept the layout basically the same, using a blue frame with a white rectangular image panel, and the cluster of flowers was my main inspiration.
 
I stamped the stems and leaves first by inking up just part of a couple of wooden stamps, omitting the actual flower heads.  I then used glue dots to adhere the mini buttons as the blooms.  A sentiment banner using a snippet of pink cardstock finished off the card.
 
The glitter cardstock, as always, is difficult to layer up.  I used the strong, red backed double sided tape for this to ensure it would stay put!
 
Materials used:
  • Cardstock: Kanban - Sherbert Pips; White cardstock from stash
  • Stamps: Stampin' Up - Both Way Blossoms; Clearly Besotted Stamps - A Little Sentimental
  • Ink: Versa Color - Sage; Versafine - Onyx Black
  • Die: Clearly Besotted Stamps - Tag Along
  • Buttons: Craftime Additions - Mini Pastel
 
I think this cluster of flower heads looks very much like a hyacinth although I think a few more packets of buttons would be required to create one!
 
I have a few more cards to make in the next few days so I hope to see you very soon.  I hope you're having a lovely weekend.


Sketch Saturday Week #280 - Guest Designer!

Hi there

Its Saturday (yay!!) and therefore time for the next challenge over at Sketch Saturday!

This is my second week as Guest Designer and I'm loving this little role for the October challenges.  I want to give the lovely Lizy of Lizy's House of Cards massive thanks for inviting me to be part of the team, I'm having great fun putting these cards together.

Before I show you this week's sketch and card I wanted to let you know that Sketch Saturday are celebrating their milestone of 2000 followers and are offering lots of thank you candy.  There are multiple prizes and therefore multiple winners and all you have to do is add your details to the Linky before 31 October 2013.  That's it - easy peasy!

So, onto this week's fab sketch...

 
I think you'll agree this is a brilliant sketch to use as a basis for your cards and this is what I came up with for this design...


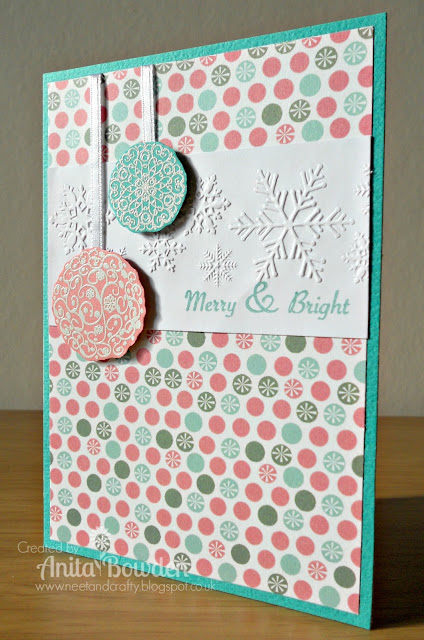
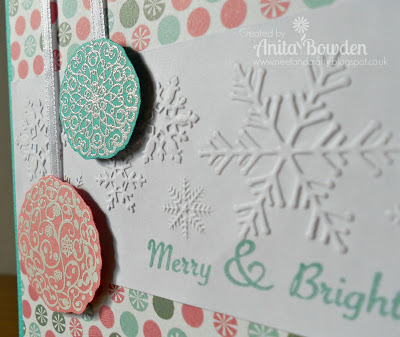
I started by covering the card base with some green cardstock.  I then cut some patterned paper slightly smaller.  I stamped the sentiment on a strip of white card and ran this though my Big Shot using a snowflake embossing folder before adhering to the patterned paper.

Next I stamped two baubles onto green and pale coral cardstock using VersaMark ink and heat embossed using white embossing powder.  I then fussy cut these out.  I adhered some ribbon in position and fixed this on the back of the patterned paper.  I then popped the baubles up on 3D foam.  This top layer was then adhered to the green card base.

Materials used:
  • Cardstock: Bazzill Basics Premium Cardstock (colours); white cardstock from stash
  • Patterned Paper: Dovecraft - Christmas Blues
  • Stamps: Marion Emberson Designs - Sparkling Christmas
  • Ink: VersaMark; Versa Color - Celadon
  • Embossing: Stampin' Up - Powder White; Snowflake folder free with a publication
  • Ribbon from stash

Please take a moment to visit the Sketch Saturday challenge blog and see what the fabulous Design Team have created this week.  And why not have a go yourself, this is a really versatile sketch so there are loads of options.  And don't forget about the great offer of Thank You Candy!

Thanks so much for popping by and I hope to see you very soon.  Have a wonderful weekend.


Thursday 10 October 2013

Butterfly Wedding

Hi there

Today I'd like to share a card I recently made for a friend.  She wanted a card to give to her new hubby on their wedding day, and today was the big day in Cyprus - lucky lady!

The theme of their wedding is butterflies and coral and this is the card I made for her.


I started by cutting a background panel of pale coral and rounding the corners.  I then cut two smaller panels, one in darker coral and one in white, rounded the corners and held them together with low tack tape, slightly offset, before cutting with an oval die through the two layers.  I then ran the white panel through my Big Shot using a hearts embossing folder.  I then glued the two offset layers together.

The only wedding sentiment stamps I have say 'on YOUR wedding day' so I printed my own sentiment and adhered this to the back, allowing the message to show through the aperture.  The top two layers were then adhered to the pale coral panel and wrapped with some white organza ribbon before attaching to the card base. 

The butterflies were stamped with white ink on coral card and die cut with co-ordinating dies.  I printed the date of the special day and used a heart die to cut this out before stamping the rings in silver.  The final touches were an organza bow and some gems on the butterflies which were then popped up on 3D foam.

I made a final finishing touch by adding an insert which I stamped with matching butterflies in silver.

Materials used:
  • Cardstock: Stampin' Up - Calypso Coral; Bazzill Basics Premium Cardstock (pale coral); white cardstock from stash
  • Embossing Folder: Cart-Us - Ornament Hearts
  • Stamps: Clearly Besotted Stamps - Butterfly Wishes and Happily Ever After
  • Ink: Versa Color - White and Silver
  • Dies: Clearly Besotted Stamps - Butterfly Wishes and Love Hearts; Spellbinders Nestabilities - Classic Ovals Large
  • Tools: Tonic - Corner Rounder
  • Ribbon and gems from stash

I'm sure the happy couple had a wonderful day and I'd like to wish them lots of happy years together :) xx

That's all for now folks.  There are a couple of challenges I have spotted that I want to have a go at so I'll be back in the next day or two to share more cards with you.  Thank you so much for visiting, I'm so grateful for your continued support.

Take care


Related Posts Plugin for WordPress, Blogger...